

Well, this whole bikepacking idea took a turn when back a few weeks ago I got an email telling me that the Juniper Bag and Ponderosa Panniers were available to me for test/review. So, I agreed to have a look and here they are.
I'm no stranger to the idea of panniers and rack mounted bags. I've done cross-country, self-contained touring before, (it's what we called it before it was called "bikepacking"), and panniers and racks were integral to making that work for me. We carried tents, clothing, food, and other gear on those tours. So, working out of a pannier isn't something I haven't ever done before and I looked forward to getting these Ponderosa Panniers and the Juniper Trunk Bag on my Singular Cycles Gryphon Mk3 to see how this would all work.
I was informed by my contact at OMM that the Juniper Trunk Bag would not fit on the Elkhorn Rack I already have on the Gryphon, so they sent out a Divide Rack to help me out there. Update 9/12/23: There was some misunderstanding/miscommunication here which led to my previous statement. The truth of the matter is that the Elkhorn rack is not compatible with the Ponderosa Panniers. The Elkhorn Rack and Juniper Trunk Bag ARE compatible.
Now, let's take a quick look at each component and then we'll see how it all looks once it all is attached to the Gryphon.
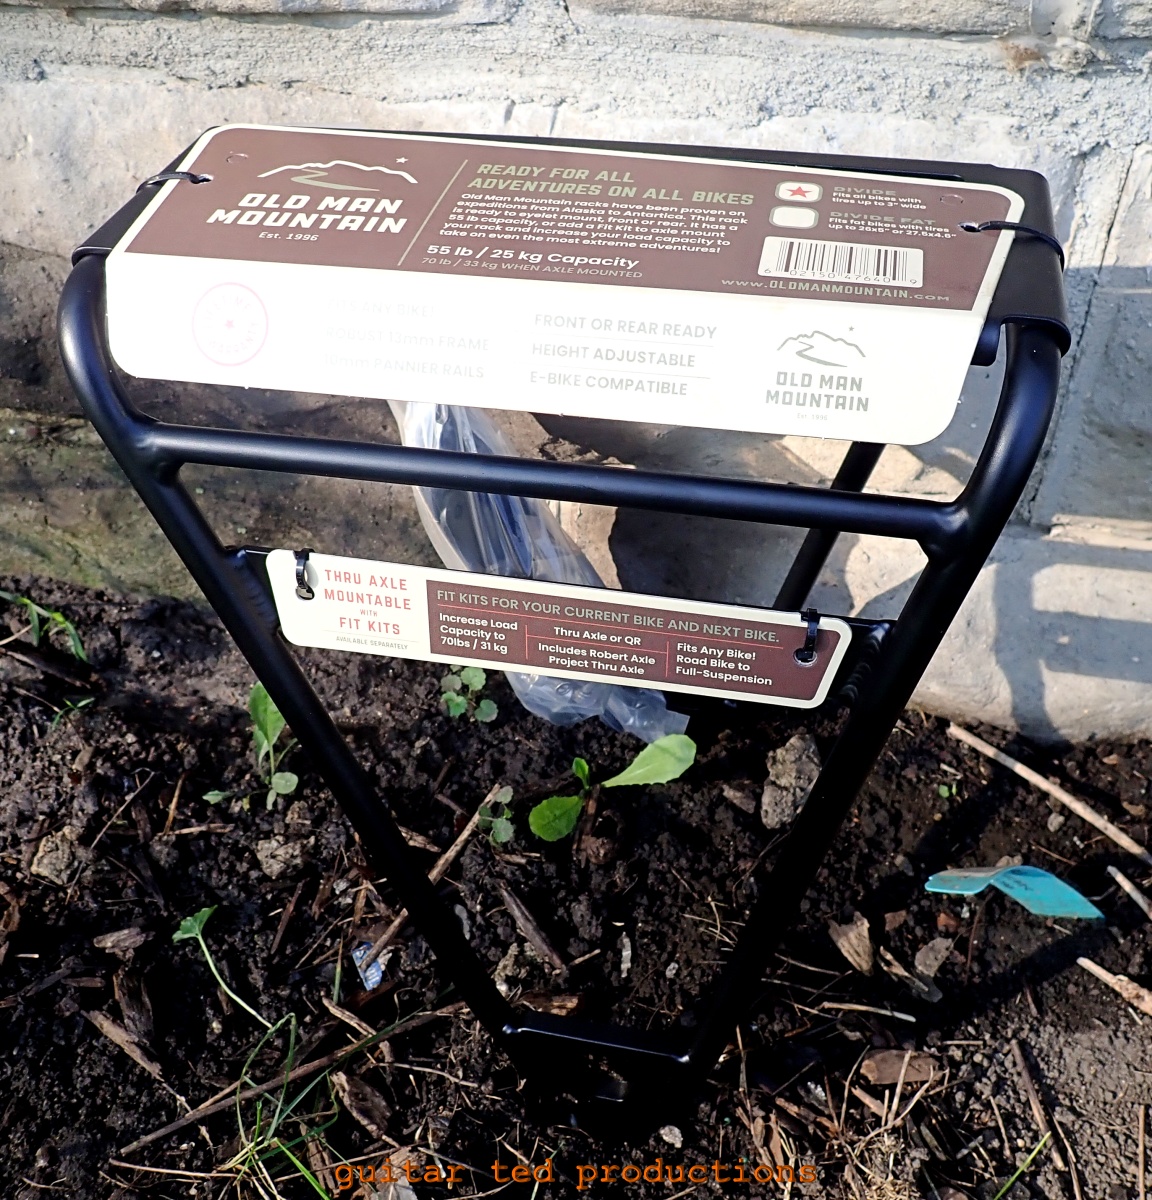 |
| The Divide Rack |
The Divide Rack: Okay, Old Man Mountain prides themselves on racks that won't let you down. Translation: This rack is heavy duty and looks bullet-proof. This one weighed in at 700 grams without any stays or hardware. OMM claims that with all stays and hardware it weighs 980 grams. OMM has said this rack has never let them or their customers down and they stand behind it with a lifetime warranty. Oh....and it is rated to carry 70lbs. That's about 20lbs more than most heavy-duty touring racks are rated for load bearing.
I've toured with big loads using a rack that wasn't nearly this nice. So, I was excited to see this and with all the hardware provided to fit about anything on two wheels, I think this is a pretty impressive bit of kit.
 |
| The Juniper Trunk: Think "Big Shopping Bag With Roll Top" and you are there. |
The Juniper Trunk Bag: While it looks like a handlebar roll in my image here, it really is a big bag, much like a grocery bag, only made out of 100% waterproof TPU fabric. It's got a side zip pocket, but other than that, it is a simple roll-top bag meant for a rack deck.
 |
| The Juniper Trunk unfurled. It is a 10L capacity bag |
It attaches via four cam-clip buckles and straps which are adjustable. The roll top is secured by straps and buckles over each end of the "trunk" and on one end there is a handy light mount. The Velcro patch is embossed with an OMM logo which is so subtle I didn't see it until I was attaching the bag to the rack. From the OMM site:
- 10 Liter capacity per bag.
- Fully welded and waterproof construction made from TPU fabric
- HypalonⓇ reinforcements at all attachment points are more abrasion resistant and provide extra grip where needed
- PFAS/PFC free materials
- Roll top enclosure.
- Waterproof zipper pocket on the outside.
- Minimal branding on Velcro patches.
- Clip light slots on the back.
- Great fitment on all racks with a deck. Perfect fitment for OMM pannier racks.
 |
| The Ponderosa Panniers |
Ponderosa Panniers: Okay, this is the bit that I was most interested in seeing since I have used and worked with many different pannier set ups over my time as a cyclist and shop mechanic. I've seen what works and what is so-so.
 |
| The frame sheet and my foot for size comparison. |
The Ponderosa Panniers are made from the same waterproof fabric as the Juniper Trunk Bag and are 13L capacity, per bag, and that's with the top rolled 3 times. The attachment method is done via a cam-action strap mechanism with large Velcro patches to hold everything down while the bottom attachment is a hook and strap affair to keep the panniers from flopping outward on corners or over rougher terrain.
Inside there are two frame sheets. Basically two pieces of plastic, these give you better compression action and give form to the bags. The outer sheet in each bag is removable if that isn't your jam though.
The roll-top functions like it does on the Juniper Trunk, but you can decide to arrange the straps to attach over the bag which kind of makes handles for carrying by hand. Might be convenient at times... (See Comments below for more on that)
- Removable and replaceable straps
- Minimal branding on Velcro patches
- Lower attachment/compression strap remains under load to prevent bags from flapping around
- HypalonⓇ reinforcements at all attachment points are more abrasion resistant and provide extra grip where needed.
- Clip light slots on the back.
- Great fitment on all racks designed for panniers. Perfect fitment for OMM pannier racks
- Minimalist weight = 475g (each), 950 grams per pair. Without side compression straps, front framesheet, or side roll top clips.
- Full Featured weight = 560g (each), 1120 grams per pair
Costs: Ponderosa Panniers: $200.00, Juniper Trunk Bag: $125.00, Divide Rack: $168.00
 |
| This was hiding under one of the strap attachment points. Hmm..... I have no idea! |
Impressions: The quality of all the Old Man Mountain stuff seems to be at a pretty high level. The Elk Horn Rack I was sent last year is solid and shows no signs of weakness no matter what I loaded on it. When I mounted that rack on my pink BMC? Well, my load was a bit much, causing some "tail wag" with that bike, but the Elk Horn was stellar. This Divide Rack, if anything, is even burlier. I suspect I will be impressed with its performance.
The Juniper Trunk Bag was sent out with the Divide Rack. Once again, as I was advised that the Juniper Trunk would not be compatible with the Elkhorn Rack I already had. (See UPDATE above) Once the Juniper Trunk was in hand though, I found this statement to be odd. It looked like it would work.....
The Ponderosa Panniers had a different attachment system than I'd ever seen, but I was willing to give it a go. The size seemed perfect for a bag that would stay "out of the way" yet have enough cargo space to prove useful.
 |
| If the hardware isn't in the kit to make it work, OMM sells kits that will work. |
Installation & Comments: Anyway, it was time to start mounting things. The Divide Rack was super-easy to install on my Gryphon. I have 29 X 2.8" tires and the rack mounts on the Gryphon are about an inch or so above the rear dropouts on the seat stays. Still, the clearance was juuussst enough to comfortably clear my Teravail Coronado's. Whew! Close, but not too close.
That said, OMM sells kits to help you fit the rack to almost any bicycle, so there is almost always an option that will make their racks work. Even on dual suspension bikes. Thankfully the copious amount of fasteners, spacers, and washers was enough to make it all work on my bike without extras. |
| Mounting instructions are sewn into the backside of the bag. |
Now with that on and leveled up, I was set to mount the panniers. Interestingly, the strapping method OMM uses with the Ponderosa Panniers requires some dexterous maneuvering to attach the panniers to the rack's cross bar. I quickly realized two things.
First off, these panniers would be a chore to remove, and then also, they would be a chore to remount, and maybe impossibly so if you had a heavy load in the bag. This is because you have to support the bag and its weight, use one hand to guide the upper loop over the rack's cross bar, and then with the other hand you have to loop the strap through a piece of plastic on the upper loop, pull that through, and then attach its hook and loop material to the hook and loop material on the back of the pannier. So like what? Three hands required? It was difficult enough to hook these up in my shop with empty bags and I cannot imagine trying to do that on a trail with a loaded bag.
With that done the lower stabilizing strap was easily attached. I loaded up the panniers with my sleeping bag in one and clothing in the other. Compressing the load down and rolling the top up revealed a very stable, tight to the rack load that looked like it wasn't going anywhere. So, at least all that hassle with the attachment method was worthwhile. Just don't expect me to remove these bags until I'm all through with them!
Now where to put that Juniper Trunk Bag? Even though I was told that it would not work on the Elkhorn Rack on the front of my Gryphon, I was looking at the rack and at the Divide Rack and thinking, "Why not?" So, I tried it and you know what? It went on fine. While I have a ton of experience with the cam type clips and strapping style attachments, I wasn't 100% impressed with how the OMM ones were working. They are not "bad" in any way,. They work just fine. It's just that if you have used Revelate's cams you will see that there is a difference. It'd be nice to see OMM raise the bar in this area since they are a premium product in the marketplace.
That said, the trunk bag is great and held my sleep pad, an ancient Thermarest one, perfectly with room to spare. I feel good about that since now the pad is protected from the elements and I won't have a dusty or wet pad to deal with once I get where I am going.
 |
| And there she be! Fully loaded using the OMM products sent for this review. |
A Look At The Set-Up: Here is the final set up. I'll go over everything here to let you know what you are looking at. Of course, the bike is my Singular Cycles Gryphon Mk3 with a three by nine speed drive train running Gevenalle shifters and levers operating Shimano derailleurs and State Bicycle Co brakes. I've also got the Enduro bottom bracket in this bike.
The two-man Sierra Designs tent is on the Divide Rack in that Outdoor Research dry bag with the Ponderosa Panniers on the sides. Up front we have the OMM Elkhorn Rack with the Juniper Trunk Bag up top. On the sides we have one Salsa Anything Cage HD and a State Bicycle Co Cargo Rack on the other both holding a Salsa Cycles dry bag. In the cockpit I have two Bike Bag Dude Chaff Bags and a Cedaero top tube bag. I've got five water bottles to drink from as well. (Option to use seven bottles if I utilize the Chaff Bags as water bottle holders)
First Ride Impressions: To simulate my planned trip, I loaded up the bike with full water bottles, clothing, my tent, sleep system, food, and tools/spares. I maybe didn't have everything there. I might have been missing my stove or something, but I did not inventory my bags, I just know that they were all loaded. Anyway, that's how I rode the bike to test ride the set up. And?
The racks and bags were totally silent, as OMM promised, and they were all rock-solidly attached and they did not waver or seem to move at all. Using panniers may not be familiar to many people these days since the advent of "rackless touring" and the prevalence of seat packs, frame bags, and the like. I had this bike set up previous to this current set up in a "hybrid", rackless/racked configuration. I had the tent in a seat pack and nothing else out back. I had a handle bar bag as well.
The front load isn't really any different than before with the exception of the removal of the handle bar bag and the addition of the Juniper Bag, which is now keeping my sleeping pad from being naked! So what has changed is that now the load weight has shifted a little to the rear, and that rear load is lower, and most importantly, more stable on the bike. This has resulted in a better handling bike with less frame flexing and "tail-wagging" than before.
There is something about a long, big seat pack load that really doesn't benefit handling and makes the bike feel squirrely to me in comparison to a load that is lashed tightly to the bike/racks and cannot sway or move at all. This cannot be ignored, and added with the lowered center of gravity, this is a much more pleasurable ship to pilot than it was before.
I've been cooking up a plan with N.Y. Roll for a sub-24 trip using the bike as set up here. Stay tuned...


