Friday, April 23, 2021

Friday News And Views

2007: You can't do that with 29"er wheels. 2021: Hold my beer...
Niner Bikes Releases New WFO-9:

Occasionally something significant still happens in the world of big wheels. Recently it came from a company once known for pushing boundaries with big, 29"er wheels. That company has been a bit silent in the 29"er scene over the past decade, but this week, Niner Bikes once again lived up to their moniker and posted news concerning a big wheeled monster of a bike, the WFO-9. 

When the first WFO-9 was whispered about in 2007, it drew a lot of criticism and negativity. "You can't do that with 29"er wheels!", and more was heard on all the major forums. However, Niner, only a couple of years into their existence, was pushing ahead regardless of their not being 'real tires' or 'real forks' for this endeavor. It was cutting edge, forward thinking, and disruptive. Looking back on that early WFO-9, one can now see that Niner Bikes, whatever you may think of them today, should be credited with helping to break the barriers down to what a 29'er could be. 

Another individual who also brought big wheels and long travel together in a way that shocked the mainstream was Devin Lenz. His Lenz Sport brand also has to be recognized in the same breath as Niner as Devin was also independently pushing the big wheeled idea forward with amazingly capable rides that blew away the criticisms of 29 inch wheeled bikes and what they were capable of. 

It's a crazy world of big wheeled bikes these days and back in the 00's, no one was thinking things would be like they are today. Well, except a couple of crazy companies that turned out not to be quite so crazy as we thought. Congratulations to Niner Bikes on the new WFO-9. It may seem like no big deal in 2021, but when you consider that at one time, 29"ers were relegated to being thought of only as single speed bikes or maybe XC bikes, it is a big deal. 
It Costs How Much?

Zipp Wheels have never been what I would call "inexpensive" wheels. Many of their past models would easily be called "halo products"- Products with heady price tags which people aspire to own, but probably never will. 

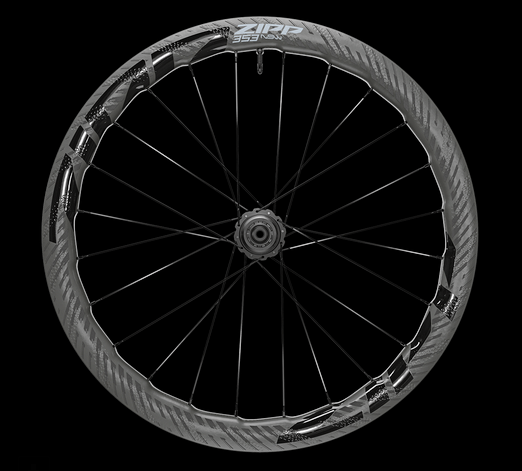
Well, Zipp didn't do anything to dent that reputation with the recent introduction of their new "353 NSW" wheel set. Yep, you need four thousand Benjamins to get these in your mitts. Carbon wheels for bicycles have been trending downward in price of late, but Zipp? Ha! Obviously they went in the opposite direction with the 353 NSW.

Okay, so what do you get for 4G, (and I ain't talkin' about ancient cell phone connectivity rates). Well, you'd better be getting a light wheel set, and Zipp delivers there with a sub-1300 gram wheel set weight. Okay, well, you'd better be getting an aerodynamic, watt-saving wheel. Once again- if the claims can be believed - Zipp delivers. That saw-toothed design is supposedly a big deal here. Okay- well, what about being able to use it for gravel? Actually- this is the most interesting part. This is basically a gravel wheel set. 25mm internal width? That's not a road racing inner rim width folks. Add in a disc only brake standard and this wheel screams "aero-gravel".

I tested the FLO Cycling wheels last year and stated that these would not be the last we'd here about aero wheels for gravel. While Zipp doesn't claim that these are only for gravel, a companion press release sent at the same time features Zipps rebadged 40mm gravel tire and shows it on.....you guessed it- the 353 NSW wheel set. They may not say it overtly, but this is aimed at the gravel market.
 

Bike Shop News: 

In the world of bike shops, I have been hearing that shortages are happening all across the nation yet. It seems to ebb and flow between different products, but certainly the situation with tires, tubes, cassettes, chains, free wheels, and other maintenance/wear items is still a bad situation. Getting accessory items is also still hit or miss. We've gotten in some stuff, like floor pumps, which were rare last year, yet we cannot get other things at all right now. It's unpredictable and frustrating for everyone. 

In terms of bicycles we actually are getting some few things through the shop. We get them built and they disappear about as fast as we build them. But I am hopeful that at least a trickle of bikes will continue throughout the Summer.  

In other bike shop related news, my friend and El Presidente' of the Slender Fungus, Ari, has been telling me that the Chicago metro region shops are desperate for qualified bicycle mechanics. Ari tells me most shops are four weeks behind in repairs in the region and that there is no end in sight. If you know how to wrench on bikes, and if you want to hang in the Chi-town area for the Spring and Summer, you can definitely find work. 

Again, this situation doesn't seem to have any resolution in sight for the near future. It's so odd working under such constraints and during such unusual times. How this shakes out is anybody's guess at the present time. All I know is that this roller coaster of a bike season in Iowa is going to be an odd one. Especially with RAGBRAI happening. (Oh, and what the heck happened with that whole "Iowa's Ride" thing? Who knows.....)

The shortages are also affecting what I do at RidingGravel.com as well. But it's all okay. Somehow we'll muddle through this. I'm not worried. I just marvel at the weirdness and how it seems to have no end at this point. They keep saying 2022...... We'll see. 

Podcast And Shirts:

Hey, just a reminder that the Riding Gravel Radio Ranch podcast has it's latest episode up. Hear it here or wherever you get your podcast feed from. We try to keep these episodes at about an hour or a little less, so you don't have to invest a ton of your time into these. My co-host is Andy of Andy's Bike Shop, so sometimes we drop a little local stuff as well. 

Also, you can still get the "Riding Stones - Shaking Bones" or "Addicted To Gravel" shirt designs at the RidingGravel.com website. The link to those shirt designs is here. 

And finally, my own designs for the former C.O.G 100 in hats and jerseys and G-Ted merch are still available and you can find that link over there on the right side or just go to the Garage Sale Page for the C.O.G. 100 stuff. 

NOTE: I've been blogging for over 15 years now, I have been doing Riding Gravel since 2015, and putting on events for 20 years or more. These small ways of making some money help me to keep going, defray some costs for making some of the content I put out, and honestly, with the C.O.G. stuff, I just don't want it to go to waste. In the case of the G-Ted merchandise, that actually helps my daughter and I don't get any monetary benefit there at all. I'm not going to apologize for occasionally making you all aware of these things as I feel it is just giving you an opportunity to give recognition to, and give back to what I have have been doing for all these years. If you don't feel led to do anything, no big deal. I'm good. I just wanted to provide the opportunity for you all to say "thanks" and if that speaks to you it does. If not, don't worry about me. I'll keep on keepin' on regardless of whether this stuff gets purchased or not. 

So, don't pull out your credit card unless you really want to. (But get this C.O.G. stuff outta here, or it is going to the landfill before long)
 

That's a wrap for this week. Hoping for warmer weather here. I also hope you get out for a ride!

Friday News And Views

2007: You can't do that with 29"er wheels. 2021: Hold my beer...
Niner Bikes Releases New WFO-9:

Occasionally something significant still happens in the world of big wheels. Recently it came from a company once known for pushing boundaries with big, 29"er wheels. That company has been a bit silent in the 29"er scene over the past decade, but this week, Niner Bikes once again lived up to their moniker and posted news concerning a big wheeled monster of a bike, the WFO-9. 

When the first WFO-9 was whispered about in 2007, it drew a lot of criticism and negativity. "You can't do that with 29"er wheels!", and more was heard on all the major forums. However, Niner, only a couple of years into their existence, was pushing ahead regardless of their not being 'real tires' or 'real forks' for this endeavor. It was cutting edge, forward thinking, and disruptive. Looking back on that early WFO-9, one can now see that Niner Bikes, whatever you may think of them today, should be credited with helping to break the barriers down to what a 29'er could be. 

Another individual who also brought big wheels and long travel together in a way that shocked the mainstream was Devin Lenz. His Lenz Sport brand also has to be recognized in the same breath as Niner as Devin was also independently pushing the big wheeled idea forward with amazingly capable rides that blew away the criticisms of 29 inch wheeled bikes and what they were capable of. 

It's a crazy world of big wheeled bikes these days and back in the 00's, no one was thinking things would be like they are today. Well, except a couple of crazy companies that turned out not to be quite so crazy as we thought. Congratulations to Niner Bikes on the new WFO-9. It may seem like no big deal in 2021, but when you consider that at one time, 29"ers were relegated to being thought of only as single speed bikes or maybe XC bikes, it is a big deal. 

It Costs How Much?

Zipp Wheels have never been what I would call "inexpensive" wheels. Many of their past models would easily be called "halo products"- Products with heady price tags which people aspire to own, but probably never will. 

Well, Zipp didn't do anything to dent that reputation with the recent introduction of their new "353 NSW" wheel set. Yep, you need four thousand Benjamins to get these in your mitts. Carbon wheels for bicycles have been trending downward in price of late, but Zipp? Ha! Obviously they went in the opposite direction with the 353 NSW.

Okay, so what do you get for 4G, (and I ain't talkin' about ancient cell phone connectivity rates). Well, you'd better be getting a light wheel set, and Zipp delivers there with a sub-1300 gram wheel set weight. Okay, well, you'd better be getting an aerodynamic, watt-saving wheel. Once again- if the claims can be believed - Zipp delivers. That saw-toothed design is supposedly a big deal here. Okay- well, what about being able to use it for gravel? Actually- this is the most interesting part. This is basically a gravel wheel set. 25mm internal width? That's not a road racing inner rim width folks. Add in a disc only brake standard and this wheel screams "aero-gravel".

I tested the FLO Cycling wheels last year and stated that these would not be the last we'd here about aero wheels for gravel. While Zipp doesn't claim that these are only for gravel, a companion press release sent at the same time features Zipps rebadged 40mm gravel tire and shows it on.....you guessed it- the 353 NSW wheel set. They may not say it overtly, but this is aimed at the gravel market.
 

Bike Shop News: 

In the world of bike shops, I have been hearing that shortages are happening all across the nation yet. It seems to ebb and flow between different products, but certainly the situation with tires, tubes, cassettes, chains, free wheels, and other maintenance/wear items is still a bad situation. Getting accessory items is also still hit or miss. We've gotten in some stuff, like floor pumps, which were rare last year, yet we cannot get other things at all right now. It's unpredictable and frustrating for everyone. 

In terms of bicycles we actually are getting some few things through the shop. We get them built and they disappear about as fast as we build them. But I am hopeful that at least a trickle of bikes will continue throughout the Summer.  

In other bike shop related news, my friend and El Presidente' of the Slender Fungus, Ari, has been telling me that the Chicago metro region shops are desperate for qualified bicycle mechanics. Ari tells me most shops are four weeks behind in repairs in the region and that there is no end in sight. If you know how to wrench on bikes, and if you want to hang in the Chi-town area for the Spring and Summer, you can definitely find work. 

Again, this situation doesn't seem to have any resolution in sight for the near future. It's so odd working under such constraints and during such unusual times. How this shakes out is anybody's guess at the present time. All I know is that this roller coaster of a bike season in Iowa is going to be an odd one. Especially with RAGBRAI happening. (Oh, and what the heck happened with that whole "Iowa's Ride" thing? Who knows.....)

The shortages are also affecting what I do at RidingGravel.com as well. But it's all okay. Somehow we'll muddle through this. I'm not worried. I just marvel at the weirdness and how it seems to have no end at this point. They keep saying 2022...... We'll see. 

Podcast And Shirts:

Hey, just a reminder that the Riding Gravel Radio Ranch podcast has it's latest episode up. Hear it here or wherever you get your podcast feed from. We try to keep these episodes at about an hour or a little less, so you don't have to invest a ton of your time into these. My co-host is Andy of Andy's Bike Shop, so sometimes we drop a little local stuff as well. 

Also, you can still get the "Riding Stones - Shaking Bones" or "Addicted To Gravel" shirt designs at the RidingGravel.com website. The link to those shirt designs is here. 

And finally, my own designs for the former C.O.G 100 in hats and jerseys and G-Ted merch are still available and you can find that link over there on the right side or just go to the Garage Sale Page for the C.O.G. 100 stuff. 

NOTE: I've been blogging for over 15 years now, I have been doing Riding Gravel since 2015, and putting on events for 20 years or more. These small ways of making some money help me to keep going, defray some costs for making some of the content I put out, and honestly, with the C.O.G. stuff, I just don't want it to go to waste. In the case of the G-Ted merchandise, that actually helps my daughter and I don't get any monetary benefit there at all. I'm not going to apologize for occasionally making you all aware of these things as I feel it is just giving you an opportunity to give recognition to, and give back to what I have have been doing for all these years. If you don't feel led to do anything, no big deal. I'm good. I just wanted to provide the opportunity for you all to say "thanks" and if that speaks to you it does. If not, don't worry about me. I'll keep on keepin' on regardless of whether this stuff gets purchased or not. 

So, don't pull out your credit card unless you really want to. (But get this C.O.G. stuff outta here, or it is going to the landfill before long)
 

That's a wrap for this week. Hoping for warmer weather here. I also hope you get out for a ride!

Thursday, April 22, 2021

Thoughts On Eccentric Bottom Brackets For Single Speed

My OS Bikes Blackbuck's split eccentric bottom bracket
Once again, a reader comment/question has spawned a blog post. This time the question was from "Tomcat" and here is his question:

".... how are you liking the eccentric bottom bracket? Has it been mostly "set it and forget it"? More and more I like the EBB for a couple reasons, including: 1. It looks sleek 2. I don't have to worry if the wheel is centered 100% in the sliding dropouts or possibly slipping. I'm constantly paranoid that my wheel is not 100% center in the horizontal dropouts. I don't personally own an EBB nor have I tried one, but I'm liking the prospect of using one more and more." NOTE: Comment edited slightly for clarity.

Tomcat was referring to my eccentric bottom bracket insert on my Twin Six Standard Rando v2, specifically, although I have had experiences with several eccentric bottom bracket types throughout the years. In fact, as I researched this topic on my blog archives, I found bicycles I had forgotten about that used eccentric bottom brackets that I once owned. Let's see.....there was an El Mariachi, an early Raleigh single speed 29"er called the "XXIX", a Soul Cycles Dillinger single speed. There were also a couple of test bikes for the former "Twenty Nine Inches" website which used eccentric bottom brackets. This in addition to a Singular Cycles Gryphon I once owned, my Blackbuck, and of course, the Raleigh tandem I own. 

So, yeah, I have experience with eccentric bottom bracket use in road, mountain, and gravel  applications. Specifically to the Twin Six, I am really liking this Wheels Manufacturing eccentric bottom bracket insert for PF-30 style bottom bracket shells. It has held its tension on the chain and has not creaked at all. 

That's probably the number one complaint about any eccentric bottom bracket. I have certainly seen a few creaking ones come through my repair stand. I do have a few thoughts on why I have not had any troubles, not a lick of creaking, and why maybe some people do have issues.  

First of all, it has to be said that some individuals ride bikes really brutally. They seem to have little smoothness, subtlety, and seem to lack finesse in their riding style. Besides many other detrimental issues this sort of riding style can impart on a bike, eccentric bottom brackets don't get along with people like that much. Keeping in mind that any two assembled parts on a bicycle that shouldn't move actually do, ( a minuscule amount) and brute force, ungainly riding styles, and wrestling with the bike exacerbate that movement. Movement causes noises. Period. So, if you seem to never have had a quiet eccentric bottom bracket, this could be a reason why that is. 

The Standard Rando v2 has a reinforced bottom bracket shell which is a good thing for single speed use.
Okay, so with that out of the way, we can see that an eccentric bottom bracket is not for everyone.  But there are some things one needs to consider after riding style. One is that the eccentric should be a quality piece. The more precise it is in terms of shape, the better. Same goes for your shell in the frame. A warped shell from a welding procedure will result in a poor eccentric fit, more chances for noise, and chances for slippage in worst case scenarios. I've seen over-sized shells as well, so be aware that it might be a bad frame to begin with which is causing the issues. The Twin Six is a good base to start from because it is made well. 

The eccentric I used is from Wheels Manufacturing, a brand that makes high quality parts for bottom brackets. So, I am not sure you could even find a better insert. Maybe you could, but the Wheels one is top notch quality. Grease that thing up and stick it in a high quality frame like a Twin Six Standard Rando and you should have a great experience single speeding. 

Unless you ride like a gorilla, then all bets are off.  (Only sort of kidding there.)

So, to answer the question- Yes. I like it a lot. It is pretty much set it and forget it. 

Got any other questions about this or anything else? Hit me up in the comments or e-mail me at g.ted.productions@gmail.com

Thoughts On Eccentric Bottom Brackets For Single Speed

My OS Bikes Blackbuck's split eccentric bottom bracket
Once again, a reader comment/question has spawned a blog post. This time the question was from "Tomcat" and here is his question:

".... how are you liking the eccentric bottom bracket? Has it been mostly "set it and forget it"? More and more I like the EBB for a couple reasons, including: 1. It looks sleek 2. I don't have to worry if the wheel is centered 100% in the sliding dropouts or possibly slipping. I'm constantly paranoid that my wheel is not 100% center in the horizontal dropouts. I don't personally own an EBB nor have I tried one, but I'm liking the prospect of using one more and more." NOTE: Comment edited slightly for clarity.

Tomcat was referring to my eccentric bottom bracket insert on my Twin Six Standard Rando v2, specifically, although I have had experiences with several eccentric bottom bracket types throughout the years. In fact, as I researched this topic on my blog archives, I found bicycles I had forgotten about that used eccentric bottom brackets that I once owned. Let's see.....there was an El Mariachi, an early Raleigh single speed 29"er called the "XXIX", a Soul Cycles Dillinger single speed. There were also a couple of test bikes for the former "Twenty Nine Inches" website which used eccentric bottom brackets. This in addition to a Singular Cycles Gryphon I once owned, my Blackbuck, and of course, the Raleigh tandem I own. 

So, yeah, I have experience with eccentric bottom bracket use in road, mountain, and gravel  applications. Specifically to the Twin Six, I am really liking this Wheels Manufacturing eccentric bottom bracket insert for PF-30 style bottom bracket shells. It has held its tension on the chain and has not creaked at all. 

That's probably the number one complaint about any eccentric bottom bracket. I have certainly seen a few creaking ones come through my repair stand. I do have a few thoughts on why I have not had any troubles, not a lick of creaking, and why maybe some people do have issues.  

First of all, it has to be said that some individuals ride bikes really brutally. They seem to have little smoothness, subtlety, and seem to lack finesse in their riding style. Besides many other detrimental issues this sort of riding style can impart on a bike, eccentric bottom brackets don't get along with people like that much. Keeping in mind that any two assembled parts on a bicycle that shouldn't move actually do, ( a minuscule amount) and brute force, ungainly riding styles, and wrestling with the bike exacerbate that movement. Movement causes noises. Period. So, if you seem to never have had a quiet eccentric bottom bracket, this could be a reason why that is. 

The Standard Rando v2 has a reinforced bottom bracket shell which is a good thing for single speed use.
Okay, so with that out of the way, we can see that an eccentric bottom bracket is not for everyone.  But there are some things one needs to consider after riding style. One is that the eccentric should be a quality piece. The more precise it is in terms of shape, the better. Same goes for your shell in the frame. A warped shell from a welding procedure will result in a poor eccentric fit, more chances for noise, and chances for slippage in worst case scenarios. I've seen over-sized shells as well, so be aware that it might be a bad frame to begin with which is causing the issues. The Twin Six is a good base to start from because it is made well. 

The eccentric I used is from Wheels Manufacturing, a brand that makes high quality parts for bottom brackets. So, I am not sure you could even find a better insert. Maybe you could, but the Wheels one is top notch quality. Grease that thing up and stick it in a high quality frame like a Twin Six Standard Rando and you should have a great experience single speeding. 

Unless you ride like a gorilla, then all bets are off.  (Only sort of kidding there.)

So, to answer the question- Yes. I like it a lot. It is pretty much set it and forget it. 

Got any other questions about this or anything else? Hit me up in the comments or e-mail me at g.ted.productions@gmail.com

Wednesday, April 21, 2021

B.O.G. Series: How To Lubricate Your Chain

  Welcome to the Basics of Gravel Series (B.O.G.)! In this series I will attempt to bring a very foundational knowledge of gravel and back road riding to anyone reading that may be curious or a beginner in riding off-pavement, but not wanting to be mountain biking. There will be a new entry every Wednesday until the series is complete. To see the schedule, click this LINK. Thanks! 

In this installment of the B.O.G. Series I am going to show an effective and easy way to lubricate your chain. But first- Chain lubrication can be a religion for many "serious cyclists" and please note- This is for beginners! So if you feel the urge to tell the world about how you do things or about how 'such-and-such' chain lube is best, please don't fill the comments with it. I will warn y'all right now, I'm not going to publish those comments. Helpful hints? That's welcomed as long as you understand, this is for beginners. You'll note the statement in bold which will appear throughout this article. This will serve as a reminder.

One of my favorite chain lubes, and some tomatoes!

As I say, chain lubes are a religion for many, and we are not going there. So, what do you do in this bewildering jungle of products and opinions? Easy.....don't sweat the overwhelming amount of advice and products. We're going to keep this super-simple. 

First, gravel and dirt roads are dusty/dirty. 'Captain Obvious' there, but that guides us in lubrication choice. There are basically two types of bicycle chain lube- "Wet" and "Dry" types. We're going the "Dry" route here because wetter lubes tend to grab more dust/dirt and we are trying to avoid that. 

Secondly- Don't lubricate a dirty chain. What's the point? You aren't going to penetrate the goo already there, and you are just making things worse if the chain is dirty. So, we'll be looking at a super-simple, fairly effective way to get most of the dirt/grunge off. 

Thirdly- Don't lubricate immediately before a ride. The chain motion while riding will just sling off most of what you just put on, making a mess and making your efforts ineffective. Always do this the night before a ride, or after you are done riding, so the lubrication has a chance to soak in, the carrier of the lubricant has a chance to off-gas, and the lubricant can bond with the metal of the chain. 

Okay, with that all out of the way, here are the items you will need for this operation. 

  • Dry chain lube (Pick yer poison here, most are good. I like Muc-Off C3 Ceramic lube or DuMonde Tech)
  • A couple rags
  • Nitrile gloves or equivalent
  • Safety glasses
  • WD-40 (NOT a lube! You'll see in a minute....)
  • A Flat blade screw driver
  • A room to do 'dirty work' (ie: NOT your significant other's kitchen, bedroom, etc)
  • A place to lean your bike or in a perfect world, a bike stand.

Okay, after you've assembled your stuff here, get to the place you are going to do the deed. Lean your bike, drive side toward you, by placing one side of the handlebar and the rear tire against the wall in such a way that you can back pedal the bike freely. (Or put it in a bike stand, if you have one)

____________________________________

 NOTE: This process will get the majority of the dirt, gunk, and old lube off your chain, but not all of it. It's okay, because we're more concerned about making this process less about technicalities and having to buy and know how to use tools and more about quick, easy ways to help you get the most out of your bike.  

____________________________________

Holding a rag wrapped around the chain like this is one of the main techniques to learn here.
 

Next- With your gloves on and safety glasses on, grab a rag (I like a terry cloth rag, like an old bath towel)  and place it underneath the chain in such a way that the rag will catch any gunk and lube that happens to come off the chain and derailleur. Secondly, grab the flat bladed screw driver, and back pedal the bike with one hand slowly. Then holding the flat bladed screw driver in such a way that the blade scrapes the sides of the lower jockey wheel, you should be able to get any build up of gunk to scrape off that jockey wheel. Kind of like a lathe, if you know about that. You may have to apply a small mount of pressure here, but not much. Do the same with the upper jockey wheel, being careful not to jamb the wheel while you pedal backward. It can be tricky at first, but you should be able to manage it, and once you get the hang of this, it goes faster. 

NOTE: You can spend the time to do this with your front chain rings and cassette, but I find rear derailleur jockey wheels get far more stuff stuck on them than do the chain rings and cassette. 

The back pedaling of the drive train and a screw driver held like this will peel off gunk from jockey wheels.

 Next- Grab the WD-40, make sure that little red tube is in the spray nozzle to make sure that you can direct the spray where you want it, grab the other rag, and cup that rag under the lower run of the chain. Now spray the lower run of the chain with the WD-40. Follow the spray with your rag in the other hand to prevent your wheel and the rest of your bike from getting WD-40 on it. This helps to loosen grime and dirt from the chain. Back pedal to a new section of chain, repeat the process, and continue until you've gone all the way round the chain. (About 4 sections on most bikes, maybe a bit extra.) 

Next- Use that rag you have and clamp down on the chain in the middle of the lower run, being careful to avoid the crank set and jockey wheels. Back pedal the drive train. You'll note a black streak on the rag. Move to a cleaner section of the rag and repeat as necessary. 

Your rag will get pretty grimy. Repeat the process until you are satisfied, but remember, you won't get ALL the dirt out this way.  It's okay!

 _________________________________________

NOTE: This process will get the majority of the dirt, gunk, and old lube off your chain, but not all of it. It's okay, because we're more concerned about making this process less about technicalities and having to buy and know how to use tools and more about quick, easy ways to help you get the most out of your bike.  

___________________________________________

Next: It's time to lubricate. Grab the lube you have, (I like drip bottles of lube versus spray. Less waste and less chances to foul wheels, braking, and paint jobs) Start at a quick link on a chain for reference, or if you don't happen to have a quick link on your chain, mark a link with permanent black marker for a reference point. Then apply one drop of lube on each roller on each link. Work your way around the chain until you come back to your reference point by back pedaling the drive train so that you are always applying lube to the lower part of the chain run. This is important because when you lubricate this way, gravity pulls the lube down into the inner workings of the chain, and as you back pedal to a new section, the chain ring teeth help push this lube into the chain as well. 

One drop on each roller is enough lube. This is the lower run of the chain, and I am applying the lube from above, letting gravity pull the lube into the chain links.

Once you've made it all the way around, you are done with the lubrication. Now grab the rag, using a clean portion, and hold it around the chain, as you did when cleaning the chain, and back pedal the chain through the stationary rag position to wipe off any excess lube. Then that's it! 

Let the bike sit for several hours, preferably overnight, for best results. Then ride. 

 Now- when do you do this again? I check my chain by rubbing my finger across a few links, if I do not get any wet residue on my finger tip, it is time to re-lubricate. Also, if you happen to ride in some wet weather, through snow, streams, puddles, mud, or the like, you will likely need to re-lubricate right away. 

Tip: If you have that WD-40 handy, spray it on a chain right after a wet ride. The "WD" in the name means "Water Displacement", so this product drives water out of your chain and helps prevent rust. I also like it for its grime-dissolving properties. Thus my suggestion for it as a cleaner for beginners. Besides, many people have this already, so it could be one less thing to buy. 

I geek out on lube often here on the blog (Example here) but for the B.O.G. Series, my intentions are to 'make things as easy as possible- not perfect!'. In the case of bicycle skills and maintenance, the minutiae often espoused by the bike geeks is a huge turn-off to those not so personally invested in whatever nuances are being discussed. So, as far as lubricating chains, is there a 'better way'? Sure there is! But 'Perfect is The Enemy of the Good' in this case where I am aiming to get beginners out and doing things instead of becoming overwhelmed by the 'ya gotta do it THIS way, with THIS lube!' mentality. And even this tutorial may be too much! 

So, keep that in mind. 

Next Week: An effective way to clean your bike without using water.

B.O.G. Series: How To Lubricate Your Chain

  Welcome to the Basics of Gravel Series (B.O.G.)! In this series I will attempt to bring a very foundational knowledge of gravel and back road riding to anyone reading that may be curious or a beginner in riding off-pavement, but not wanting to be mountain biking. There will be a new entry every Wednesday until the series is complete. To see the schedule, click this LINK. Thanks! 

In this installment of the B.O.G. Series I am going to show an effective and easy way to lubricate your chain. But first- Chain lubrication can be a religion for many "serious cyclists" and please note- This is for beginners! So if you feel the urge to tell the world about how you do things or about how 'such-and-such' chain lube is best, please don't fill the comments with it. I will warn y'all right now, I'm not going to publish those comments. Helpful hints? That's welcomed as long as you understand, this is for beginners. You'll note the statement in bold which will appear throughout this article. This will serve as a reminder.

One of my favorite chain lubes, and some tomatoes!

As I say, chain lubes are a religion for many, and we are not going there. So, what do you do in this bewildering jungle of products and opinions? Easy.....don't sweat the overwhelming amount of advice and products. We're going to keep this super-simple. 

First, gravel and dirt roads are dusty/dirty. 'Captain Obvious' there, but that guides us in lubrication choice. There are basically two types of bicycle chain lube- "Wet" and "Dry" types. We're going the "Dry" route here because wetter lubes tend to grab more dust/dirt and we are trying to avoid that. 

Secondly- Don't lubricate a dirty chain. What's the point? You aren't going to penetrate the goo already there, and you are just making things worse if the chain is dirty. So, we'll be looking at a super-simple, fairly effective way to get most of the dirt/grunge off. 

Thirdly- Don't lubricate immediately before a ride. The chain motion while riding will just sling off most of what you just put on, making a mess and making your efforts ineffective. Always do this the night before a ride, or after you are done riding, so the lubrication has a chance to soak in, the carrier of the lubricant has a chance to off-gas, and the lubricant can bond with the metal of the chain. 

Okay, with that all out of the way, here are the items you will need for this operation. 

  • Dry chain lube (Pick yer poison here, most are good. I like Muc-Off C3 Ceramic lube or DuMonde Tech)
  • A couple rags
  • Nitrile gloves or equivalent
  • Safety glasses
  • WD-40 (NOT a lube! You'll see in a minute....)
  • A Flat blade screw driver
  • A room to do 'dirty work' (ie: NOT your significant other's kitchen, bedroom, etc)
  • A place to lean your bike or in a perfect world, a bike stand.

Okay, after you've assembled your stuff here, get to the place you are going to do the deed. Lean your bike, drive side toward you, by placing one side of the handlebar and the rear tire against the wall in such a way that you can back pedal the bike freely. (Or put it in a bike stand, if you have one)

____________________________________

 NOTE: This process will get the majority of the dirt, gunk, and old lube off your chain, but not all of it. It's okay, because we're more concerned about making this process less about technicalities and having to buy and know how to use tools and more about quick, easy ways to help you get the most out of your bike.  

____________________________________

Holding a rag wrapped around the chain like this is one of the main techniques to learn here.
 

Next- With your gloves on and safety glasses on, grab a rag (I like a terry cloth rag, like an old bath towel)  and place it underneath the chain in such a way that the rag will catch any gunk and lube that happens to come off the chain and derailleur. Secondly, grab the flat bladed screw driver, and back pedal the bike with one hand slowly. Then holding the flat bladed screw driver in such a way that the blade scrapes the sides of the lower jockey wheel, you should be able to get any build up of gunk to scrape off that jockey wheel. Kind of like a lathe, if you know about that. You may have to apply a small mount of pressure here, but not much. Do the same with the upper jockey wheel, being careful not to jamb the wheel while you pedal backward. It can be tricky at first, but you should be able to manage it, and once you get the hang of this, it goes faster. 

NOTE: You can spend the time to do this with your front chain rings and cassette, but I find rear derailleur jockey wheels get far more stuff stuck on them than do the chain rings and cassette. 

The back pedaling of the drive train and a screw driver held like this will peel off gunk from jockey wheels.

 Next- Grab the WD-40, make sure that little red tube is in the spray nozzle to make sure that you can direct the spray where you want it, grab the other rag, and cup that rag under the lower run of the chain. Now spray the lower run of the chain with the WD-40. Follow the spray with your rag in the other hand to prevent your wheel and the rest of your bike from getting WD-40 on it. This helps to loosen grime and dirt from the chain. Back pedal to a new section of chain, repeat the process, and continue until you've gone all the way round the chain. (About 4 sections on most bikes, maybe a bit extra.) 

Next- Use that rag you have and clamp down on the chain in the middle of the lower run, being careful to avoid the crank set and jockey wheels. Back pedal the drive train. You'll note a black streak on the rag. Move to a cleaner section of the rag and repeat as necessary. 

Your rag will get pretty grimy. Repeat the process until you are satisfied, but remember, you won't get ALL the dirt out this way.  It's okay!

 _________________________________________

NOTE: This process will get the majority of the dirt, gunk, and old lube off your chain, but not all of it. It's okay, because we're more concerned about making this process less about technicalities and having to buy and know how to use tools and more about quick, easy ways to help you get the most out of your bike.  

___________________________________________

Next: It's time to lubricate. Grab the lube you have, (I like drip bottles of lube versus spray. Less waste and less chances to foul wheels, braking, and paint jobs) Start at a quick link on a chain for reference, or if you don't happen to have a quick link on your chain, mark a link with permanent black marker for a reference point. Then apply one drop of lube on each roller on each link. Work your way around the chain until you come back to your reference point by back pedaling the drive train so that you are always applying lube to the lower part of the chain run. This is important because when you lubricate this way, gravity pulls the lube down into the inner workings of the chain, and as you back pedal to a new section, the chain ring teeth help push this lube into the chain as well. 

One drop on each roller is enough lube. This is the lower run of the chain, and I am applying the lube from above, letting gravity pull the lube into the chain links.

Once you've made it all the way around, you are done with the lubrication. Now grab the rag, using a clean portion, and hold it around the chain, as you did when cleaning the chain, and back pedal the chain through the stationary rag position to wipe off any excess lube. Then that's it! 

Let the bike sit for several hours, preferably overnight, for best results. Then ride. 

 Now- when do you do this again? I check my chain by rubbing my finger across a few links, if I do not get any wet residue on my finger tip, it is time to re-lubricate. Also, if you happen to ride in some wet weather, through snow, streams, puddles, mud, or the like, you will likely need to re-lubricate right away. 

Tip: If you have that WD-40 handy, spray it on a chain right after a wet ride. The "WD" in the name means "Water Displacement", so this product drives water out of your chain and helps prevent rust. I also like it for its grime-dissolving properties. Thus my suggestion for it as a cleaner for beginners. Besides, many people have this already, so it could be one less thing to buy. 

I geek out on lube often here on the blog (Example here) but for the B.O.G. Series, my intentions are to 'make things as easy as possible- not perfect!'. In the case of bicycle skills and maintenance, the minutiae often espoused by the bike geeks is a huge turn-off to those not so personally invested in whatever nuances are being discussed. So, as far as lubricating chains, is there a 'better way'? Sure there is! But 'Perfect is The Enemy of the Good' in this case where I am aiming to get beginners out and doing things instead of becoming overwhelmed by the 'ya gotta do it THIS way, with THIS lube!' mentality. And even this tutorial may be too much! 

So, keep that in mind. 

Next Week: An effective way to clean your bike without using water.

Tuesday, April 20, 2021

Thoughts On IWAR

So, the Iowa Wind And Rock ultra-distance gravel event happened over the weekend and I paid some attention to the goings on down there in South Central Iowa. I figured a few folks might be curious as to what I think about that event and how things went down this year, seeing as there are similarities to the event I used to put on called Trans Iowa. I figured I would put in my two cents here. 

First, a few things you should know. I purposefully stayed away from any contact with the event and stayed away from even paying any attention to it, for the most part, on their first run in 2019. Then last year was, well, last year. I was down there as a volunteer for the Spotted Horse, which was run on the same weekend as the postponed IWAR, but I did not show my face around the event headquarters nor made any attempt to associate myself with IWAR. (Iowa Wind And Rock) I'll let my "Trans Iowa Stories" tell you why all that is, so this post won't say anything about that story. Stay tuned......

Nothing 'bad blood' about that, or even negative, so you conspiracy theorists and speculators can stuff that. You'll just have to wait for my reasons for why I stayed away. But this year, I decided being a spectator from afar would be okay. So, off and on all weekend I checked in with the proceedings. Here are a few thoughts from my, admittedly very unique, perspective. 

IWAR does the event pretty much how I used to do things, but of course, it is a different event. It's their baby down there, so any differences are to be expected. I'm sure they put their own spin and flavor on things. But from what I can tell, the bones of the event are pretty similar. Okay, so from that standpoint, I was able to make some observations on the event as it unfolded. 

We knew there would be Level B Maintenance roads and from watching the weather, it was obvious that some amount of precipitation had fallen over the area of their course not long before, or perhaps during, the start. That meant some wet dirt and we all know what that can do. It can destroy stuff, and it did in this case. I guess it is a bit odd, in some ways, from an outsider's view, as to why anyone would fall victim to the eventuality of destruction when dealing with Level B muck, but you kind of have to have been there. Some folks can actually ride these roads and get away with it while sometimes you can be super careful and still get bitten. It's not as cut-and-dried as it might seem. Anyway, I was not at all surprised to see that many of the riders had a shortened day due to the conditions. 

Then races like this get very strung out and IWAR was no exception. A small lead group formed and was whittled down as the day-night-day progressed. I watched and saw times given by the IWAR organizers on social media, along with mileages. I've done the math so much in my head that I could see long before the end that finishers would likely be coming in between 8:00am and 9:00am, given the weather. Of course, I didn't know the course, but I know the pace of these types of events gets slower as the event wears on. 

You also get a few that miss checkpoint cut-offs and IWAR has two you have to make on time. I was impressed by a few mentions of drop outs at the CP#2 spot, as that was how things often went at Trans Iowa. People would get there and figure that was enough fun for one day. Interestingly, almost every time people left CP#2, more often than not they finished. Sure, I had exceptions to that rule, like if folks barely made the cut-off. But it seems like if riders get CP#2 under their belt, can ride past 4:00am, and see a hint of the Sun rising in the East, it's a done deal. It then just becomes a matter of will. I seem to get the feeling IWAR was similar in that way this year. (And that's a LOT easier said than done, by the way!)

So, I was happy for the Relentless Adventures team and for the riders. It seemed like a great event. It seemed to have been done very well, from where I sat, anyway. Not that it matters a whit what I think for their success. It doesn't, they have made their own reputation. But I was pleased to see it all went off well. I wish for nothing but the best for the riders and the organizers there. Congratulations to all who took part in the 2021 IWAR! Well done!

And that's my thoughts on that...............

Thoughts On IWAR

So, the Iowa Wind And Rock ultra-distance gravel event happened over the weekend and I paid some attention to the goings on down there in South Central Iowa. I figured a few folks might be curious as to what I think about that event and how things went down this year, seeing as there are similarities to the event I used to put on called Trans Iowa. I figured I would put in my two cents here. 

First, a few things you should know. I purposefully stayed away from any contact with the event and stayed away from even paying any attention to it, for the most part, on their first run in 2019. Then last year was, well, last year. I was down there as a volunteer for the Spotted Horse, which was run on the same weekend as the postponed IWAR, but I did not show my face around the event headquarters nor made any attempt to associate myself with IWAR. (Iowa Wind And Rock) I'll let my "Trans Iowa Stories" tell you why all that is, so this post won't say anything about that story. Stay tuned......

Nothing 'bad blood' about that, or even negative, so you conspiracy theorists and speculators can stuff that. You'll just have to wait for my reasons for why I stayed away. But this year, I decided being a spectator from afar would be okay. So, off and on all weekend I checked in with the proceedings. Here are a few thoughts from my, admittedly very unique, perspective. 

IWAR does the event pretty much how I used to do things, but of course, it is a different event. It's their baby down there, so any differences are to be expected. I'm sure they put their own spin and flavor on things. But from what I can tell, the bones of the event are pretty similar. Okay, so from that standpoint, I was able to make some observations on the event as it unfolded. 

We knew there would be Level B Maintenance roads and from watching the weather, it was obvious that some amount of precipitation had fallen over the area of their course not long before, or perhaps during, the start. That meant some wet dirt and we all know what that can do. It can destroy stuff, and it did in this case. I guess it is a bit odd, in some ways, from an outsider's view, as to why anyone would fall victim to the eventuality of destruction when dealing with Level B muck, but you kind of have to have been there. Some folks can actually ride these roads and get away with it while sometimes you can be super careful and still get bitten. It's not as cut-and-dried as it might seem. Anyway, I was not at all surprised to see that many of the riders had a shortened day due to the conditions. 

Then races like this get very strung out and IWAR was no exception. A small lead group formed and was whittled down as the day-night-day progressed. I watched and saw times given by the IWAR organizers on social media, along with mileages. I've done the math so much in my head that I could see long before the end that finishers would likely be coming in between 8:00am and 9:00am, given the weather. Of course, I didn't know the course, but I know the pace of these types of events gets slower as the event wears on. 

You also get a few that miss checkpoint cut-offs and IWAR has two you have to make on time. I was impressed by a few mentions of drop outs at the CP#2 spot, as that was how things often went at Trans Iowa. People would get there and figure that was enough fun for one day. Interestingly, almost every time people left CP#2, more often than not they finished. Sure, I had exceptions to that rule, like if folks barely made the cut-off. But it seems like if riders get CP#2 under their belt, can ride past 4:00am, and see a hint of the Sun rising in the East, it's a done deal. It then just becomes a matter of will. I seem to get the feeling IWAR was similar in that way this year. (And that's a LOT easier said than done, by the way!)

So, I was happy for the Relentless Adventures team and for the riders. It seemed like a great event. It seemed to have been done very well, from where I sat, anyway. Not that it matters a whit what I think for their success. It doesn't, they have made their own reputation. But I was pleased to see it all went off well. I wish for nothing but the best for the riders and the organizers there. Congratulations to all who took part in the 2021 IWAR! Well done!

And that's my thoughts on that...............

Monday, April 19, 2021

Country Views: A Run To The County Line

Escape Route: Park Avenue North, Waterloo.
 Saturday's forecast looked the best that it had looked for days. High of 50-ish, light Northwesterly winds of 5-10mph, and no precipitation. So, I was hoping to pull off a big ride. I made all the plans, but Friday evening I was feeling really beat down. In fact, I took a nap after work, which I almost never do. Saturday morning I felt really beat yet, so instead of the big ride plans, I did a run to the county line and back, figuring that would be fine. Of course, the weather is the wild card, and it got played. 

I decided to roll with the Standard Rando with the 650B wheels and tires. After futzing around with bags and making sure I had the right tube for 650B, in case of a tire failure, I managed somehow to get out the door by 8:30am. That was winning right there, considering how I felt. 

So, I headed North on Park Avenue toward 4th Street and out to Moline Avenue to get on gravel. No real indications all through town that things would be anything other than what the weather people were saying it would be. But then, of course, I wasn't out in the open yet. Once I crested the first hill on Moline, I realized that this was not going to be the ride I thought it was going to be. 

Hello Wind!

Yeah, the flags I saw were pretty much standing straight out. 5-10mph winds? Ha! I got home and saw that the current conditions at the time were 18mph winds with 33 mph gusts. Uh huh.....sounds about right. And that made for some hard riding. At least the roads weren't covered in fresh gravel. 

Field work has been getting done now with the warmer weather. Most fields had at least been worked up.

A 'Cat' and a 'Johnny Popper' sitting idle in a worked up field North of Waterloo. 

Woo! Single speed and heavy winds make for a tough go of it. Plus, with how I had been feeling of late it wasn't making for a whole lot of good times. Well, I figured that feeling not so hot, bucking a heavy wind, and single speed was better than not feeling so hot, not bucking a heavy wind, and sitting around at home. So, with that mildly positive thought, I managed to grind out to The Big Rock. 

The Big Rock looking South down Sage Road.

Looking North up Schenk Road.

I rested up a bit and then headed East to Schenk Road and then back North again. The roads here were broken down, dusty, and you'd never know we had any rain lately at all. This blasting Northwest wind and super dry air we've had for a week has been doing its business. 

Schenk tends flatter than not so it was a nice respite from the rollers I had been crawling up previously. My right knee wasn't quite too happy, but what was really the worst was just a deep level of fatigue. I ground up Schenk for a bit and then on to Gresham Road where I decided to make a left to get out of the wind for a little relief. 

Another stop to rest a bit.

The frost heaves caused some pretty significant damage on Gresham Road.

I noticed frost heave damage up here, which surprised me a bit as I hadn't noted anything in Southern Black Hawk County, nor just North and East of Waterloo. However; I noted at least minor frost heave damage from this point all the way back around to Burton Avenue at least to Dunkerton Road. 

A controlled burn, (hopefully!) along the Southern edge of Marquise Road just West of Hwy 63.

Approaching East Janesville Church from the North on Burton Avenue.

I jogged North on Moline then to catch Marquise Road, named after James Marquise who built a cabin in the early 1850's which this road eventually ran by. Then across HWY 63 and up the big hill to Burton Avenue and a much looked forward to respite from the gales I had been working against.

Approaching St. Paul's Church from the North on Burton Avenue.

I chased that cloud of gravel dust in the middle of this image for about a half a mile.

Burton Avenue has its fair share of rollers, especially up by the two old churches, but with this massive wind at my back, the hills were no problem, even though I was riding single speed. Then I noted a bit of a cloud of dust being driven by the wind down the road about a eighth of a mile ahead of me. I never could catch it, but that tells you how hard the wind was blowing, and how dry it is in reality in the country. 

Frost damage repaired with this "yellow limestone" gravel, which is unusual in this part of Iowa.

A big fertilizer rig getting reloaded here.

As I got further South, I noted that some fresh gravel patches were laid down which were of the 'yellow gravel' type of crushed rock. This is an unusual color for gravel around here, but in Northeast Iowa, it is a common gravel type. We generally have the whitish/grey limestone around here. 

The difference is that the yellow gravel tends to be softer, holds more moisture, (in my opinion), and seems to hold up better when wet. Our typical gravel isn't quite like that, but it is what is mined locally and why we have this type of gravel. I'm not sure why we have the yellow gravel here, but there it is....

Not long after I got by the fertilizer rig above, I got a call from Mrs. Guitar Ted and she told me that our vehicle had been vandalized. Apparently someone took a pot shot at our rear passenger window with a bee-bee gun. The window was shattered. So, my ride ended on a bit of a sour note. 

But I was glad to have gotten out, despite all the tough wind, not-so-hot feelings, and the bad news at the end. A ride is good for the soul.....

Country Views: A Run To The County Line

Escape Route: Park Avenue North, Waterloo.
 Saturday's forecast looked the best that it had looked for days. High of 50-ish, light Northwesterly winds of 5-10mph, and no precipitation. So, I was hoping to pull off a big ride. I made all the plans, but Friday evening I was feeling really beat down. In fact, I took a nap after work, which I almost never do. Saturday morning I felt really beat yet, so instead of the big ride plans, I did a run to the county line and back, figuring that would be fine. Of course, the weather is the wild card, and it got played. 

I decided to roll with the Standard Rando with the 650B wheels and tires. After futzing around with bags and making sure I had the right tube for 650B, in case of a tire failure, I managed somehow to get out the door by 8:30am. That was winning right there, considering how I felt. 

So, I headed North on Park Avenue toward 4th Street and out to Moline Avenue to get on gravel. No real indications all through town that things would be anything other than what the weather people were saying it would be. But then, of course, I wasn't out in the open yet. Once I crested the first hill on Moline, I realized that this was not going to be the ride I thought it was going to be. 

Hello Wind!

Yeah, the flags I saw were pretty much standing straight out. 5-10mph winds? Ha! I got home and saw that the current conditions at the time were 18mph winds with 33 mph gusts. Uh huh.....sounds about right. And that made for some hard riding. At least the roads weren't covered in fresh gravel. 

Field work has been getting done now with the warmer weather. Most fields had at least been worked up.

A 'Cat' and a 'Johnny Popper' sitting idle in a worked up field North of Waterloo. 

Woo! Single speed and heavy winds make for a tough go of it. Plus, with how I had been feeling of late it wasn't making for a whole lot of good times. Well, I figured that feeling not so hot, bucking a heavy wind, and single speed was better than not feeling so hot, not bucking a heavy wind, and sitting around at home. So, with that mildly positive thought, I managed to grind out to The Big Rock. 

The Big Rock looking South down Sage Road.

Looking North up Schenk Road.

I rested up a bit and then headed East to Schenk Road and then back North again. The roads here were broken down, dusty, and you'd never know we had any rain lately at all. This blasting Northwest wind and super dry air we've had for a week has been doing its business. 

Schenk tends flatter than not so it was a nice respite from the rollers I had been crawling up previously. My right knee wasn't quite too happy, but what was really the worst was just a deep level of fatigue. I ground up Schenk for a bit and then on to Gresham Road where I decided to make a left to get out of the wind for a little relief. 

Another stop to rest a bit.

The frost heaves caused some pretty significant damage on Gresham Road.

I noticed frost heave damage up here, which surprised me a bit as I hadn't noted anything in Southern Black Hawk County, nor just North and East of Waterloo. However; I noted at least minor frost heave damage from this point all the way back around to Burton Avenue at least to Dunkerton Road. 

A controlled burn, (hopefully!) along the Southern edge of Marquise Road just West of Hwy 63.

Approaching East Janesville Church from the North on Burton Avenue.

I jogged North on Moline then to catch Marquise Road, named after James Marquise who built a cabin in the early 1850's which this road eventually ran by. Then across HWY 63 and up the big hill to Burton Avenue and a much looked forward to respite from the gales I had been working against.

Approaching St. Paul's Church from the North on Burton Avenue.

I chased that cloud of gravel dust in the middle of this image for about a half a mile.

Burton Avenue has its fair share of rollers, especially up by the two old churches, but with this massive wind at my back, the hills were no problem, even though I was riding single speed. Then I noted a bit of a cloud of dust being driven by the wind down the road about a eighth of a mile ahead of me. I never could catch it, but that tells you how hard the wind was blowing, and how dry it is in reality in the country. 

Frost damage repaired with this "yellow limestone" gravel, which is unusual in this part of Iowa.

A big fertilizer rig getting reloaded here.

As I got further South, I noted that some fresh gravel patches were laid down which were of the 'yellow gravel' type of crushed rock. This is an unusual color for gravel around here, but in Northeast Iowa, it is a common gravel type. We generally have the whitish/grey limestone around here. 

The difference is that the yellow gravel tends to be softer, holds more moisture, (in my opinion), and seems to hold up better when wet. Our typical gravel isn't quite like that, but it is what is mined locally and why we have this type of gravel. I'm not sure why we have the yellow gravel here, but there it is....

Not long after I got by the fertilizer rig above, I got a call from Mrs. Guitar Ted and she told me that our vehicle had been vandalized. Apparently someone took a pot shot at our rear passenger window with a bee-bee gun. The window was shattered. So, my ride ended on a bit of a sour note. 

But I was glad to have gotten out, despite all the tough wind, not-so-hot feelings, and the bad news at the end. A ride is good for the soul.....