Showing posts with label how to post. Show all posts

Wednesday, February 23, 2022

A Guide To Fork Swapping

2000 Fisher Tassajara
 In Monday's "Randomonium" post I asked you readers if you had any questions about fork swapping or technical questions about fork geometry. One of you did ask, so that results in today's subject: "A Guide To Fork Swapping". 

So, before we get started, let's get some definitions and terms down that I'll be using today. It is very important to note that a bicycle is a 'system'. It is not wise to think of a bicycle in terms of one of its parts, or to focus in solely on a particular facet of a bicycle's geometry. So, for instance, when we discuss forks, it is not a good thing to just focus on "offset", and to disregard that "offset" is but one of a few things that ultimately determines how a bicycle will handle. So, don't fall for the simplistic idea that changing a fork from one offset to another will magically cure your handling ills. Many media writers are guilty of perpetuating this myth.

So, following are the things that are important to consider about a fork for your bicycle:

Basic fork geometry terms visualized: From http://yojimg.net/bike/web_tools/trailcalc.php

 
Fork Offset/Fork "Rake": These are interchangeable terms that define how far the wheel axle is placed ahead of the steering axis. More 'offset/rake' means that the axle sits further away in front of the steering axis

Steering Axis: This is an imaginary line which is traced through the centerline of the head tube, fork crown, and on down towards the ground. (See the blue hash marked line in the diagram above) Steering Axis angle is equal to the "Head Angle" of a bicycle. Designers adjust this to affect overall Fork Trail.

Fork Trail: This is the distance from a point on the ground where the steering axis intersects the ground plane to the center point of the tire's contact patch behind it. More "Trail" usually means slower/ more stable handling and vice-versa- Less "Trail" means a quicker, less stable bike. This measurement is typically expressed in millimeters.

Wheel Diameter: Wheel diameter is determined by the combination of tire and wheel rim diameter you choose. So, just saying "twenty-niner" isn't good enough. Similarly, the terms "26 inch", "700c", and "27.5"er/650B" are not sufficient for determining overall handling characteristics. Not if we are concerned with detail. Here we need an actual measurement of the wheel/tire combination's diameter, which- as you probably know- is a measurement from the ground, through the axle centerline, to the top of the tire. Essentially, in visual terms for our example above, you would extend that blue hash mark line from the ground plane past where it terminates with the rear wheel axle to the top of the diagram's 'tire'. 

The axle to crown measurement is the distance between the axle to the fork crown along the fork's 'leg'.

Axle to Crown: This determines overall fork 'length'. The distance is determined from the centerline of the wheel axle to the top of the fork crown, or you can think of this as the point where the steer tube exits the fork. 

Suspension Correction: Designers account for the longer length of a suspension fork, necessary to allow for a wheel to 'travel' in a suspension design, and translate that to their rigid fork design, So, if a suspension fork has, let's say, 80mm of travel, to keep the front end of a bicycle equipped with that fork the same in terms of head angle, stack height, and more, that designer makes the rigid fork a similar length to a suspension fork with a rider on board. 

With the weight of a rider, that suspension fork will sink into its travel a bit, and this is called "sag". That is also accounted for in the rigid fork design. So, let's take our 80mm travel fork in a 29'er size and measure that. It's going to come out, nominally, with an axle to crown of around 480mm. That's a bit more than 18"'s for you non-metric folk. Now, 80mm of travel equals about 3"'s. take that off the slightly more than 18" and you are left with around 15+ inches, doubled, equals 30+ inches, or in other words, more than enough to clear a 29" wheel safely with room to spare at full travel of the fork. 

Now let's say we don't want a suspension fork, but we want a rigid one that keeps our 29"er handling similar to what we know. Accounting for some rider induced "sag", while on the bike, our suspension fork really probably is more like 470mm or so in terms of axle to crown. So, our rigid fork needs to be that measurement to preserve the handling characteristics we know, all else remaining the same. This is what we mean when we say that a fork is "suspension corrected for_____ travel". In our example's case, the rigid fork would be suspension corrected for 80mm's of travel. 

Whew!

____________________________________________________________________________

Choosing A Fork:

So, let's say you want a new fork for that old bike you have in the garage. Let's say it is a clapped out old suspension fork on an older MTB that you have had for years, but now you have some ideas. Maybe you want to do some bikepacking, or maybe this will end up being your 'gravel bike', or like me, maybe you want to use that bike as a townie/urban errand rig. 

Well, you know that a suspension fork is too much money, hassle, and it isn't necessary. So what do you get? Well, here is a list of things you'll need to know:

  • What is your steer tube size: One inch? Inch-and-an-eighth? Is that a threaded or threadless steer tube? It is probably a straight steer tube, and if so, a tapered steer tube fork, (like the one to the left here) won't work.
  • Wheel size, (Probably 26 inch, but there are old 650B MTB's and old 29"ers out there nowadays)
  • If you have suspension, what travel length does your fork have? Older bikes had 63mm, bikes from about 1998 on had 80mm, or even 100mm in 26"er flavors. Measure the axle to crown and see if you can compress the shock to assess what travel you might have. 
  • Axle type: Most probably are quick release, but there may be a few instances of thru-axle bikes in this situation. 
  • What is your suspension fork offset/rake? If it was a fork made before 2007 and a 26"er fork, it most assuredly is going to have the then industry-wide standard 38mm offset. But some newer bikes had longer offsets, so check specifications if you can find them. Measuring a fork offset can be done at home, but it gets tricky to be accurate. 

Now, with that information in hand, you can start looking for a suitable replacement fork. Here's an important thing to remember though- If you veer too far from your bicycle's original specifications, you will affect the way the bike handles. And I cannot tell you if you would or would not like that. Just realize that millimeters make a big difference. It may seem trivial to you that your fork has a 440m axle to crown and the replacement you want has 420mm axle to crown, but that matters. You will feel a difference. 

And in some cases you won't be able to replace your fork with an off-the-shelf option. Let's say that you have a 1" steer tube, threaded fork with 63mm of suspension travel, (Original Rock Shox forks, as an example). Well.....you may have to get a fork custom made to suit your desires. Options off the shelf will likely be, what in the industry are called, "replacement forks', and generally are the lowest common denominator in terms of fork options. 

Many 1990's MTB's with 1 1/8th steer tubes and 63mm travel forks can be converted to rigid using a Surly Troll fork, which - while a bit shorter than the stock forks, and have a bit more offset, seem to work a trick for a weight bearing, bikepacking set up. Plus they had canti OR disc brake tabs. Now if you can actually find one......

Sometimes you have to think outside the box. Take for example the Surly Ogre Fork, which is for rigid, non suspension corrected 29"ers. It has an axle to crown of 447mm. Since it is a disc fork, it could work for a 26" wheel. If your 26" suspension fork had 4"/100mm travel, that Ogre fork might work for you. 

Besides those things, you'll need to consider brake standard, brake levers, and if the forks are different lengths, one from the other, you'll need to consider how that affects your stem, bottom bracket height, and seat angle too. 

_______________________________________________________________________________

Hopefully that helps! But if you have anymore questions about forks, switching forks, or what have you, let me know. 

A Guide To Fork Swapping

2000 Fisher Tassajara
 In Monday's "Randomonium" post I asked you readers if you had any questions about fork swapping or technical questions about fork geometry. One of you did ask, so that results in today's subject: "A Guide To Fork Swapping". 

So, before we get started, let's get some definitions and terms down that I'll be using today. It is very important to note that a bicycle is a 'system'. It is not wise to think of a bicycle in terms of one of its parts, or to focus in solely on a particular facet of a bicycle's geometry. So, for instance, when we discuss forks, it is not a good thing to just focus on "offset", and to disregard that "offset" is but one of a few things that ultimately determines how a bicycle will handle. So, don't fall for the simplistic idea that changing a fork from one offset to another will magically cure your handling ills. Many media writers are guilty of perpetuating this myth.

So, following are the things that are important to consider about a fork for your bicycle:

Basic fork geometry terms visualized: From http://yojimg.net/bike/web_tools/trailcalc.php

 
Fork Offset/Fork "Rake": These are interchangeable terms that define how far the wheel axle is placed ahead of the steering axis. More 'offset/rake' means that the axle sits further away in front of the steering axis

Steering Axis: This is an imaginary line which is traced through the centerline of the head tube, fork crown, and on down towards the ground. (See the blue hash marked line in the diagram above) Steering Axis angle is equal to the "Head Angle" of a bicycle. Designers adjust this to affect overall Fork Trail.

Fork Trail: This is the distance from a point on the ground where the steering axis intersects the ground plane to the center point of the tire's contact patch behind it. More "Trail" usually means slower/ more stable handling and vice-versa- Less "Trail" means a quicker, less stable bike. This measurement is typically expressed in millimeters.

Wheel Diameter: Wheel diameter is determined by the combination of tire and wheel rim diameter you choose. So, just saying "twenty-niner" isn't good enough. Similarly, the terms "26 inch", "700c", and "27.5"er/650B" are not sufficient for determining overall handling characteristics. Not if we are concerned with detail. Here we need an actual measurement of the wheel/tire combination's diameter, which- as you probably know- is a measurement from the ground, through the axle centerline, to the top of the tire. Essentially, in visual terms for our example above, you would extend that blue hash mark line from the ground plane past where it terminates with the rear wheel axle to the top of the diagram's 'tire'. 

The axle to crown measurement is the distance between the axle to the fork crown along the fork's 'leg'.

Axle to Crown: This determines overall fork 'length'. The distance is determined from the centerline of the wheel axle to the top of the fork crown, or you can think of this as the point where the steer tube exits the fork. 

Suspension Correction: Designers account for the longer length of a suspension fork, necessary to allow for a wheel to 'travel' in a suspension design, and translate that to their rigid fork design, So, if a suspension fork has, let's say, 80mm of travel, to keep the front end of a bicycle equipped with that fork the same in terms of head angle, stack height, and more, that designer makes the rigid fork a similar length to a suspension fork with a rider on board. 

With the weight of a rider, that suspension fork will sink into its travel a bit, and this is called "sag". That is also accounted for in the rigid fork design. So, let's take our 80mm travel fork in a 29'er size and measure that. It's going to come out, nominally, with an axle to crown of around 480mm. That's a bit more than 18"'s for you non-metric folk. Now, 80mm of travel equals about 3"'s. take that off the slightly more than 18" and you are left with around 15+ inches, doubled, equals 30+ inches, or in other words, more than enough to clear a 29" wheel safely with room to spare at full travel of the fork. 

Now let's say we don't want a suspension fork, but we want a rigid one that keeps our 29"er handling similar to what we know. Accounting for some rider induced "sag", while on the bike, our suspension fork really probably is more like 470mm or so in terms of axle to crown. So, our rigid fork needs to be that measurement to preserve the handling characteristics we know, all else remaining the same. This is what we mean when we say that a fork is "suspension corrected for_____ travel". In our example's case, the rigid fork would be suspension corrected for 80mm's of travel. 

Whew!

____________________________________________________________________________

Choosing A Fork:

So, let's say you want a new fork for that old bike you have in the garage. Let's say it is a clapped out old suspension fork on an older MTB that you have had for years, but now you have some ideas. Maybe you want to do some bikepacking, or maybe this will end up being your 'gravel bike', or like me, maybe you want to use that bike as a townie/urban errand rig. 

Well, you know that a suspension fork is too much money, hassle, and it isn't necessary. So what do you get? Well, here is a list of things you'll need to know:

  • What is your steer tube size: One inch? Inch-and-an-eighth? Is that a threaded or threadless steer tube? It is probably a straight steer tube, and if so, a tapered steer tube fork, (like the one to the left here) won't work.
  • Wheel size, (Probably 26 inch, but there are old 650B MTB's and old 29"ers out there nowadays)
  • If you have suspension, what travel length does your fork have? Older bikes had 63mm, bikes from about 1998 on had 80mm, or even 100mm in 26"er flavors. Measure the axle to crown and see if you can compress the shock to assess what travel you might have. 
  • Axle type: Most probably are quick release, but there may be a few instances of thru-axle bikes in this situation. 
  • What is your suspension fork offset/rake? If it was a fork made before 2007 and a 26"er fork, it most assuredly is going to have the then industry-wide standard 38mm offset. But some newer bikes had longer offsets, so check specifications if you can find them. Measuring a fork offset can be done at home, but it gets tricky to be accurate. 

Now, with that information in hand, you can start looking for a suitable replacement fork. Here's an important thing to remember though- If you veer too far from your bicycle's original specifications, you will affect the way the bike handles. And I cannot tell you if you would or would not like that. Just realize that millimeters make a big difference. It may seem trivial to you that your fork has a 440m axle to crown and the replacement you want has 420mm axle to crown, but that matters. You will feel a difference. 

And in some cases you won't be able to replace your fork with an off-the-shelf option. Let's say that you have a 1" steer tube, threaded fork with 63mm of suspension travel, (Original Rock Shox forks, as an example). Well.....you may have to get a fork custom made to suit your desires. Options off the shelf will likely be, what in the industry are called, "replacement forks', and generally are the lowest common denominator in terms of fork options. 

Many 1990's MTB's with 1 1/8th steer tubes and 63mm travel forks can be converted to rigid using a Surly Troll fork, which - while a bit shorter than the stock forks, and have a bit more offset, seem to work a trick for a weight bearing, bikepacking set up. Plus they had canti OR disc brake tabs. Now if you can actually find one......

Sometimes you have to think outside the box. Take for example the Surly Ogre Fork, which is for rigid, non suspension corrected 29"ers. It has an axle to crown of 447mm. Since it is a disc fork, it could work for a 26" wheel. If your 26" suspension fork had 4"/100mm travel, that Ogre fork might work for you. 

Besides those things, you'll need to consider brake standard, brake levers, and if the forks are different lengths, one from the other, you'll need to consider how that affects your stem, bottom bracket height, and seat angle too. 

_______________________________________________________________________________

Hopefully that helps! But if you have anymore questions about forks, switching forks, or what have you, let me know. 
Wednesday, July 21, 2021

A Couple Of Hacks For The Pink MCD

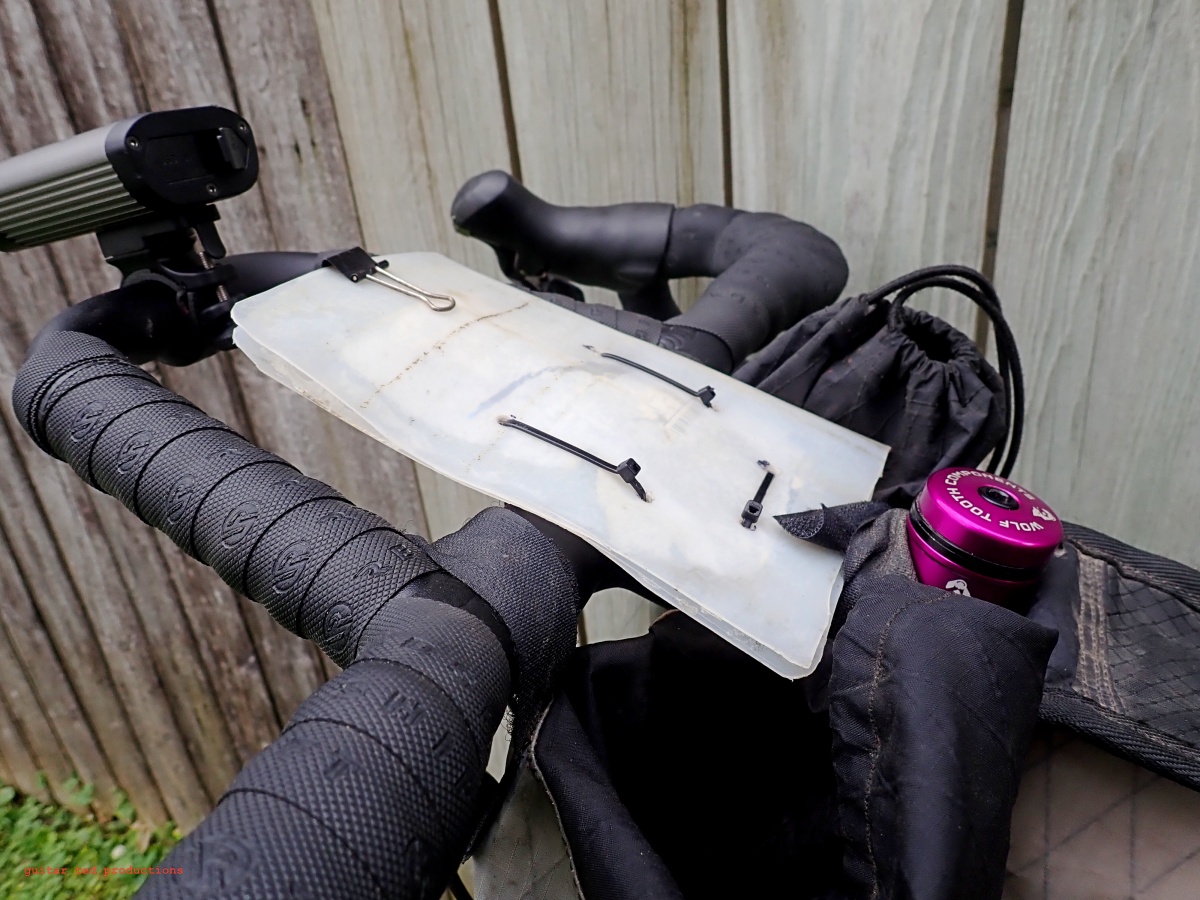
An 'upcycled' plastic bit, a clip, and some cable ties.
 I had a commenter ask about my hack for a cue sheet holder and light mount which I mentioned that I had done on the pink BMC MCD bike. Well, here are the images and descriptions for replicating these bits for yourself. If you care to....(*See disclaimer in the last paragraph!)

These are not what I would call 'elegant' solutions to problems, but they are basic, they work, and almost anyone could probably make something along these lines and likely make it look better than what I have done here. I really don't care how it looks, just that it works.

Okay, so first up is the cue sheet holder, which in itself may seem like an archaic idea given the existence of GPS data for many events. That said, I like cues. They don't have batteries which can fail, screens that freeze, or glare that makes them unreadable. That's my take, anyway......

So, this is super-easy to do. I got this idea from Mike Johnson, actually, who did something similar for his Trans Iowa cue sheet holder back in the day.  I believe Mike used old water bottles, but in this instance, I used an empty container of washer solvent for car windshields to make this. First- Cut off the top tapered section and the very bottom of the container and recycle them. I used a sharp, new blade in a utility knife to do this. then, with what remains, which should be a cylinder, simply cut that lengthwise and fold it in half. I rounded the edges with a scissors to eliminate any sharp edges. I laid a heavy object, (I cannot remember what it was now) on the folded over plastic and let it sit for weeks before I picked it back up again. By that time the plastic had taken on the flattened form you see here. You can accelerate this process, as Mike Johnson did, by putting the part in an oven, or toaster oven, and set it at a very low temperature so as not to melt the plastic, and heat it. (Note- I didn't do the heat activated part, so I am not 100% sure how Mike did his. You are on your own there)

At any rate, then all I did was to punch some holes into this with an awl, and lace it using cable ties to my handle bars. A simple office paper clip, as shown in the image, holds the cues. (Note- I will get a larger pair for the event to aid against wind issues) That's it! A simple cue sheet holder made from something you otherwise might throw away. Obviously you can make this any size you need to. That's another plus to it. And yes- it doesn't look pretty. But it works. 

A carbon fiber steer tube made into a light mount.

The next bit I have done before and learned from some posters online years ago. This is a fairly common hack, but if you haven't seen it done, here's how you do it.

You'll need a chunk of steer tube. The 1 1/8th diameter type is fairly common and not too hard to get from local bike shops that do a lot of fork installations. I have always saved these bits of tubing for several reasons, including making light mounts. 

You will need a star nut, a star nut setter, and a fairly long water bottle bolt, washer, and a boss to mount the thing from. It is important that the bit of steer tube you use is at least long enough to clear your light head unit from the fork blade. I used a piece of a carbon steer tube approximately 3.5" long. Mine could have been a tic shorter, but you'll want to pay attention to that as you get your set up figured out and try to make a mount like this. 

Next, using the star nut setter, drive a star nut into one end of the steer tube bit enough that it is fully into the tube, and that's it. You don't want it down any further. Then, using the bolt and washer, thread the bolt through from the opposite end from the star nut and pass it through the center hole of the star nut. You'll likely want a long hex key to turn the bolt at this point. Thread the bolt into the boss and tighten. Make sure you greased the threads on the bolt! Then you are done! 

You can use steel, aluminum, or a carbon steer tube bit. I'd not try carbon unless you are fairly certain you know what you are doing as it can beak and splinter if you are not careful. (You are NOT supposed to do this, by the way, with carbon steer tubes!) Aluminum would probably be your best bet here. Steel works as well, but it is heavier, if that matters, and it could rust.

Happy Hacking! 

*Remember! You are doing any of this on your own and any damages, failures, or other negative issues are your responsibility. I am only showing you how I did these things and you should consider these strategies carefully and think things through for yourself. I am NOT responsible for YOUR actions. 

A Couple Of Hacks For The Pink MCD

An 'upcycled' plastic bit, a clip, and some cable ties.
 I had a commenter ask about my hack for a cue sheet holder and light mount which I mentioned that I had done on the pink BMC MCD bike. Well, here are the images and descriptions for replicating these bits for yourself. If you care to....(*See disclaimer in the last paragraph!)

These are not what I would call 'elegant' solutions to problems, but they are basic, they work, and almost anyone could probably make something along these lines and likely make it look better than what I have done here. I really don't care how it looks, just that it works.

Okay, so first up is the cue sheet holder, which in itself may seem like an archaic idea given the existence of GPS data for many events. That said, I like cues. They don't have batteries which can fail, screens that freeze, or glare that makes them unreadable. That's my take, anyway......

So, this is super-easy to do. I got this idea from Mike Johnson, actually, who did something similar for his Trans Iowa cue sheet holder back in the day.  I believe Mike used old water bottles, but in this instance, I used an empty container of washer solvent for car windshields to make this. First- Cut off the top tapered section and the very bottom of the container and recycle them. I used a sharp, new blade in a utility knife to do this. then, with what remains, which should be a cylinder, simply cut that lengthwise and fold it in half. I rounded the edges with a scissors to eliminate any sharp edges. I laid a heavy object, (I cannot remember what it was now) on the folded over plastic and let it sit for weeks before I picked it back up again. By that time the plastic had taken on the flattened form you see here. You can accelerate this process, as Mike Johnson did, by putting the part in an oven, or toaster oven, and set it at a very low temperature so as not to melt the plastic, and heat it. (Note- I didn't do the heat activated part, so I am not 100% sure how Mike did his. You are on your own there)

At any rate, then all I did was to punch some holes into this with an awl, and lace it using cable ties to my handle bars. A simple office paper clip, as shown in the image, holds the cues. (Note- I will get a larger pair for the event to aid against wind issues) That's it! A simple cue sheet holder made from something you otherwise might throw away. Obviously you can make this any size you need to. That's another plus to it. And yes- it doesn't look pretty. But it works. 

A carbon fiber steer tube made into a light mount.

The next bit I have done before and learned from some posters online years ago. This is a fairly common hack, but if you haven't seen it done, here's how you do it.

You'll need a chunk of steer tube. The 1 1/8th diameter type is fairly common and not too hard to get from local bike shops that do a lot of fork installations. I have always saved these bits of tubing for several reasons, including making light mounts. 

You will need a star nut, a star nut setter, and a fairly long water bottle bolt, washer, and a boss to mount the thing from. It is important that the bit of steer tube you use is at least long enough to clear your light head unit from the fork blade. I used a piece of a carbon steer tube approximately 3.5" long. Mine could have been a tic shorter, but you'll want to pay attention to that as you get your set up figured out and try to make a mount like this. 

Next, using the star nut setter, drive a star nut into one end of the steer tube bit enough that it is fully into the tube, and that's it. You don't want it down any further. Then, using the bolt and washer, thread the bolt through from the opposite end from the star nut and pass it through the center hole of the star nut. You'll likely want a long hex key to turn the bolt at this point. Thread the bolt into the boss and tighten. Make sure you greased the threads on the bolt! Then you are done! 

You can use steel, aluminum, or a carbon steer tube bit. I'd not try carbon unless you are fairly certain you know what you are doing as it can beak and splinter if you are not careful. (You are NOT supposed to do this, by the way, with carbon steer tubes!) Aluminum would probably be your best bet here. Steel works as well, but it is heavier, if that matters, and it could rust.

Happy Hacking! 

*Remember! You are doing any of this on your own and any damages, failures, or other negative issues are your responsibility. I am only showing you how I did these things and you should consider these strategies carefully and think things through for yourself. I am NOT responsible for YOUR actions. 

Thursday, April 09, 2020

Tubeless Maintenance 101- Part 1

Selection of Orange Seal products for tubeless set ups.
Recently I got a selection of tubeless stuff from Orange Seal to use for Riding Gravel. This got me to thinking about how many customers of the bike shop that had no idea what to do when dealing with a tubeless tire set up. Maybe you are thinking about doing the tubeless dance yourself? Perhaps you are new to it. Maybe it is all old hat to you, but you are curious about what Guitar Ted does? Well, dear reader, read on...... 

First: I think it is very important to understand that tubeless tires are not for everyone, nor do you need tubeless tires in many cases. 

I think this is good to let settle in on your brain. Many shop employees and media wonks are sold on tubeless tires and think everyone should use them, but many people would actually be frustrated and ride less with tubeless set ups. This is because tubeless tires require more maintenance and are technically more challenging than tubed tire set ups, generally speaking. So...why do tubeless tires at all? 

 First of all, it is often not the case at all that tubeless tires are lighter than tubed set ups. Sometimes they are, (most often with fat bikes, this is the case), so don't go tubeless for the lighter weight. That gain- if there is one- is negligible for most bicycles. Do consider tubeless tires if you get a lot of punctures from goat heads, thorns, or if you are sensitive to how tires perform. If you can tell the difference between a few psi less or more, or if you can feel the difference in tire brands/products/models easily, or if you want more traction, a softer ride, and if you crave lower rolling resistance, you'll like a tubeless tire. If none of that registers with you, then those reasons for going tubeless will be lost on you.

Tubed tires, when they are not punctured, require almost zero maintenance. Theoretically, you can run a tube in a tire until the tire wears out, put that tube in a new tire, and probably a third and fourth tire if you never flat. Air up your tires on a regular basis and that's it. Boom! Go ride.....

Tubeless tires require sealant to work, and therein lies the reason for maintaining these set ups.
Tubeless tires, obviously, have no tube in them. They seal up using a system of tubeless tape, a tubeless valve stem, and sealant, which coats the inner casing of a tubeless tire, seals it, and doubles as a way to seal up small punctures. This sealant is most often based upon a formula using latex rubber as the main ingredient, along with some sort of carrier fluid, which in many cases is some form of ammonia.  The carrier fluid eventually dries up, leaving semi-coagulated sealant, dried sealant "skin", or a clump of sealant bouncing around inside of your tire, depending on what type of sealant you have. All that doesn't matter as much as replenishing sealant on a regular basis, and annually cleaning out tires. 

How often do you have to replenish sealant? Well.....that depends. It may only take a month if you use a fast coagulating "race day sealant", or your sealant may last six months. Regular checking is key. Doing this is easy. You can read about how to check your tires for sealant level, the tools I recommend to do it with, and see the "MG Secret Sauce" tubeless goop recipe I often use at THIS LINK.

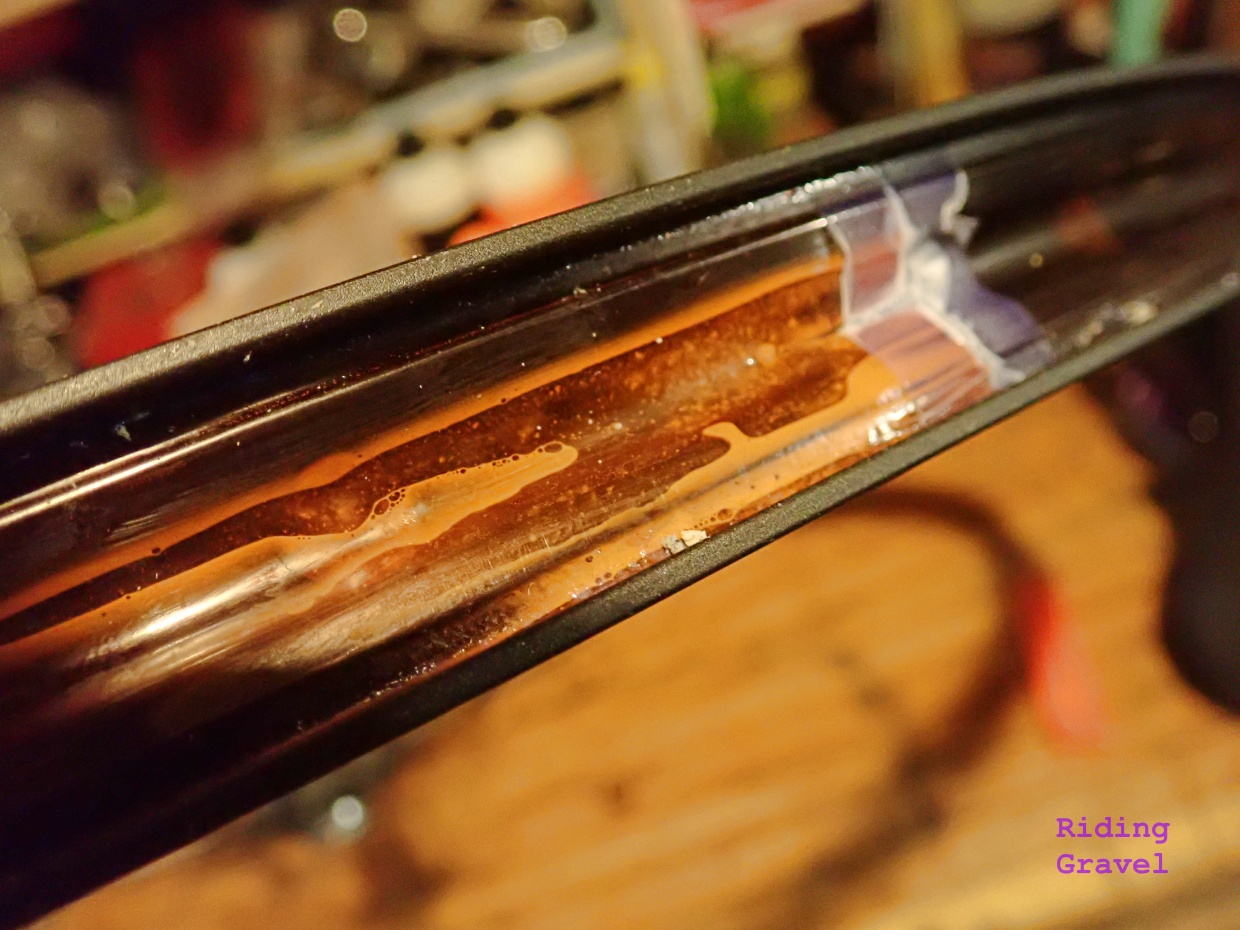
Checking sealant levels are only one part of the maintenance scheme though. You also need to check your tires for build up, your tape, and your valve stems every year. At least once a year. The reason is that sealant carriers break down adhesives, which is what your tape relies on to seal off the spoke bed of your rims. Sealant often builds up inside a tire, making them heavier, for one thing, but sealant also builds up on valves as well. Sealant can also break down a tire casing from the inside, which needs checking. Finally, air pressure, tire removal/remounting, or time can cause rim tape to fail.

An example of failed rim tape. You can see where the sealant has crept under the tape here.
There are several tips and tricks I can share that will give you an idea of where to go with getting yourself set up to maintain your own tubeless tires. That will come in a separate post. However; I wanted to address something that is becoming a bit more prominent with the wide usage of tubeless tires these days. Something almost no one ever talks about- casing stretch.

If you weren't aware, or maybe you never thought about this before, but tires are basically fabric with a layer of vulcanized rubber over it. In the most basic of terms, that is what makes up your bicycle tires. Sure- it's a lot more complex than that, but for purposes of this discussion, remembering the simple things is all that is necessary here.

Considering the fact that our bicycle tires are, for the most part, pared down to be usable with the least amount of material possible, it should be easy to understand that the forces of air and the chemicals in sealant work together to break down the integrity of a tire over time. This most often is seen as a casing that stretches. Tubed tires don't suffer from this as much due to the reinforcing nature of a tube. But this is also why tubed tires ride stiffer and have higher rolling resistance. Of course, tubed tires won't be adversely affected by sealant either.

You'll notice that a new tubeless tire may be super difficult to mount, but after a few months, you might take that same tire off and it almost falls off the rim. If you had taken the time to measure your tires with a Vernier calipers, when they were first mounted they would measure narrower than after they had been set up for a few days. Casing stretch is the reason for all of that. Each tire will react differently, so it is important to remember that swapping tires back and forth in tubeless set ups will, more than likely, render your tire useless after a while just due to stretch. By the way, fat bike tires are notorious for this issue.

My recommendation is to set up a set of tires and use them for a long time. Don't go swapping tires back and forth all the time, unless you just don't care.  Also keep in mind that despite the fact that you should remove the tires once a year for inspection, the very act of doing so may render your tires almost useless as tubeless tires.

So, going tubeless does come with a LOT of caveats. For many it is absolutely worth it, but again- it isn't for everybody. 

Next: Maintaining tape, valves, and sealant recovery methods I use. 

Tubeless Maintenance 101- Part 1

Selection of Orange Seal products for tubeless set ups.
Recently I got a selection of tubeless stuff from Orange Seal to use for Riding Gravel. This got me to thinking about how many customers of the bike shop that had no idea what to do when dealing with a tubeless tire set up. Maybe you are thinking about doing the tubeless dance yourself? Perhaps you are new to it. Maybe it is all old hat to you, but you are curious about what Guitar Ted does? Well, dear reader, read on...... 

First: I think it is very important to understand that tubeless tires are not for everyone, nor do you need tubeless tires in many cases. 

I think this is good to let settle in on your brain. Many shop employees and media wonks are sold on tubeless tires and think everyone should use them, but many people would actually be frustrated and ride less with tubeless set ups. This is because tubeless tires require more maintenance and are technically more challenging than tubed tire set ups, generally speaking. So...why do tubeless tires at all? 

 First of all, it is often not the case at all that tubeless tires are lighter than tubed set ups. Sometimes they are, (most often with fat bikes, this is the case), so don't go tubeless for the lighter weight. That gain- if there is one- is negligible for most bicycles. Do consider tubeless tires if you get a lot of punctures from goat heads, thorns, or if you are sensitive to how tires perform. If you can tell the difference between a few psi less or more, or if you can feel the difference in tire brands/products/models easily, or if you want more traction, a softer ride, and if you crave lower rolling resistance, you'll like a tubeless tire. If none of that registers with you, then those reasons for going tubeless will be lost on you.

Tubed tires, when they are not punctured, require almost zero maintenance. Theoretically, you can run a tube in a tire until the tire wears out, put that tube in a new tire, and probably a third and fourth tire if you never flat. Air up your tires on a regular basis and that's it. Boom! Go ride.....

Tubeless tires require sealant to work, and therein lies the reason for maintaining these set ups.
Tubeless tires, obviously, have no tube in them. They seal up using a system of tubeless tape, a tubeless valve stem, and sealant, which coats the inner casing of a tubeless tire, seals it, and doubles as a way to seal up small punctures. This sealant is most often based upon a formula using latex rubber as the main ingredient, along with some sort of carrier fluid, which in many cases is some form of ammonia.  The carrier fluid eventually dries up, leaving semi-coagulated sealant, dried sealant "skin", or a clump of sealant bouncing around inside of your tire, depending on what type of sealant you have. All that doesn't matter as much as replenishing sealant on a regular basis, and annually cleaning out tires. 

How often do you have to replenish sealant? Well.....that depends. It may only take a month if you use a fast coagulating "race day sealant", or your sealant may last six months. Regular checking is key. Doing this is easy. You can read about how to check your tires for sealant level, the tools I recommend to do it with, and see the "MG Secret Sauce" tubeless goop recipe I often use at THIS LINK.

Checking sealant levels are only one part of the maintenance scheme though. You also need to check your tires for build up, your tape, and your valve stems every year. At least once a year. The reason is that sealant carriers break down adhesives, which is what your tape relies on to seal off the spoke bed of your rims. Sealant often builds up inside a tire, making them heavier, for one thing, but sealant also builds up on valves as well. Sealant can also break down a tire casing from the inside, which needs checking. Finally, air pressure, tire removal/remounting, or time can cause rim tape to fail.

An example of failed rim tape. You can see where the sealant has crept under the tape here.
There are several tips and tricks I can share that will give you an idea of where to go with getting yourself set up to maintain your own tubeless tires. That will come in a separate post. However; I wanted to address something that is becoming a bit more prominent with the wide usage of tubeless tires these days. Something almost no one ever talks about- casing stretch.

If you weren't aware, or maybe you never thought about this before, but tires are basically fabric with a layer of vulcanized rubber over it. In the most basic of terms, that is what makes up your bicycle tires. Sure- it's a lot more complex than that, but for purposes of this discussion, remembering the simple things is all that is necessary here.

Considering the fact that our bicycle tires are, for the most part, pared down to be usable with the least amount of material possible, it should be easy to understand that the forces of air and the chemicals in sealant work together to break down the integrity of a tire over time. This most often is seen as a casing that stretches. Tubed tires don't suffer from this as much due to the reinforcing nature of a tube. But this is also why tubed tires ride stiffer and have higher rolling resistance. Of course, tubed tires won't be adversely affected by sealant either.

You'll notice that a new tubeless tire may be super difficult to mount, but after a few months, you might take that same tire off and it almost falls off the rim. If you had taken the time to measure your tires with a Vernier calipers, when they were first mounted they would measure narrower than after they had been set up for a few days. Casing stretch is the reason for all of that. Each tire will react differently, so it is important to remember that swapping tires back and forth in tubeless set ups will, more than likely, render your tire useless after a while just due to stretch. By the way, fat bike tires are notorious for this issue.

My recommendation is to set up a set of tires and use them for a long time. Don't go swapping tires back and forth all the time, unless you just don't care.  Also keep in mind that despite the fact that you should remove the tires once a year for inspection, the very act of doing so may render your tires almost useless as tubeless tires.

So, going tubeless does come with a LOT of caveats. For many it is absolutely worth it, but again- it isn't for everybody. 

Next: Maintaining tape, valves, and sealant recovery methods I use.