Showing posts with label Honeman Flyer Project. Show all posts

Monday, April 01, 2024

Honeman Flyer: Reviewed

This review of my Honeman Flyer from King Fabrications is going to cover mostly what I think about the geometry of this bicycle. I will also touch upon a few other things concerning the way it handles and on some of the parts I have on the bike. 

NOTE: The frame, fork, wheels, and a few other small parts were paid for out of pocket by Guitar Ted. Most of the cockpit components were gifted or sent in for previously written up reviews at no cost. 

None of the companies represented in this review paid for this post or have any pre-knowledge of this review being done. As always, I strive to give you my honest thoughts and views throughout. 

Now, on with the review.

Obviously the whole intention of the Honeman Flyer project was to prove if old 1930's track bike geometry had any bearing on current gravel bike geometry. It sounds like a far-fetched idea, but when you dig into history a bit, it starts to make more sense. I already wrote about this in an earlier post which you can read HERE

In this post, I will give you my take on what this unique geometry feels like and how it handles on gravel roads in the 21st Century, nearly 100 years after bicycles with this geometry first appeared on the board tracks across the United States. This post will also dispel the uninformed notion that "gravel bikes are just 1990's MTB's".

A long grade I rode up during the Mid-South gravel event recently with the Honeman Flyer.

The radical part of this bike is the rear end. The front? Pretty standard fare, actually, and I was quite surprised that 1930's track bikes would use numbers almost spot-on for a gravel bike made in 2024. However; no one is currently using the odd rear end geometry that the King Fabrications Honeman Flyer does. 

Just to quickly recap, the seat tube angle is a slack, slightly less than 70° while the chain stay is currently set at 450mm with the slider drop-outs. That connects to a bottom bracket that has 76mm of drop, which is what the geometry I found dictated for the 1930's track bike geometry I copied. That's a little lower than most, but not as low as I've seen today by far in a gravel bike. 

Just to keep things interesting, I went with a single speed specific frame and my gearing was "John Deere 4020" at 40T X 20T. A little lower than a lot of folks single speed gravel gearing, but my worst facet of gravel single speeding is climbing, so I erred to that side. 

Remarkably, I found that, while standing and mashing was certainly possible on this geometry, seated climbing worked better. It just seemed to fit my style and was a bit less of an effort to do, which is counter-intuitive for single speed riding. Especially when your cadence drops very low. 

Image by Erik Mathy

I'm not sure what else to attribute this to other than that perhaps having the bottom bracket a little further in front than I would normally have. This made seated climbing more desirable. Standing and mashing was fine, and I have no trouble getting into a standing position for climbing, it is just that seated climbing felt better and less strenuous, despite the low speeds at times. 

Even with the longer chain stays, I had no troubles with climbing in either position, dispelling any notions that longer chain stays are "bad" for climbing. I did get the rear tire to break loose twice during the same climb while standing but it wasn't detrimental and only was a brief "scratch" of the rear tire. 

I've already mentioned that cornering was a trait I immediately felt was a big improvement with this geometry, and that single track section at Mid-South only furthered my feelings that this is a strong suit of the Honeman Flyer. 

Another time when stability was prized was a brief moment during the Mid-South when I crossed over some looser dirt/gravel during a descent and the rear end broke loose. I was easily able to correct and ride it out, which seemed intuitive and not at all 'twitchy'. That was a nice revelation. 

Another interesting thing about this geometry is that the wheelbase is not crazy-long. It measures a touch over 41 inches at 1043mm, which isn't out of the ordinary. My Twin Six Standard Rando measures exactly the same, as an example. The thing is, this King Fab bike rides like a much longer wheelbase bicycle. It is definitely springy in the vertical plane and because of that, it rides quite smoothly. 

In fact, this is probably why I came out of the Mid-South without any physical issues. Normally my hands would get numb at some point, and the feeling of being "beaten up" would have been happening. However; I felt great after that ride, in terms of what I normally feel like, and I am pretty sure that was all in the bike's design. 

Now with the slipping seatpost issue squared away I can ride the bike without a constantly varying saddle height! That has proven to be a good thing and has reinforced my feelings about the geometry. Oddly enough, I actually moved the saddle back a couple more millimeters when I swapped out the post and this has been a good move so far. I never would have dreamt that making the bottom bracket a bit further forward would have this dramatic of an effect on so much of the bike's handling.

Why, exactly, the old track bike designers made the bikes like this is still a guess. I can speculate, but without some definitive dissertation from a designer from that time, all I can do is guess. There was the reference I found that intimated that these machines were often used on rough, unpaved roads while training, so that would make sense if the geometry was defined by that part of the rider's needs for a racing bike. 

Conclusions On The Geometry: So, are we the beneficiaries of old track bike geometry during these gravelly times? Maybe. I doubt that it was a direct influence, but in a roundabout way, we have ended up, at least partially, where we started. 

 As far as a connection to mountain bikes of the 1990's goes, it pays to keep in mind that early mountain bikes were an outgrowth of 1930's Schwinn/cruiser style bikes made for youths. (And their smaller diameter wheels, by the way.) Early MTB's were carbon copies of 1930's cruisers, in terms of their angles, as an example.  

So, to say that "gravel bikes are just 1990's MTB's" is really missing the mark. Those 1990's bikes were evolutions of the first generation MTB's and their 1930's inspired cruiser bike geometry with smaller diameter wheels. 1990's MTB's were not the predecessor of the modern gravel bike then. Nor were gravel bikes influenced by those early MTB's. 

The Parts: Some of the bits and pieces I used on the Honeman Flyer deserve a little attention here as well. I have Wolf Tooth Morse cages on the bike as well as their rear through-axle. I am using a painted to match Salsa Waxwing carbon fork, and those sweet TRP brake levers. 

The bottle cages are actually really good. If I were to eject a bottle, it would have been on one of the bone-jarring high-speed descents at Mid-South, or in that single track they had there. But that did not happen and I would 100% trust these cages in almost any situation. 

The through axle did its job, and that's a good thing. I did actually witness a guy have his rear through axle eject on a high-speed down hill at Mid-South. Frightening! Fortunately he was able to bring the bike to a stop without crashing. But that just points out that a good through axle used correctly is a key to a safe, enjoyable ride. Thanks Wolf Tooth! 

The TRP brake levers on the bike which were gifted to me by a reader of this blog are top notch. I love the feel and the hoods are super-comfy for my paws. Thank you!!

Finally, the Waxwing fork was something I feared would be super-stiff and unforgiving. I was pleasantly surprised to find out it was nothing of the sort. That smoother ride and those Three-pack bosses are much appreciated. 

Conclusions: So, with all of that said, does this bike do the things I need in a single speed gravel bike? To that the short answer is "Yes". However; there are always things I'd change about any bike I've ridden, and this one is no different in that regard. 

First, I'd add another bottle cage mount under the down tube and I would have arranged for two on the inside of the main triangle on the down tube. But I am a water bottle hoarder and I don't always need that many mounts. Having just four places for a water bottle will force me to pare back on the packing! Plus it would have increased the price to me for the frame and I was on a pretty strict budget.

I'd probably ask for a tiny bit more tire clearance so I could run 45-47mm tires. No big deal. At least this bike has more clearance than the Twin Six does! Interestingly, it doesn't need bigger tires, mostly due to the already fantastic ride quality of the frame and fork. The Stormchaser single speed I tested in 2020 was a great single speed gravel bike but the front end of that bike was super-stiff and unforgiving. It took me putting in 50mm tires to tame that. It is nice to have this Honeman Flyer be so smooth, and lighter, since it doesn't require those heavier, fatter tires to smooth things out.

Otherwise I am quite happy for now. I don't see anything glaringly "wrong" with the geometry. It is a super-smooth riding bike. The wheels, especially the Paul Components hubs, roll like crazy. The handlebar is comfy and along with the smoother ride, my hands are pretty happy. So, yeah.....this one is a keeper. I am excited to roll with it for years to come.

Monday, March 25, 2024

Catching Up

Look for a Lube-Off update soon.
Whew! Thank you for being patient as I worked through my Mid-South report. Now it is time to catch up on what has been happening since a week ago when I returned home. 

I was pretty torched after that trip. Tuesday was essentially a write-off. I was very out of sorts and very tired. Wednesday didn't start out a whole lot better either. 

The weather was very blustery and chilly on Tuesday and Wednesday, so along with my low levels of energy I just did little efforts and I tried not to overextend myself in my weakened state. Rest isn't coming as easily as I had hoped for, though, and short nights have been the norm so far.

One of the things I tackled immediately after coming home was to diagnose what was going on with the slipping seat post at Mid-South on the Honeman Flyer. The clamp was torqued as high as I dared and still no love. 

I decided to switch out the post, but before I did that, I put a caliper to the shaft and found out it was barely larger than 27mm in diameter. Okay! Now it all makes sense. The Wolf Tooth clamp probably is fine, it was the Tamer post being undersized. I put a caliper to a few other 27.2 mm seat posts and confirmed that it was an undersized seat post issue. 

So, I grabbed a PRO 27.2mm post with a slight set-back in black and put that on with the same saddle, the WTB Volt, and did a test ride. I am still fine tuning my position after Mid-South and when I get it dialed in I'll get another longer gravel ride in to confirm everything and then I hope to write up a final take on the project. 

The new seatpost is in.
I'll also have a take on the Flowerpower chain wax after Mid-South. I think you will find the results interesting. I know that I was a bit surprised. I'll contrast what I found with how SILCA Super-Secret lube works in extremely dusty situations also. 

The weather went to heck after I got back also. Really cold, blustery, and a touch of snow has greeted my return. This will keep me out of riding the country for a bit. It's probably a wise thing anyway, since I am run down and the chance of getting sick is pretty high. Plus, I have a new component in for review which I cannot talk about just yet. So, it isn't as though I don't have anything to do. 

Stay tuned, we're back on track now! 

Friday, March 22, 2024

Mid South Report: The Race: Part 2

The view from the oasis stop
 Note: There will be no FN&V this week as I am still writing up the Mid-South experience. The FN&V will return next Friday!

Ben had promised that this oasis stop would be one of the highlights of my trip down to Mid-South,, and he was not wrong about that! The guys had a plan for roadside charcuterie and Old Fashioneds made with whiskey, bitters, and a cherry with ice! 

Ben or Justin, I cannot remember which it was, sat the whiskey bottle in plain sight and we began cheering on riders. The responses were entertaining, to say the least. 

Most would smile, nod or wave in recognition of us, and some would yelp, cheer back, or say hello. But the ones who were trying to look serious, give us no response, and all the while look as though they were jealous, were our favorites. Some folks even admitted that it looked as though we were "doing it the right way", yet they pedaled on anyway? Weird!

Ben declared that we had "won the event" by doing things in fun mode, and we were packed up and gone again within an hour, maybe more. Next stop, the Salsa Chaise lounge! I was really looking forward to getting my picture made in the Chaise Lounge. 

Justin Michaels looks on as our first partaker of whiskey fumbles a bit!

This woman brought her cat in a trailer along for the 50 miler.

During the route to the lake and the Salsa Chaise Lounge I managed to get ahead of the guys again and I was feeling pretty strong once more. The day was going great so far and the Honeman Flyer was holding up well. Only thing was that the other bottle cage came loose at one point and I had to re-tighten it as well. But besides that, and a slightly slipping seat post from the really rough terrain, I was doing great. 

The Salsa stop at Lake McMurtry.

The road leading away from the single track section at Lake McMurtry.

I saw Mike Reimer and he had a Chesire cat grin on as I rode by. I got in the couch and held the bike with one hand, smiled, and that was that. I was off. By the time I cleared the couch here came Ben and the others rolling up. They got their pictures done and we then all rolled out together to the ......singletrack

Now, I had no idea I would be required to ride about a mile of single track on a drop barred single speed with 42mm tires, but that's what was expected. I had no time to consider the ramifications as we were heading in and it was game on.

I ended up getting separated from the guys again when I caught an inexperienced rider sitting at the apex of a steep uphill corner and I lost my momentum. That was the only time I had to put a foot down though and otherwise I cleaned the entire section without dabbing or having a pedal strike. The last thing was tricky to avoid as I have a 76mm bottom bracket drop which puts the bottom bracket in the weeds a bit and makes the bike ripe for a strike, but nope! No such thing!

I caught up with the guys at this roadside rest stop.

The final miles roll by......

I ended up catching the guys at a corner where they were sitting alongside the road in some luscious green grass. There were now only about ten miles to go, and this ride would be over. I have to say, I wasn't doing badly, even though this was my longest ride of 2024, and I hadn't been on this bike for that long before either. 

The experience was awesome. I was stoked to have ridden Oklahoma roads now and especially the Mid-South, even though I wasn't "official", (yes, Bobby is aware I did this), and I did not receive a time or record of it in their books. But no one cares about that anyway.... 

I wasn't going to do this, but Bobby was waiting for me, so.....

In fact, all along I had planned on bailing out a block or two before the official finish and coming back around on the back streets to reconnect with the guys who had paid and earned their "Bobby Hug". But remember what Bobby said to me earlier? That he was so looking forward to giving me a finish line hug? Well, I could not take away his hope in that, so I rode on in like everyone else did. 

Of course, Bobby Wintle went nuts, as he does, and gave me a very special hug. He said into my ear, "Thank you so much for teaching us how to do this." That really meant a lot to me. I'll never forget that as long as I can remember stuff. 

Then Bobby made us wait as he hugged about ten more finishers. Then he demanded we stand next to the tall bike and get our picture made with him and the Northfield Crew. Then he sped off like a whirling dervish and was gone again. 

Erik Mathy rode this King Fabrications bike belonging to Li King on the 100 mile route.

My bike right after the ride.

Then there was a looooong hang in an alley by the finish line. People came by that were new to me, but had known Ben and crew from previous Mid-South events, and I had a chance to get to know them as well. I saw a few folks that I knew that finished. Rob Evans and Kerry Moyer to name a couple. I saw Derek Henry, a Trans Iowa vet, out on course too. It was a great day on the bike and now it was time to soak it all in at the finish. 

I got to chat again with Li King, who had a sprint finish to win the non-binary category for Mid-South this year. Li actually rode my bike and was pretty impressed with how it came out after all. 

Later we went back to the Air BnB to get showered and cleaned up. A return ride to downtown was in order and we were thinking about eating and catching the DFL rider, the last person to finish, which Mid-South makes a big deal over. 

We ended up eating out at Louie's downtown and then heading back to catch some sleep. All of us were too tuckered out to stay up for the DFL, so we went back and had a nice, long sleep until Sunday morning and our last full day in Stillwater. 

Next: The After-Party

Thursday, March 14, 2024

Inspiration And Some History

The page posted on Facebook that started this journey.

 The Honeman Flyer project has taken up a lot of space here on the blog of late. However; you may not have read what the reason for the project was, or how this all came to be a thing. So that's the point of this post.

Today I am traveling to the Mid-South event mainly because of an idea that germinated last year when I saw a post by frame builder Steve Garro on Facebook. The image Steve posted was from an issue of "Popular Mechanics" from the mid-40's (1940's) which showed an advertisement from a frame builder by the name of Willie Honeman. (Image to left here)

The name of the builder did not catch my attention, but what Steve said did. He essentially noted that the geometry of the frame drawing in the ad was eerily close to gravel bike geometry. He wondered what such a bike might ride like. So did I, along with other commenters on the image. 

This prompted myself to go into research mode and I found a site that had a page on Bill "Willie" Honeman, a much decorated national champion track racer.  The site, called Classic Cycles, has a wealth of obscure track cycling information from the turn of the 20th Century to the 1950's. Searching further, I found out that Iowa figured into track racing lore. 

There was a racer who took up crafting racing bikes and running a shop out of Davenport, Iowa named Worthington Mitten. Worth, as he was known by, was himself a well accomplished six-day racer from the time when those contests were actually ridden for six consecutive days by one rider. Once he took up a torch, he made a small number of frames and forks out of his Davenport shop under the "Mitten" brand. One of his clients was an orphaned paper boy who made his rounds by bicycle named Victor Hopkins

Vic was an Iowa native, and his story is compelling. From a tough childhood he was eventually moved to try racing bicycles after he discovered Worth Mitten's Davenport cycling club. Vic immediately was successful. Some of his exploits were something which might resonate with ultra-distance, self-supported gravel riders today.

Willie Honeman's track racer (Image courtesy of Classic Cycles)

Vic apparently went at least once to Chicago to race. He didn't take the train, nor did he drive a car. Instead he rode to the event and back. Then, in an effort to qualify for the 1924 Paris Olympics, he did a similar thing, only this time he rode over 1000 miles from Davenport. Most of the roads he used to get there were dirt. It turned out that he qualified for the Olympics since he won the event by 20 seconds. 

I assume Vic did that self-supported as well. This got me to thinking - these bicycles must have been pretty decent for rough roads.  

Examining the Honeman geometry, and then realizing that it was a design from the 1930's led me to Pop Brennan, who was the maker of Honeman's track bike. Reading further I found that Brennan's bikes were quite popular with the major star track racers on the circuit back then. Many of the other builder's bikes seemed to be of a similar geometry as well. Finally, the Mitten model built for Vic Hopkins was especially meant for rougher roads found in Iowa and Illinois at the time. 

So, how would a modernized version of these bikes do on gravel

Fast forward to 2024: The "Honeman Flyer" project came to life, as I have detailed here on these pages. The project culminates with this trip to Stillwater, Oklahoma as I will be riding (hopefully) on Oklahoma's red clay roads and getting to be a part of the story Erik Mathy is crafting around this idea, and more than that. 

The finished Honeman Flyer by King Fabrcations made to the geometry of a Brennan track bike from the 1930's.

Was It A Good Idea? There was a huge risk involved in doing this project, that mainly being that my resources for this experiment were based on a paltry amount of evidence and a lot of my past experience and my own guesswork. There was a good chance that I paid out of pocket for a pretty wall hanging. 

The price for admission to this deal was not cheap. Yes - there also was the chance that I would have "confirmation bias" and think it was a fine bike even though it might not be. But if you really knew me you'd know that I cannot stand a bike that handles poorly. Most bikes have "pretty decent" traits, but there are some that have some bad warts and I think that in the past I have been pretty honest about those things. 

 The point of the experiment is to find if we, as a community of cyclists, can take anything from history and apply it to today. This is not easy to do. Today it would be difficult to ascertain "why" things were done the way they were done without direct evidence from builders and period riders, most of whom, if not all, are deceased. Then there is also the factor with materials technology. Certain things could not be done back then and have reliability. Things which we can do now and not worry about. 

But did we, (cyclists, designers, brands) cross a line at some point and start doing things "because we could' or because "rules" disallowed certain aspects of design? I think fashion and marketing also have affected cycling design. Think about Worth Mitten. He probably wasn't as concerned about how his product made people feel when they looked at it as he was concerned about how his product worked for a cyclist training and racing. Mitten's designs were most assuredly executed accordingly. 

We also have lost a lot of wisdom and information about cycling from days of yore. For example, I think it is fair to say that most of us unfamiliar with wooden rimmed wheels would be quick to say that today's carbon fiber rims are lighter. If the Classic Cycles site is to be believed, a claim is made there that they have examples of racing wheels from the 20's and 30's that rival the weights of today's carbon wheels. Maybe something along those lines goes for geometry also. Maybe our own assumptions about "what is old" affects our views of those old bicycles as well. 

So, can we learn anything from the past by having a modernized version of what was raced and ridden on rough roads back then?

So far I would say - Yes. I need to ride it more to really know if anything will crop up that bugs me. I need to get into various situations with the bike. I need more time to decide. But I don't think I wasted my money, if that is what you are wondering out there. I have wasted my money on custom design before, so I am not necessarily going to hold back judgement on the King Fab bike because it is "custom" or cool, or because the geometry is whatever. In fact, I have already pointed out a few things about the process with King Fab that weren't ideal and that I found a flaw in the paint job, if you were paying attention. 

So, in the future I think you'll find an unvarnished take on the bike and the point of it being this experiment. Until then I'll point out again that back in the first half of the 20th Century there were a lot of bicycles like this and there were good reasons for their design. You'd have to be pretty blind to ignore those facts. There is something to this. The question is, should we be looking at this sort of design for gravel in the 21st Century? 

Anyway... stay tuned.....

Wednesday, March 13, 2024

Headed South

 The culmination of months of planning, spending, and gathering of parts will occur over the next few days as I am to head South on a trip. The point of it all will be two-fold: First will be the Honeman Flyer Project. I will be bringing that bike along and then Erik Mathy will photograph it, myself, and possibly the frame builder as well at the venue. Then I will be getting interviewed for a story about the bike and the idea behind it all. 

Secondly, I will be exploring behind the scenes at the Mid-South event. I've never been to this event but I have met Bobby Wintle on several occasions. He has been said to be the "soul" of the Mid-South event (Formerly known as the  Land Run 100 for you old school riders.)

I suspect I'll ride a bit, hang a bit, and talk to many folks. I plan on getting a lot of images and maybe an interview or two. I will be starting my reports on Mid-South on Tuesday of next week as Monday will be a travel home day. On Monday I may have a preliminary report with no images as I will be posting from an iPhone and I don't get on with the interface with Blogger on the iPhone. So, no promises there. If I can figure it out, you'll get an image. 

There may even be a random post or two thrown in while I am down there. We will see. I plan to arrive in Stillwater sometime Thursday and will be there through Sunday. If you follow me on social media I am on Instagram and "X" (formerly Twitter) as "guitarted1961". 

This will be the first multi-day trip I have taken since last year's GCHoF trip to Emporia, Kansas, which I am also supposed to be doing again this year. Woo! See ya later....

Saturday, March 09, 2024

Brown Season: Honeman Flyer Maiden Gravel Voyage

Escape Route: North Side alleys
 After a couple of test rides and a commute back and forth to work, the Honeman Flyer had gained enough of my trust to go for a brief ride out in the country. The goal was simple: Go to the Big Rock and back home again. 

I chose this route because that is where I rode my Black Mountain Cycles MCD on its maiden gravel voyage in 2018. It is also where I first rode on gravel with my Twin Six Standard Rando v2 in 2020. So, keeping the them alive with another test ride two years later to the Big Rock just seemed appropriate. 

It was a nice day, a little hazy with high clouds creeping in which heralded a rain event we experienced Friday. It was warm, about 57°F and hardly any wind, but what there was seemed to be out of the Southeast. I wore 3/4's pants, a bib short for a liner, a base layer, and my long sleeved wool jersey with the Twin Six wind vest. I stuck some plastic shopping bags on my feet and wore my Shimano gravel shoes. Wool socks.....but of course!

Hitting first gravel here. This was about as Sunny as it ever was during the ride.

That's Big Rock Road in the distance.

I wound my way through town casually. The road out to Moline Road wasn't too busy, which was nice. People drive 55 mph on that section which is signed at 45mph, so it can get a little hairy if the traffic is bad. There are no shoulders to speak of either. That lasts about a mile, but it really sucks to ride that stretch. 

I hit first gravel and thought to myself, "Well, it rides like a bike!" Which is a good thing. The Honeman design isn't all that far off from modern day gravel machines, so things like the front end geometry and the bottom bracket drop are not all that weird at all. In fact, a lot of gravel bikes are where this geometry is at. The outlier here is the rear of the bike which features a very different set of numbers. It all starts with that slack, 70° seat tube, which in reality measured out for me at a half a degree slacker than that! 

It's a keeper!

I'll likely have a deeper dive into the historical aspects of this idea, but as for now, I'll just say that the entire design seems to be a very relevant one to gravel riding. As I said, the front end is, for all intents and purposes, "standard gravel geometry fare". The rear is the old married back to what was old, and the entire package just really shines for me on gravel. I'll also say that the fact that the bike is a steel bike makes this even hit home more precisely. 

The slack seat tube angle "works" that seat post more, and perhaps the angles of the rear triangle help here as well. All I can say is that this is a very, very smooth riding bike. The thin gauge steel tubing helps a lot too, but whenever a builder chooses thin gauged steel, you have to start riding more calmly and smoothly. This would not be the bike for a person that pedaled in squares, but not because of the geometry, but because of the frame tubing. 

I had a Tomassini road bike built out of Columbus SL tubing and you HAD to ride that bike with excellent form or it would hate you. This bike is not that bad, but I can tell it rewards a smoother, more efficient pedaler. I'm fine with that. If you wrassle your bike, you should err on the side of heavier gauge steel, in my opinion. 

The rural beer drinkers must have been kickin' it old school recently.
That little grouping of trees off to the left here on Big Rock Road held some new arrivals from the South.

As I rode along Big Rock Road I was ruminating on how I had not yet seen, nor heard, any Robins yet this year. And then it dawned on me that the Red Winged Blackbirds should also be back by now. But I had seen no signs of either. I looked across a field and then a small group of trees was coming up on my left. I saw movement, I heard sounds. Both Red Winged Blackbirds and Robins in the same trees! 

Check and check! 

Well, I suppose the Robins will be heard outside the house any morning now then. Up until now though, they haven't been heard singing their random, warbly song. 

What?! "Normal" gravel conditions? Weird.....

It is still insanely dry and dusty out in the country. At least the roads aren't ditch-to-ditch crushed rock three inches deep. I don't know what sort of rain we got, but we're going to need a whole lot more of that before we are out of the woods with regard to the drought here. 

As for the Honeman Flyer, I have to await the incoming through axle (should be today) and then all will be done with it and then it will be on to more riding. Until then.....

Thursday, March 07, 2024

Honeman Flyer Update: Finished & Test Ride Impressions

 Okay, today y'all get to see this thing. I have to say that the build process for this was fraught with difficulties. More so than I thought it might be. While the bike is complete and rideable there will be some adjustments and probably a couple of changes as well. 

The seat collar I borrowed from Carl, my coworker, is one thing. While it works well, the red anodized color sticks out like a sore thumb. The incoming Wolf Tooth collar in black should calm that down a bit.

I also will have a Wolf Tooth through axle coming in so I can return the current through axle to the Standard Rando v2. I am still adjusting the stem/saddle set up also. 

But besides those things I think this bike is a go and I am pretty happy with how it all turned out. ironically that super-slack seat tube angle turned out to be not a big deal, in terms of set-up. I feared that I would be so far out of whack in terms of my relationship to the bottom bracket that it would be a negative, but as you will soon learn, that is not the case at all. First up, let's take a look at this thing, shall we?


A couple more notes first before I get into my impressions of the build and looks. These are Teravail Rutland 700 X 42mm tires on Velocity Blunt SS rims laced to Paul WORD Disc hubs. The inner rim width on these is nearly 27mm at 26.6mm. That's spreading out the Rutlands to look like more than their 42mm width. In fact, the rear tire measures out at 44.1mm at sub-40psi. With that there is adequate rear tire clearance all around, but a larger tire would not be advisable if I were to ride in wet or muddy conditions. That's fine, because I have a single speed with 29"er tires in the Pofahl Signature and I did not want another bike that did what I already have. 

The gear on the bike is exactly the same as I ran on the Twin Six when I had it single speed, so that is very familiar and a perfectly good gear for rolling hill terrain, such as I expect to ride with this bike. At some point I'd like to buy a White Industries 20T freewheel and replace the Shimano one, but for the time being it is good to go. 

Finally, some of you may have noticed that there is a rear derailleur hangar on this bike. I could run an AXS SRAM 1 X set up, since there would not have to be any cables, but that was not the plan going in. It's just a "happy" accident since Paragon Machine Works doesn't offer a single speed only insert. 

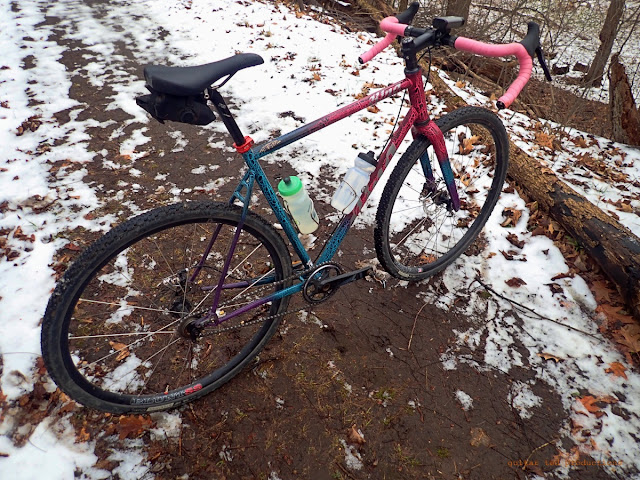
The Looks: Overall, I am pleased. This is the best paint job on a bike I've ever had. Runners up include the 1992 Klein Attitude in Sunset Linear Fade and my old orange Badger which was painted by Joe Bell. This Honeman Flyer takes the cake though. I'm not riding this anywhere and going unnoticed, that's for sure! 


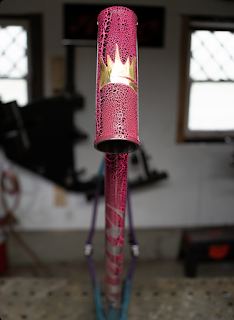
 The logos in raw steel are super-rad. It almost looks like a part of the design of the paint since the font is so weird. You can see the tooling marks on the steel which is kind of neat as well. The colors are great. Remember, I let Li King do whatever he wanted as long as it was the signature crackle style paint, and this is what Li chose to do. I am very happy with the outcome. 

Overall the bike looks modern and rakish, not too old or stuffy, even though it is based upon a 1930's era track bike. You do see the super-slack seat tube angle if it is pointed out, but otherwise I think it looks pretty much like a "gravel bike" looks these day, only in steel with a mind-bending paint job. 

Of course, I had to put a Trans Iowa sticker on there!

The Ride: I was a bit afraid of the thin gauged steel tubing and the wispy stays, but strangely enough, this bike is pretty solid and I don't have to baby it when climbing a steep hill in a low, high-torque way. Nor did I notice much, if any, bottom bracket side-to-side motion. So, I think that, while it is definitely not the tankish, solid feeling of a Standard Rando, it will hold up fine to single speed usage. 

The whole set-back to the saddle position in relation to the crank set is fascinating to me. I felt no real big difference in seated pedaling or climbing other than that I knew I was "folded up" on the bike a bit more, which you could tell while pedaling. But getting up out of the saddle is no big deal, and cresting a climb while standing felt totally normal. 

I did notice that in cornering I could set my outside pedal at the six o'clock position and plant the bike in a much more solidly felt way than on any of my other bikes. That was a big surprise and I quite like this new feeling. 

The slack head tube (71°) did not wander on climbs or cause me to have to work harder when turning to resist any sort of wheel flop. The bike turns like a bike at slow speeds, so this was nice to find out. Surprisingly, I clipped my sole of my ginormous Giant mtb shoes in a tight corner. But I do have the cleats set waaaay back on these shoes, and they are bulky. I may not have any issues at all with "normal" gravel shoes, and this was barely a scrape as it was. 

The bottom bracket drop on this is 76mm, which is 1mm deeper than my Twin Six Standard Rando v2, and I like this a lot. It's definitely noticeable and it helps keep the saddle to bar drop a little more in check. This ain't no cyclo cross design! It feels very stable at speed and I can let go of the bars and it feels pretty rock solid. 

Of course, it has a springy ride feel. It definitely scores that "steel feel" in spades, but it doesn't feel like a noodle and it accelerates fine for me. I cannot complain about anything here. One more note: I feel more "draped over the bike" on this Honeman Flyer than I do on most any other bike I own save the Fargo Gen I. So, this is very encouraging.

So Far... I've got to do some country riding on this before I can give it my 100% seal of approval, and of course, there are some tweaks to be made which will affect the outcome overall. But the Honeman Flyer is very, very promising so far. I am planning on a final take on the bike and how it relates to today's gravel rigs in the near future. Updated: That review can be found HERE.

Thank You: I want to kick off this by thanking Erik Mathy up front. Without him this bike would never have happened, and that is not hyperbole. It was he that put the idea together with a story idea, the builder, and a trip plan for me and he was definitely the "glue" behind the scenes. Otherwise this would have been nothing more than another one of my blog postings and I probably would never have had the chance I have now to try this idea out. So, THANKS Erik!

Of course, you need a frame builder and Li King of King Fabrications was that frame builder. The frame and the paint job are all done at a very high level of talent and expertise, and Li translated the geometry idea perfectly, which was key to this being a success. Thanks!

Then I have to thank my friend of many years, Ben Witt of Heath Creek Cycles for his building the front wheel and making a way for me to get the fork and send it direct to King Fabrications, which saved a lot of time. Thank you, Ben!

Wednesday, March 06, 2024

Honeman Flyer Update: Overcoming Until The End

 A new day. More challenges to meet with the Honeman Flyer build. The first task on this day was to measure once, twice, and three times. Mock up the stem and spacer stack. Measure some more just to confirm. Then..... The Cutting!

You know, whenever you cut a steer tube, that is a great metaphor for commitment. There is no going back once the saw bites that steer tube, so you'd better be damn sure what you want is really what you want

Then the carbon factor was there also. I know what to do there, and if I may brag on myself a moment, I think this was the finest cut on a carbon steer tube I've ever made. It looked factory fresh when I was finished, just like you'd want it to.

That fork install went well, and the trick there is to use some carbon paste on the plug for the steer tube so it doesn't pull up when you try to adjust the head set. That and greasing the parts of the plug that slide against each other, which also aids in the smooth operation of the plug. Preparation is 9/10's of the job, ya know? 

That front through axle thing bugged me and I ended up getting the Salsa Dead Bolt to go through the Paul hub with a little coercing. Man! How can two things be off so much from each other that they are nearly incompatible?  At least the correct through axle is being used on the fork now. Warranty recovered!

The next step was to get my new front wheel ready. I knew that I had a stack-o-rotors.......somewhere....but where?! I could not find them in the swirling vortex of parts and boxes and whatnot. Dang it! Another hitch in the process. But I did find a matching rotor on a wheel set I had hanging up that I am not using now. So, off it came, and on it went. Well, after cleaning, it went on. A little isopropyl bath does wonders. 

Then it was on to getting the brakes on the bike. I tell ya! That weird all-the-way through bolt set up on the Waxwing fork is both weird and ugly. But....it's the fork I have. So, since these bolts are really odd-ball, and - of course - Salsa does not provide you with any, the search was on. I was digging through everything I had for bolts and found only one. For the curious out there, the bolts that fit are typical "water bottle" bolt threaded and sized, but longer. A lot longer! 

Fortunately I have run fenders for so long that I have accumulated many longer M-5 bolts in my time as a rider and mechanic. That is why I found one stainless steel one. I had another, but it was way too long. In the end, I had to bust out my Dremel and saw off the longer bolt to fit. After a little careful dressing with a file, it was good to go. Another hurdle overcome.

But it didn't stop there. The rear brake takes extra short bolts, because - why not? So, I had to scrounge those up as well. Fortunately I have tons of shorter M-5 bolts laying about. But the difficulty level in getting these bolts to go into the calipers through the rear axle insert is about as hard as dealing with the rear-most bolt for a caliper on Gen I Fargo. In fact, you are best off removing the rear wheel for access. I'll get to the actual brake set up later where you have to have the rear wheel installed.....

So, on to the handle bar and stem. I measured, as I said before, and determined that I really needed a longer stem. I had a 90mm one that is off a Raleigh, maybe even the OG Tamland one, not sure, but it would do. Then a handle bar.... 

I dove into the pile of ancient flared drop bars I have and found my old Ritchey Venturemax bar. Those are the bars with that weird, bump in the drops, as you might recall. I always kind of liked those, so they went on the bike. 

After that, those gifted TRP levers went on there and I positioned those and tightened up the clamps. I have used a lot of Tektro/TRP stuff over the years so I was pretty sure I'd like these levers despite never having tried them before. 

Then it was on to installing the wheels and setting up the brake housings and cables. I decided on using an inline brake adjuster for the rear brake only. I don't use the rear brake a ton, but having an adjuster on the front end of the bike is nice when you have an adjuster at the caliper for the front brake as well. Just a weird preference I have. 

I then taped and zip-tied the housing for the rear down and taped and routed the front through the fork, as the Waxwing features a through-hole route for the front brake. These are cool and all, but if you run a hydraulic set up, they are a pain in the butt because you then have to bleed the front brake. 

Now it was time to set the brakes up. Man! having to reinvent the wheel, as it were, to set up brakes on this bike was a total pain, and then with the rear caliper bolt placement. gah! I had to check into the Paragon Machine works site to see how the rear caliper was to be mounted and learned that it did not need an adapter for the 160mm rotor. So, after about a half an hour of fiddling around with that I finally started making some forward progress again. 

Since you have to have the rear wheel in to set up the calipers in relation to the rotors, you have to be a very patient and flexible person to manipulate the hex key to get in there to loosen and tighten the bolts until you finally get that caliper where it needs to be. VERY fiddly! Not a fan of that design for that reason, but hopefully I don't have to get in there again any time soon.

After the brakes were all set up I then wrapped the bars. I had thought about using this magenta colored tape I have, but just as I was about to put it on I decided that it clashed with the pink color of the paint job. Too close and not contrasting enough. So, I removed the old (well - not very used) tape I had on that last gravel mutt Schwinn project and used it over. It was in almost-new condition, and I carefully wrapped it in the same direction and on the same sides as it was installed in before. 

Now I was on the home stretch. My thoughts turned to test riding, but..... I did not have the correct through axle for the rear wheel. But hey! I have several bikes. I wondered if one of them might have a through axle I could "borrow" for the time being. 

The Black Mountain Cycles through axle was no good. Different thread pitch. However; the one in the Standard Rando v2 did work. Cool! Now I had a chance to ride yet! I just needed to install bottle cages, set up the chain, and give everything the once-over. 

I ended up going with my tried and true chain choice for single speed - the ubiquitous and lowly SRAM PC-830. Not a "sexy" choice at all, but serviceable and I have a few spares which I could choose from. I selected a near-new one and popped it on. Then I adjusted the Paragon Machine Works sliding rear drop outs. If you have never used these, they are bomber and easy to adjust. But - you need an 8mm box end, a 5mm hex key, and a 4mm hex key to adjust them. So, not very "in-the-field" friendly to adjust, but if you remember a tool kit, make sure you have those three wrenches! 

Final adjustments were made and a recheck of all the fasteners was done. This thing was almost ready to go. Pedals installed, (old, beat to hell Shimano SPD's), and air in the tires. Test ride forthcoming....

Stay tuned for the final reveal tomorrow.....

Tuesday, March 05, 2024

Honeman Flyer Update: The Frame Arrives - Problems Begin!

What's in the box?
 Well, finally the Honeman Flyer is in my hands. Now to get to building it up, but as I have stated several times when doing frame/fork builds, there are always hiccups. This would be the case right out of the box with this frame. 

My main worry ahead of getting this was whether or not the Salsa Cycles Waxwing fork would show up with a steer tube plug which is the piece that takes the place of a star nut in an aluminum steer tube. Carbon fiber steer tubes are not a place where a star nut should be used, although I have heard of it being done before. Whatever... You go on with yer bad self!

I would never consider doing such a thing, so it was paramount that the steer tube plug come with the fork. I knew that most carbon fiber forks are supplied with this part, but I had the Waxwing fork sent directly to King Fabrications to save time, so I did not have the chance to see if there was a plug nor did I have the chance to squirrel it away. I was trusting that King Fab would send it. 

Once I opened the box I found that the plug had been inserted into the steer tube so that was good! Now on to the Lab and parts installation. But first......let's weigh the thing, shall we? Yes, let us do that... 

And it weighed in at 4.10lbs. That's without the fork, by the way. That's pretty dang light, and the frame tubing sounds pretty thin gauged when I ping it. Woo! This was maybe pushing the limits for a single speed design and a guy my weight. But let's go!

The contents of the box unwrapped.

First Impressions: Well, to be honest, I've seen so many images of this bike there wasn't much to leave to the imagination. The aforementioned weight was what impressed me the most. The fork weighs next to nothing as well, but we all would expect that these days with carbon fiber. One thing about the Paragon sliding through axle drop outs was a bit of a surprise and that was that the non-driveside drop out (is it a "drop out" if it is a through axle plate?) has the place for the flat mount brake as part of the drop out. In other words, there is no direct connection of the brake to the frame itself. 

This means that the non-driveside chain stay has a full-length run from the bottom bracket shell to the connection to the seat stay. I once heard Joe Breeze theorize that longer frame members have a more comfortable (flexier) ride quality. We will see how this plays out on this bike. A single speed and a flexy rear end? Might not work well. This is something to look into later. 

As I suspected the logos are masked off and clear-coated over to show the raw steel. The head badge is brass brazing material, as is the serial number plate which is stamped "CG001". I assume that to mean "Custom Gravel 001". The paint is pretty cool. It isn't as thick as I thought it would be. In fact, I think it is actually pretty thin. There is one place on the top tube, near the seat tube, over toward the drive side, where there is raw steel showing, as if the paint wasn't applied in that small patch. Odd..... I may do something there to make it look intentional. 

Problems Crop Up: The first thing I wanted to do was to find a seat collar, and I had a black Salsa one identified as a candidate. It was a typical-for-steel frames 30.0mm size, but the frame tubing on the Honeman Flyer is so thin that this was too big! And so was anything else I had. Dang it! Right out of the box I was thwarted. 

I gently clamped the frame by the seat tube with a terry cloth rag in the stand's jaws. Then I tried the through axle I guessed the length of and yep! Too long! Batting a thousand so far. I then tried to fit the crown race on the Waxwing fork and what the..... Oh! I was dealing with an integrated crown race. Cool....cool. that head set would work then. Okay.... There is something going right here at least. 

Borrowed from a coworker.

I left for work and asked my coworker Carl if he had any nicer seat collars squirreled away and he did. One was a 28.6mm AC Components anodized red collar, probably for a BMX bike. But he let me take it home and it actually worked, which was a good thing since I just ordered a Wolf Tooth black anodized one in the same size from Jenson USA along with the correct through axle, also Wolf Tooth. 

Later on I mocked up the build with a stubby stem, Cowbell bar, my Tamer seat post, WTB Volt saddle, and I sat on this thing for the first time. (Oh! Both wheels were temp fitted with the rear using the too-long through axle) Amazingly, I think I may need a 90mm stem on this thing! I should also mention that the stock Dead Bolt through axle from Salsa would not fit the brand new Paul Components front hub! Yeah... Weird. Fortunately I had a spare Paragon Machine works axle that fit perfectly in the fork and the hub. I suppose this voids the Salsa warranty.....

Checking angles with the wheels fitted I found that the seat tube, which was supposed to be a 70° is reading out at a bit steeper than 69° and the head tube, which was supposed to be 71° is dead on. This was measured with an app on my iPhone. So, this will be pretty true to the design manifest for a modernized 1930's track bike. 

More soon....

Monday, March 04, 2024

Honeman Flyer: Parts

Image courtesy of Erik Mathy
I thought Friday would be the day I got my mitts on my King Fabrications Honeman Flyer, but that was delayed until today. In fact, it was tracked in town on Saturday, at the UPS distribution center, but it won't show up at the delivery spot until this afternoon. (Maybe by the time that you read this.) 

So, while I thought I might be sharing images of the completed build today, I instead will be building it today. The bike, that is, and until that finishes up, I thought I'd share some of the parts that are going into this. 

My personal build procession goes something like this: Fit the seat collar, insert the seat post, hang the frame by the post in the work stand. Then I fit the head set and put the fork on with a stand-in set of spacers and a stem. 

Next is getting the threads chased in the bottom bracket shell, (if needed), and then fitting the bottom bracket and crankset. On a single speed I would then fit the wheels, brake calipers, and turn my attention to the cockpit with a lot of measuring and finally cutting down of the steer tube. Then I would fit the saddle, the final stem, handle bar, brake levers, and set up the brakes. I then would wrap the bars. I don't know why, but the chain is almost always the last thing I put on a bike I build. 

Weird, but maybe that's just me. 

I chose a Cane Creek head set for this build. I think black anodized parts work best to highlight this wild paint job on the bike. I just so happened to have had a Cane Creek 40 head set for a 44mm head tube on hand that was new. 

Honestly, the brand of head set doesn't matter that much to me. Cane Creek is good. Wolf Tooth is great, especially if you want color. Chris King is bling, but again, only if you want anodized colors. Black? Heck..... At that point a Cane Creek is hard to beat. So, I think it will likely stay in there as long as I have this bike, and I doubt I'll ever have to service it or do anything but clean the outside once in a while. 

The Honeman Flyer was built to accept a 27.2mm seat post by King Fabrications. That's the "standard" size for gravel these days, and there are a TON of choices I could have gone with. 

My conundrum with the Honeman Flyer was with the design. It's based on a 1930's track bike design, which back in those days used a seat post with a brazed forward extension and a very slack seat tube angle. This set up had the appearance of a stem for a handle bar. The extension would be fitted with a clamp. That clamp could slide fore and aft to allow for different positions for different riders. During my research on 1900's to mid-century track bikes, I learned that these forward extended seat posts and stems were done because many times racing bicycles were so expensive that sometimes several riders would use the same machine. The sliding saddle and handle bar set ups allowed for the precise fitment of different riders. 

Okay, so back to 2024. The Honeman Flyer has a slack, 70° seat tube. Generally I ride 73° seat tube angled bikes and a fair amount of saddle set-back using set-back seat posts. To get in approximately the same position on the Honeman Flyer as I would on my other gravel bikes, I would necessarily need a 0 degree set back post to have any chance of getting the angle right. 

That led me to an old friend in the parts bin. A carbon fiber Tamer seat post from the late 1990's/early 00's. When I last used this, oh....maybe 12 -15 years ago, I remember it being pretty flexy and comfortable. The Honeman Flyer will have less exposed seat post than almost any bike I have other than maybe the Twin Six Standard Rando v2, so this Tamer post should do the trick for me. 

Wolf Tooth is represented on the build by their Morse Cages and rear through axle. I love Wolf Tooth's B-Rad rails that allow me to move water bottle mounting points around on my various bikes, but the Morse Cage also allows for several mounting options as well. 

I've never used the stainless steel Morse Cages so I am curious to see how they will handle the rigors of gravel riding. They look pretty well thought out and the construction looks top-notch. I'll be reviewing them in the future so stay tuned for my thoughts on them coming in the following weeks and months. 

The rear through axle should work well, as long as I picked the right length one! I had to take a stab in the dark since I don't have the frame in front of me to measure things and King Fab didn't give me those precise dimensions when I asked either. So......we will see

Wheels Manufacturing got the nod for the SRAM compatible bottom bracket. (Not DUB! yecch!) This particular version they sell has Enduro bearings, (GOOD!), and a double-row bearing on the drive side cup. Plus these are angular contact bearings, which should be better for the rigors that a bottom bracket will see. 

It was spendy but I think it will be worth it. Yes......it is not black! That wasn't an option, and anyway - who looks at bottom brackets? They are hidden behind crank sets and covered in dust. It'll be fine. Don't worry about it!

I'll be inserting my SRAM Rival crank with a 40T ring on it, so this is why I chose this particular bottom bracket. I gave some thought to doing a full-on Enduro Max-Hit bottom bracket, but those are even more expensive and maybe when this wears out, well, we will see.... I suspect this one will last quite some time. 

How could I not include these sleek, black levers I received from "Charlie", a blog reader here, who gifted these like-new levers for the build. (Maybe they are new? Don't know)

The TRP design is the very same that I was thinking of using anyway, and these fit the design manifesto like a hand in glove. All black and shiny!

These will be pulling cable in Jagwire black housing which in turn will work against the flat mount TRP Spyre calipers, so it all makes for a fitting system. 

Rotors will be six bolt SRAM affairs due to the WORD Disc not having Center Lock capabilities. Otherwise I might have used TRP rotors here as well. 

Okay, that's a big part of the build right there and hopefully by tomorrow I should have some build images to share. I was afeard that this all would come down to a short time span before Mid-South, and this is about as minimal, in terms of time, as I would feel comfortable with. I sure hope it all falls into place as planned, because if it doesn't, I think it will be time to push the panic button. Especially if I have to order in more parts. 

Stay tuned......