Showing posts with label Tubeless 101. Show all posts

Thursday, November 18, 2021

A Skinflint's Guide To Tubeless Products

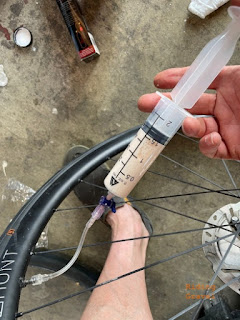
Setting up tires tubeless soon? (Image courtesy of Grannygear)
 I saw someone Tweeting the other day about how tubeless rim tape is a 'rip-off' when cheaper tapes exist and can be used to 'get the job done'. This subject is something I find near and dear to my heart, because I have several years of tubeless usage under my belt, have set up hundreds of tires tubeless, and I have used just about every combination of components imaginable. 

I also like cheap, well performing solutions. I do not like cheap, poor performing solutions when more expensive, readily available solutions exist. To my way of thinking, there is 'cheap for the sake of being cheap', and then there is 'being smart cheap'. I prefer to be found in the latter category. 

And I will say right up front here that not everything I am going to suggest today is "the cheapest solution" because just spending the least amount of money is not the goal here. You can always find 'cheaper', but cheaper and smarter, and better? That's more than just being cheap. That counts for more than spending the least amount possible. 

So, keep your, "But this is cheaper here" comments to yourself. I'm talking about something completely different here. Less money spent is good, but it has to also be readily available, easy to use, and work as well as, or better than, what is offered in retail bicycle channels. Okay? 

Okay.....

Tubeless Tapes: Let's start with tubeless tape. Right off the bat I'm going to nix any fabric based tape solution off this list, and yes, that includes Gorilla Tape. That stuff I have tried, and I know its failure modes well, and I also know it is a complete pain in the butt to remove from a rim. So, it isn't smarter, and it isn't better, and it is not easier. Not when it comes to failures and maintenance. So, no..... No fabric based tapes. There are a LOT better ways to go. 
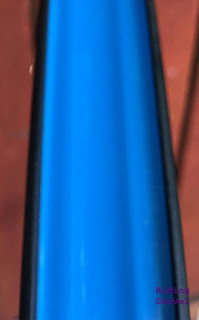
The best tape is polypropylene
"Real" tubeless rim tapes that are really good which have been adopted by the bicycle industry are made from polypropylene. They have a rubberized adhesive back which sticks to metal. They have stretching characteristics, and they have a high tensile strength. These types of tapes are resistant to sealants, come off easily, and require little to no clean up after being pulled from a rim. 

The bicycle industry did not develop their own tape when they came up with tubeless tape. So, where did they get it from? Find that out and you will have saved yourself a bit of money buying essentially the same product and cutting out the bicycle industry. This is smarter, better, and easier than futzing with fabric based tapes that aren't as good. (Even though they may be cheaper.) 

It's pretty widely known that the most commonly seen 'yellow tape' used on many wheels is Tessa model 4289 tape. In fact, some wholesale sites which sell this tape tout its being the same thing as the bicycle industry uses. So, there ya go. 

Another alternative I've seen mentioned which looks similar to some tubeless tapes I've seen and used, (in particular, a brand with the color name "orange" in it) is this tape here. I cannot say it is the exact stuff, or even close to the same, but I have heard about it being used as an alternative to Tessa 4289 tape. In my opinion, it looks like that Kapton tape is really similar to what the bicycle industry uses and in my opinion it isn't quite as good as the yellow stuff, but you know- maybe it'll work for ya. 

Another thing or two I've heard about- Electrical tape. Seems iffy to me. Not very smart, probably prone to failure due to the adhesive, and probably a mess to clean up. I've used this solution as a rim strip for tubed set ups with some success, but electrical tape gets moved around easily and scarred by tire levers. But hey.... I've also heard people use this tape under Gorilla Tape. Seems like a way to make the already too thick Gorrilla Tape even thicker. Again- I think it isn't a smart way to go. 

Get-choo-sum
Sealants: Okay, here you go folks. This is a solution I was turned on to by my brother MG down Lincoln, Nebraska way. He came up with this formula and the ingredients on his own. I've used this with great success for over a decade now. It is modifiable, adjustable in consistency, and does as well as any sealant I've ever tested, and I've tested them all, pretty much. 

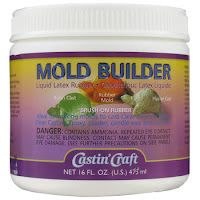
So, get this Latex Mold Builder from a craft store.  Get this wind shield washer solvent, (or anything based on this, really) and a container to seal up your mixture in that won't leak through the lid. (Recycle something here, cost little to nothing) Now you are in a 20 spot total, but you have the makings for a tubeless tire solution which can make enough for several sets of 29"er wheels. Mix three heaping table spoons of the mold builder with around 4 ounces of wind shield washer solvent, shake vigorously until well mixed in a closed container, and you are done. 

You can store this stuff relatively indefinitely. You can 'thin it out' or 'thicken it up' accordingly. Just adjust the viscosity with the washer solvent amount. You can add glitter to seal bigger holes, or granular acrylic beads would work too, (but that would cost more). Anyway, rock on with that sealant. It's cheaper and it works. 

When it dries up, it does so in a 'skin', much like its orange colored retail counterpart. It's way easy to clean up, and it typically does not clog up valves. Again- I have years of experiences using this formula and MG has been using it longer than I have. Do I use other traditional bicycle sealants? Yes. Are any of these 'better' than this? A couple are, a little bit maybe, but this stuff is as good than the most popular sealants and a lot better than many I have tried. 

Other Stuff: You will notice that injector image from Grannygear above. Those are nice and you can score a really well made one from KOM Cycling here. I mean, you can probably find something cheaper, but is it any better? I don't know. Here I would just spend the slightly less than 20 bucks and get the KOM injector. Especially since you get a quality valve core tool with it. I suppose you could go with this knock-off from Amazon and save a few bucks. 

Tubeless valve stems are all over Amazon for between 10 and 15 bucks, some come with valve core removal tools. See a bunch of that here. Need an extra boost of air to set up your tires but you don't have an air compressor? This MilKit system has been tested by RidingGravel.com and works pretty well. It's far cheaper than an air compressor. You can probably find something similar for cheaper, but the MilKit works. Other options? Unknown...

Okay, that's a wrap. Got any questions or quality suggestions? Hit me up in the comments. 

A Skinflint's Guide To Tubeless Products

Setting up tires tubeless soon? (Image courtesy of Grannygear)
 I saw someone Tweeting the other day about how tubeless rim tape is a 'rip-off' when cheaper tapes exist and can be used to 'get the job done'. This subject is something I find near and dear to my heart, because I have several years of tubeless usage under my belt, have set up hundreds of tires tubeless, and I have used just about every combination of components imaginable. 

I also like cheap, well performing solutions. I do not like cheap, poor performing solutions when more expensive, readily available solutions exist. To my way of thinking, there is 'cheap for the sake of being cheap', and then there is 'being smart cheap'. I prefer to be found in the latter category. 

And I will say right up front here that not everything I am going to suggest today is "the cheapest solution" because just spending the least amount of money is not the goal here. You can always find 'cheaper', but cheaper and smarter, and better? That's more than just being cheap. That counts for more than spending the least amount possible. 

So, keep your, "But this is cheaper here" comments to yourself. I'm talking about something completely different here. Less money spent is good, but it has to also be readily available, easy to use, and work as well as, or better than, what is offered in retail bicycle channels. Okay? 

Okay.....

Tubeless Tapes: Let's start with tubeless tape. Right off the bat I'm going to nix any fabric based tape solution off this list, and yes, that includes Gorilla Tape. That stuff I have tried, and I know its failure modes well, and I also know it is a complete pain in the butt to remove from a rim. So, it isn't smarter, and it isn't better, and it is not easier. Not when it comes to failures and maintenance. So, no..... No fabric based tapes. There are a LOT better ways to go. 

The best tape is polypropylene
"Real" tubeless rim tapes that are really good which have been adopted by the bicycle industry are made from polypropylene. They have a rubberized adhesive back which sticks to metal. They have stretching characteristics, and they have a high tensile strength. These types of tapes are resistant to sealants, come off easily, and require little to no clean up after being pulled from a rim. 

The bicycle industry did not develop their own tape when they came up with tubeless tape. So, where did they get it from? Find that out and you will have saved yourself a bit of money buying essentially the same product and cutting out the bicycle industry. This is smarter, better, and easier than futzing with fabric based tapes that aren't as good. (Even though they may be cheaper.) 

It's pretty widely known that the most commonly seen 'yellow tape' used on many wheels is Tessa model 4289 tape. In fact, some wholesale sites which sell this tape tout its being the same thing as the bicycle industry uses. So, there ya go. 

Another alternative I've seen mentioned which looks similar to some tubeless tapes I've seen and used, (in particular, a brand with the color name "orange" in it) is this tape here. I cannot say it is the exact stuff, or even close to the same, but I have heard about it being used as an alternative to Tessa 4289 tape. In my opinion, it looks like that Kapton tape is really similar to what the bicycle industry uses and in my opinion it isn't quite as good as the yellow stuff, but you know- maybe it'll work for ya. 

Another thing or two I've heard about- Electrical tape. Seems iffy to me. Not very smart, probably prone to failure due to the adhesive, and probably a mess to clean up. I've used this solution as a rim strip for tubed set ups with some success, but electrical tape gets moved around easily and scarred by tire levers. But hey.... I've also heard people use this tape under Gorilla Tape. Seems like a way to make the already too thick Gorrilla Tape even thicker. Again- I think it isn't a smart way to go. 

Get-choo-sum
Sealants: Okay, here you go folks. This is a solution I was turned on to by my brother MG down Lincoln, Nebraska way. He came up with this formula and the ingredients on his own. I've used this with great success for over a decade now. It is modifiable, adjustable in consistency, and does as well as any sealant I've ever tested, and I've tested them all, pretty much. 

So, get this Latex Mold Builder from a craft store.  Get this wind shield washer solvent, (or anything based on this, really) and a container to seal up your mixture in that won't leak through the lid. (Recycle something here, cost little to nothing) Now you are in a 20 spot total, but you have the makings for a tubeless tire solution which can make enough for several sets of 29"er wheels. Mix three heaping table spoons of the mold builder with around 4 ounces of wind shield washer solvent, shake vigorously until well mixed in a closed container, and you are done. 

You can store this stuff relatively indefinitely. You can 'thin it out' or 'thicken it up' accordingly. Just adjust the viscosity with the washer solvent amount. You can add glitter to seal bigger holes, or granular acrylic beads would work too, (but that would cost more). Anyway, rock on with that sealant. It's cheaper and it works. 

When it dries up, it does so in a 'skin', much like its orange colored retail counterpart. It's way easy to clean up, and it typically does not clog up valves. Again- I have years of experiences using this formula and MG has been using it longer than I have. Do I use other traditional bicycle sealants? Yes. Are any of these 'better' than this? A couple are, a little bit maybe, but this stuff is as good than the most popular sealants and a lot better than many I have tried. 

Other Stuff: You will notice that injector image from Grannygear above. Those are nice and you can score a really well made one from KOM Cycling here. I mean, you can probably find something cheaper, but is it any better? I don't know. Here I would just spend the slightly less than 20 bucks and get the KOM injector. Especially since you get a quality valve core tool with it. I suppose you could go with this knock-off from Amazon and save a few bucks. 

Tubeless valve stems are all over Amazon for between 10 and 15 bucks, some come with valve core removal tools. See a bunch of that here. Need an extra boost of air to set up your tires but you don't have an air compressor? This MilKit system has been tested by RidingGravel.com and works pretty well. It's far cheaper than an air compressor. You can probably find something similar for cheaper, but the MilKit works. Other options? Unknown...

Okay, that's a wrap. Got any questions or quality suggestions? Hit me up in the comments. 
Tuesday, October 19, 2021

Reader Mail: How To Clean Up A Tubeless Tire For Re-Mounting

Mess of old sealant to get off. How do you do it?
 Readers sometimes send in questions, sometimes I get a comment on a post, and these questions and comments are best answered in a blog post. I'll tag such posts as "Reader Mail". Here is the latest.....

This is the first in what should have been a long time running series here, but, ya know, sometimes I'm thick-headed when it comes to thinking about features for this blog. Anyway... Here is today's question from reader "S.C." (Note- The question was lightly edited for clarity)

 "I use Orange Seal for my tubeless bikes and spend a lot of time getting the old sealant off the bead of the tire. What do you use? I have used alcohol, Scotch Brite and rubbing my fingers back and forth, which works pretty good, but makes my fingers raw after a while. I have now 3 bikes with tubeless and I start to cringe when I think of replacing the sealant and cleaning the tires."

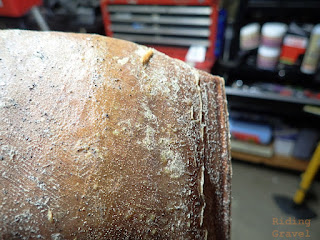
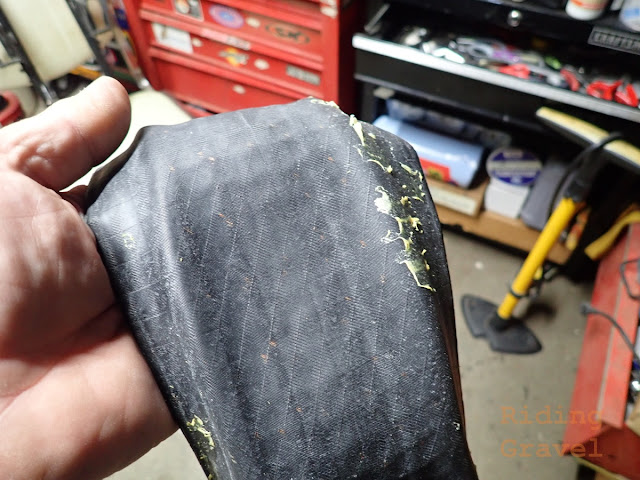
Cleaning up a tubeless tire after it has been used a while is smart maintenance. First of all, if you just keep jamming sealant into a tire when your sealant dries out, your tire is going to end up looking kind of like this one here to the left. That is not a good look! Plus it makes your set up heavier and less capable of sealing a puncture. 

So, the best call is to look at your tubeless tires at least once every six to twelve months by at least pulling a bead and cleaning things up- if necessary. Not every sealant dries up similar to another. For instance, Stan's often dries up into these clumps a lot of people refer to as "Stanimals". They are wet, slimy, and often a wet, slimy residue is left inside a Stan's sealed set up. In that case, a good cleaning with a rag and isopropyl alcohol is all you'll need to do there. Oh....and discard the Stanimal! 

An example where I probably wouldn't worry about cleaning off the old sealant.
Other sealants dry into thin, crusty skins. These are the least bothersome, and typically I don't even worry about the cleaning of those types of sealant, as long as the bead area is smooth. But you can sometimes get that sealant off with a brush and Monster Energy drink, in the the original flavor. (Yes, really. I've done it.) <===You probably can do the same thing, with less drama, using warm soapy water, by the way.

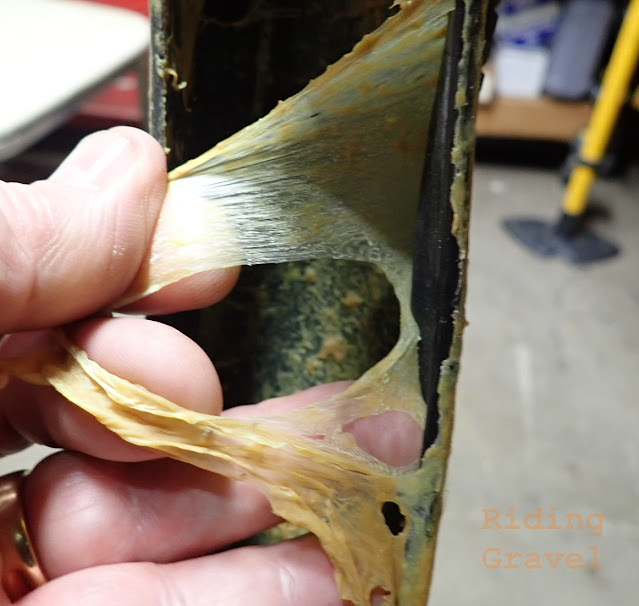
Then there are the sealants where you get a 'skin'. Kind of like peeling off a stretchy sticker, or a Sunburned patch of skin. I usually just do the peeling thing. It can be soooo satisfying! I don't know why that is. Anyway.... The bead area can be the hardest part of cleaning off a sealant like that, and our Reader Mail question today refers to just such a sealant. 

Orange Seal, when it dries out, does leave a 'skin' and you can peel it off. But as our question today reveals, getting this off from the bead to leave a clean area to seal against your rim is hard. This is important to achieve though, because leaving old sealant on a bead area invites a place for sealant to leak, or make your set up more difficult than it needs to be. A thin layer of dried sealant on the casing is really no big deal. I wouldn't even worry about that. But the bead area is a critical area to clean. So, just how do I get a bead area cleaned up? 

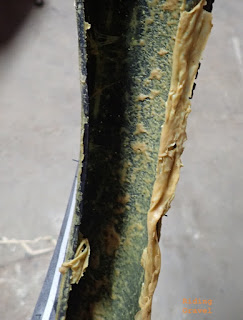
I decided to use this gross old sealant clogged tire as an example for today's post.

For my example today I used an old Terrene Honali tire I tested for RidingGravel.com a few years back. (Standard Disclaimer) This tire was run with my 'home made sealant' which dries up a lot like Orange Seal does. I used a ton of sealant in this tire over a fairly long period of time without cleaning it up. You can see the disgusting results! My task to answer today's question was to see how long it would take to clean up this tire to a state where I would feel comfortable using it on a new tubeless set up again. 

The main bit I had peeled out in five to ten minutes. The beads took a little longer, but I found a tool which sped up the process, and I think this will be something a lot of you can do at home which will help you get a tire cleaned up in a jiffy. 

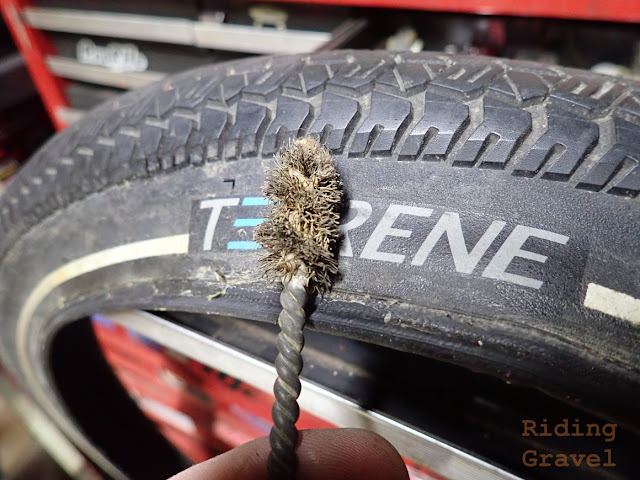
This plumber's wire brush soldering tool worked a trick.

I had a wire brush which plumbers use for soldering, but you probably could use any wire bush made with finer gauge wire. Gently, and I mean gently, scrub the beads of the tire where sealant has built up until it balls up or an edge peels back. Then grab that and peel away as much as you can. Repeat as necessary. It is very important that you don't scrub so hard you cut into the rubber! You won't need to use much pressure as the wire will pull up the sealant easily. 

You don't need to have it 100% clean. This is good to go on to another rim now.

 I wouldn't use a motorized drill type set up either. Just go by hand and be gentle! My results were very satisfactory and the entire tire took about 15 minutes from start to finish to clean up to a point that I felt comfortable with remounting it. And you can see how mucked up it was to start out with! That went 360°, by the way. It wasn't just on one side of the tire. 

Obviously the best practice is to not let sealant dry out 100% and then it cleans up initially with a rag, then some soapy water, and a follow up with a dry rag. But sometimes you don't catch it that way and it ends up all dried up. Then you can use these tips to get that tire ready for remounting and a new dose of sealant. And by the way, while you are in there, replace your tape, valve core, or the entire valve. It isn't worth trying to reuse these things if they look even the tiniest bit 'iffy'. I replace tape before remounting any tires and I replace valve cores every six months religiously. Cheap insurance!

I hope this helps! If you have further tips, leave them in the comments. Also, I take questions for future Reader mail posts at g.ted.productions@gmail.com. 

Thanks!

Reader Mail: How To Clean Up A Tubeless Tire For Re-Mounting

Mess of old sealant to get off. How do you do it?
 Readers sometimes send in questions, sometimes I get a comment on a post, and these questions and comments are best answered in a blog post. I'll tag such posts as "Reader Mail". Here is the latest.....

This is the first in what should have been a long time running series here, but, ya know, sometimes I'm thick-headed when it comes to thinking about features for this blog. Anyway... Here is today's question from reader "S.C." (Note- The question was lightly edited for clarity)

 "I use Orange Seal for my tubeless bikes and spend a lot of time getting the old sealant off the bead of the tire. What do you use? I have used alcohol, Scotch Brite and rubbing my fingers back and forth, which works pretty good, but makes my fingers raw after a while. I have now 3 bikes with tubeless and I start to cringe when I think of replacing the sealant and cleaning the tires."

Cleaning up a tubeless tire after it has been used a while is smart maintenance. First of all, if you just keep jamming sealant into a tire when your sealant dries out, your tire is going to end up looking kind of like this one here to the left. That is not a good look! Plus it makes your set up heavier and less capable of sealing a puncture. 

So, the best call is to look at your tubeless tires at least once every six to twelve months by at least pulling a bead and cleaning things up- if necessary. Not every sealant dries up similar to another. For instance, Stan's often dries up into these clumps a lot of people refer to as "Stanimals". They are wet, slimy, and often a wet, slimy residue is left inside a Stan's sealed set up. In that case, a good cleaning with a rag and isopropyl alcohol is all you'll need to do there. Oh....and discard the Stanimal! 

An example where I probably wouldn't worry about cleaning off the old sealant.
Other sealants dry into thin, crusty skins. These are the least bothersome, and typically I don't even worry about the cleaning of those types of sealant, as long as the bead area is smooth. But you can sometimes get that sealant off with a brush and Monster Energy drink, in the the original flavor. (Yes, really. I've done it.) <===You probably can do the same thing, with less drama, using warm soapy water, by the way.

Then there are the sealants where you get a 'skin'. Kind of like peeling off a stretchy sticker, or a Sunburned patch of skin. I usually just do the peeling thing. It can be soooo satisfying! I don't know why that is. Anyway.... The bead area can be the hardest part of cleaning off a sealant like that, and our Reader Mail question today refers to just such a sealant. 

Orange Seal, when it dries out, does leave a 'skin' and you can peel it off. But as our question today reveals, getting this off from the bead to leave a clean area to seal against your rim is hard. This is important to achieve though, because leaving old sealant on a bead area invites a place for sealant to leak, or make your set up more difficult than it needs to be. A thin layer of dried sealant on the casing is really no big deal. I wouldn't even worry about that. But the bead area is a critical area to clean. So, just how do I get a bead area cleaned up? 

I decided to use this gross old sealant clogged tire as an example for today's post.

For my example today I used an old Terrene Honali tire I tested for RidingGravel.com a few years back. (Standard Disclaimer) This tire was run with my 'home made sealant' which dries up a lot like Orange Seal does. I used a ton of sealant in this tire over a fairly long period of time without cleaning it up. You can see the disgusting results! My task to answer today's question was to see how long it would take to clean up this tire to a state where I would feel comfortable using it on a new tubeless set up again. 

The main bit I had peeled out in five to ten minutes. The beads took a little longer, but I found a tool which sped up the process, and I think this will be something a lot of you can do at home which will help you get a tire cleaned up in a jiffy. 

This plumber's wire brush soldering tool worked a trick.

I had a wire brush which plumbers use for soldering, but you probably could use any wire bush made with finer gauge wire. Gently, and I mean gently, scrub the beads of the tire where sealant has built up until it balls up or an edge peels back. Then grab that and peel away as much as you can. Repeat as necessary. It is very important that you don't scrub so hard you cut into the rubber! You won't need to use much pressure as the wire will pull up the sealant easily. 

You don't need to have it 100% clean. This is good to go on to another rim now.

 I wouldn't use a motorized drill type set up either. Just go by hand and be gentle! My results were very satisfactory and the entire tire took about 15 minutes from start to finish to clean up to a point that I felt comfortable with remounting it. And you can see how mucked up it was to start out with! That went 360°, by the way. It wasn't just on one side of the tire. 

Obviously the best practice is to not let sealant dry out 100% and then it cleans up initially with a rag, then some soapy water, and a follow up with a dry rag. But sometimes you don't catch it that way and it ends up all dried up. Then you can use these tips to get that tire ready for remounting and a new dose of sealant. And by the way, while you are in there, replace your tape, valve core, or the entire valve. It isn't worth trying to reuse these things if they look even the tiniest bit 'iffy'. I replace tape before remounting any tires and I replace valve cores every six months religiously. Cheap insurance!

I hope this helps! If you have further tips, leave them in the comments. Also, I take questions for future Reader mail posts at g.ted.productions@gmail.com. 

Thanks!

Wednesday, April 29, 2020

Tubeless 101: Part 4

Tubeless set ups are not as straightforward as you'd hope.
With this post I am going to end the series on basic bicycle tubeless tire knowledge I use for setting up gravel road tubeless tires/wheels. Some of these tips cross over to mountain bikes and fat bikes, but be aware that things like single wall rims (fat bikes) and "cush core inserts", (mountain bikes) require certain tips and tricks outside of the parameters of my series. For most "basic" needs though, these tips and tricks should suffice. Part One is here, Part Two is here, and Part Three is here. Go back and see these previous posts before asking any questions. Thanks. And......if you haven't already had this drilled into you enough already......

 Tubeless tires are not for everyone, nor do you need tubeless tires in many cases. And also: Tubeless tire set ups are not only more technical and maintenance intensive, but more expensive as well.

Now here's the kicker: Not all tubeless tires fit the rims they are designated to fit, and there is (almost) no way of knowing based upon manufacturers recommendations. 

That's right folks. You may buy a 700c tubeless ready tire, you may have a 700c tubeless ready wheel set, and those tires may not work on those rims. Sound wacky? It totally is, and this has been how things have worked since tubeless tires for bicycles came about. So, how does one navigate the 'wild, wild West' of the tubeless tire/rim world? 

By trial and error- that's how. So, not only does all this tubeless tire stuff cause MORE maintenance, and COST MORE, it may not even work!  Admittedly, this is rarer than it used to be, but it still happens. Reasons are several, but the main ones are:
  • Differences In Wheel Bead Seat Diameter vs Tire Bead Diameter: Tires and rims only have to be off fractional amounts between the two to make things miserable. Stan's rims have their own diameter (slightly larger) and Hutchinson/Vittoria/Mavic/Michelin tires have more UST based diameters (slightly smaller) for tires. Never the twain shall meet. While those are the most glaring offenders, there are others as well. There is almost no information out there at a retail level to protect you from making the mistakes that could cause you a nightmare. 
  • Super-Light Tire Sidewall Construction Leading To Casing Leakage: You may get past the first hurdle only to find that the tires you chose leak sealant through the sidewalls of the casing. This is most notable as a shiny appearance to the tires, and in worst case scenarios, the tire will actually bubble sealant right through the pores of the casing. Sometimes a dosage of more sealant will cure this- but sometimes leaks keep popping up. Beware of tires sporting lightweight claims, XC racing tires for MTB, and certain brands which have histories of doing this. 
  • Tire Tread/Casing Separation: This is a lot less common today than it used to be, but we are still seeing this. Maxxis and Kenda tires have been noted for this in the past. It also will happen more commonly where people use folding bead, non-tubeless tires as tubeless. It usually occurs after you've had the tires a while. The issue is caused by sealant incompatible casing materials which sometimes sneak into a brand's tire casings (or are naturally used in non-tubeless folding bead tires never meant for tubeless set ups) via their factories. If a company changes a factory in the Far East, for whatever reason, this might start happening where it didn't before. Consumers have no way of seeing this coming. 
Use all the resources at your disposal before you jump and buy in.
So, what do you do? Well, as I said, things are not as bad as they were ten years ago, but things are not as straightforward as you'd hope they would be. If you are sitting on the fence yet, here are some recommendations that will help you navigate this minefield more successfully.
  • Use A System: If you have tubeless ready wheels, try to stick with tires from the same manufacturer if they are available. For instance, many bikes come with WTB rims. WTB makes really great tubeless ready tires. Matching the tires to the rims almost always makes for a great tubeless set up. Specialized, Bontrager/Trek, and Giant all have OE spec tubeless ready wheels on many of their bikes and tires to go with them too. 
  • Use Your Local Bike Shop's Knowledge: Got a wrench in your area that knows his stuff and has been around a while? Talk to them and get the knowledge that a guy/gal has that has worked with a lot more tires and wheels than you'll likely ever see in your lifetime. Then, after you gain some hard won knowledge from them, buy something from that shop
  • Research Your Choices: The forums, review sites, and Facebook can be a resource, but extreme caution is advised. Look for trends in commentary, and try to find consistency in comments and advice. Be careful of just wanting your choices to be validated. Cross check with your local bike shop knowledge, and if it is not a systemic approach, double your caution. 
So, let's say you have a tire and the wheels are all prepped properly. Now about mounting those things successfully. You'll know if you are going to have a successful tubeless set up pretty much right away if (a) your tires go on really hard by hand, or (b) if you have to use a tire lever to get that last bit of bead on inside the rim well. Chances are that if this is what you experience, and after you inject some sealant into the tire through the valve stem, that tire will pump up with any old crappy floor pump.

I've used this slightly modded Bontrager Charger pump several times for tubeless set ups.
In fact, I use a Bontrager Charger pump that was headed for the bin after being warranted as my litmus test. If I can pump up a tire tubeless on a rim with that poor old thing, then anyone can do it. I only modded the pump with a Silca pump head, but otherwise it is its bad, broken down self.

If you cannot move quite enough air to create a seal with a floor pump, then a small air compressor will usually do the trick. A short blast of air through a valve with the core removed generally will push the sidewalls out quickly enough to create a seal. I air up the tire- never higher than 40 psi to seat beads - and then slip the core back in, tighten it, then I finish off pumping up the tire.

If either one of those two things does not happen, I am sorry- but this is 2020. If tactics #1 and #2 fail- then that combination is a failure. Flat out. We should not have to bounce, strap, or do any sort of 'trick' outside of the first two things I have described here to get tires to set up anymore. Conversely, if you cannot even get to this point because the tire won't go on? Major Fail. Plain and simple. You need to try a different combination.

By the way, if your tire blows off the rim, that tire is instantaneously no good. Never try that tire tubeless again. It is unsafe. Period.

Now lets say you get that tire set up. You are not done yet. Take the wheel into your hand, lay the wheel/tire down on its side. Now pick up one end about four inches off the ground. Pivot the opposite end up, then drop it. Turn the tire about three degrees, pick up the other end and drop it. Repeat this process for three revolutions of the wheel, then flip the wheel and repeat. Then- if you can- go ride the wheel in a bike for about 15-20 minutes. This should distribute the sealant around the tire's innards enough to seal the casing and the tire should stay sealed now for a reasonable amount of time.

If you see trouble after this, most often it is related to the valve, valve core, or possibly a porous sidewall. Go back and start over.

Did I mention tubeless tires for bikes are more technical, more expensive, and not as easy as tubed systems?

Yeah.

Tubeless 101: Part 4

Tubeless set ups are not as straightforward as you'd hope.
With this post I am going to end the series on basic bicycle tubeless tire knowledge I use for setting up gravel road tubeless tires/wheels. Some of these tips cross over to mountain bikes and fat bikes, but be aware that things like single wall rims (fat bikes) and "cush core inserts", (mountain bikes) require certain tips and tricks outside of the parameters of my series. For most "basic" needs though, these tips and tricks should suffice. Part One is here, Part Two is here, and Part Three is here. Go back and see these previous posts before asking any questions. Thanks. And......if you haven't already had this drilled into you enough already......

 Tubeless tires are not for everyone, nor do you need tubeless tires in many cases. And also: Tubeless tire set ups are not only more technical and maintenance intensive, but more expensive as well.

Now here's the kicker: Not all tubeless tires fit the rims they are designated to fit, and there is (almost) no way of knowing based upon manufacturers recommendations. 

That's right folks. You may buy a 700c tubeless ready tire, you may have a 700c tubeless ready wheel set, and those tires may not work on those rims. Sound wacky? It totally is, and this has been how things have worked since tubeless tires for bicycles came about. So, how does one navigate the 'wild, wild West' of the tubeless tire/rim world? 

By trial and error- that's how. So, not only does all this tubeless tire stuff cause MORE maintenance, and COST MORE, it may not even work!  Admittedly, this is rarer than it used to be, but it still happens. Reasons are several, but the main ones are:
  • Differences In Wheel Bead Seat Diameter vs Tire Bead Diameter: Tires and rims only have to be off fractional amounts between the two to make things miserable. Stan's rims have their own diameter (slightly larger) and Hutchinson/Vittoria/Mavic/Michelin tires have more UST based diameters (slightly smaller) for tires. Never the twain shall meet. While those are the most glaring offenders, there are others as well. There is almost no information out there at a retail level to protect you from making the mistakes that could cause you a nightmare. 
  • Super-Light Tire Sidewall Construction Leading To Casing Leakage: You may get past the first hurdle only to find that the tires you chose leak sealant through the sidewalls of the casing. This is most notable as a shiny appearance to the tires, and in worst case scenarios, the tire will actually bubble sealant right through the pores of the casing. Sometimes a dosage of more sealant will cure this- but sometimes leaks keep popping up. Beware of tires sporting lightweight claims, XC racing tires for MTB, and certain brands which have histories of doing this. 
  • Tire Tread/Casing Separation: This is a lot less common today than it used to be, but we are still seeing this. Maxxis and Kenda tires have been noted for this in the past. It also will happen more commonly where people use folding bead, non-tubeless tires as tubeless. It usually occurs after you've had the tires a while. The issue is caused by sealant incompatible casing materials which sometimes sneak into a brand's tire casings (or are naturally used in non-tubeless folding bead tires never meant for tubeless set ups) via their factories. If a company changes a factory in the Far East, for whatever reason, this might start happening where it didn't before. Consumers have no way of seeing this coming. 
Use all the resources at your disposal before you jump and buy in.
So, what do you do? Well, as I said, things are not as bad as they were ten years ago, but things are not as straightforward as you'd hope they would be. If you are sitting on the fence yet, here are some recommendations that will help you navigate this minefield more successfully.
  • Use A System: If you have tubeless ready wheels, try to stick with tires from the same manufacturer if they are available. For instance, many bikes come with WTB rims. WTB makes really great tubeless ready tires. Matching the tires to the rims almost always makes for a great tubeless set up. Specialized, Bontrager/Trek, and Giant all have OE spec tubeless ready wheels on many of their bikes and tires to go with them too. 
  • Use Your Local Bike Shop's Knowledge: Got a wrench in your area that knows his stuff and has been around a while? Talk to them and get the knowledge that a guy/gal has that has worked with a lot more tires and wheels than you'll likely ever see in your lifetime. Then, after you gain some hard won knowledge from them, buy something from that shop
  • Research Your Choices: The forums, review sites, and Facebook can be a resource, but extreme caution is advised. Look for trends in commentary, and try to find consistency in comments and advice. Be careful of just wanting your choices to be validated. Cross check with your local bike shop knowledge, and if it is not a systemic approach, double your caution. 
So, let's say you have a tire and the wheels are all prepped properly. Now about mounting those things successfully. You'll know if you are going to have a successful tubeless set up pretty much right away if (a) your tires go on really hard by hand, or (b) if you have to use a tire lever to get that last bit of bead on inside the rim well. Chances are that if this is what you experience, and after you inject some sealant into the tire through the valve stem, that tire will pump up with any old crappy floor pump.

I've used this slightly modded Bontrager Charger pump several times for tubeless set ups.
In fact, I use a Bontrager Charger pump that was headed for the bin after being warranted as my litmus test. If I can pump up a tire tubeless on a rim with that poor old thing, then anyone can do it. I only modded the pump with a Silca pump head, but otherwise it is its bad, broken down self.

If you cannot move quite enough air to create a seal with a floor pump, then a small air compressor will usually do the trick. A short blast of air through a valve with the core removed generally will push the sidewalls out quickly enough to create a seal. I air up the tire- never higher than 40 psi to seat beads - and then slip the core back in, tighten it, then I finish off pumping up the tire.

If either one of those two things does not happen, I am sorry- but this is 2020. If tactics #1 and #2 fail- then that combination is a failure. Flat out. We should not have to bounce, strap, or do any sort of 'trick' outside of the first two things I have described here to get tires to set up anymore. Conversely, if you cannot even get to this point because the tire won't go on? Major Fail. Plain and simple. You need to try a different combination.

By the way, if your tire blows off the rim, that tire is instantaneously no good. Never try that tire tubeless again. It is unsafe. Period.

Now lets say you get that tire set up. You are not done yet. Take the wheel into your hand, lay the wheel/tire down on its side. Now pick up one end about four inches off the ground. Pivot the opposite end up, then drop it. Turn the tire about three degrees, pick up the other end and drop it. Repeat this process for three revolutions of the wheel, then flip the wheel and repeat. Then- if you can- go ride the wheel in a bike for about 15-20 minutes. This should distribute the sealant around the tire's innards enough to seal the casing and the tire should stay sealed now for a reasonable amount of time.

If you see trouble after this, most often it is related to the valve, valve core, or possibly a porous sidewall. Go back and start over.

Did I mention tubeless tires for bikes are more technical, more expensive, and not as easy as tubed systems?

Yeah.

Wednesday, April 22, 2020

Tubeless 101: Part 3

If you are re-using a previously mounted tire, make sure the bead area is clean!
Tubeless 101: Part 3

If you missed Part 1 or Part 2, please go back and review those posts as these are meant to be a series.

Last time I went over how to dismount a tire, I gave some tips on sealant recovery, and in this post I will discuss preparations for mounting either a previously used tire or a new tire on a freshly prepped rim.

The first order of business is to make sure that everything necessary for good seals inside your system are clean, fresh, and in good shape. I recommend that anything that looks suspect be replaced regardless of its age. You may have had that tubeless tape for only a few months, but trust me, if it looks the least bit compromised, it is far easier to deal with it now, when you have everything apart, than when it fails you on that 50 mile ride out in the middle of nowhere. Never mind the frustration of having done all that work to mount a tire and then having to peel it back off because you didn't decide to replace the tape, or put in a new, fresh valve stem. Trying to 'get by' can get you in trouble. And in my experience, it isn't worth the risk.

Remember folks: Tubeless tires are not for everyone, nor do you need tubeless tires in many cases. And also: Tubeless tire set ups are not only more technical and maintenance intensive, but more expensive as well.

Still determined to go tubeless? Okay, moving on now.......

Cleaning up a previously used tubeless tire for remounting.
 Cleaning up the old tires is a must for good tubeless set up. So I would concentrate on the area of the bead of the tire. The part that is to seal onto the rim is a critical point and must be free of old, coagulated sealant, or you risk a failure or a lot tougher time re-seating the tire on the rim. How you accomplish this clean up is going to depend upon what sort of sealant you had in there.

Orange Seal makes a "skin", as does Muc-Off No Hassle Puncture Protection Sealant. My "home brew" does as well. In these cases, a peeling off of the old sealant seems to work fine, but it can be a tedious job. Generally speaking, you may as well just do the entire inner casing. Other sealants, like Stan's or Caffe Latex don't make a skin, but will leave a layer of sealant, or coagulate into "stanimals" which you can easily remove. To get all the remaining layers of sealant out. you can scrub with warm water and soap, or....... A certain energy drink that comes in a black can with a green "M" on it will take off the sealant. Just pour some in the tire casing, slosh it around, and dump out the remaining sludge, wipe down, and you should be good to go. Really. It works, and I've tried it, but you can do it the traditional way if you'd like.

The next bit you need to have perfectly clean is the rim well. That is if your tape is the least bit compromised. I use rubbing alcohol to clean off any skin oils or dirt. Then I start re-taping the rim starting opposite from the valve hole. I always, always do two rounds of tape. The risk of having the tape fail in a spoke hole drilling is just not worth trying to get away with one round of tape. By the way, many OE tape jobs are just one round, so if your bike came with pre-taped wheels, best to check that out.

I like to use tape that goes all the way to the rim bead wall. Covering where the bead of the tire sits will not only give you a better seal, but it will make the tire fit tighter too. Running tape slightly too narrow, or tape that you have to run on one side, then another because it is too narrow, is a bad idea and will cause a leakage leading to failure eventually. Conversely, using tape that is too wide is obviously a bad way to go as well. Any wrinkling should be kept to a bare minimum and taking care in laying down the tape will reap dividends down the line.

Muc-Off tape, Orange Seal valve, in a Shimano GRX rim.
One technique that does work well, but takes extra time, is to go ahead and mount a tire with a tube and air it up with the newly installed tubeless tape. The pressure of the tube and tire with air presses the tape into the rim well and gets a good seal on the rim. But not everyone has that kind of time.

Now the last bit which is important for the set up is probably one of the most overlooked bits. The valve stem and in particular, the valve core, are critical to get right or your tubeless set up will be problematic and prone to failure.

Valve stems come in a lot of variants. My favorites, as stated before, are made from chrome plated brass. These are sturdier and less likely to bend, or come unseated within the inner rim, which can cause leakage. In fact, I'm not a fan of having anything aluminum in the valve assembly. Generally speaking aluminum threading is weaker, the aluminum itself is prone to oxidation due to the sealant carriers in many sealants, and their bases many times are suspect, in my opinon, in comparison to brass valve stems. It is tempting to want to save weight and have pretty anodized flashes of color here, but I'm bot convinced this is such a great idea.

One more thing- Make sure you get the correct length valve stem. If you have a deeper profile rim, especially carbon rims which typically are aero and deeper, then you'll need a longer stem. If you have more typical aluminum rims which are not very deep in profile, then get shorter ones. Do not use a stem longer than you need because when you start using a pump it will act like a lever on the stem and a long stem may bend or break off, if it is aluminum. You can also compromise the inner seal at the base of the stem inside the rim by bending the stem too much in a pump head.

New valve core (top) and two bad ones.
Sometimes when remounting a tire I will replace the valve core. You can remove these and upon careful comparison with a new one you can easily determine if the rubber seal or plastic seal is compromised. Valve cores have direct contact with sealant and can corrode, the rubber and plastic can easily be deformed, broken down, and the brass bits can fail due to oxidation. In fact the middle core above has a frozen outer nut, so you can't even close the valve anymore. A cursory glance at these makes it seem that nothing is amiss, but I would not use the bottom two cores at all. Get a new one if you aren't sure. It's well worth it.

Standard Presta nut (center) and an aluminum nut (left) with a stepped nut on the right.
Presta valve nuts are even important. I like the stepped, brass/chrome plated ones because I can get a firmer grip on them for making the valve stem seal against the inner rim well. Regular nuts are hard to get a hold of. Aluminum ones are hard to get tight enough before they strip out sometimes, and that's why I don't like them.

Okay, got all that cleaned up, installed, and ready to go? Next time I'll cover the final details regarding mounting tires, introducing sealant, airing up and setting beads, and finally the tricks I use to seal up a new tubeless set up. NOTE: I sometimes actually have used, or am going to use, products and styles of doing things I don't necessarily agree with. The aluminum valve stem pictured above in the rim well is one of those things. I do this to prove to myself, and to test for review at times, products that are worthy or no, disregarding any preconceived notions I may have. So, eventually I get informed opinions, and not just guesses. Hopefully these posts are helpful. Stay tuned for the next one coming soon. 


Tubeless 101: Part 3

If you are re-using a previously mounted tire, make sure the bead area is clean!
Tubeless 101: Part 3

If you missed Part 1 or Part 2, please go back and review those posts as these are meant to be a series.

Last time I went over how to dismount a tire, I gave some tips on sealant recovery, and in this post I will discuss preparations for mounting either a previously used tire or a new tire on a freshly prepped rim.

The first order of business is to make sure that everything necessary for good seals inside your system are clean, fresh, and in good shape. I recommend that anything that looks suspect be replaced regardless of its age. You may have had that tubeless tape for only a few months, but trust me, if it looks the least bit compromised, it is far easier to deal with it now, when you have everything apart, than when it fails you on that 50 mile ride out in the middle of nowhere. Never mind the frustration of having done all that work to mount a tire and then having to peel it back off because you didn't decide to replace the tape, or put in a new, fresh valve stem. Trying to 'get by' can get you in trouble. And in my experience, it isn't worth the risk.

Remember folks: Tubeless tires are not for everyone, nor do you need tubeless tires in many cases. And also: Tubeless tire set ups are not only more technical and maintenance intensive, but more expensive as well.

Still determined to go tubeless? Okay, moving on now.......

Cleaning up a previously used tubeless tire for remounting.
 Cleaning up the old tires is a must for good tubeless set up. So I would concentrate on the area of the bead of the tire. The part that is to seal onto the rim is a critical point and must be free of old, coagulated sealant, or you risk a failure or a lot tougher time re-seating the tire on the rim. How you accomplish this clean up is going to depend upon what sort of sealant you had in there.

Orange Seal makes a "skin", as does Muc-Off No Hassle Puncture Protection Sealant. My "home brew" does as well. In these cases, a peeling off of the old sealant seems to work fine, but it can be a tedious job. Generally speaking, you may as well just do the entire inner casing. Other sealants, like Stan's or Caffe Latex don't make a skin, but will leave a layer of sealant, or coagulate into "stanimals" which you can easily remove. To get all the remaining layers of sealant out. you can scrub with warm water and soap, or....... A certain energy drink that comes in a black can with a green "M" on it will take off the sealant. Just pour some in the tire casing, slosh it around, and dump out the remaining sludge, wipe down, and you should be good to go. Really. It works, and I've tried it, but you can do it the traditional way if you'd like.

The next bit you need to have perfectly clean is the rim well. That is if your tape is the least bit compromised. I use rubbing alcohol to clean off any skin oils or dirt. Then I start re-taping the rim starting opposite from the valve hole. I always, always do two rounds of tape. The risk of having the tape fail in a spoke hole drilling is just not worth trying to get away with one round of tape. By the way, many OE tape jobs are just one round, so if your bike came with pre-taped wheels, best to check that out.

I like to use tape that goes all the way to the rim bead wall. Covering where the bead of the tire sits will not only give you a better seal, but it will make the tire fit tighter too. Running tape slightly too narrow, or tape that you have to run on one side, then another because it is too narrow, is a bad idea and will cause a leakage leading to failure eventually. Conversely, using tape that is too wide is obviously a bad way to go as well. Any wrinkling should be kept to a bare minimum and taking care in laying down the tape will reap dividends down the line.

Muc-Off tape, Orange Seal valve, in a Shimano GRX rim.
One technique that does work well, but takes extra time, is to go ahead and mount a tire with a tube and air it up with the newly installed tubeless tape. The pressure of the tube and tire with air presses the tape into the rim well and gets a good seal on the rim. But not everyone has that kind of time.

Now the last bit which is important for the set up is probably one of the most overlooked bits. The valve stem and in particular, the valve core, are critical to get right or your tubeless set up will be problematic and prone to failure.

Valve stems come in a lot of variants. My favorites, as stated before, are made from chrome plated brass. These are sturdier and less likely to bend, or come unseated within the inner rim, which can cause leakage. In fact, I'm not a fan of having anything aluminum in the valve assembly. Generally speaking aluminum threading is weaker, the aluminum itself is prone to oxidation due to the sealant carriers in many sealants, and their bases many times are suspect, in my opinon, in comparison to brass valve stems. It is tempting to want to save weight and have pretty anodized flashes of color here, but I'm bot convinced this is such a great idea.

One more thing- Make sure you get the correct length valve stem. If you have a deeper profile rim, especially carbon rims which typically are aero and deeper, then you'll need a longer stem. If you have more typical aluminum rims which are not very deep in profile, then get shorter ones. Do not use a stem longer than you need because when you start using a pump it will act like a lever on the stem and a long stem may bend or break off, if it is aluminum. You can also compromise the inner seal at the base of the stem inside the rim by bending the stem too much in a pump head.

New valve core (top) and two bad ones.
Sometimes when remounting a tire I will replace the valve core. You can remove these and upon careful comparison with a new one you can easily determine if the rubber seal or plastic seal is compromised. Valve cores have direct contact with sealant and can corrode, the rubber and plastic can easily be deformed, broken down, and the brass bits can fail due to oxidation. In fact the middle core above has a frozen outer nut, so you can't even close the valve anymore. A cursory glance at these makes it seem that nothing is amiss, but I would not use the bottom two cores at all. Get a new one if you aren't sure. It's well worth it.

Standard Presta nut (center) and an aluminum nut (left) with a stepped nut on the right.
Presta valve nuts are even important. I like the stepped, brass/chrome plated ones because I can get a firmer grip on them for making the valve stem seal against the inner rim well. Regular nuts are hard to get a hold of. Aluminum ones are hard to get tight enough before they strip out sometimes, and that's why I don't like them.

Okay, got all that cleaned up, installed, and ready to go? Next time I'll cover the final details regarding mounting tires, introducing sealant, airing up and setting beads, and finally the tricks I use to seal up a new tubeless set up. NOTE: I sometimes actually have used, or am going to use, products and styles of doing things I don't necessarily agree with. The aluminum valve stem pictured above in the rim well is one of those things. I do this to prove to myself, and to test for review at times, products that are worthy or no, disregarding any preconceived notions I may have. So, eventually I get informed opinions, and not just guesses. Hopefully these posts are helpful. Stay tuned for the next one coming soon. 


Thursday, April 16, 2020

Tubeless 101 Part 2

Tubeless 101 Part 2:

Last time I posted on this subject I mentioned that tubeless set ups may not be for you and that they are more technical and require more maintenance than tubed set ups. This time I am going to get into more of the techniques and tips which can help you if you should decide to actually pursue this tubeless madness.

First of all, you'll need a good supply of sealant, tubeless valve stems, valve cores, a way to introduce sealant into your tires, and it wouldn't hurt to have some tubeless tape around. Basic tools like tire levers, a pair of needle nosed pliers, a valve core remover, and a really good pump are also requisite items. It also wouldn't hurt to have a small air compressor handy as well.

By now you should be getting the idea that tubeless tire set ups are not only more technical and maintenance intensive, but more expensive as well. By the way, I highly recommend getting legit items and do not try to cut corners, like getting Gorilla Tape instead of real tubeless tape, as an example. While many will say this is just fine, it doesn't make sense that it is "better" than the real deal, or why would there be tubeless tape at all? Besides, Gorilla Tape can soak up sealant and fail, which will happen faster than with using real tubeless tape. Besides the mess you have cutting it to size, and getting it on right, Gorilla Tape doesn't save you anything in the long run. And yes, I've used it before. 

So, in that vein, it also needs to be said that in 2020 fudging tubeless set ups is not only unnecessary, but it is very unwise. Systems exist, so use them. If you don't have tubeless rims, tires, or the proper tools and equipment, it just doesn't make sense to reinvent the wheel, so to speak, and garage-tech your way along until you get a successful set up. Unless you are just curious, have a ton of time to waste, and think you are "saving money/beating The Man" by doing it your way. Your time is valuable. You just need to buck-up and do it right, save time, and get to riding. Or.....use tubed set ups. Again- tubeless tires are not for everyone

That said, I will now recommend what I've found to work well over my 14 years or so of messing around with tubeless set ups.

Sealant: Muc-Off No Puncture Hassle Tubeless Sealant, Orange Seal, Caffe Latex. In that order, and all of those are better than Stan's, which isn't bad, but Stan's is my last choice.

Tubeless Tape: Stan's, Muc-Off, Velocity Blue. In that order. WTB is actually Stan's tape, so that is on the list too. DO NOT USE DUCT TAPE or GORILLA TAPE. Oh, and by the way, I've heard good things about Whiskey tape, but I have yet to use it. (Note- Muc-Off tubeless tape is so new it isn't online yet. You can get it at Andy's Bike Shop)

Injector: Get a sealant injector. You'll thank me later. The best is KOM Cycling's unit. Caffe Latex also makes a decent one.

Valve Core Remover: Park Tools or KOM Cycling's which comes with some killer tire levers.

Valves: Mavic used to make the best ones. But anything that is not aluminum is best. Pay attention to the bases. Some are meant to fit certain inner rim wells and others won't so well. Velocity makes good valves. WTB has decent ones. Bontrager's are specific to their plastic rim strips, but are sturdy and work great.

Pedros lever, WTB tire.
How To Remove A Tubeless Tire And Recover Sealant:

First step: Remove air. Open the valve and release as much as you can, then remove the valve core to get it all out. Next: Press the bead of the tire off the rim bead shelf of the rim toward the center of the rim. Do this ALL THE WAY AROUND and on BOTH SIDES of the tire. 

NEXT: Lift the tire upward away from the rim by pinching the beads together at one point on the tire and pulling away from the rim. Stick a tire lever under one side of the tire's bead, pry over the rim, (see image) and push the lever away from you, peeling the tire bead over the rim as you go. Now you should have one side of the tire off. STOP here and do not spill any sealant that remains inside the tire.

Hang the wheel off a hook or something similar and wait for 15-30 minutes. This will allow any sealant in the tire to settle into a pool at the bottom of the wheel. You can do this previous to working on the wheel by setting the wheel in a static position for a time, but you'll have to be careful not to rotate it as you work the tire off the rim bead shelf and peel off one side of the tire. The idea here is to recover any wet sealant in the tire. If there is none, I'll cover the next steps in my next post.

After setting for a while your tire should look like this with a pool of sealant at the bottom.
You then suck up the sealant with a sealant injector, and push what you recover into a container.
Put your recovered sealant back into the bottle, (if you purchased commercially available sealant) or in a separate container that is opaque and sealable. Once you have hoovered out as much sealant as you can, you can wipe out the remaining bit with a wet rag. Then your tire should be easily removed by hand, most likely. You might need a lever, but if so, only one should do the trick.

The last bead should come over the rim fairly easily.
Inspect the inner casing of the tire for any casing degradation. Sealants can degrade tire casings over time. Also, just the fact that the casing has to do the job of holding the air and handling all sorts of abuse can damage casings. If you see any deformation, it is time for a new tire. Now- maybe the tire isn't quite right, but usable. In that case, keep it for a tubed set up. But don't risk it as a tubeless tire again. Ditto if the tire casing stretched a lot and fits too loosely after dismounting. Double that ditto if the tire ever blew off the rim, even once. Yes- this can be an expensive lesson. Did I mention tubeless set ups are more expensive than tubed? I'm pretty sure I did....... Anyway-

If the tire checks out, I usually hang it up to allow it to air dry. If you are going to re-use it, then there are a few things you'll need to do, which I will cover in my next post. I will also cover how to mount a tire.

Notes On Storing Sealant: Keep your recovered sealant in a cool, dry, dark place. It will last longer this way. I have stored sealant for well over six months and have seen no issues with use afterward, but some sealants do better than others. Also- clean your sealant injector by sucking up warm water and pushing it out again several times. Sealant will muck up an injector causing blockage if you do not clean up the innards of the injector immediately after using it.

Okay, next time I will have the tire clean up and mounting procedure I use to share with you in Part 3.