Showing posts with label Mojave Cage. Show all posts

Tuesday, August 20, 2024

Review: Velo Orange Mojave Cage

Image courtesy of Velo Orange
 Note: The Velo Orange Mojave Cage was purchased by Guitar Ted for test and review on this site. Guitar Ted was not paid nor bribed for this review and all opinions are Guitar Ted's.

The Velo Orange Mojave Cage is a cage for oversized bottles, such as a Nalgene bottle, or any cylindrical canister/bag that comes close to the diameter described by the Mojave Cage's two sprung arms. 

I have used this cage on my Singular Gryphon Mk3 bike as a fork mounted accessory. The cage does have multiple mounting points on its back plate and could be positioned in many ways. Typical uses besides a fork mounted cage might include a down tube, either above or below, or off a rack of the type that Tumbleweed Bicycles makes, or the Old Man Mountain Elkhorn or Axle Pack racks. 

Initially I used a plastic food canister with the Mojave Cage, (seen HERE) and that worked quite well. Because the canister was pliable, the cage could actually make an impression into the plastic and eventually this almost molded the canister into the Mojave Cage! 

This made getting the plastic canister out a chore, but it was doable. I likely would go with a harder plastic canister for a longer tour to store dry food items in if I were planning a bike packing/tour. I don't have a Nalgene, or equivalent canister to try this with, but I do have an ancient Thermos bottle/canister which I tried as a carrier for some coffee on a recent outing. 
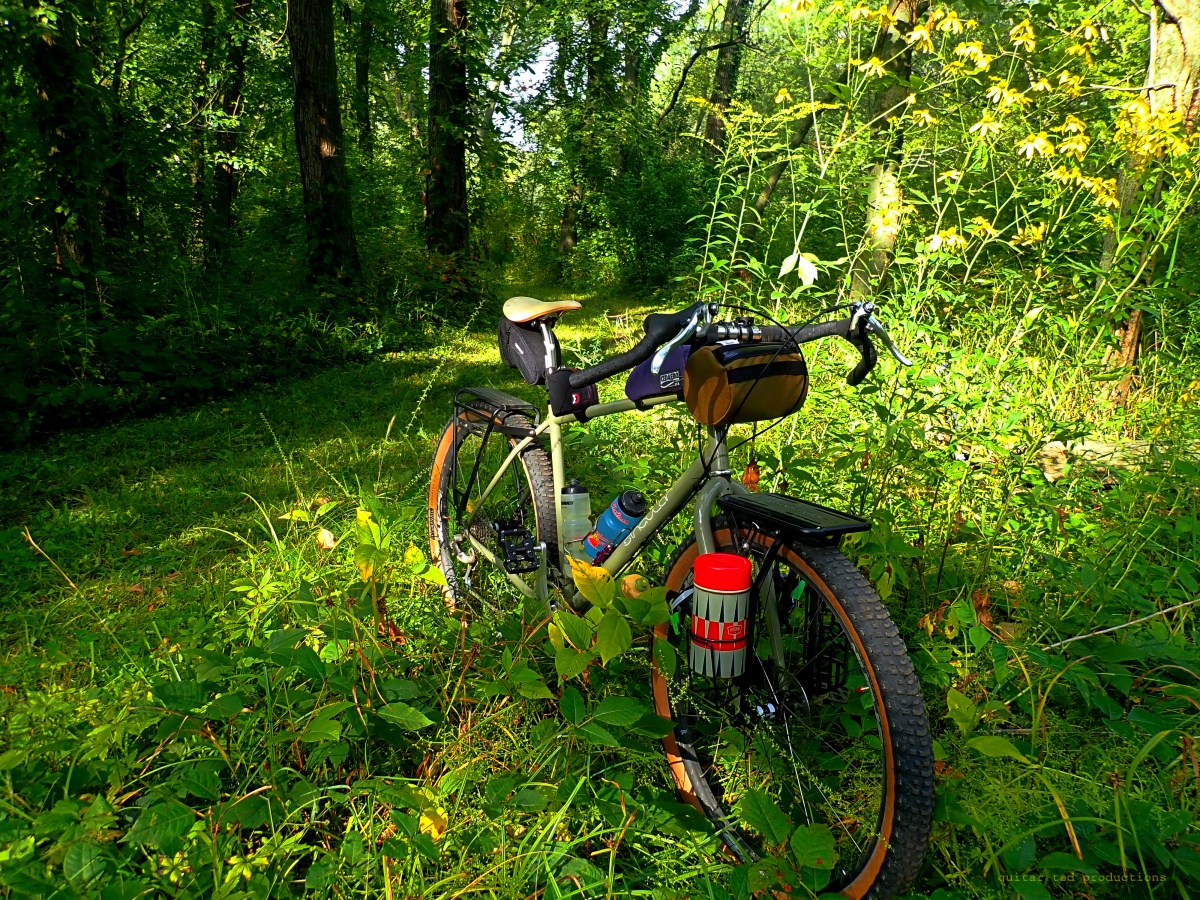
The Thermos would not fit all the way in, but the cage held it anyway!

The grip of the Mojave Cage is pretty stout if you have a larger diameter canister or bottle. The Thermos seemed to be on the larger side for the Mojave Cage, but that was not the limitation I thought it was at first. Actually one of my mounting bolts was protruding out enough that the steel edge of the Thermos was catching on it, which acted like a stop. However; the Mojave Cage's grip was so strong I figured I would give it a go and see how the cage would handle a Thermos filled with coffee on rougher trail with only half a grip on the bottle. 

Of course, I was risking destroying an antique Thermos jug, but hey! Someone has to test these things, and this looked like a good way to test the Mojave Cage's grip level. I am happy to report that coffee was enjoyed alongside a local lake and it was a very good morning. The Mojave Cage was not fazed by this test at all. 

The Mojave Cage delivered my coffee to this spot with no issues.

Final Word:

I think if I were to go on an extended trip by bicycle and needed a bigger cage for water, food, or other storage that the Mojave Cage would provide me with a safe, reliable way to do just that. As long as the canister you choose is large enough to spread the arms a bit on the cage I would think that the grip this cage exerts on things would be perfect for such a trip. 

One thing about this design which might be a concern is that if your canister is larger in diameter, those arms get really tough to spread apart far enough to release the canister. The hand strength required to push the arms apart (a pinching motion, by the way) is pretty high in such cases. Perhaps smaller hands or weaker hands would be prevented from moving the cage's arms enough to release a larger canister. It is something to think about, say if you are cold, wet, or really tired after a long day in the saddle. 

Other than that, I like and recommend this cage to anyone looking for something along these lines to carry oversized bottles on their bicycle. You can find a more detailed description of the Mojave Cage here. 

Monday, May 20, 2024

Two Things

The Mojave Water Bottle Cage is sprung to hold bottles very tightly.
First Impressions On The Velo Orange Items:

I have already given a pretty detailed look at the Camp Snap Camera HERE, so this bit will focus on the other two items I bought, the Mojave Water Bottle Cage and the Burrito Supreme Handle Bar Bag.  

First, the Mojave cage. This thing is pretty stoutly made. You also have a nicely attached back plate with several mounting holes to set the cage in place on a frame or fork member as you'd like to have it. These mounting holes also work with Three-Pack mounts. 

The cage is made in such a way that it has spring tension on the bottle you choose to put in there, as long as it is a bigger diameter than the cage at rest. This cage is made for oversized containers, so nothing close to a typical water bottle for a bicycle will work. We're talking Nalgene bottles and the like here which can include anything round in profile large enough for this cage.

As an example, I have what was a nutritional powder canister converted to food storage which I am planing on using in the Mojave Cage. This canister is plastic and since it is a little larger in diameter than the Mojave Cage is, I have to push the canister in which in turn pushes each half of the Mojave cage outward. The Mojave Cage has such a grip on this canister that I think it will stay in there even during the roughest of trails. 

Which is a good thing since I wouldn't want to lose my vittles, now would I? No, I would not. We'll (hopefully) be putting this thing to the test this coming weekend when N.Y. Roll and I are planning a little overnighter. 

Now as for the Burrito Supreme Bag, I gotta say I have been very impressed so far. This bag has exceeded my expectations for such a bag, which I will admit, those expectations were pretty low. But this bag hangs really tight up against the Top Shelf Bar, (a match made in heaven, perhaps?), and it looks really nice.  

I particular like the sheen of the fabric and in concert with the color of this bag, it has a bronze look to it. It really doesn't match my Tamland Two's red, white, and blue scheme, but it looks so good I almost don't mind it. 

The sheen of the fabric doesn't translate over in this image, but this bag looks great in the Sunshine.

I like that the zipper faces the rider in this set up. 

I cruised around a bit to see how it was to zip and unzip the bag one-handed, which is the litmus test for any cockpit mounted bag. I was able to get that done easily and so I think as time goes by and things settle in a bit it will get easier to operate and this bag looks like it will be a winner to me. 

If there is one thing that bugs me about it that would be the plastic buckles for the straps that hold the Burrito Supreme to the bar. There is no good place to "stash" the loose ends. Take a Revelate bag, as an example, which has a nice feature built into the buckles to stash the loose ends, or their little loop holders that some of the newer bags from Revelate have. Little details like that separate the best from the rest, in my opinion. 

Victory Ride: I don't have a lot to add to this, but here are a couple of details on the ride which will happen June 15th out of Urbana Iowa. By the way, if you don't know anything about this, you can click HERE for why this ride is happening. 

Time & Location: Since I am thinking this will be a casually paced ride and that we have a little over 50 miles now (see below the reason for that), I wanted it to end at a reasonable time for post-ride socializing or for folks that need to drive home to have a chance to get back before it gets too dark out. I also figured there is no reason to start at the crack of dawn so folks driving in can have a bit better go of it. Therefore; I have landed on 9:00am at the Cedar Valley Nature Trail head parking lot in Urbana. This lot is located off Capital Street just off Sunset Street near the City Hall.

The Route: The route has lengthened a bit because after I saw N.Y. Roll's proposed route I noted a lot of Cedar Valley Nature Trail being used and I told him "I am a gravel guy!". So he re-routed a section but that added miles, so there ya go! I'm not too concerned about it. 

There looks to be a few stops planned into this. There is one near Vinton, an overlook onto the Cedar River. Then there is Vinton, a decent sized town, where we can use a Casey's Convenience store as a stop/resupply. Finally, we will be rolling through Brandon, Iowa, a small village once used as a checkpoint for Trans Iowa v3, and is the place where the World's Largest Frying Pan is located. N.Y. Roll thought we need to have our picture made there. 

Social & Weather: Then there is the social aspect. There isn't much in Urbana. I hear tell there is a Casey's there, maybe a bar? We will see. As far as weather, expect it to be hot, possibly humid, windy, and there is always the chance for a pop-up thunderstorm. If the weather looks sketchy running up to this we probably will call it off and reschedule. Keep your eyes peeled here the week before if you think you might come.

Stay tuned...

Thursday, May 09, 2024

Review News: Velo Orange Items

Image courtesy of Velo Orange
Note: The items mentioned in this post have been paid for out-of-pocket by Guitar Ted. Velo Orange has no affiliation with Guitar Ted Productions, nor are they aware that this review is starting. Hey! Maybe they will get tipped off to it later, but all I know is I am independently conducting these reviews and I will give you my honest thoughts and opinions throughout.

Okay, it is time for a few new review items to show up here any day now, so I figured that I would introduce each item and why I am getting that item in so you will know my plans here. Truth be told, there is a common purpose here which you will see shortly.

First up we have the Velo Orange "Burrito Supreme Handle Bar Bag". This is one of those ubiquitous barrel shaped bags you see often now for cycling. The main purpose for this bag was to have it tested with the Redshift Sports Top Shelf Bar which I am reviewing. That and I've wanted to try a barrel shaped bar bag for quite some time now. The Velo Orange example here is actually made in the USA by Road Runner Bike Bags. 

This bag runs $85.00USD and has one main compartment which holds its shape via an internally sewn in sheet of plastic. It's canvass, of course, and attaches via two straps for the handle bar and one for the stem. We will see how that all works for the Top Shelf Bar soon. 

I'm also planning on using this bag for a trip/over night gravel ride I have planned out. Stay tuned for that....

Image courtesy of Velo Orange

Mojave Water Bottle Cage:

This one is for my quest to carry large amounts of water but not on my back, while cycling. I have used over-sized bottles in traditional and extendable cages, but the Mojave Cage is a bit of a different way to solve the puzzle.

This cage fits big Nalgene water bottles, as shown. I like the concept and the Mojave Cage should be a good solution for a longer trip by bicycle, like the one mentioned above here.

This cage has several mounting holes in a plate on the base of the cage allowing for various ways to mount it including using a Three-Pack Boss. 

This cage comes in silver or black and runs $39.99 USD. This will be going directly on to the Singular Gryphon Mk3 rig. I am kind of hoping to put it on underneath the down tube so we will see how that works out soon. 

Finally, and the entire reason I purchased all these things from Velo Orange in the first place, is something you might not have considered at all. It is a camera! 

Image courtesy of Velo Orange

Camp Snap Digital Camera:

So, I've been using an Olympus TG - 5 camera for years now. I don't know a lot about how it works. I'd estimate I know maybe 10% of it, as far as what it can do. The TG -5 is a very capable outdoors camera, and it has a fair amount of features and normal "camera-guy" things that can be adjusted, tweaked, or whatever.  Most of that is completely lost on me. I usually set it on "Aperture", adjust the light balance a bit, and shoot while riding. I almost never use the viewfinder/screen. It's fairly useless to me due to glare, bright Sun light, and my old, fading eyesight. 

So, when I saw the Camp Snap camera, I immediately knew that I was the person this was made for. Well.....at least I feel that way. A truly "point it and shoot" camera with a whopping 8 megapixel sensor. You get what you get for a shot, and I am okay with that. This is almost exactly how I shoot almost every image that you've seen here in the last ten years. Point. Shoot. Download into computer. Tweak in the box. Publish. 

So, we'll see if this thing can handle gravel travel. I'll be taking images with it for the blog here and for documenting my trip I mentioned earlier. By the way, this camera costs $65.00 USD, so it isn't all that dear and if it gets biffed or craps out, well we will all know better.

So, that's what is coming up. Look for more on these items here soon.