Saturday, September 30, 2023

Two Things

The new Wilde X Country Bar
 Wilde X Country Bar In For Review:

 Note: Wilde Bikes sent the X Country Bar over to me for test and review at no charge. I am not being paid, nor bribed, for this post.

Wilde Bikes recently asked me if I wanted to review their new handlebar, the Wilde X Country Bar. It's a funny thing, because in my brain for several days I was thinking that this was the "X" then "Country Bar". Like "ex country bar". Not "cross country bar" as is probably intended. 

My brain doesn't necessarily work like everyone else's does, clearly!

Anyway, following are the specs on the handlebar I was sent:

  • 50mm Rise
  • 27° Back Sweep
  •  7° Up Sweep
  • 800mm Wide 
  • 31.8mm Clamp
  • Weight: 420g
  • Heat Treated Aluminum
  • Made in Japan
  • The Country Bar is rated for off-road touring, it's not meant to be an enduro bar, ride accordingly

Interesting, yes? Not an enduro bar. Made for off-road touring, eh? Okay then. So like bikepacking, I suppose. It's wide, for sure, so your bar bag will rest in there nicely. That rise puts you in a more relaxed position, perhaps, and so you are going to be more comfortable here. Maybe. That all depends upon how you set your bike up. 

Nitto. If you are a "bike nerd" Nitto needs no introduction. But let's say you haven't gotten a clue as to who Nitto is. That's okay. Here ya go... 

From their website; "Nitto is a bicycle parts maker specializing in metal tube production"

Yes, but..... Nitto is THE handlebar company when it comes to handlebars. Their handlebars have a cult-like status, a fine "glow" to them. (Especially the silver ones) They feel different. They just do. It's very hard to articulate the quality that exudes from a Nitto made product, but it is there.  

Nitto is a Japanese company, and they got their name in cycling via track cycling, which if you did not know, is a really big deal in Japan. Of course, track bikes are fixed gear bikes, and you know what? Wilde Bikes founder, Jeffrey Frane, helped to start up All City Bikes (R.I.P), and that company was heavily into fixed gear and track bikes in the beginnings of that brand. So..... maybe that has something to do with Wilde Bikes sourcing this handlebar from Nitto? Perhaps. 

I've gotten busy setting this thing up and I will have a review coming soon. Stay tuned.... 

Image courtesy of Moots
Kerfluffles And Technology:

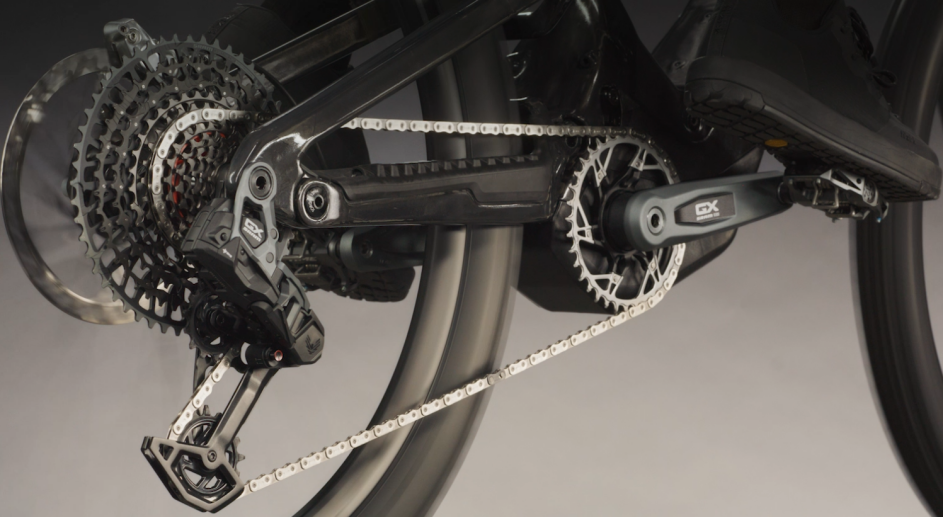
This week was a weird week. SRAM comes out with "Powertrain" and the internet loses its mind and the debate about electrified, HPC vehicles burns brighter than the Sun. They aren't "real" bicycles! It just isn't the same as 100% human powered bikes!

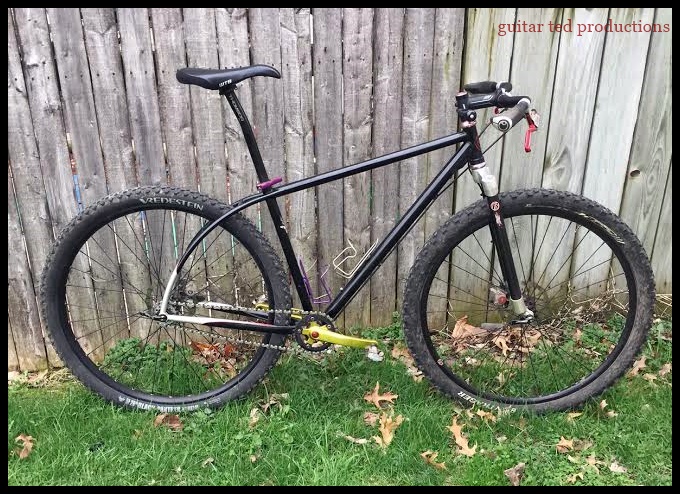
Then I post about single speeds, do a podcast about them, and the place goes nuts. I get comments, questions, seekers, fans, and pundits coming on giving their two cents.

On one hand you have the cutting edge of bicycle technology now, which is pretty much an electrified take on what has happened with internal combustion engines and bicycles from the early 20th Century. Bicycles were very popular, but motorcycles were easier, went further, and didn't make you work as hard mentally either. You just twisted a throttle, figured out how to stop, and went forward. None of the human efficiencies and physical fitness stuff had to be a concern. 

SRAM went as far as calling the 100% human powered aspect of cycling a "mundanity" (Their word) and that Powertrain allowed you to "escape" that. Yet here I had a few thousand people from the podcasts and the blog getting excited over the simplest type of bicycle ever. 

I'm not here to say that one is better than the other. I am saying that electrified bikes are going to be less human powered/controlled going forward. Of course it won't be anything like 100% human controlled and powered cycling. Why do we even try to conflate the two things? One will be rife with electronics and won't give a whit about taking anything away from the human aspect. The other won't have any of the trappings of technology's moving electrons and will rely more on the human element. 

Both will thrive.

Friday, September 29, 2023

Friday News And Views

Image courtesy of State Bicycle Co.
State Bicycle Co. Launches Gravel Sus Fork:

Further expanding into the gravel bicycle category, State Bicycle Co. originally a fixture of the fixie scene of the 2000's, has just released a gravel suspension fork. 

The 40mm travel air sprung fork with a lock-out feature is said to weigh in at 1600 grams. (Compare to most steel forks this is about 300+ grams heavier. About 2X or more heavier than typical carbon forks) The fork features flat mount disc brake standard, a tapered steer tube (1 1/8th" - 1 1/4") and has a 12mm through axle. Tire clearance is a generous 2.3". Fork offset is 52mm. Axle to crown is 440mm. Price is set at $450.00 USD. 

Details on the fork can be seen at State Bicycle Co's website HERE

Comments: Readers of this blog already know that I am very skeptical of the advantages of adding a suspension fork to a "gravel" bike. In fact, it would be fair to say that I remain unconvinced of the necessity of such a device for gravel. I lean more to the vibration reduction side of things and am an advocate for devices like Cane Creek's eeSilk stem or Redshift Sport's ShockStop Stem. Stems are swappable from bike to bike, and with suspension stem options weighing in at less than 300 grams and costing less than $300.00, (more like closer to 200 hundred bucks in some cases), it is easy to see why a gravel suspension fork seems like a not-so-great an idea. 

In my experience, riding a Fox gravel suspension fork, if you set it up for absorbing vibrations (what you'll see most of on gravel) then the fork blows through its travel on pot holes and washboard. Set it up for handling washboard and potholes makes it unusable for the rest of the ride. Essentially you end up carting around an expensive, heavy fork that requires maintenance every 50 to 100 hours of use. 

Yeah..... In my opinion, this is a non-starter. But you do you. If it suits your needs, then the State Bicycle Co fork is a much more budget friendly choice than the big names in gravel suspension. 

Single Speed Gravel - Part Two:

As you well know if you have been reading here this week, I wrote a short series on single speed in general, but this was a response to our first Single Speed Gravel podcast. 

If you want to listen to us discuss a few of the highlights of the series, then you can check out Part 2 of the Single Speed Gravel podcast episode HERE

We also feature a bit of gab about another Pennsylvania gravel event and a bit about the next item in the "FN&V" today. 

Just a reminder that we do have some listener engagement opportunities on the GTP site (found at the link) and that we were sponsored once again by CORE4 who have announced there 2024 date, opened registration (HERE) and have made a couple of tweaks to the offerings which you can learn about from listening to the episode. 

Thanks for supporting the podcast and our sponsor, if you do that. 

Image courtesy of Specialized

Gravel eBike For The Well-Heeled Gravelist:

 Every so often I am aghast at the level of entry into cycling's high-end products. I was once again found in this state when reading about Specialized's newest Turbo Creo model, the Turbo Creo 2.  

Base price is 10.5K. That's nuts

But advance up to the ladder and climb to the S-Works edition and you'll spend almost twice that!

I read a review of the bike that was conducted at some posh location where the journos were flown in to taste the offerings. The resulting review, while glossy and favorable, as one would expect it to be, showed up some rather interesting results.

I know that battery technology is getting better all the time, so when I saw that a rider can maybe expect about 43 miles on a charge in eco mode, I was left scratching my head. That's not real impressive. Then the tester went out on a ride with a bit more than 2k elevation gain, the rider weighed less than 180lbs, and the battery drained down to 38% level. Mileage? Less than 24 miles. 

For 10K plus some I'd want to see a bit more impressive mileage and battery life numbers. 

It's also interesting to note that the Creo was strictly a road bike in its previous incarnation. Now? Gravel all the way baby! Specialized is telling us that "gravel" is worth something to consumers, and this redesign tells us that in spades. It takes big, 2"+ tires, and it has slacker geometry than the previous iteration. Huh! Quite the change from the days when everyone outside the gravel niche were telling us to just ride a cyclo cross bike!

Image courtesy of SRAM

SRAM Debuts A New HPC Drivetrain:

SRAM announced this week that they have a new electric assist MTB drivetrain out called Eagle Powertrain. 

The motor was designed in conjunction with German manufacturer, Brose and features two new benefits that are unique. Auto Shift and Coast Shift.

Auto Shift is what it sounds like. This can be overridden by the rider if the rider chooses to and then the function will return automatically without the rider having to switch back and forth. The interesting feature here is Coast Shift which allows the crank set to remain stationary while the motor turns the drive train to allow the rear derailleur to shift to another gear. Essentially, the crank set "freewheels", but only when the Coast Shift is activated. 

Comments: While Auto Shift is not all that surprising, (I rode an electric auto shifting bike which was being tested by Gary Fisher in 2007) the Coast Shift is probably the most interesting feature here. I have to chuckle a bit because "coast shifting" has been around for years with internal gear hubs. So, I have to wonder if this SRAM thing is really more about traditionalists doing a novelty exercise in technology. Don't get me wrong, Coast Shift is impressive, but at this point, why are we still dinking around with the external, rear derailleur shifted drive train at all?

It isn't as though most every person that buys these SRAM Powertrain equipped bikes are ever going to purposely ride them unassisted. That's probably not ever going to happen. So, as long as we are doing motor/human hybrid power, why not eliminate the derailleur altogether? Just put a gearbox on these bikes and be done with it already. 

Why pretend that these are "like traditional mountain bikes" when they clearly are not. Efficiency benefits to 100% human powered bicycles will almost always lean towards the external derailleur drive train being most efficient, but if we are adding motors, who cares about human efficiency anymore? Certainly the buying public doesn't, because their efficiency is being assisted. Why have dangly bits that can be sheared off when that reason for the dangly bit has been erased by electric motors and batteries?  

So, nice job, SRAM. very impressive and all, but this is kind of silly. Convince me otherwise.... 

With that, I will sign off for today and hope that you all have a wonderful weekend of riding (hopefully). Thanks for reading Guitar Ted Productions!!

Thursday, September 28, 2023

Single Speed Questions - Part 3

 Today I am going to try to wrap up answering the questions I received concerning single speed bikes. If you missed yesterday's discussion, you can read that at the following link:

Single Speed Questions - Part 2

Today I want to first tackle the crank length debate for single speed. Although this wasn't a question I was asked, it often comes up in talk about single speed bicycles. It also can affect knee health, so I wanted to add this bit in briefly.

First off, I don't necessarily buy into any of the recent "your crank arms are probably too long" thing that you may be seeing going around the internet sites and forums of late. Here's the bottom line: Humans have a wide variety of types and predisposed ways of moving due to various influences. To say that "this is the way to go" in regard to crank length is too narrow a focus. There are just too many variables in humans to be able to pinpoint some formula or shortcut to crank arm length nirvana. 

Besides, you have to also add in the adaptability humans have. One crank length may work just as well as another after a given amount of time for a person to adapt to that. As an example, I offer up myself! I have tried crank arms on single speed bikes from 170mm to 180mm with stops in between of 172.5mm, 175mm, 177.5mm, and I've demoed a 225mm crank on a single speed, fixed gear bike. All "worked" for me and some of these still do. 

I see longer cranks as something that keeps your legs in the "power stroke" for a longer period of time. Longer cranks also will articulate your knee joint more and you'll have a longer "dead spot" in your stoke. That dead spot can be mitigated depending on momentum that you develop. 

Shorter cranks tend to keep you alternating into a power stroke more often, but that section of your pedal rotation has a shorter time duration. Shorter crank sets don't articulate your knee joints as much, providing less strain on the joint. 

So, you might want to look at shorter cranks if you have a knee issue. Thinking about knee rehab, many places used to do physical therapy on an exercise bike and they would continually lower the saddle height, causing more and more joint articulation as the patient got stronger. So, I think my analysis of short versus long cranks in regard to knees has some credence. But I am not a doctor, so take that with a HUGE grain of salt. Well, not literally a huge grain of salt! You know what I mean! 

But beyond that? Ride what you feel best on. I think you cannot go wrong with a 170mm-180mm crank. Or maybe this is better said by saying, "use whatever crank set you like", as most are between 170mm and 175mm. My only caveat is if you ride fixed gear, (no coasting!) where you may want to err on the side of short cranks to allow for clearance to spin the cranks through corners. 

Are there any significant differences between riding single speed on a flat/riser bar vs a drop bar?

This is a great question, because your handle bar is a big deal when you talk about single speed riding.  Using leverage which can be applied through the handle bar, a rider can engage the upper torso to aid in cranking up and over hills and other obstacles which you may encounter on a ride. 

On the question of drops versus flat/riser bars though, that debate is less of a concern now. This is because back in the day, a 44cm drop bar was considered "pretty wide" while flat bars were creeping outward in width from the upper 600mm's in the 1990's to almost 800mm wide by 2010. Then drop bars started to be available in wider widths, and I daresay that now you could probably buy a drop bar that is actually wider than a lot of flat bars. 

That said, wide flat bars of up to and over 800mm wide can give a single speed rider a lot of leverage. That is, if the bar fits you. Because I feel that ergonomically there is a point where wider bars give you diminishing results. Of course, this depends upon your build and strength. So, there is no "magic width" to look at here. 

Same with drop bars, and as well, I feel that drop bars don't hinder your performance versus flat bars on a single speed. If anything, a drop bar lever can maybe give a rider a better purchase on the bar in terms of grip, so this will likely just fall to preferences. I see no real disadvantage in terms on single speed use to either type of bar, but they will definitely give the rider different experiences in terms of use. 

 Which is better in your opinion, larger chain ring/larger cog or smaller chain ring/smaller cog for less spin and better top end?

Efficiency is increased when you articulate the chain less, so in those terms, running bigger diameter cogs/chain rings would be preferable. (On gravel. MTB users may want smaller combos for better ground clearance.)  What many may not understand is that you can achieve similar gear ratios using smaller rings/cogs as you can with bigger chain rings/cogs. Example: 38 X 20 results in a 55.1" gear inch while a 32 X 17 results in just shy of a 55" gear. (Assuming a 29" wheel diameter with each combination) So, I'd err toward the larger diameter components and run the 38T X 20T combo. 

"Speed" is only affected by changing the ratio from something higher/lower to something lower/higher in ratio. That and cadence determines speed. "Spin" can also be affected by crank arm length. (See above) So, all else being equal, I'd run the largest cog and chain ring I could to achieve the ratio I wanted to have. 

Are there any danger or warning signs that single speeding might not, or no longer, be good for you? 

Yeah, this is a tough question to answer. I definitely can tell you that single speed riding is not for everyone. My friend, Jason Boucher actually asked me when he was down here recently if I was still riding a single speed. He also added that, while he keeps trying a single speed, it just doesn't click with him. And so it may be with many other folks. 

Single speeding on gravel circa 2006
So, one sign may be that you just don't like it! And that's completely okay. No one should look down on you for that, nor should anyone look down on single speeders. It's all good, this riding of bicycles. 

When would you might want to call it quits on single speed use? Well, obviously health issues might come into play here. Overuse injuries can be a big problem, but just general aging can make riding any bicycle a tough ask if there are health concerns. 

Otherwise, if you have followed good bike set up, and don't over-do things, there really isn't any reason a person couldn't ride a single speed well into the proverbial Sunset. Well, as long as you like it and want to do that

Thanks for reading this series! I hope that you enjoyed it. If you have any further single speed questions, feel free to ask in teh comments!

Wednesday, September 27, 2023

Single Speed Questions - Part 2

 If you missed yesterday's post, click the link below to read that.

Single Speed Questions - Part 1

Today's post will continue on with some more gear/hardware/technique related questions about single speed use, and tomorrow we'll get into some more gear ratio stuff. 

So, buckle up and grab a cuppa. Here we go!

The first question we will look at today regards set-up of a single speed chain. 

How and why would you adjust the sliding dropouts, (or eccentric bottom bracket, track ends, or swinging drop outs) and where are they supposed to be adjusted to?

This answer could get really into the weeds with trying to describe each adjustable feature of any particular single speed frame. So, I am going to assume that you will have researched the "how you adjust" your particular drop out or eccentric bottom bracket. I will focus on how to know when your chain is adjusted properly instead. This seems to me to be the thing that trips up people the most, not how their adjustments work. In other words, it's all about chain tension and how you determine what is "right". 

First, you'll need to figure out how long your chain needs to be. A chain tool to help aid you making the correct adjustment is all you'll need here for tools. I recommend getting something like THIS or THIS. These chain tools will allow you to loosen a stiff link. (See THIS video to learn how to do this)

To determine chain length and to allow for a bit of adjustability, move your rear wheel, (or eccentric bottom bracket) so that it sits in about the mid-point of adjustability. You could move the wheel forward a bit or backward a bit from this point. (Or the bottom bracket if eccentric) Okay, now lace your chain, (I recommend a SRAM PC830 for most single speed applications), and you should find that you have far too much chain. Bring the chain together, overlapping the ends, until you see about where the ends would have to be to meet to make things work out on the bike. 

You may not be able to make a perfect fit where your wheel is at, but remember, you can go and adjust for that. Keep in mind the a pair of inner plates has to mate with a pair of outer plates. (I typically stay away from quick links on a single speed, by the way.) Note how much of the chain will have to be removed. Err on the side of "too long", if you are not sure. Then using your chain tool, push out a link's pin, but juuuust enough that it doesn't go all the way through the last outer plate. (See images below) You want to be able to push that pin back through here in a bit. Okay, now with your predetermined amount of chain removed, double check the length. Hopefully you are right in the ball park, but if not you can shorten it up a link or two here. Make sure you end up with one exposed inner set of plates, and one outer set at the other end of the chain. Not two sets of outers, or vice versa! 

Then join the two ends as they should mate together. If your pin sticking out of the outer plate is protruding slightly on the inside of that plate, this may help you hold the chain in place a bit as you reconnect the loose ends. (Again, please refer to the images below for reference)

Once you've determined an approximate chain length, push out the pin which will cut the chain at the spot you've chosen
Don't push that pin all the way out. You want it to look like this when you are done. Clean up any extraneous flashing and bits of metal.

The opposite, inner pair of plates at the other end of the chain now can be "snapped" into place. It may take a little effort to do this. Also- Make sure the chain is laced through the frame when doing this!

Now carefully drive that pin back into the chain. You will feel more resistance when the pin starts to go through the outer plate. See next image.....

Ideally, you want to push that pin juuuust a bit too far. See orange arrow.

Note the position of the chain in the chain tool. Now gently push that pin that sticks out a hair and this will free up the stiff link you created when putting the chain together.

Now you've hopefully come pretty close to the ideal chain length, but things are a bit slack, right? This is where you adjust the chain with whatever system you have on your bike. But how tight should you make the chain? There is a trick to doing this. 

Not all things that look "round" are actually "round". What I mean by this is that chain rings and cogs often are not perfectly round. They will usually be, but not in every instance, somewhat elliptical in shape, although we cannot see that with the naked eye.

Checking for chain deflection to help adjust chain tension.

  If you adjust your tensioning system to where the chain has a bit of tension on it, stop there and then rotate the crank about a quarter of a turn. Now, finding a spot in the chain midway between each gear, use your finger and deflect the chain downward. If you cannot push it down a half inch, the chain is too tight. Loosen your adjustment until you get that amount of deflection, but now rotate the crank a 1/4 turn again and check. Maybe now you are seeing 3/4's of an inch deflection. Okay...,.go another 1/4 turn. If you get back to 1/2 inch, you are good. But let's say that you see an inch of deflection at that point after the first adjustment. Go back on your adjustment and then continue. Essentially, what you want to do is to adjust for that 1/2 inch of deflection wherever the chain is "tightest" during the crank's rotation. 

A chain that is too tight will potentially cause accelerated wear, be resistant to rotation, robbing you of power, and is more susceptible to breaking under stress. Too loose and the chain is apt to jump off the cogs at an inopportune time, which may cause a serious crash and injury. 

Here you can see various spacers used to align the rear cog with the chain ring on a geared free hub body.

Chain Line is VERY important with a single speed set up. Chain line is the "line" a chain makes from the front chain ring to the rear cog. If this "line" deflects inward or outward from the chain ring as it goes to the rear cog, you have a BIG problem! Ideally you want this set of components to all be in the same plane. No chain deflection at all. If you are using a geared rear wheel to mount a single speed cog on, you'll need to set up spacers to align the cog with the front chain ring to achieve a straight chain line. 

If your chain line is off, meaning that the front chain ring and rear cog are not on the same plane, you will get noises, popping, and you may even have the chain jump off the rear cog. this can result in a serious accident and injury. So, pay attention to chain line! 

A single speed specific hub is generally set to a certain chain line, and at that point you'd need to adjust your chain ring. You might be able to do that by mounting the chain ring on either the front of the chain ring mounting tabs or behind them. You may be stuck in that regard depending upon the type of crankset you chose. You may also be able to do some adjusting with the bottom bracket using spacers and shims. See your local bike shop if this gets to be an issue with your single speed set up.

That'll do it for today. Tomorrow we will talk about crank length and how that can affect your single speed success or failure. I will also touch upon gearing and how to choose a good place to start out.

Tuesday, September 26, 2023

Single Speed Questions - Part 1

Listen to this episode HERE
Recently N.Y. Roll and I did a podcast all about single speed bikes on gravel. You can check it out HERE in case you missed it. I'm not sure why, but that episode has become one of our most popular episodes, quickly reaching Top Ten all-time status in our brief history. Still, we were a bit taken aback by the interest. 

In fact, we've received more than the usual feedback on that episode and so by that we already knew that many of our listeners found the subject intriguing. 

I even received an email from a long-time blog reader who listened in and had a lot of great questions about single speeding in general, and on gravel in specific. I had no real solid answers at first, because some of these questions were beyond the scope of my expertise. So, I did some research. 

Now that I feel comfortable with what I have found out, I am ready to share the results of my research and then add in what I know about some other questions that came up through the days since the podcast went live. So, grab a cuppa your favorite beverage, sit back, and get ready for a long post today! There will be links to go to for supplemental research you can do on your own time as well. Here we go! 

We're going to jump right in the deep end with a question on health concerns or health benefits in regard to single speed usage. Note: These questions were sent in by a reader and have been lightly edited for clarity. 

What impact, advantage or disadvantage, does riding single speed have on your knees?


The benefits and disadvantages of single speed use are not clear-cut.

This is probably the number-one reason most often given for folks either not wanting to give single speed a try, or for people to say that they cannot do single speed anymore. Knees. It is a big concern, but when I did my research, I found that overwhelmingly a few things rose to the surface that many riders don't give a lot of attention to when they go to a single speed set up and try riding it. I'm going to list the issues in bullet point fashion and I will provide links to go to for more information.

First and foremost though, it needs to be understood that any above-average use of joints and tissues can advance the onset of problems and accelerate wear issues. Always consult your physician/care provider before undertaking any extracurricular physical activities above and beyond your normal lifestyle's physical demands. 

  • Initial Position/Set Up For The Rider: The overwhelmingly most mentioned issue that can cause you to have problems with single speed use is rider positioning on the bike. Saddle height is the main culprit, but cleat positioning can also be a major issue if it is wrong. (See "5 Common Causes of Cycling Knee Pain" Arizona Pain & Spine Clinic) Get these wrong and the extra stress induced by single speed usage will get issues to crop up faster than with geared bikes. 
  • Single Speed Use Can Help Build Up Surrounding Knee Tissues: If your set up is correct for your body and bicycle, (we will get into gearing later), then single speed use can be a benefit to stronger knee support since it will build up tissues around the knee, make them stronger, and may help stabilize the knee joint in a more secure way than without that sort of stress being induced by single speed usage. (See "Fixed Gear Bicycles And Knee Health" by Sheldon Brown and "Cycling and its Impact on Your Knees" by The Noyes Knee Institute
  • Overuse Injuries Can Be Mitigated: You can take some preventive measures, (beyond proper bike fitting) to help mitigate or avoid overuse injuries, which are one of the, if not THE most common type of complaint against single speed use. These measures include, but are not limited to, the following: Choose a reasonable gear ratio (More on this later) Go easy on the hills and downhills (if fixed gear). Walk longer/steeper hills. Stretching before and after exercise. Employ proper technique (Use your core, arms, glutes, etc) Maintain efficient pedaling as much as possible (Use momentum) Get into a state of physical fitness before attempting a heavy diet of single speeding, and then maintain that fitness while employing a single speed in your cycling routine. Finally, be cognizant of weather! (Wind) (See "Are Fixed Gear Bikes Bad For Your Knees? (The Truth)" by Brooklyn Fixed Gear)
  • Go Easy To Start Out: Jumping right into the deep end by trying a single speed out and doing your regular geared routine/routes is definitely not the way to do it. As they sat, "Baby steps!" One of my sources stated that "Overuse injuries most likely occur when an athlete changes the mode, intensity, or duration of training." So, don't go out and pile on a few long single speed rides in the beginning if you want to be successful later on. Patience Grasshopper! (See "Cycling Knee Problems" by the Chester Knee Clinic & Cartilage Repair Center)

How do you know if a bike or frame can be made up as a single speed? 

Most single speed specific frames have a built-in tensioning mechanism

Actually, any bike can be ridden as a single speed. Just don't shift! But seriously, almost any bike can be modified in some way to be a single rear cog, no shift bike. 

Even a derailleur bike can be made to be a single speed by using the rear derailleur as your chain tensioning device. That said, there are opinions which say that you are not going to get a real "feel" for single speed unless you use a frame designed especially for that purpose. That's debatable, but I will say it is easier to just get a single speed and be done with it. Plus it is a level of commitment that might just motivate you enough to be successful at the venture. 

Now let's say that you are thinking about piecing together a single speed build. Then you will need to be looking for a certain type of frame that has the ability to position the rear wheel in the rear dropout in several positions. Most of the time this will be a "horizontal" drop out. 

The forward facing slotted rear drop out on this frame means it is SS ready

Check out the frame to the left here (or above if you are on a phone/device). It is my Black Mountain Cycles Monstercross frame and fork when I got it in 2011. 

Note the rear drop outs are facing forward slots. This is a "horizontal" style drop out which would allow you to position the rear wheel in several spots, of course, altering the wheel base. But, and most importantly for this discussion, it allows you to "tension" the chain for a single speed set up! 

Move the wheel forward in the drop out and this slackens the chain for wheel removal. Slide it back for tension on the chain for riding. Make sure to use a bolt-on wheel or a quick release wheel with an internal cam mechanism like that found on most Shimano skewers. 

If the slotted drop out faces the opposite direction, as with most older Surly frames, it is then called a "track end", "rear fork", or just "track drop-outs". 

Another example of a single speed tensioning system.

An example of an eccentric bottom bracket which allows for chain tensioning for SS set ups.

An example of a "swinging drop out", Salsa Cycles' Alternator Drop Out. This can be used as a single speed also.

I may be missing something else out there, but the idea is that either the rear wheel has to be "moveable" in terms of how it is fixed to the frame or the bottom bracket is an eccentric allowing the bottom bracket to be rotated in an elliptical orbit which tensions/detentions the chain against the rear cog. There is an elliptical rear hub, the White industries ENO hub, but that is pretty niche. 

That's enough for today. Look for Part 2 of "Single Speed Questions" to post tomorrow.

Monday, September 25, 2023

Country Views: Moody Skies

Escape Route; Waterloo Maintained this trail!
First day of Fall. The air and light is different. The temperature? Summer-like. 80's and windy. out of the Southeast, so I headed East first into it. I decided to head over to Evansdale and maybe go out to those little dirt road sections out there, but I had no real agenda. 

On the way over I ran across a couple riding their hybrid bikes going my way. I waited for an opportunity to go around a block to leap-frog them and then I dove back into some quieter city streets to stay off the main drag which is typically very busy. I'd have to come back to that same busy street near to the border of Waterloo and Evansdale, but then I was planning on riding a gravelly shoulder until I hit the bike path and then maybe go up on the CVNT to those dirt roads.

When I popped back on the busy street, there went the hybrid riders! They had stayed the course and because I went a long way around they were back in front of me again. I aimed for that shoulder of gravel, but they opted to cross the street and take advantage of a big parking lot. I ended up passing them by again, and then I went into "being chased mode". 

The Sun was out for a hot second there.
Lots of brown now!

Well, I know..... It's silly, but I get into this "I cannot be caught again!" mode and I went off. I was pushing it pretty hard compared to my usual pace all the way through Evansdale and I just felt like going onward to Elk Run Heights because I figured I could drop these phantom cyclists going into that stiff wind and the long, slightly uphill grade. 

I looked back at the corner where I turned right at the Casey's and I "thought" I saw some cyclists, so I wasn't off the hook in my mind and I went gangbusters all the way to the corner with the road that eventually turns into Young Road. Gassed, I looked back and, of course, I saw no cyclists. 

Why? Why do I do that to myself? Anyway....

Headed up Young Road into a stiff wind.

The clouds got thicker as I headed North here on McStay Road.

I stopped briefly to have a "nature break" in a cornfield and then I was trying to decide how far to go up Young Road. I had burnt a lot of matches so far, and the wind was unrelenting. I decided to cut the madness short at McStay Road and I headed North. 

Now headed Northward on Pilot Grove Road

Still a lot of corn in the fields yet so far into the ride.

The clouds thickened and then the oddness of this time of year became evident. The air felt like Summer, but the winds were definitely Fall, and the light over the land is starting to get that weird feeling with the lower angle of the Sun. Even last week riding with Jason it felt like Summer yet, but now? 

It is as if someone flipped a switch.

A beam of Sunlight illuminates a corn field in the distance.
I started to see some harvesting action about halfway into the ride.

I had been passed by a big combine early in my ride but I saw no evidence of harvesting until I reached about halfway into the ride. Then I saw many corn fields which had been partially, or some wholly harvested. 

Traffic wasn't as bad as it was when I rode with Jason, but maybe that was because some places had received heavy downpours of rain the day previous. This may have deterred harvesting. At any rate, you couldn't tell by the gravel that it had rained. It was even powdery dust in some places. 

The Standard Rando v2 got the call for this ride.

I eventually ended up coming onto Newell Street and putting the wind behind me. Wow! Was that a relief. I was now in the big ring just toodling along on the pedals but flying down the road. A nice respite from the wind and fighting the crosswind while going North. 


I finally started seeing some harvesting action.

I realized that I had actually still gone a long ways on this loop. Longer than I had intended to ride in the first place. But I let those recreational cyclists kick me into that mode and well.... Here I was. I had to finish out. My legs were probably not doing real well by this point, but it was all masked by that glorious tailwind. It's great when it works out that way.

You can see how hard the wind was blowing this flag.

The skies were downright moody. It looked like a cool, Fall day, but the temperature was 82°F. It just felt really weird. Soon enough we will be reaching for the wool jerseys and wind jackets. I shouldn't complain!

The last stretch on Newell before hitting the outskirts of Waterloo.

Soybeans getting harvested. That's the first I've seen of that this season.

Well, that wind pushed me all the way back to Waterloo and I was home before I knew it. That was about a 2.5 hour ride and I was glad to shoehorn this in between days of rain and not-so-great weather. We're supposedly coming into a dry stretch again, so I look forward to getting out a bit more yet. 

Time is running out on 2023. Before long it will be a lot more difficult to get in longer rides. Gotta get to gettin'.

Sunday, September 24, 2023

The GTDRI Stories: The 2017 GTDRI - Part 2

"The GTDRI Stories" is a series telling the history, untold tales, and showing the sights from the run of Guitar Ted Death Ride Invitationals. This series will run on Sundays. Thanks for reading!

After leaving Kevin to fend for himself and afetr a brief foray into Benton County, it was time to make the small loop near Dysart and over toward Traer where we would meet back up with Kevin again, hopefully.

This was a section of roads that I had eyed on maps before but had avoided due to them not fitting my plans before. However; with the mission of riding dirt roads, this section was desirable as it has a lot of Level B Road action in it. Most of this part of the 2017 GTDRI was a mystery to me, so I was particularly excited about getting to this part of the course.

Rob Evans leads N.Y. Roll and Nick from Iowa City here.

These decorative columns were a big surprise find South of Dysart.

Probably one of the most notable things I have ever "discovered" while riding gravel roads was experienced on this particular GTDRI when we came to the end of another Level B Maintenance Road South of Dysart. We spied an old farmstead, now devoid of outbuildings or a house, with a semi-circular pattern of columns in a grassy area. Was this some sort of weird cemetery? No.....but what was it?! 

At the time and for quite a while afterward, I had no answer to that. But in time I tracked down the answer, which was that a certain member of a farming family took to casting these columns in cement as an expression of their artistic nature. Nothing more, nothing less. But still no less spectacular and unique.

This display of wild flowers in the ditch still resonates with me to this day.

Almost immediately after riding past the strange set of columns we rode past one of the most spectacular arrays of flowers in a ditch that I can remember. I know I've seen a lot of wild flowers, but for whatever reason, this day's flowers at that particular spot are burned into my memory, at least for now. 


We were riding pretty fast yet and now the Sun was up in the sky. I was hanging on, but if it had been any hotter or more humid, or both, I would have been toast by this point. We were, for me at any rate, going way too hard, but I wanted to see this section badly and my excitement carried me through it with an ability to hang with the group up to that point. 

However; when the road dumped out on Highway 63, and Traer was right there where we were to stop, I was more than ready for a rest. Plus, I was worried about Kevin and how things would go with him. plus, we had more dirt on the menu and I was excited to see some more roads I hadn't ever been on before. 

Next: Part 3