Monday, April 08, 2024

Country Views: Green Creeps In

Escape Route: Alleys.
After a nasty weather stretch which lasted for several days we finally had a day that was "tranquil" in comparison. It was Sunny, the temperatures were in the low to mid-50's, and the wind was just under 20mph with gusts to 25mph. Mere gentle breezes compared to what had been going on before this. 

I had a hankering to ride the King Fab Honeman Flyer, so I saddled up and headed down the Sergeant Road Bike Path Southward. This won't be possible to do soon since there are plans to replace some ancient, small rail road bridges which cross drainages at a few points along the trail. The construction should start soon. Then I'll have to find another way out of town Southwards if that's where I want to go for a ride. 

On my previous ride out in the country to this one, things were barely turning green, but on this ride it was quite evident that Spring is here. The grass is green, the leaves are starting to come out on the smaller trees and brush, and the farmers have been busy.

The hint of leaves coming out could be seen here and there along the bike path.

It sure looks as though the farmers have been in the fields.

I'm still kind of in my "getting to know you" phase with regard to the Honeman Flyer. So, no big ride mileage today, and for testing, I rode my regular loop down Aker Road, over to Quarry Road, back on Beck Road to Petrie, then over to Ansborough and back toward Waterloo. 

There are some good grades out on that loop which would test the climbing and the descending traits of the bike and my legs, of course! But along the course of this ride, I learned something remarkable about this bike, which I will get to in a bit. 

What the heck is this? Hero gravel South of town? Crazy!

We've had some decent amounts of precipitation lately on several occasions, but we are still no where near being out of the woods when it comes to this drought. The roads were bone dry, dusty, and while there was plenty of places where water was standing in the ditches, the streams are still very low. 

Rural garbage truck. The amount of dust being kicked up is a sign we're still in drought mode.

Is this field planted already?

I saw a lot of fields that looked like the image above where you could discern rows of.....something. Is this corn? In every instance that I saw this it was a field that had soybeans in it last year, so I surmised that it was corn. I'm probably wrong, but if not, this feels pretty early for corn planting. 

Beck Road

So, while I was lost in thought, which isn't uncommon while I am riding, I suddenly felt a tugging on the handle bar. I had found myself in a rut created by a large wheel and tire which had made an impression into the road when things were wet, but was now solid as concrete. My front tire had caught the left side of the ridge in the rut, causing my front tire to scrub and be pulled hard to the left. 

I was clipping along at probably 12mph - 14mph at the time, which is the window for my normal pace. So, on any other bike, this situation would have jerked the handlebar out of my hands or caused the front wheel to flop to the left . In either case, I would have been going down. 

Somehow, and I credit the geometry of the bike for this, I was able to hold the bars steady and steer out of the rut. The force pulling the wheel to the left was so great I could actually feel the carbon steer tube wind up a bit! That was crazy! But I kept the rubber side down, as they say, and rode on amazed by what had happened.

Look closely and you'll find the three deer in this image.

So, the rest of the ride went pretty well. I did run across a fellow on his road bike who said he was down this way from Rochester, Minnesota to ride our trail system. This was when I got back into town and was riding home on the paved trails. He looked at me funny, and I guess I can understand since I was riding the Honeman Flyer with its wild paint job, riding single speed (!), and riding with a flower covered vest and pink wool socks (!!!). He peeled off at a trail intersection and I did not see him again. But it was cool to know that people are already coming down to ride our trails here. 

Two and a half hours later I got home and was pretty tired. That wind made me work! But what a great day on the bike. 

Sunday, April 07, 2024

Two Things

Image courtesy of Wolf Tooth
Wolf Tooth Tubeless Valve Kits:

Does Wolf Tooth have something new to announce every week? It seems that way this year. This time it is tubeless valve kits in various anodized colors. 

The kits, which cost $31.95, come with two valve stems, two different styles of gaskets, valve caps in a matching color - one that is a core removal tool, extra gaskets, and two spare valve cores. The stems come in either 40mm or 60mm lengths to cover most wheels.

Sounds like a pretty good deal to dress out your rig in a pop of color on the wheels. There are nine different hues to choose from including "Oil Slick" which I rarely see in anything outside of drive train parts. 

Comments: These look a lot like Muc-Off's valve kits, which I have used before. Their kits have recently been upgraded and they have more color choices and are also foam insert compatible. they cost about $3.00 more though. 

I like Wolf Tooth's use of an oversized nut to secure the stem to the rim. Those are nicer to get a good seal and also nicer to get removed out in the field should you have to do that. That said, I haven't had a tubeless valve fail in quite a while, so that may not be such a big deal anymore.

State Bicycle Co. & Grassroots Gravel Partner For Ride Together Grant:

While I was attending Mid-South at the Expo day, I ran across a booth with a big banner that read "Grassroots Gravel". I figured I'd better investigate that! Anyone grabbing that name had better be "legit", in my opinion, or that might be seen as a pretty cheeky name for an organization or event bent on just being another "taker" in the gravel scene. 

Well, I was pleasantly surprised to find out that the organizers of this event out in Pueblo, Colorado are, in fact, very much about grassroots gravel, as I understand the term. I hope to have one of the two RD's on the podcast at some point soon, but recently I have been made aware of an effort on their part in partnership with State Bicycle Co. to foster a program to bring in folks who otherwise could not afford to go to such an event. They are calling it the "Ride Together Grant", and it will be funded, in part, right out of Grassroots Gravel's budget. 

Here is a bit, provided by State Bicycle Co., describing how this will work:

"The Ride Together Grant will provide an opportunity for registration, travel & lodging expenses, and equipment support for riders facing financial barriers to participating. Ten free event entries will be awarded, five expense stipends to support lodging & travel, and State Bicycle Co will be providing a new gravel bike to five awardees. Additional in-kind support will be provided by event partners Flow Formulas, Twisted Spoke CBD, Squirt Cycling Products, and Pearl Izumi. The bikes will be assembled and tuned by The Great Divide bike shop of Pueblo, CO prior to being transferred to the awardees. "

I have been critical in the past concerning some of the "big-time events" alluding to being "inclusive" and then charging triple-digit entry fees, which besides travel and lodging expenses, pretty much puts the attending of that sort of an event beyond the reach of minorities and marginalized folks. I've said that these events should have a fully sponsored package to bring those sort of people to their event, put them up, and give them free entry. Well, there ya go, Grassroots Gravel, you done did it! 

This is very impressive from an event that, for all intents and purposes, is just getting off the ground, seeing as how they have only run one event. This should be an example to those bigger, higher budget events that push the inclusivity narrative but are not walking the walk like Grassroots Gravel is. 

Check out the event at THIS LINK if you want to learn more.

Saturday, April 06, 2024

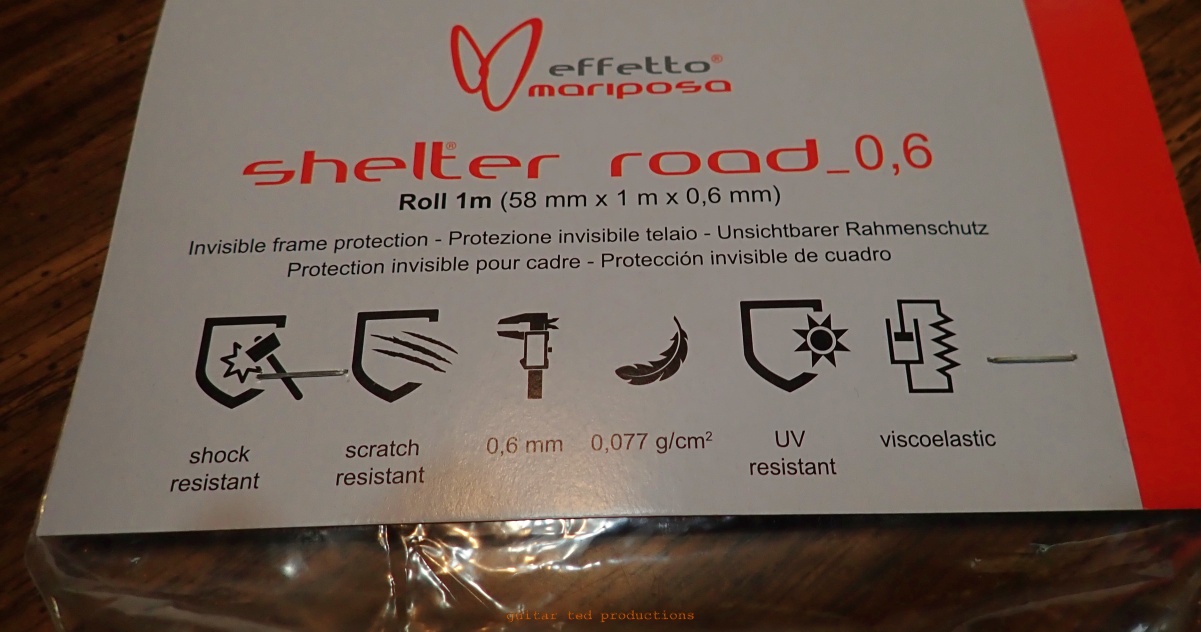
Review: Effetto Mariposa Shelter Road 0.6 Frame Tape

 Note: This review of Effetto Mariposa's Shelter Road 0.6 tape is being done independently of their knowledge and the product was paid for by Guitar Ted. 

Years ago I used some Effetto Mariposa Shelter Tape on a custom made frame I had done back in 2007. That frame ended up in the hands of a co-worker of mine. He came to me one day and asked what this weird clear "sticker" was on the downtube of that frame. Then I remembered....

Oh! Shelter Tape! That stuff that prevents rocks and other debris from chipping your paint, or helps prevent cable rub. That stuff! It was a timely remembrance since I had just received another custom made frame and custom paint job on it and the fork which I was concerned about since it was on a bike to be ridden on gravel. 

So, I decided to give the Shelter Tape another try. By this time Effetto Mariposa had added a few options within the range of protective tapes which allowed me to choose the slightly less thick "Road" version of Shelter Tape. I ordered some up, received it recently, and now I am ready to start this review.

What It Is: Shelter Road 0.6 Tape is a two-part tape. The outer layer is a scratch resistant material which is mated to a visco-elastic 0.4mm layer. This visco-elastic layer helps transmit shock through the tape and not into the frame material. 

The Road version is available in rolls measuring 50mm X 1m, 80mm X 1 m, 58mm X 5m, 80mm X 5m, all at 0.6mm thick. 

The adhesion process takes about 8 hours for Shelter Tape to reach "optimal bonding" after which time normal use of the bicycle or washing the bike will not affect it. I can attest to the holding power of Shelter Tape as my old custom frame showed no visual evidence of any of the tape edges lifting. As well, the tape was still clear and not yellowed after all these years. 

The size I ordered was the 50mm X 1m and the price before shipping was $32.00. Shipping from Switzerland, the home of Effetto Mariposa, cost about another $10.00. You can also find Shelter Tape at bicycle dealers who carry their products and there you can probably save a bit on shipping from overseas. 

The Shelter Tape has an adhesive which is a bit on the aggressive side.

Installation: Shelter Tape has an adhesive which is covered with a backing tape, kind of like a vinyl sticker might have. It is wise to cut the tape into the desired length, width, and shape before taking that backing tape off as the adhesive is pretty aggressive and finger prints will show if you touch the adhesive side. 

Surface preparation included a wipe-down to knock off any dust or dirt, then a quick wipe-down with some isopropyl alcohol. A clean, dry surface is imperative to achieving the best results. Once you have all the preparations done, it is time to apply the tape. 

The 50mm wide width was perfect for my steel frame and the 1 meter length was just barely long enough to get everything I wanted to cover covered. I ended up doing the entire length of the down tube, the bottom bracket shell, the potential rub areas in the fork crown and chain stays, and the top of the right chain stay. 

After taping the Shelter Tape is pretty invisible to most folks.

Impressions: The Shelter Road 0.6 was about the same experience as I remembered from handling it before. One must exercise a lot of care and patience to get a great result. I might suggest conning a friend into doing the job for you if you have a short attention span and details are not your thing. While it is possible to pull the tape back off while installing, it is nearly impossible to do that and not ruin the tape. So, all the preparation is very important and care in installing is paramount. 

I was pretty pleased with my outcome. It took about an hour total to install it including preparations. The tape is pretty invisible, but you can see it if you look closely at a bike which is using Shelter Tape. I don't mind that as having no paint damage is more important to me than being able to see where the tape edges are at on the frame.

While you can see the tape edges, you have to know where to look.

Expectations: The visco-elastic tape is claimed to be able to damp vibrations from gravel riding. Effetto Mariposa makes this bold claim and I will be interested in seeing if this is true. 

Otherwise I expect the Shelter Tape to ward off any dings and scratches inherent in gravel riding. I probably could have done the chain stays on the underneath side to really get 100% protection from rocks, but I did not have enough Shelter Tape to do that. I don't expect to see a lot of damage down there though, but we will see and it will be a nice contrast to see how Shelter Tape does protect things if that area does see rock hits. 

Stay tuned for updates, but I wouldn't expect anything until I get a lot more rides in on this bike.

Friday, April 05, 2024

Friday News And Views

5DEV direct mount chain wheel as shared on their social media.
 The Colorful Edition of the FN&V!

Fashion Plates?

I've been noticing a trend of late on social media. Bicycles with derailleur drive trains being shown with 'pie plate' style, solid chain wheels as 1X drive rings. 

I first noted this back in 2022 at the Gravel Cycling Hall of Fame shindig in Emporia, Kansas. I noted a Stormchaser single speed with a brilliant purple, solid chain wheel. 

Then I found out that Absolute Black does a 'pie plate' style ring, which is supposedly aero. It is a rather stark, unusual offering from this company known for its more open designs and industrial looking offerings in several anodized colors. 

Now I am noticing a few custom bikes being shown on the Insta that have silver colored, solid chain wheels. Okay.....something is going on here. I suspect that some more offerings in this style will appear at Sea Otter soon.

I don't know if I am a fan though. Color me jaded by years of working on cheapo BMX kids bikes, but these look like a gussied-up department store bike component. It's hard for me to take the 'pie plate' look seriously. But that's probably just me. What do you think? Let me know in the comments.

Image courtesy of Wolf Tooth.

Wolf Tooth Announces New Colors For SS Cogs:

Now for the other end of the drive train, you have Wolf Tooth announcing new colors for their line of single speed cogs. Gold and Orange are being added to their other offerings in the range. 

These are aluminum, of course, but Wolf Tooth also has a stainless steel single speed cog offering for those of you who want the longest lasting cogs and don't care about fashion. (Ha!) 

Comments: I am happy that someone out there still believes in making single speed stuff. That kind of went away for a while there in the last ten years and for a while I was worried that I'd be scrounging for parts for my several single speed bikes. But Wolf Tooth must be selling these things, otherwise they would not introduce more colors, I would imagine anyway. 

Now I know where to go to replenish the look on my Campstove Green Karate Monkey when I wear out a cog, or want to change gearing, and want a green cog! 

Image courtesy of Wheels Manufacturing.

Wheels Manufacturing Offers Anodized BB-30 Options:

Now on to the bottom bracket! Wheels Manufacturing recently added anodized color options for their range of bottom brackets for 30mm spindles. Now available in seven anodized hues for BSA 30, T-47 internal, T-47 outboard, and PF-30 variants. 

Prices are $100 - $124.00 each. You can check them out HERE along with all their other bottom bracket options. 

Comments: I've used Wheels Manufacturing bottom brackets for repairs and personally for years now and have found them to be very good quality options for a decent price. The anodized colors are just icing on the cake here. 

Image courtesy of Chris Skogen's social media

Almanzo 100 v3?:

Monday a surprise announcement from Chris Skogen, the founder of the seminal and legendary Almanzo 100, came out, via Skogen's Instagram page, announcing that the Almanzo 100 was coming back. 

This would mark the third come-back for Skogen and the second time for the event to come back as well. (A timeline of events documenting the retiring of the Almanzo 100 name and original event can be found HERE) 

In the announcement, Skogen indicated that the 100 mile event would occur this May on the 18th. Other details are yet to be released, but this post will be updated when and if those details become available. 

The announcement reads as follows, taken from Skogen's Instagram:

"***WE’RE BACK***

That’s right, we’re bringing Almanzo back!

WHEN: Saturday, May 18th - 8:00am
WHERE: Starting location will be announced here on May 11th
WHAT: 100 mile self-supported route (no drop bags, no outside support, no GPS)
WHO: Everyone
WHY: Because

See you in a few weeks!!

#nerd #party"

Comments:  Mr. Skogen has been known to make surprise, unexpected announcements at odd times regarding the Alamanzo and its satellite events. (See link above) On April 2nd he posted again saying this was "real" and that he is, "Taking another swing at building community in and around the bike space."

 UPDATED 4/7/24: Mr. Skogen posted on Saturday on Instagram a list of gravel events with some designated as events he will attend. Quoted: "I’ll be at the events in BOLD." One of those events he marked in bold, on May 18th, is The Heywood Ride, the ride that Mr. Skogen handed over to the organizers of The Heywood, when it was called the Almanzo,  and asked that they not use the name "Almanzo" for it. So, they came up with "The Heywood Ride".

So, is the Heywood going back to being called the Almanzo? 

Stay tuned........

Kit for a Cause Jersey image from Gravel Worlds social media.
Jersey To Benefit Cancer Causes:

Gravel Worlds announced recently that they are offering "Kits For A Cause" now through their jersey vendor, Voler USA. 

The first is a design by Kevin Wilkins that features dogs biting one another with a sign on the rear that says "Chase me!"

All profits from the sales of the jerseys are going toward cancer survivor @kevinwilkins and the organization Grind For Life.org which has a mission to provide financial assistance to cancer patients and their families when traveling long distances to doctors and hospitals.

You can check out the kit and order at this link:  www.gravel-worlds.com/kit

Orders for this kit close on April 15th. Gravel Worlds says there will be other efforts similar to this in the future.  

The Guitar Ted Podcast Sponsored by The Spinistry:

A new episode of the Guitar Ted Podcast is up now. In this one N.Y. Roll and I discuss the celebrations of last place, the Sardine Tool, and N.Y. Roll's experience in Texas recently where he rode the Red River Riot.

You can listen to the episode by clicking THIS LINK. 

We are working on new episodes concerning tires and their construction, how gravel roads are made and why, and more. If you have any episode ideas, let me know in the comment section. 

Thanks again to The Spinistry for their continued support of The Guitar Ted Podcast and check out their Gravel 1000 challenge which anyone can engage in from any location. You can find out more about this challenge by clicking THIS LINK.
 

That's a wrap on this colorful edition of the FN&V for this week. Have a great weekend and thanks for reading Guitar Ted Productions!

Thursday, April 04, 2024

Gravel Riding And Suspension Forks

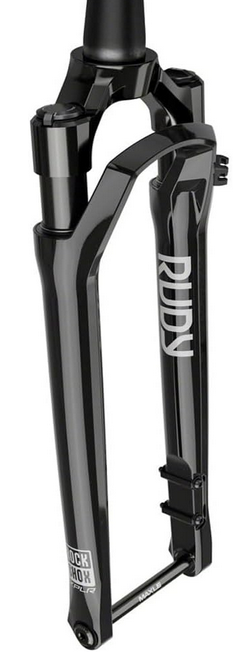
Image poached off Amazon
Does The Cost & Maintenance of a Gravel Suspension Fork Outweigh The Benefits?

I recently read a 'review' (and I use that term loosely in this case) of a Rockshox Rudy Ultimate XPLR gravel suspension fork. The model features some pretty cutting-edge suspension fork technology and comes in either 30mm travel or 40mm travel options. The minimalist travel is mostly due to the restrictions in geometry and stack height for a gravel bike. 

Before I get into my opinions on this, and any gravel bike suspension forks, I will admit to not being a fan of having such a device on a bicycle meant for gravel riding. I understand the "problem" that forks like these are trying to solve, I just do not agree with the solution presented in the form of a telescopic suspension device.  I feel, and I have tested, other forms of dealing with the problems of vibration and rough roads that I feel are not only as effective, or better than a telescopic fork, but are, in most cases, less expensive and easier to maintain than a telescopic suspension fork could ever be. 

Furthermore, I have ridden a gravel suspension fork before on Iowa gravel roads for a good amount of miles, so it isn't as though I don't have any experience with the form factor. So, with all that said, let's dive into this....

The Benefits: Obviously, these things would not exist if it weren't for real, measurable benefits of these forks. Again, it is one way to solve the problem of vibration and bumps that can fatigue a rider, or cause issues like hand pain, etc. The devices offered by Fox and Rockshox are probably the most sophisticated and technologically loaded solutions one can find to address this problem with riding gravel. The forks do a thing and do it with a modicum of success. At least, compared to other solutions meant for riding gravel. Now if we bring in anything meant for a mountain bike, well....That's a totally different story.

I tested this Otso Waheela S with a Fox telescoping suspension fork.

The Problem: Minimal travel on a suspension fork is a handicap for riders. Until, and unless, designers start modifying designs to accept longer axle to crown suspension forks with more travel, this issue with minimal travel cannot be overcome. It is simple physics. Any review of such a device that ignores this is not worth the digital ones and zeros it is made from. 

So, will designers start doing this? Will "gravel bikes" morph into short travel XC mountain biking territory, only with skinnier tires? I doubt this will happen since then the consumer will not see the bike as a "road" bike anymore and at that point, just buy a mountain bike instead of something "less than" a mountain bike. In this way, designers are also pigeonholed into short travel forks for gravel, and therefore they are doomed to proffering up forks that don't quite live up to their billing. 

What They Don't Tell You: The main hidden negative to any telescopic suspension fork is the maintenance that is "required" for such devices. Gravel suspension forks are no different here. Let's take the Rudy Ultimate XPLR as an example.

Service intervals, according to SRAM, the manufacturer of Rockshox forks, is the same across the board for their range of suspension forks. So, every 50 hours SRAM recommends lower leg service and every 200 hours they recommend a full-service on the fork damper and internals. Okay, what does that mean for the average rider? 

That means that you probably should be getting full maintenance done every year, at a minimum, and lower leg service more often than that. By my math, which could be wrong, anyone who rides 2,500 miles a year of gravel with a suspension fork is going to fall into that once a year, deep maintenance category with multiple light services as well. 

From Rockshox social media in 2023

What would that cost? Anywhere from $100.00+ for light service to closer to $200.00 for that deeper service, plus parts. That's not insignificant. That's on top of the price of the fork, which if bought separately is about $700-$800 bucks.

Of course, you could ignore the service intervals. Many likely do. But at some point, your denial will catch up to you and then what? As a mechanic, I can tell you that this will end up costing you more when you finally do decide it is time to fix that fork. There is no way around it. Suspension forks will cost you dollars and downtime at some point.

What Are The Alternatives? I think that before I get into hardware solutions it needs to be said that the first thing to work on is you. The status of your physical condition, your fitness, and your expectations need to be honestly examined. A suspension fork won't fix a person's issues of being out of shape physically, it won't fix a bad bike fit, and it won't make a century ride you are not ready for doable. 

I've seen a lot in my time as a mechanic and many odd solutions for issues that start with the rider have been affixed to and applied to bicycles that were less than effective. In some cases these were downright dangerous. Now, a gravel suspension fork isn't dangerous, of course, but it could be a very expensive band-aid for something else that is not being realized, or that is being ignored. I'll mention this again - Bike fit. It's HUGE, and a good bike fit makes a monumental difference in where you go next in making decisions like getting a component or not. 

Okay, 'nuff said there. Let's take a look at other less expensive ideas. Things like using tire pressure, different handlebars, compliant seat posts, or even a suspension stem. Maybe all of that. Keep in mind that most of your issues stem from medium to higher frequency vibrations. Vibrations that a suspension fork typically does not address, nor is it meant to address. 

This is where the Lauf fork gets a bad rap, in my opinion. Some folks equate that fork with the typical telescoping suspension fork. The Lauf is meant to absorb all that mid to high frequency stuff, not to eat bumps, pot holes, and washboard so much. It can do that, but with no real damper, it doesn't fare well over repeated hits like that. A suspension fork like the Rudy is meant for bigger hits, in terms of design theory, but again, due to gravel fork's limitations (both real and imposed), it cannot do that job really well either. 

But the big kicker is that all of the alternatives do not require the repetitive and expensive maintenance that a telescopic suspension fork does. So, the alternatives are not only more effective, typically, than a suspension fork on gravel, but are also less expensive to own. 

Conclusions: So, maybe I am a "hater", and if you think so, I can see why. However; I would ask you to weigh the evidence and see if you do not agree that a telescopic suspension device, as presented currently for gravel, is not a very effective measure for addressing mid to higher frequency vibrations found commonly on gravel rides. I would even submit that smaller bumps and some lower frequency stuff is also addressed by a simple, low maintenance suspension stem. 

One third the price of a fork, near zero maintenance. (Image courtesy of Cane Creek

Wheels, tires, handle bars, seat posts, and saddles can all combine to nearly erase the mid to high frequency vibrations that fatigue a rider. Now what about those potholes and washboard sections? What about hard, rough trails and roads?

This is where a drop bar MTB-like bike such as a Cutthroat with a suspension fork would be superior. Yes - even those forks require periodic maintenance. However; the 80mm - 120mm telescopic fork has a far, far better performance over potholes, washboard, and hard, rough roads than anything hamstrung by less than two inches of fork travel would. One has to decide what sort of surfaces they will be expecting to ride most. Any decision on any bicycle or component is going to be a compromise to some degree. You have to decide what is best for you and your riding.

Again, I'm not saying a 30mm - 40mm telescopic fork doesn't do anything for the rider. I am saying that such a fork is not the right answer. The maintenance costs outweighs any possible benefits to the rider when the forks with that sort of limited travel don't do anything really well.

Wednesday, April 03, 2024

Review: Redshift Sports Top Shelf Bar - Intro

The Redshift Sports Top Shelf Handlebar.
 Note: Redshift Sports sent over their Top Shelf drop bar for test and review at no charge to Guitar Ted Productions. I am not being paid, nor bribed, for this review and I will always strive to give you my honest thoughts and opinions throughout. 

Drop handle bars for gravel riders keep evolving and one of the latest evolutions in drop bar design for gravel and recreational uses is the Redshift Sports Top Shelf Bar. The Top Shelf is at once familiar to to many of you that already have seen or have used a Redshift Sports Kitchen Sink Bar because the Top Shelf is basically that same handle bar at its core. The difference is that the Top Shelf has a riser portion at its center. 

A riser center section maybe is nothing new in a flared drop bar, but the Top Shelf has a continuation of the riser portion that goes all the way across the bar with the riser section being dropped below that and this is where the stem attaches. This gives the Top Shelf Bar a few advantages over other riser drop bars for gravel. 

For one thing, the Top Shelf looks more normal. It almost appears as a standard drop bar until you really look at it. This is probably more descriptive of the 50mm rise (tested) Top Shelf than it is the 70mm rise option. Yes, there are two rise options and two widths available now - a 44cm and a 47cm, (tested).

You also have more options to mount accessories without being hampered by the riser section. Redshift Sports also claims that your handle bar bag won't be flopping around since the bag will have another support in the section that the stem attaches to. By the way, Redshift will be making a handle bar bag for the Top Shelf coming this Summer. 

As stated previously, this new handle bar is identical in back sweep, drop, flare and reach to the Kitchen Sink Handlebar, which I already have tested and still use. With a 50mm rise, I thought this might be a good time to address something I've had an issue with for a while now. That being the low stack height on my 2014 Raleigh Tamland Two. 

The low front end on that bike required that I run my stem in a slight rise, I want to say it is a 7° rise, but I could be wrong there. At any rate, I am loathe to run a stack of spacers and high rise stems on a gravel road bike because (a) a bunch of spacers puts a lot more leverage on a steer tube and headset and (b) I simply just don't like the looks of that. That's me, I guess, but I do have to like the looks of my bicycles, so there ya go. 

The 50mm rise of the Top Shelf Bar gave me some options. I could keep the stem in the "rise" position and add the handle bar. OR - I could flip the stem to the negative rise and add the bar for a higher position than I had, but not too high. I took the latter option and it raised the bar position not quite 50mm, at about 46mm, from where it had been before. So now the drops were easier to get to and stay in. The tops of the handle bar were, obviously, more upright than the previous handle bar's position, which is nice for cruising. 

At a glance the 50mm rise isn't very noticeable.

But not so from the frontal view. Note the cross bar blends into the handle bar tops.

My impressions of the looks are also favorable. The side view looks almost normal, and the cross bar, which is really the handle bar top section all the way across, gives the bike an almost BMX-drop bar feel. Mount a handle bar bag or bikepacking gear on the Top Shelf and anyone that saw the bike may not ever notice that it is a riser bar. 

I received the 47cm version for testing ahead of the official release date. So, I have several rides on it already. On a recent gravel ride I noted that the set up with the Top Shelf did make it more welcoming to stay in the drops. It is a good thing Redshift stuck with the design of the Kitchen Sink as the Top Shelf has similarly good extensions. Add the Cruise Control lower grips and this could be where you ride the Top Shelf bar all the time. 

I used Redshift's "Extra Long Bar Tape" (Sent along with the Top Shelf Bar) to cover the Top Shelf Bar and its grippy, yet somewhat forgiving feel is a nice compliment to the slight bit of compliance that the Top Shelf Bar has going on. Again, a nice addition here would be a Redshift Sports ShockStop stem, but I went full-rigid for this test to focus on the Top Shelf Bar. 

The Top Shelf Bar has a nice, all-day feel to the drop section.

Conclusions: Since this Top Shelf Bar is basically a Kitchen Sink Bar with rise, I have to defer to my take on the Kitchen Sink here which is a very favorable one. Redshift Sports used all the same flares, sweeps and other dimensions for the Top Shelf as they did for the Kitchen Sink Bar. If you like a Kitchen Sink Bar you will like the Top Shelf Bar. 

If you haven't tried the Kitchen Sink Bar, well it is one of the bars that hits the hands well and has a very nice feel in all positions. Like the Kitchen Sink, the Top Shelf is not a lightweight handlebar. I weighed my example in at 510 grams. But you don't buy a Top Shelf Bar for light weight. You get it to relieve stress on the back, or to address a bike with low stack height, or maybe you like the "moto" looks of this particular drop bar. 

Amazingly the Top Shelf Bar has some "give" to it and is not overly stiff, which is nice to find. So, it may be a little on the heavy side for a flared drop bar, but at least it doesn't zing your hands because the material is too stiff. 

I can see this bar being one to solve issues for riders suffering from injuries that keep their flexibility limited, or for those bikepackers that want a drop bar that will accommodate a more "heads-up" riding style and yet function as a drop bar. The extra mounting options have to be seen as a good thing here as well. At least that rise section isn't compromising options to mount stuff, as with some other riser drop bars. 

Stay tuned later this year for a long-term review of the Top Shelf Bar. So far, I like it really well. We'll see how I feel after a few months using it if that holds up in the long term.

 The Top Shelf Bar is available now at Redshift Sports HERE for $139.99 USD.

Tuesday, April 02, 2024

Gravel Grinder News: Shimano Introduces ESSA 8 Speed Components

Today Shimano announces a new component parts name in ESSA. This will be a designation for a new rear derailleur and crankset that will be seen on many "affordably priced" new bicycles in the marketplace. ESSA will be compatible with all current Shimano Hyperglide 8 speed parts with the exception of CUES, which is its own standard. 

ESSA will also be paired with Acera, Altus, and Tourney TX systems. The rear derailleur will have a maximum capacity of 34T and a maximum low cog size compatibility of 45T. The ESSA rear derailleur will use the Shadow profile developed for MTB rear derailleurs. There is no clutch, but Shimano claims that the derailleur spring tension has been optimized for 1X drive train operation.

Image courtesy of Shimano

In other news Shimano also has introduced a new CUES shifter which has been optimized for smaller hands called S-Reach. The throw of the triggers has been reduced by 11% and the triggers have been placed to be more on the same plane to enhance ergonomics for smaller hands. 

Finally, Shimano has also revamped it's non-series hubs for more robustness and better sealing to adapt to the needs on eBikes. 

Comments: While not really gravel specific, ESSA and the new S-Reach CUES probably will find their way onto many youth bikes which may see gravel use. Additionally, CUES S-Reach shifters may see spec on some lower priced flat bar gravel offerings in the youth and women's bike ranges of some companies. 

It is hard to imagine that 7 speed components will be left behind, but with no mention of ESSA working with 7 speed, it may mark the beginnings of Shimano finally leaving 7 speed components behind for good. In this old mechanic's opinion, I have found it hard to believe 6 and 7 speed stuff still exists as new parts on bicycles. It would make sense from a business standpoint for Shimano to cut those SKU's and focus resources on 8 speed and above. Perhaps this ESSA introduction marks that this time has arrived. 

Note: Images and information used in this post were provided to Guitar Ted Productions by Shimano.

Review: Equipt Sardine Tool

Note: Equipt sent over their Sardine Tool for test and review at Guitar Ted Productions at no cost. I was not bribed nor paid for this review and I always strive to give my honest thoughts and opinions throughout.

Equipt is a brand out of Japan that makes a small multi-tool for cycling called the Sardine. I was contacted by Koh who runs Equipt and was asked if I would consider taking a look at this tool. You can follow Equipt on Instagram HERE if you are interested in more details. 

What It Is: The Sardine is a basic multi-tool with a 3-D printed mounting base/holster that mounts to a water bottle boss on a bicycle. The tool itself is made from aluminum with tool steel bits in 3mm, 4mm, 5mm, and 6mm sizes along with a T25 Torx bit. the tool ends flip out or rotate 180° for access to the different sizes. The bits can be angled as well to increase leverage or for reaching fasteners at an angle. 

The Sardine body is aluminum which can be had in several anodized colors. I have green and purple anodized Sardines and N.Y. Roll has a green anodized one as well. These tools also come with a 3-D printed holster which the Sardine can be snapped into. You can mount that all on the bike or simply carry the Sardine in a tool bag or other bag of your choice. It is not recommended that you carry a Sardine in your pocket/jersey as the bits could cause injury if you were to fall on the tool.

The Sardine mounted to my Singular Gryphon Mk3.

Impressions: The Sardine tool is definitely one of those minimalist tools seeing as it has only the basic bits for most fasteners on a bike. The aluminum body seemed to be robust and the anodization was done quite nicely. No faded portions or variations in the hue were noted. 

The tool bits are easily rotated but will not flop around or rotate at will. The bits have just the correct amount of friction to prevent them from rotating freely. This is a nice detail for this sort of tool and one that not every tool gets right. 

The length of the Sardine, not including the bits, is approximately 85mm. This and the gently curved and rounded shape give the Sardine a good amount of leverage when tightening or loosening a fastener without any sharp corners that could cause pain when applying a lot of force. I also appreciated that the 6mm hex bit was placed more towards the middle of the Sardine's body so you can really get a grip on the tool and apply maximum force. This was a smart idea since the 6mm size fasteners typically are going to require more force to tighten and loosen. 

The tool bits seem to be precisely sized and made well. I used a Sardine for a day in my work at a bicycle collective and it did all the tasks I required of it with ease and it felt good to use this tool as well. So, in terms of the design and functionality of the Sardine, I can give it high marks. 

The holder is a nice feature, but I did not think I would like it as much as I ended up liking it. Well, "appreciate" might be a better term here. See, I carry most every multi-tool I own in a bag. Top tube bags, seat bags, tool bags, etc, but I haven't ever really given thought to mounting a multi-tool off a water bottle cage mount. 

First off, I was fearful of knocking the thing off the bike and then what? You are out of a tool. Well, I decided to test this out when I went on my ramble through the Washington-Union access which saw me bushwhacking my way through some thick underbrush and downed trees. 

Through all of that the Sardine was not moved. It stayed securely in the mount, so that fear was dispelled. But would this external mounting of a multi-tool really be necessary? I mean, it is nice to show off that brilliant anodized Sardine tool body, I'll give you that much. However; would that mounting idea ever be practical or better than having the tool in a bag?

That question was answered at Mid-South this year. I was not intentionally looking to use the Sardine in such an event. In fact, I was hundreds of miles away from the Sardine when I realized that I could have benefited from the tool and its mounting from a bottle cage boss. 

I had a multi-tool at Mid-South, but it was in a tool roll hanging off my saddle rails. Fashionable? Yes, but functional? Eh..... Digging out my multi-tool twice convinced me that had I run a Sardine tool off a bottle cage mount I could have saved a bunch of time spent fiddling with a tool roll on the side of the road. 

Lesson learned.

Conclusions: The Sardine tool is a well thought out multi-tool with a unique take that feels good to use. I liked the external mount, but what I did not see coming was how that mount makes the tool more readily available since it is at hand when you need it instead of floating around in a bag. You know at a glance whether or not you have it with you and because of that you are less likely to forget where you put the Sardine. Of course, this is all predicated on the assumption that the mount is secure and stable, which, as far as I can tell, is the case. 

What's not to like? Well, this tool costs $60.00USD, which is a premium price for a tool that carries only five bits. That kind of money can buy a Topeak Mini PT 30, as an example, which has 30 functions, so it might be hard to justify the Sardine based upon that alone. However; the minimalist amongst us might appreciate the Sardine for its ergonomic design, economy of choices, and for its aesthetics. Not to mention the mount, which has its own appeal. 

I like the Sardine as a functional tool that has bits that are easily accessed, easy to use without the other tool bits interfering, and that it has the basic fastener bits most bikes need. Nothing more, nothing less. Oh.....and it looks cool. Yeah...sixty bucks is a lot of cash for this tool, but it isn't without value. It just depends on whether or not you can see that value and whether or not that matters to you. 

The Sardine Tool is also a bit hard to come by, so there is that as well. You can get one HERE if you are interested.

Monday, April 01, 2024

Honeman Flyer: Reviewed

This review of my Honeman Flyer from King Fabrications is going to cover mostly what I think about the geometry of this bicycle. I will also touch upon a few other things concerning the way it handles and on some of the parts I have on the bike. 

NOTE: The frame, fork, wheels, and a few other small parts were paid for out of pocket by Guitar Ted. Most of the cockpit components were gifted or sent in for previously written up reviews at no cost. 

None of the companies represented in this review paid for this post or have any pre-knowledge of this review being done. As always, I strive to give you my honest thoughts and views throughout. 

Now, on with the review.

Obviously the whole intention of the Honeman Flyer project was to prove if old 1930's track bike geometry had any bearing on current gravel bike geometry. It sounds like a far-fetched idea, but when you dig into history a bit, it starts to make more sense. I already wrote about this in an earlier post which you can read HERE. 

In this post, I will give you my take on what this unique geometry feels like and how it handles on gravel roads in the 21st Century, nearly 100 years after bicycles with this geometry first appeared on the board tracks across the United States. This post will also dispel the uninformed notion that "gravel bikes are just 1990's MTB's".

A long grade I rode up during the Mid-South gravel event recently with the Honeman Flyer.

The radical part of this bike is the rear end. The front? Pretty standard fare, actually, and I was quite surprised that 1930's track bikes would use numbers almost spot-on for a gravel bike made in 2024. However; no one is currently using the odd rear end geometry that the King Fabrications Honeman Flyer does. 

Just to quickly recap, the seat tube angle is a slack, slightly less than 70° while the chain stay is currently set at 450mm with the slider drop-outs. That connects to a bottom bracket that has 76mm of drop, which is what the geometry I found dictated for the 1930's track bike geometry I copied. That's a little lower than most, but not as low as I've seen today by far in a gravel bike. 

Just to keep things interesting, I went with a single speed specific frame and my gearing was "John Deere 4020" at 40T X 20T. A little lower than a lot of folks single speed gravel gearing, but my worst facet of gravel single speeding is climbing, so I erred to that side. 

Remarkably, I found that, while standing and mashing was certainly possible on this geometry, seated climbing worked better. It just seemed to fit my style and was a bit less of an effort to do, which is counter-intuitive for single speed riding. Especially when your cadence drops very low. 

Image by Erik Mathy

I'm not sure what else to attribute this to other than that perhaps having the bottom bracket a little further in front than I would normally have. This made seated climbing more desirable. Standing and mashing was fine, and I have no trouble getting into a standing position for climbing, it is just that seated climbing felt better and less strenuous, despite the low speeds at times. 

Even with the longer chain stays, I had no troubles with climbing in either position, dispelling any notions that longer chain stays are "bad" for climbing. I did get the rear tire to break loose twice during the same climb while standing but it wasn't detrimental and only was a brief "scratch" of the rear tire. 

I've already mentioned that cornering was a trait I immediately felt was a big improvement with this geometry, and that single track section at Mid-South only furthered my feelings that this is a strong suit of the Honeman Flyer. 

Another time when stability was prized was a brief moment during the Mid-South when I crossed over some looser dirt/gravel during a descent and the rear end broke loose. I was easily able to correct and ride it out, which seemed intuitive and not at all 'twitchy'. That was a nice revelation. 

Another interesting thing about this geometry is that the wheelbase is not crazy-long. It measures a touch over 41 inches at 1043mm, which isn't out of the ordinary. My Twin Six Standard Rando measures exactly the same, as an example. The thing is, this King Fab bike rides like a much longer wheelbase bicycle. It is definitely springy in the vertical plane and because of that, it rides quite smoothly. 

In fact, this is probably why I came out of the Mid-South without any physical issues. Normally my hands would get numb at some point, and the feeling of being "beaten up" would have been happening. However; I felt great after that ride, in terms of what I normally feel like, and I am pretty sure that was all in the bike's design. 

Now with the slipping seatpost issue squared away I can ride the bike without a constantly varying saddle height! That has proven to be a good thing and has reinforced my feelings about the geometry. Oddly enough, I actually moved the saddle back a couple more millimeters when I swapped out the post and this has been a good move so far. I never would have dreamt that making the bottom bracket a bit further forward would have this dramatic of an effect on so much of the bike's handling.

Why, exactly, the old track bike designers made the bikes like this is still a guess. I can speculate, but without some definitive dissertation from a designer from that time, all I can do is guess. There was the reference I found that intimated that these machines were often used on rough, unpaved roads while training, so that would make sense if the geometry was defined by that part of the rider's needs for a racing bike. 

Conclusions On The Geometry: So, are we the beneficiaries of old track bike geometry during these gravelly times? Maybe. I doubt that it was a direct influence, but in a roundabout way, we have ended up, at least partially, where we started. 

 As far as a connection to mountain bikes of the 1990's goes, it pays to keep in mind that early mountain bikes were an outgrowth of 1930's Schwinn/cruiser style bikes made for youths. (And their smaller diameter wheels, by the way.) Early MTB's were carbon copies of 1930's cruisers, in terms of their angles, as an example.  

So, to say that "gravel bikes are just 1990's MTB's" is really missing the mark. Those 1990's bikes were evolutions of the first generation MTB's and their 1930's inspired cruiser bike geometry with smaller diameter wheels. 1990's MTB's were not the predecessor of the modern gravel bike then. Nor were gravel bikes influenced by those early MTB's. 

The Parts: Some of the bits and pieces I used on the Honeman Flyer deserve a little attention here as well. I have Wolf Tooth Morse cages on the bike as well as their rear through-axle. I am using a painted to match Salsa Waxwing carbon fork, and those sweet TRP brake levers. 

The bottle cages are actually really good. If I were to eject a bottle, it would have been on one of the bone-jarring high-speed descents at Mid-South, or in that single track they had there. But that did not happen and I would 100% trust these cages in almost any situation. 

The through axle did its job, and that's a good thing. I did actually witness a guy have his rear through axle eject on a high-speed down hill at Mid-South. Frightening! Fortunately he was able to bring the bike to a stop without crashing. But that just points out that a good through axle used correctly is a key to a safe, enjoyable ride. Thanks Wolf Tooth! 

The TRP brake levers on the bike which were gifted to me by a reader of this blog are top notch. I love the feel and the hoods are super-comfy for my paws. Thank you!!

Finally, the Waxwing fork was something I feared would be super-stiff and unforgiving. I was pleasantly surprised to find out it was nothing of the sort. That smoother ride and those Three-pack bosses are much appreciated. 

Conclusions: So, with all of that said, does this bike do the things I need in a single speed gravel bike? To that the short answer is "Yes". However; there are always things I'd change about any bike I've ridden, and this one is no different in that regard. 

First, I'd add another bottle cage mount under the down tube and I would have arranged for two on the inside of the main triangle on the down tube. But I am a water bottle hoarder and I don't always need that many mounts. Having just four places for a water bottle will force me to pare back on the packing! Plus it would have increased the price to me for the frame and I was on a pretty strict budget.

I'd probably ask for a tiny bit more tire clearance so I could run 45-47mm tires. No big deal. At least this bike has more clearance than the Twin Six does! Interestingly, it doesn't need bigger tires, mostly due to the already fantastic ride quality of the frame and fork. The Stormchaser single speed I tested in 2020 was a great single speed gravel bike but the front end of that bike was super-stiff and unforgiving. It took me putting in 50mm tires to tame that. It is nice to have this Honeman Flyer be so smooth, and lighter, since it doesn't require those heavier, fatter tires to smooth things out.

Otherwise I am quite happy for now. I don't see anything glaringly "wrong" with the geometry. It is a super-smooth riding bike. The wheels, especially the Paul Components hubs, roll like crazy. The handlebar is comfy and along with the smoother ride, my hands are pretty happy. So, yeah.....this one is a keeper. I am excited to roll with it for years to come.