Showing posts with label townie. Show all posts

Tuesday, April 11, 2023

Roller Cams On The Brain: Final Update

It's a rollercam thing. You might not understand.
Okay, well I think I've made up my mind here about the Dorado Sherpa MTB which I have been fettling with off and on over the past several months here. I'll get this out of the way right now- It's a keeper. 

I've waffled back and forth on just what I wanted this bike to be, but I've stuck to the guideline to "service what you have first. Maybe then make modifications/upgrades. So, I ended up just fixing what needed fixing on this old Costco bike. 

It is not anything remarkable outside of the pair of rollercam brakes. That is enough for me, and the fact that old MTB's make for really comfortable city bikes. That's why I've been using an old Schwinn High Sierra as a townie for many years. That's another not very special bike without those rollercams it has front and rear. But for some reason, I've never been able to get the front one on that bike to work correctly, and it has bothered me for many years. That and there is precious little clearance for tires and fenders on that bike. 

That's where keeping the Dorado comes in. It has everything the Schwinn had, plus tire clearances, and room for fenders. Plus it even fits me better than the Schwinn does. The rollercams actually work correctly, and they were easily set up because they aren't crustified from years of usage. They have some surface oxidation, but nothing that inhibited their performance.

Now decked out in accessories for a trial period.

Anyway, there it is, all gussied up with some accessories I had laying about. The big thing here, in my opinion, are the fenders. They fit well around those big 26"er tires, (temporary placeholders), so I know anything I get that is urban/pavement oriented will likely fit fine, since those tires will likely be narrower. (Extraterrestrials probably wouldn't fit without fenders on this bike, by the way)

The fenders, Planet Bike models seemingly out of production now, are the type that have stainless steel stays and are held in place on the bike mainly by these rubber straps. Almost like a mini version of an old car rack strap. The fenders are sort of a hybrid in that you can attach them at the chain stay bridge and brake bridge using hardware and a bracket, like most fenders. Anyway, they were odd, and for the front, I had to modify the stays and fork mounting holes to get that fender to work. 

Another Planet Bike accessory, the Snack Shack top tube bag, is there along with a couple Banjo Brothers bags as well. That should suffice for most of my errands/commuting by bicycle trips in the future. 

I know I've gone on about the handlebars, but with that oddball ID for the fork steerer, and my inability to come up with a stem that would work the way I want it to, I am resigned to using the set up as it is. Honestly? It feels great to ride. Maybe I just need to get over myself concerning that particular aspect of this bike. 

The plan is to take this on a three month trial and see if it will do the tricks I need it to. (It probably will) I will need to make a few minor adjustments, I am sure, and I may add a rear rack. We'll see about that. I know I definitely do not want a front basket, and I know that from experience. This sort of bike has such a slack head angle with such a high trail figure that anything like a basket will be a chore to live with. So, no front baskets! 

 Well, that's it for now on the Dorado Sherpa mountain bike/townie. What do you think of it? Let me know in the comments.

Roller Cams On The Brain: Final Update

It's a rollercam thing. You might not understand.
Okay, well I think I've made up my mind here about the Dorado Sherpa MTB which I have been fettling with off and on over the past several months here. I'll get this out of the way right now- It's a keeper. 

I've waffled back and forth on just what I wanted this bike to be, but I've stuck to the guideline to "service what you have first. Maybe then make modifications/upgrades. So, I ended up just fixing what needed fixing on this old Costco bike. 

It is not anything remarkable outside of the pair of rollercam brakes. That is enough for me, and the fact that old MTB's make for really comfortable city bikes. That's why I've been using an old Schwinn High Sierra as a townie for many years. That's another not very special bike without those rollercams it has front and rear. But for some reason, I've never been able to get the front one on that bike to work correctly, and it has bothered me for many years. That and there is precious little clearance for tires and fenders on that bike. 

That's where keeping the Dorado comes in. It has everything the Schwinn had, plus tire clearances, and room for fenders. Plus it even fits me better than the Schwinn does. The rollercams actually work correctly, and they were easily set up because they aren't crustified from years of usage. They have some surface oxidation, but nothing that inhibited their performance.

Now decked out in accessories for a trial period.

Anyway, there it is, all gussied up with some accessories I had laying about. The big thing here, in my opinion, are the fenders. They fit well around those big 26"er tires, (temporary placeholders), so I know anything I get that is urban/pavement oriented will likely fit fine, since those tires will likely be narrower. (Extraterrestrials probably wouldn't fit without fenders on this bike, by the way)

The fenders, Planet Bike models seemingly out of production now, are the type that have stainless steel stays and are held in place on the bike mainly by these rubber straps. Almost like a mini version of an old car rack strap. The fenders are sort of a hybrid in that you can attach them at the chain stay bridge and brake bridge using hardware and a bracket, like most fenders. Anyway, they were odd, and for the front, I had to modify the stays and fork mounting holes to get that fender to work. 

Another Planet Bike accessory, the Snack Shack top tube bag, is there along with a couple Banjo Brothers bags as well. That should suffice for most of my errands/commuting by bicycle trips in the future. 

I know I've gone on about the handlebars, but with that oddball ID for the fork steerer, and my inability to come up with a stem that would work the way I want it to, I am resigned to using the set up as it is. Honestly? It feels great to ride. Maybe I just need to get over myself concerning that particular aspect of this bike. 

The plan is to take this on a three month trial and see if it will do the tricks I need it to. (It probably will) I will need to make a few minor adjustments, I am sure, and I may add a rear rack. We'll see about that. I know I definitely do not want a front basket, and I know that from experience. This sort of bike has such a slack head angle with such a high trail figure that anything like a basket will be a chore to live with. So, no front baskets! 

 Well, that's it for now on the Dorado Sherpa mountain bike/townie. What do you think of it? Let me know in the comments.

Wednesday, September 15, 2021

Townie Refurb

My Mid-80's Schwinn High Sierra townie.
 The longer term readers here will maybe remember this bike. It's literally been years since I've posted anything about this bike though, so if you are not familiar with this, let me introduce you to my townie. It is a 1986 Schwinn High Sierra mountain bike. 

This bike came to me not long after I'd gotten back into the bicycle business again in 2002. I'd guess it was probably around 2003 or so when I still was working some night shifts at the shop. One particular evening, a gentleman came in and asked if we could dispose of a couple of old bikes he did not want anymore. My boss affirmed him that we could do this. The man then wheeled the first bike in, and it was this bike I am showing today, only it did not look like this then! 

It had about three coats of spray-bomb paint jobs on it back then but otherwise it was a straight, as sold component-wise bike. The tires were flat and the cables were a mess. My boss looked at it and suggested that I take it home if I wanted as it looked like it would fit me. So, I did that, and I got to stripping it down to the bare frame. Then I scraped off most of the paint with a paint scraper and sent it to a local business that did powder coating via a mutual cyclist and then customer of the shop. He was told by me to just use whatever was in the machine for the day, and so I got this 'army green', matte finish which I happened to like a lot. 

Anyway, I set it up 1 X 5, (way ahead of anything being 1X), and started off by putting an old rack on it so I could use my ancient Jandd Mountaineering panniers. The very same panniers I used for both of my self-supported tours which I have documented here. I ended up using the original wheels off the old Mongoose 26"er touring bike from those days which are nutted axle, high flanged, and the rims have cut-outs, much like a fat bike rim would have. (That was a 'thing' on early BMX bikes, and Mongoose being from BMX did this on their early MTB's) 

Looking livelier than it had been when it was an ashen grey color!
The saddle I got in a trade, but I cannot recall how or for what. It's been years ago now! Anyway, the old Brooks Pro seemed comfy enough, so it stayed on this bike. Then I put it to use as my errand bike. It was always in the garage, ready to go get milk, diapers, butter, or beers. Then life changed and the garage roof started leaking and the next thing ya know I have a nearly destroyed Brooks Pro and a big mess to clean up in regards to the bike. 

The ol' Brooks took a hit, but a liberal application of Proofide has seemed to liven it up again. I may have to apply a bit more here and there, but I think it is going to survive. Anyway, this ol' Schwinn is pretty much bullet proof, but for a small issue with the roller cam brake in the front. I think the brake bosses need to be reamed true and round again. There was a tool back in ancient bike times that was made to do this job, but as you probably know, roller cam brakes are pretty much rare antiquities and tools to work on them are rarer yet. So, I just get by with a bit of a funky front brake for now. 

The bike rides really well. It is heavy, but it is nimble! I recall reading somewhere that Charlie Kelly, the Marin mountain biking pioneer, said that if you wanted to know what a first generation, purpose-built mountain bike rode like from the late 70's, well then just buy any Schwinn MTB made up until the late 80's as they pretty much mirror the same geometry and steel tubing sizes. If that is true, then those bikes must be a hoot to ride. It is a totally different vibe than MTB is now. Laid back, touring, ripping corners, hopping up and over stuff, and generally just crawling along anywhere, this old Schwinn seems to not be bothered with much of anything I throw at it. I suppose that with a knobby set of tires swapped in for the Continental Winter Contacts, it would become quite a fun trail bike. But that ain't a gonna happen 'round here! Nope! Maybe I'd do a gravel ride or tour with it if I swapped out the drive train to a triple 3 X 7. 

But enough of that. It's a townie now, and that is good.

Townie Refurb

My Mid-80's Schwinn High Sierra townie.
 The longer term readers here will maybe remember this bike. It's literally been years since I've posted anything about this bike though, so if you are not familiar with this, let me introduce you to my townie. It is a 1986 Schwinn High Sierra mountain bike. 

This bike came to me not long after I'd gotten back into the bicycle business again in 2002. I'd guess it was probably around 2003 or so when I still was working some night shifts at the shop. One particular evening, a gentleman came in and asked if we could dispose of a couple of old bikes he did not want anymore. My boss affirmed him that we could do this. The man then wheeled the first bike in, and it was this bike I am showing today, only it did not look like this then! 

It had about three coats of spray-bomb paint jobs on it back then but otherwise it was a straight, as sold component-wise bike. The tires were flat and the cables were a mess. My boss looked at it and suggested that I take it home if I wanted as it looked like it would fit me. So, I did that, and I got to stripping it down to the bare frame. Then I scraped off most of the paint with a paint scraper and sent it to a local business that did powder coating via a mutual cyclist and then customer of the shop. He was told by me to just use whatever was in the machine for the day, and so I got this 'army green', matte finish which I happened to like a lot. 

Anyway, I set it up 1 X 5, (way ahead of anything being 1X), and started off by putting an old rack on it so I could use my ancient Jandd Mountaineering panniers. The very same panniers I used for both of my self-supported tours which I have documented here. I ended up using the original wheels off the old Mongoose 26"er touring bike from those days which are nutted axle, high flanged, and the rims have cut-outs, much like a fat bike rim would have. (That was a 'thing' on early BMX bikes, and Mongoose being from BMX did this on their early MTB's) 

Looking livelier than it had been when it was an ashen grey color!
The saddle I got in a trade, but I cannot recall how or for what. It's been years ago now! Anyway, the old Brooks Pro seemed comfy enough, so it stayed on this bike. Then I put it to use as my errand bike. It was always in the garage, ready to go get milk, diapers, butter, or beers. Then life changed and the garage roof started leaking and the next thing ya know I have a nearly destroyed Brooks Pro and a big mess to clean up in regards to the bike. 

The ol' Brooks took a hit, but a liberal application of Proofide has seemed to liven it up again. I may have to apply a bit more here and there, but I think it is going to survive. Anyway, this ol' Schwinn is pretty much bullet proof, but for a small issue with the roller cam brake in the front. I think the brake bosses need to be reamed true and round again. There was a tool back in ancient bike times that was made to do this job, but as you probably know, roller cam brakes are pretty much rare antiquities and tools to work on them are rarer yet. So, I just get by with a bit of a funky front brake for now. 

The bike rides really well. It is heavy, but it is nimble! I recall reading somewhere that Charlie Kelly, the Marin mountain biking pioneer, said that if you wanted to know what a first generation, purpose-built mountain bike rode like from the late 70's, well then just buy any Schwinn MTB made up until the late 80's as they pretty much mirror the same geometry and steel tubing sizes. If that is true, then those bikes must be a hoot to ride. It is a totally different vibe than MTB is now. Laid back, touring, ripping corners, hopping up and over stuff, and generally just crawling along anywhere, this old Schwinn seems to not be bothered with much of anything I throw at it. I suppose that with a knobby set of tires swapped in for the Continental Winter Contacts, it would become quite a fun trail bike. But that ain't a gonna happen 'round here! Nope! Maybe I'd do a gravel ride or tour with it if I swapped out the drive train to a triple 3 X 7. 

But enough of that. It's a townie now, and that is good.

Friday, April 02, 2021

Friday News And Views

New Riding Gravel stickers are in.
 Riding Gravel Apparel & Stickers Are In:

Thanks to Bike Rags the newest editions of Riding Gravel t-shirts and the new stickers are in. We kept things simple and brought back a classic design this time. 

First up, Ben, my partner in RidingGravel.com brought up a tagline and posted it with one of our Riding Gravel Radio Ranch podcast postings. He came up with "Fun On The Rocks" and it was something that just struck a chord with me. I like that it points to this type of cycling as being a good time, not just gnarly adventure, racing, or suffer-fest nonsense. Not that those things cannot be a part of the gravel riding scene, or that they shouldn't be, but that is not the main attraction here. "Fun" is. 

Bike Rags did all the printing and sourcing of the shirts. They did a great job. For shirts we have an ash grey colored "Addicted To Gravel" shirt featuring that phrase in a clearly read black font. Next up we decided to bring back a classic shirt from 2013-14. It is a dark grey shirt wth white printing showing an old time high-wheeler bike with the saying "Riding Stones Shaking Bones" above and below the cyclists in old Western style font. 

Bike Rags is also the sponsor of the Riding Gravel Radio Ranch which just posted another episode which you can get the link to here. Fancy yourself a t shirt, or just want to check them out? See this link. Every order gets a free sticker too. Thanks!

March went out like a lion, I rode my Trek commuter bike anyway.

Townie Update:

That old Trek I featured here earlier in the year is getting out and getting used again. I thought some of you might be interested in how it has been going so far. 

My main concern was the seated position which put me a bit further out over the front end than I typically like. I do have a silver set-back seat post I want to install in the bike but I haven't gotten around to that yet. I am not in too big of a hurry to get that done, obviously!

Secondly, I was a bit concerned that this frame would flex, or that the quick release skewer would be too weak to hold the wheel straight under heavier pedaling, and the tire would rub on the chain stay. But so far? Nothing to report there. In fact, this frame does ride a bit stiffer than I would have imagined that it would have. It isn't all that smooth, to be honest. I was a bit surprised by that revelation.

I also do not like how the handle bars want to slam to one side or the other when I get off the bike, or if I try to push the bike without having a hand on the bars. Something is a bit off in the front geometry of this rig. Of course, all that forged stem weight and the additional weight from the bottle cages, sitting where that does, affects this trait negatively as well. It's not a 'deal killer' but it is really annoying at times.

But the bike does what I need it to. I get errands done on it and save wear, tear, and gas on the truck. I get exercise instead of no exercise while driving.  I get to dodge car traffic and wonder if 'that guy is going to pull out or.......?' (Of course, the same thing happens when I drive, so- no difference!) So, that's how it's been going with the old Trek. The bike doesn't carry much, so that's a bit problematic. I need to drag that old Schwinn with the rack and panniers out and get that going again. It is pretty much a 'pump the tires up and go' job but for one small detail- I have to recondition the old Brooks saddle on it. Once I get that squared away, I'm good to go. Then I'd be all set as far as cargo rigs and townies. 

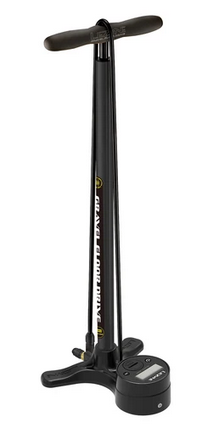
Lezyne Gravel Floor Drive

Yes- Gravel Specific Pumps: 

If it is for bicycles and if it can be marketed it probably has an option which is 'Gravel® Specific'. It's weird, I know....... I wish it would stop as well, but trying to market to folks using 'gravel bikes' makes it harder to call this 'just a pump' which would be great for your gravel tires when you can sum that all up by saying "This is a gravel specific pump". (sigh!)

So, we get all this goofy 'gravel specific' this and that thrown at us to consider. The latest groan-inspiring marketing play came last week when I got information regarding Lezyne's new range of floor pumps for gravel. Now, maybe it is wrong, or maybe it is not, but most companies sending me stuff like this? I delete it. Garbage time. But I know Lezyne has quality pumps and so, I opened the email. 

Okay, here's the deal: I have floor pumps. Multiple floor pumps, but I have specific jobs for each. My basement/shop pump is an old, almost dead, Bontrager Charger pump. My 'upstairs' pump for years has been a Topeak Joe Blow. Both of those pumps are really aging out fast. I use them a LOT, and so, no surprises there. I've gotten my money's worth out of both of them. 

I have one other pump. A review item which Silca did not want back, which I have been using consistently since it arrived here. That's probably going to take over the 'upstairs' duties completely. The old Joe Blow will retire to the basement and I'll use that as a back-up pump to.......

What I hope to be getting in for a review is one of those Lezyne gravel specific pumps. I have had good luck with their stuff and I still have a Mini-Drive pump I bought something like 14 years ago that I rely on as an emergency pump in one of my top-tube bags. It should be said that that old Lezyne pump has saved the day on many an occasion since I've had it. For myself and others. 

So while the whole "Gravel®" thing gets long in the tooth, I do think that many products actually do deserve some of our attention. Perhaps if we can put aside our collective distaste for how a product is marketed and look at what things actually are- in this case, a decent floor pump - maybe then we'd find some worthwhile aids to our cycling experience. That's what I'm hoping to find here, anyway.

That's a wrap for this week! get out and ride if you can.

Friday News And Views

New Riding Gravel stickers are in.
 Riding Gravel Apparel & Stickers Are In:

Thanks to Bike Rags the newest editions of Riding Gravel t-shirts and the new stickers are in. We kept things simple and brought back a classic design this time. 

First up, Ben, my partner in RidingGravel.com brought up a tagline and posted it with one of our Riding Gravel Radio Ranch podcast postings. He came up with "Fun On The Rocks" and it was something that just struck a chord with me. I like that it points to this type of cycling as being a good time, not just gnarly adventure, racing, or suffer-fest nonsense. Not that those things cannot be a part of the gravel riding scene, or that they shouldn't be, but that is not the main attraction here. "Fun" is. 

Bike Rags did all the printing and sourcing of the shirts. They did a great job. For shirts we have an ash grey colored "Addicted To Gravel" shirt featuring that phrase in a clearly read black font. Next up we decided to bring back a classic shirt from 2013-14. It is a dark grey shirt wth white printing showing an old time high-wheeler bike with the saying "Riding Stones Shaking Bones" above and below the cyclists in old Western style font. 

Bike Rags is also the sponsor of the Riding Gravel Radio Ranch which just posted another episode which you can get the link to here. Fancy yourself a t shirt, or just want to check them out? See this link. Every order gets a free sticker too. Thanks!

March went out like a lion, I rode my Trek commuter bike anyway.

Townie Update:

That old Trek I featured here earlier in the year is getting out and getting used again. I thought some of you might be interested in how it has been going so far. 

My main concern was the seated position which put me a bit further out over the front end than I typically like. I do have a silver set-back seat post I want to install in the bike but I haven't gotten around to that yet. I am not in too big of a hurry to get that done, obviously!

Secondly, I was a bit concerned that this frame would flex, or that the quick release skewer would be too weak to hold the wheel straight under heavier pedaling, and the tire would rub on the chain stay. But so far? Nothing to report there. In fact, this frame does ride a bit stiffer than I would have imagined that it would have. It isn't all that smooth, to be honest. I was a bit surprised by that revelation.

I also do not like how the handle bars want to slam to one side or the other when I get off the bike, or if I try to push the bike without having a hand on the bars. Something is a bit off in the front geometry of this rig. Of course, all that forged stem weight and the additional weight from the bottle cages, sitting where that does, affects this trait negatively as well. It's not a 'deal killer' but it is really annoying at times.

But the bike does what I need it to. I get errands done on it and save wear, tear, and gas on the truck. I get exercise instead of no exercise while driving.  I get to dodge car traffic and wonder if 'that guy is going to pull out or.......?' (Of course, the same thing happens when I drive, so- no difference!) So, that's how it's been going with the old Trek. The bike doesn't carry much, so that's a bit problematic. I need to drag that old Schwinn with the rack and panniers out and get that going again. It is pretty much a 'pump the tires up and go' job but for one small detail- I have to recondition the old Brooks saddle on it. Once I get that squared away, I'm good to go. Then I'd be all set as far as cargo rigs and townies. 

Lezyne Gravel Floor Drive

Yes- Gravel Specific Pumps: 

If it is for bicycles and if it can be marketed it probably has an option which is 'Gravel® Specific'. It's weird, I know....... I wish it would stop as well, but trying to market to folks using 'gravel bikes' makes it harder to call this 'just a pump' which would be great for your gravel tires when you can sum that all up by saying "This is a gravel specific pump". (sigh!)

So, we get all this goofy 'gravel specific' this and that thrown at us to consider. The latest groan-inspiring marketing play came last week when I got information regarding Lezyne's new range of floor pumps for gravel. Now, maybe it is wrong, or maybe it is not, but most companies sending me stuff like this? I delete it. Garbage time. But I know Lezyne has quality pumps and so, I opened the email. 

Okay, here's the deal: I have floor pumps. Multiple floor pumps, but I have specific jobs for each. My basement/shop pump is an old, almost dead, Bontrager Charger pump. My 'upstairs' pump for years has been a Topeak Joe Blow. Both of those pumps are really aging out fast. I use them a LOT, and so, no surprises there. I've gotten my money's worth out of both of them. 

I have one other pump. A review item which Silca did not want back, which I have been using consistently since it arrived here. That's probably going to take over the 'upstairs' duties completely. The old Joe Blow will retire to the basement and I'll use that as a back-up pump to.......

What I hope to be getting in for a review is one of those Lezyne gravel specific pumps. I have had good luck with their stuff and I still have a Mini-Drive pump I bought something like 14 years ago that I rely on as an emergency pump in one of my top-tube bags. It should be said that that old Lezyne pump has saved the day on many an occasion since I've had it. For myself and others. 

So while the whole "Gravel®" thing gets long in the tooth, I do think that many products actually do deserve some of our attention. Perhaps if we can put aside our collective distaste for how a product is marketed and look at what things actually are- in this case, a decent floor pump - maybe then we'd find some worthwhile aids to our cycling experience. That's what I'm hoping to find here, anyway.

That's a wrap for this week! get out and ride if you can.

Thursday, February 18, 2021

Townie Update: Part 4

I used some Finish Line De-greaser to clean up the bearings
 The time finally came to get the head set cleaned and re-greased so I could button this project up for now and move on to other things. (I'll get to those in a minute here)

Recently I received some products from Finish Line to test and review for RidingGravel.com. These were sent free of charge and this post is not being paid for or even a part of that review, other than to say this is how I got that stuff. (The review will happen and be posted on RidingGravel.com soon)  

The de-greaser is pretty volatile and very effective. I ended up spraying some on a rag and just using that to wipe down a lot of the parts of the head set which took the final veneer of varnished grease off. The head set bearings came out far better, and what tiny bits of goo were left were remnants of old grease that I wasn't too keen about chasing down. I could have made the bearing cages spotless, but I've already invested far too much time dinking around with this component already, so I cut bait and started reassembling the thing. 

That may rub some of your sensibilities wrong but this is a steel head set with about zero collectable value and as such it doesn't deserve more of my time, which is valuable. My aim is to make it function better than it would have, and that goal has been more than accomplished here. Your mileage may vary, but time doesn't grow on trees. Time to get 'er buttoned up! 

A closer look at that toothed spacer.

This is a pretty crude head set too. The adjustment is held by the interfacing of two toothed faces- one on the upper bearing race and the other by a spacer. Neither are machined with wrench flats, and since the adjustment can only be fine tuned to a tooth one way or another, wrench flats would be a waste. No, this is a hand adjusted head set. You get it 'close enough' and it's likely going to be a tic loose or a hair too tight. I cannot do anything beyond that as a mechanic. The design dictates the final outcome here. 

The top nut just keeps the teeth from skipping over each other and keeps the piece from rattling. That's about all it really does in this design. So, I hand tightened the unit after a thorough greasing with the Finish Line product I was sent to try. Interestingly, and maybe fittingly, it is a white grease, just like they would probably have used in the old barn at Trek back in the 70's. It also kind of feels like lithium grease. Anyway.....

I also used that grease on the threaded parts of the head set and the fork. This keeps things from hanging up and giving you a false sense that the head set is adjusted correctly. Dry threading parts together will often not allow you to get things fastened up completely, and you'll end up doing adjustments again, or you'll have parts come apart. Besides that, a thin layer of grease also helps to ward off corrosion. I was always taught that you should always have something on threaded parts of a bicycle- either grease or a thread locking agent. This bit of wisdom imparted to me early on in my career as a mechanic has served me well. With that thin coating of grease on threads, you'll also find that things thread together with much less effort. That's always nice! 

No machined slot in the fork threads, just a ground down area.

One thing I thought was odd here was that there was no key-way slot machined or cut into the fork's threaded section. This is typically done to match keyed one inch threaded head set spacers so they will not rotate when you adjust a head set. The Trek here has a ground down section on the threads instead. I have never come across this before.

It looks hand-filed, and this serves the same purpose as a slotted threaded section on a fork, it's just much cruder, in my opinion. Maybe that is how old-school hand-made forks were done, but it took me a bit by surprise. Just another example of how Trek was a completely different company in the beginnings of their history. 

So the rest of the job went without any fanfare. I got it all put back together and the apparent indexing was now absent, so I did take care of the problem. Plus I have insured smooth operation of the head set for a long time to come. Again, while it is a crude piece, it should be serviceable and ride okay. If I come across a nicer head set some day I may swap that in, but for now? I'm good. 

Now that this has been accomplished I am going to put the Trek townie aside for the time being and concentrate on a few other bikes. I have bits coming in which will need to be installed on bikes. I also need to service my gravel fleet as the day is coming that this sort of riding will commence again. Fenders will be fitted again in preparation for "Slop Season" and I may spruce up a 650B wheel set for soft conditions riding. Lots of maintenance will be happening. I'll have to investigate the possibilities of getting some 11 speed chains in here. I also have a couple wide range cassettes with light use available to me now courtesy of N.Y. Roll. So, going forward I should have anything I need to maintain these rigs throughout 2021, if I can snag some new chains.

So look for some maintenance posts coming in the next couple of weeks as I get ready to hit the country roads once again. 2021 riding season is just about here! I am pretty stoked! And the Trek> I'll come around back to that later, but it won't be forgotten, plus I have another commuter/errand rig I am going to be putting back into service here soon. Stay tuned for that and more!

Townie Update: Part 4

I used some Finish Line De-greaser to clean up the bearings
 The time finally came to get the head set cleaned and re-greased so I could button this project up for now and move on to other things. (I'll get to those in a minute here)

Recently I received some products from Finish Line to test and review for RidingGravel.com. These were sent free of charge and this post is not being paid for or even a part of that review, other than to say this is how I got that stuff. (The review will happen and be posted on RidingGravel.com soon)  

The de-greaser is pretty volatile and very effective. I ended up spraying some on a rag and just using that to wipe down a lot of the parts of the head set which took the final veneer of varnished grease off. The head set bearings came out far better, and what tiny bits of goo were left were remnants of old grease that I wasn't too keen about chasing down. I could have made the bearing cages spotless, but I've already invested far too much time dinking around with this component already, so I cut bait and started reassembling the thing. 

That may rub some of your sensibilities wrong but this is a steel head set with about zero collectable value and as such it doesn't deserve more of my time, which is valuable. My aim is to make it function better than it would have, and that goal has been more than accomplished here. Your mileage may vary, but time doesn't grow on trees. Time to get 'er buttoned up! 

A closer look at that toothed spacer.

This is a pretty crude head set too. The adjustment is held by the interfacing of two toothed faces- one on the upper bearing race and the other by a spacer. Neither are machined with wrench flats, and since the adjustment can only be fine tuned to a tooth one way or another, wrench flats would be a waste. No, this is a hand adjusted head set. You get it 'close enough' and it's likely going to be a tic loose or a hair too tight. I cannot do anything beyond that as a mechanic. The design dictates the final outcome here. 

The top nut just keeps the teeth from skipping over each other and keeps the piece from rattling. That's about all it really does in this design. So, I hand tightened the unit after a thorough greasing with the Finish Line product I was sent to try. Interestingly, and maybe fittingly, it is a white grease, just like they would probably have used in the old barn at Trek back in the 70's. It also kind of feels like lithium grease. Anyway.....

I also used that grease on the threaded parts of the head set and the fork. This keeps things from hanging up and giving you a false sense that the head set is adjusted correctly. Dry threading parts together will often not allow you to get things fastened up completely, and you'll end up doing adjustments again, or you'll have parts come apart. Besides that, a thin layer of grease also helps to ward off corrosion. I was always taught that you should always have something on threaded parts of a bicycle- either grease or a thread locking agent. This bit of wisdom imparted to me early on in my career as a mechanic has served me well. With that thin coating of grease on threads, you'll also find that things thread together with much less effort. That's always nice! 

No machined slot in the fork threads, just a ground down area.

One thing I thought was odd here was that there was no key-way slot machined or cut into the fork's threaded section. This is typically done to match keyed one inch threaded head set spacers so they will not rotate when you adjust a head set. The Trek here has a ground down section on the threads instead. I have never come across this before.

It looks hand-filed, and this serves the same purpose as a slotted threaded section on a fork, it's just much cruder, in my opinion. Maybe that is how old-school hand-made forks were done, but it took me a bit by surprise. Just another example of how Trek was a completely different company in the beginnings of their history. 

So the rest of the job went without any fanfare. I got it all put back together and the apparent indexing was now absent, so I did take care of the problem. Plus I have insured smooth operation of the head set for a long time to come. Again, while it is a crude piece, it should be serviceable and ride okay. If I come across a nicer head set some day I may swap that in, but for now? I'm good. 

Now that this has been accomplished I am going to put the Trek townie aside for the time being and concentrate on a few other bikes. I have bits coming in which will need to be installed on bikes. I also need to service my gravel fleet as the day is coming that this sort of riding will commence again. Fenders will be fitted again in preparation for "Slop Season" and I may spruce up a 650B wheel set for soft conditions riding. Lots of maintenance will be happening. I'll have to investigate the possibilities of getting some 11 speed chains in here. I also have a couple wide range cassettes with light use available to me now courtesy of N.Y. Roll. So, going forward I should have anything I need to maintain these rigs throughout 2021, if I can snag some new chains.

So look for some maintenance posts coming in the next couple of weeks as I get ready to hit the country roads once again. 2021 riding season is just about here! I am pretty stoked! And the Trek> I'll come around back to that later, but it won't be forgotten, plus I have another commuter/errand rig I am going to be putting back into service here soon. Stay tuned for that and more!

Tuesday, February 02, 2021

Townie Update: Part 2

Judging by the patina, I'd say it's been a very long time since this was cracked open!
 Okay, the last time I posted about the townie bike I mentioned that it felt as though the head set needed attention. I felt a bit of indexing, which usually indicates that the crown race on the fork is damaged. Basically, it happens when a ball bearing type head set sees a lot of rough roads and the ball bearings, which usually sit in one place most of the time while riding, get driven into the crown race repeatedly and hard enough that they indent or 'index' . This makes it so that when the head set is rotated, the ball bearings are momentarily displaced from their indentations and when they return, (you straighten the bars back up), you might feel a bit of a detent. If this gets bad enough it can impede a rider's ability to navigate while riding and can cause accidents when the condition is severe enough. By the way, this condition can also be caused by improperly adjusted head sets. 

So, yesterday I dug into this head set to see what was up. This appears for all the world to be the stock Tange', "Micro-Adjust" head set that was spec'ed on complete Treks in 1978. Back then Trek was mainly a purveyor of frame sets, not complete bikes, and only complete bikes were sold in the Mid-West at the time. This makes sense with the one I have as it sports a World of Bikes sticker from Iowa City. 

You might note that this head set has the 'limited slip' style bearing adjustment where saw-tooth looking machined teeth integrate with each other- one set on the knurled bit you can see here, and another set on the mating ring that sits above it. Adjustments to this style head set are made by loosening the lock nut on top and gripping the knurled bit and making the adjustment. Then you tighten the lock nut. Yes- it's hard to make fine adjustments with this sort of head set. But, it is what it is. Apparently, travelers like this sort of head set, but I'm not into taking the fork off for transport, so that's a bit lost on me. Anyway.....

My first peek inside. Note the machined teeth on top of the bearing race.

The crown race after fork removal.
Well, I was a bit surprised by what I found. The grease, obviously, is far beyond its service life. That will all need to be cleaned up and then I will apply new grease. I didn't really note any indentations in the races, so I feel that it may be that the grease was actually the issue, as it is pretty much like a hardened shellac at this point. 

Spotlight on the upper bearing race. (Yes- it really is that dim in my shop!)


Wiping away a bit of the goo revealed a pretty decent looking bearing race. 

I feel that just a solid servicing of the parts will result in a smooth, good operating head set. No need for tricks or a full-on replacement here. Not for a townie bike, at any rate. So, I will be doing that and after this I think it will end up that I am done doing any major maintenance or changes here. I think I'm going to skip the powder coating idea as well. Minimal money in, maximum benefit to me as a bike. 

While Ishiwata tubing is not a CrMo that 'the cool kids' would be excited about, it is good stuff.

So, I decided to weigh the fork, for grins. Keep in mind that the crown race is still on there, and that is a good bit of metal too. Gunk and grease still attached add a bit, but what do you think this steel fork with a 'forged semi-sloping Cinelli type'* crown weighs? Okay.....the answer is......

820 grams!

That's pretty light, and it shows what the protocol testing of frames and forks have done to steel bikes over the years. There is no way a road bike fork in steel would ever come out of a major factory over seas now and weigh anything close to that. I know my Raleigh Reynolds 631 uni-crown steel disc fork weighs well over 1000 grams, as a for instance. Not apples to apples, but it gives you an idea of how much things have changed over the years. While an 820 gram fork, (with chunky steel crown race!) sounds great, it also points up that factories are being overly-cautious with regard to durability and safety. Probably not a bad idea in our litigious world. 

Stay tuned for more updates on the townie rig.

*Much of the spec information I gathered on this Trek TX502 was garnered from the website "Vintage Trek"

Townie Update: Part 2

Judging by the patina, I'd say it's been a very long time since this was cracked open!
 Okay, the last time I posted about the townie bike I mentioned that it felt as though the head set needed attention. I felt a bit of indexing, which usually indicates that the crown race on the fork is damaged. Basically, it happens when a ball bearing type head set sees a lot of rough roads and the ball bearings, which usually sit in one place most of the time while riding, get driven into the crown race repeatedly and hard enough that they indent or 'index' . This makes it so that when the head set is rotated, the ball bearings are momentarily displaced from their indentations and when they return, (you straighten the bars back up), you might feel a bit of a detent. If this gets bad enough it can impede a rider's ability to navigate while riding and can cause accidents when the condition is severe enough. By the way, this condition can also be caused by improperly adjusted head sets. 

So, yesterday I dug into this head set to see what was up. This appears for all the world to be the stock Tange', "Micro-Adjust" head set that was spec'ed on complete Treks in 1978. Back then Trek was mainly a purveyor of frame sets, not complete bikes, and only complete bikes were sold in the Mid-West at the time. This makes sense with the one I have as it sports a World of Bikes sticker from Iowa City. 

You might note that this head set has the 'limited slip' style bearing adjustment where saw-tooth looking machined teeth integrate with each other- one set on the knurled bit you can see here, and another set on the mating ring that sits above it. Adjustments to this style head set are made by loosening the lock nut on top and gripping the knurled bit and making the adjustment. Then you tighten the lock nut. Yes- it's hard to make fine adjustments with this sort of head set. But, it is what it is. Apparently, travelers like this sort of head set, but I'm not into taking the fork off for transport, so that's a bit lost on me. Anyway.....

My first peek inside. Note the machined teeth on top of the bearing race.

The crown race after fork removal.
Well, I was a bit surprised by what I found. The grease, obviously, is far beyond its service life. That will all need to be cleaned up and then I will apply new grease. I didn't really note any indentations in the races, so I feel that it may be that the grease was actually the issue, as it is pretty much like a hardened shellac at this point. 

Spotlight on the upper bearing race. (Yes- it really is that dim in my shop!)


Wiping away a bit of the goo revealed a pretty decent looking bearing race. 

I feel that just a solid servicing of the parts will result in a smooth, good operating head set. No need for tricks or a full-on replacement here. Not for a townie bike, at any rate. So, I will be doing that and after this I think it will end up that I am done doing any major maintenance or changes here. I think I'm going to skip the powder coating idea as well. Minimal money in, maximum benefit to me as a bike. 

While Ishiwata tubing is not a CrMo that 'the cool kids' would be excited about, it is good stuff.

So, I decided to weigh the fork, for grins. Keep in mind that the crown race is still on there, and that is a good bit of metal too. Gunk and grease still attached add a bit, but what do you think this steel fork with a 'forged semi-sloping Cinelli type'* crown weighs? Okay.....the answer is......

820 grams!

That's pretty light, and it shows what the protocol testing of frames and forks have done to steel bikes over the years. There is no way a road bike fork in steel would ever come out of a major factory over seas now and weigh anything close to that. I know my Raleigh Reynolds 631 uni-crown steel disc fork weighs well over 1000 grams, as a for instance. Not apples to apples, but it gives you an idea of how much things have changed over the years. While an 820 gram fork, (with chunky steel crown race!) sounds great, it also points up that factories are being overly-cautious with regard to durability and safety. Probably not a bad idea in our litigious world. 

Stay tuned for more updates on the townie rig.

*Much of the spec information I gathered on this Trek TX502 was garnered from the website "Vintage Trek"

Thursday, January 28, 2021

Townie Update

My 1978 Trek converted to single speed and 700c wheels
 I mentioned those old Dura Ace hubs and Salsa Cycles Delgado Cross rims back a week or so ago now. Well, here is where those ended up. This is an old 'barn-built' Trek that I acquired several years ago. I had tried it as a Gravel Mutt back in 2013 or so, and then it ended up on a hook shortly thereafter. so, like nearly eight years later.....

I built up those Dura Ace hubs and Salsa rims and thought about what to put them on. This bike seemed like a good place. And as I said, this will end up becoming my townie after I divested myself of the old Surly 1X1. That was my go-to errand rig for a while there.

Looking back at the back story on this bike, I realized that my intentions all along were to make this bike into a single speed. Ha! Things have finally come full-circle then. And I think that's a good thing with this bike. While I did do a gravel ride or two on this, it is a 'road bike' in the old-school, classical sense of the term. It isn't meant for anything too rowdy like a gravel road can be like. 

No, bikes built with the classic road racing ideal in mind back then all featured certain ideas about how the end user was to be sat on the thing. It was all about nose-to-the-stem, butt-in-the-air, aero type positioning. You get that feeling immediately when you sit on this bike, even though I fitted some old Origin 8 Gary Bars with a super-shallow drop. Your face is 'out in the wind' and the whole experience is one of feeling as though that if the front wheel hit a stick you'd come flying straight off the front of the thing as the bike stopped dead in its tracks. Personally, I find this feeling to be quite uncomfortable. Especially on gravel.

Maybe that's because we've grown accustomed to bikes where the front is higher, the front-center is longer, and the angles are slacker. These things all push the front end 'out there' with the front wheel way out from underneath you. Even older MTB off-road machines weren't like this, and they were a lot more like this old Trek is. The old style of positioning along with the geometry is night-and-day different than it is now. 

The old brass head badge has a nice patina on it.

But this won't be anything but an errand bike now, so I am okay with doing short rides to pick up things here and there. The simplicity of the frame- no braze ons- makes for a really clean look, although I'm not a fan of the outboard, full-run housing rear brake. 

One thing that always strikes me about older steel road bikes is that they look like they are barely here in this world. I mean, look at those skinny steel tubes! Handle bars have larger diameter tubing. The seat stays are truly 'pencil thin'. It just looks like it would be impossible to ride it. Too flexy! How can it hold up? 

But therein lies the magic of steel tubing. Strength is not measured by visual mass. But most folks would never buy into a bike built with such gossamer thin tubes anymore. It just looks too weak! But it isn't! Maybe that is inherently why these old bikes are fascinating to some people. More than any space-aged carbon doohickey, a good steel frame is far more amazing to the eye upon closer inspection. The engineering principals are honed to their finest points. The connection method- lugged and brazed- is as minimal as it can be, yet if done properly, amazingly long lasting and strong. Add in wire spokes and a relatively weak aluminum hoop that becomes another thing when tensioned and laced to a stout hub, and the package is simply mind boggling, yet so familiar we lose sight of the marvel that is a bicycle. 

So, to me this is a classic example of the bicycle as it appeared most often throughout its history. It will glide along just fine on the streets of the city. Now I need to figure out just how I want to accessorize it- or not- to aid me in my goal. I could find a rear rack and that would open up some great possibilities, or I could just use a messenger bag. I have several. I also could go the top-tube bag route, or get a frame bag. So, we'll see. 

Not a lot of room here!

I did find that I needed every bit of space here to allow for the 36mm Panaracer Pasela tire to spin freely. This may end up being swapped for a 35mm tire at some point, but for now, my brief test ride gave me some hope that it will be okay. Tons of clearance elsewhere, of course. It's always at the chain stays where things get tight. 

The gear will stay. I like the ratio for city cruising. So, the 39T chain ring and the 20T free wheel. Seems about right. Plus the added bonus of having a longer lasting set of parts versus spinning smaller diameter components is a nice thing. 

Now, the rear brake was an issue going way back, and that due to a missing, rare bit that Dia Compe had to work as a cable stop inside their levers. I had forgotten that I came up with a kludge to get myself by. It was to use a fixing nut from a linear pull brake as a cable stop. Good idea but for the fact that by pulling the lever the pressure created stripped the plastic cover off the housing and the spiral reinforcing wire pulled through the opening in the nut. There was my problem with the rear brake! 

So I fixed that by installing a step-down ferrule on the new run of housing I installed and then have that go into the nut. Perfect! Now I could set up the rear brake and have decent stopping power. Nothing like a disc brake, mind you. Brakes back then were pretty much 'speed modulators' more than they were brakes. I probably could stand to use some real pads here, but that'll come later. This is basically an effort to prove the concept. 

The brake issue has been solved.....for now

So, besides making the rear brake functional, I had to re-wrap the handle bars as well. I found a couple forgotten rolls of fizik tape I had and used that on the Gary Bar. This bar is a pretty radical take on a flared drop bar. It has extreme flare and super-minimal drop. The ramps are really steep and the extensions are short. It happens to work, ergonomically, as long as you don't ever ride on the hoods, because that position is too weird on this bar. 

This oddness makes it a really tough bar to wrap too. I had to really take my time, and fizik's faux-leather like material they use is not very forgiving. So, I had to be patient and take my time. It ended up going well. I like how it turned out for now. This may end up getting changed anyway depending on what I decide with the stem. Yeah.......that old school stem! 

Of course it is a negative rise, old forged, no face plate style bit that was once super commonplace. It is a big reason I feel so much like falling off the front of this thing. I was thinking as I test rode this that I might like a taller front with less reach in the stem, but I am going to live with this for now. That said, I have a strong desire to get a stem with some rise and swap this out. Of course, that will ruin the classic lines this bike has. I could always opt for a flat bar with a shim....... Nah! If I start messing with that I'll end up wanting to swap out the seat post for an offset head one, (I happen to have the perfect Campy Record post for this) and that will be another thing to mess with. Besides, I nailed the position on that Brooks. Why mes with a good thing? 

Let's see......There is only one other nit I would have to address if I end up going with this, as I think I am going to do. That is the head set. It is the original component to the bike and it is indexed pretty badly. That isn't a good thing for city riding. I will have to see about turning the crown race 90°, an old trick used by racers back in the day to extend the life of their head sets. If that doesn't work, I'll have to source a new head set. Maybe..... I may have a Campy head set somewhere.....

The test ride was successful, even though I had to ride on some snow.

 So, now I will have to strip this back down, clean up some bits, and then decide if I want to powder coat this jalopy or if I want to just touch up the paint job with some fingernail polish and leave it at that. The old Treks were painted with wet paint, Imron if I am not mistaken, and that is some pretty brittle paint. This could be a never ending touch-up job. That's why I am considering powder coating it for the more durable- but not original- finish. 

For now I want to get the necessities done. The head set being number one there. Then I'll go from that point and either rack this up, or whatever. Stay tuned.......

Townie Update

My 1978 Trek converted to single speed and 700c wheels
 I mentioned those old Dura Ace hubs and Salsa Cycles Delgado Cross rims back a week or so ago now. Well, here is where those ended up. This is an old 'barn-built' Trek that I acquired several years ago. I had tried it as a Gravel Mutt back in 2013 or so, and then it ended up on a hook shortly thereafter. so, like nearly eight years later.....

I built up those Dura Ace hubs and Salsa rims and thought about what to put them on. This bike seemed like a good place. And as I said, this will end up becoming my townie after I divested myself of the old Surly 1X1. That was my go-to errand rig for a while there.

Looking back at the back story on this bike, I realized that my intentions all along were to make this bike into a single speed. Ha! Things have finally come full-circle then. And I think that's a good thing with this bike. While I did do a gravel ride or two on this, it is a 'road bike' in the old-school, classical sense of the term. It isn't meant for anything too rowdy like a gravel road can be like. 

No, bikes built with the classic road racing ideal in mind back then all featured certain ideas about how the end user was to be sat on the thing. It was all about nose-to-the-stem, butt-in-the-air, aero type positioning. You get that feeling immediately when you sit on this bike, even though I fitted some old Origin 8 Gary Bars with a super-shallow drop. Your face is 'out in the wind' and the whole experience is one of feeling as though that if the front wheel hit a stick you'd come flying straight off the front of the thing as the bike stopped dead in its tracks. Personally, I find this feeling to be quite uncomfortable. Especially on gravel.

Maybe that's because we've grown accustomed to bikes where the front is higher, the front-center is longer, and the angles are slacker. These things all push the front end 'out there' with the front wheel way out from underneath you. Even older MTB off-road machines weren't like this, and they were a lot more like this old Trek is. The old style of positioning along with the geometry is night-and-day different than it is now. 

The old brass head badge has a nice patina on it.

But this won't be anything but an errand bike now, so I am okay with doing short rides to pick up things here and there. The simplicity of the frame- no braze ons- makes for a really clean look, although I'm not a fan of the outboard, full-run housing rear brake. 

One thing that always strikes me about older steel road bikes is that they look like they are barely here in this world. I mean, look at those skinny steel tubes! Handle bars have larger diameter tubing. The seat stays are truly 'pencil thin'. It just looks like it would be impossible to ride it. Too flexy! How can it hold up? 

But therein lies the magic of steel tubing. Strength is not measured by visual mass. But most folks would never buy into a bike built with such gossamer thin tubes anymore. It just looks too weak! But it isn't! Maybe that is inherently why these old bikes are fascinating to some people. More than any space-aged carbon doohickey, a good steel frame is far more amazing to the eye upon closer inspection. The engineering principals are honed to their finest points. The connection method- lugged and brazed- is as minimal as it can be, yet if done properly, amazingly long lasting and strong. Add in wire spokes and a relatively weak aluminum hoop that becomes another thing when tensioned and laced to a stout hub, and the package is simply mind boggling, yet so familiar we lose sight of the marvel that is a bicycle. 

So, to me this is a classic example of the bicycle as it appeared most often throughout its history. It will glide along just fine on the streets of the city. Now I need to figure out just how I want to accessorize it- or not- to aid me in my goal. I could find a rear rack and that would open up some great possibilities, or I could just use a messenger bag. I have several. I also could go the top-tube bag route, or get a frame bag. So, we'll see. 

Not a lot of room here!

I did find that I needed every bit of space here to allow for the 36mm Panaracer Pasela tire to spin freely. This may end up being swapped for a 35mm tire at some point, but for now, my brief test ride gave me some hope that it will be okay. Tons of clearance elsewhere, of course. It's always at the chain stays where things get tight. 

The gear will stay. I like the ratio for city cruising. So, the 39T chain ring and the 20T free wheel. Seems about right. Plus the added bonus of having a longer lasting set of parts versus spinning smaller diameter components is a nice thing. 

Now, the rear brake was an issue going way back, and that due to a missing, rare bit that Dia Compe had to work as a cable stop inside their levers. I had forgotten that I came up with a kludge to get myself by. It was to use a fixing nut from a linear pull brake as a cable stop. Good idea but for the fact that by pulling the lever the pressure created stripped the plastic cover off the housing and the spiral reinforcing wire pulled through the opening in the nut. There was my problem with the rear brake! 

So I fixed that by installing a step-down ferrule on the new run of housing I installed and then have that go into the nut. Perfect! Now I could set up the rear brake and have decent stopping power. Nothing like a disc brake, mind you. Brakes back then were pretty much 'speed modulators' more than they were brakes. I probably could stand to use some real pads here, but that'll come later. This is basically an effort to prove the concept. 

The brake issue has been solved.....for now

So, besides making the rear brake functional, I had to re-wrap the handle bars as well. I found a couple forgotten rolls of fizik tape I had and used that on the Gary Bar. This bar is a pretty radical take on a flared drop bar. It has extreme flare and super-minimal drop. The ramps are really steep and the extensions are short. It happens to work, ergonomically, as long as you don't ever ride on the hoods, because that position is too weird on this bar. 

This oddness makes it a really tough bar to wrap too. I had to really take my time, and fizik's faux-leather like material they use is not very forgiving. So, I had to be patient and take my time. It ended up going well. I like how it turned out for now. This may end up getting changed anyway depending on what I decide with the stem. Yeah.......that old school stem! 

Of course it is a negative rise, old forged, no face plate style bit that was once super commonplace. It is a big reason I feel so much like falling off the front of this thing. I was thinking as I test rode this that I might like a taller front with less reach in the stem, but I am going to live with this for now. That said, I have a strong desire to get a stem with some rise and swap this out. Of course, that will ruin the classic lines this bike has. I could always opt for a flat bar with a shim....... Nah! If I start messing with that I'll end up wanting to swap out the seat post for an offset head one, (I happen to have the perfect Campy Record post for this) and that will be another thing to mess with. Besides, I nailed the position on that Brooks. Why mes with a good thing? 

Let's see......There is only one other nit I would have to address if I end up going with this, as I think I am going to do. That is the head set. It is the original component to the bike and it is indexed pretty badly. That isn't a good thing for city riding. I will have to see about turning the crown race 90°, an old trick used by racers back in the day to extend the life of their head sets. If that doesn't work, I'll have to source a new head set. Maybe..... I may have a Campy head set somewhere.....

The test ride was successful, even though I had to ride on some snow.

 So, now I will have to strip this back down, clean up some bits, and then decide if I want to powder coat this jalopy or if I want to just touch up the paint job with some fingernail polish and leave it at that. The old Treks were painted with wet paint, Imron if I am not mistaken, and that is some pretty brittle paint. This could be a never ending touch-up job. That's why I am considering powder coating it for the more durable- but not original- finish. 

For now I want to get the necessities done. The head set being number one there. Then I'll go from that point and either rack this up, or whatever. Stay tuned.......