Showing posts with label Review Of Parts Past. Show all posts

Thursday, January 20, 2022

Review Of Parts Past: Gun Kote (Cerakote)

 Today we are going to take a look at something you cannot get anymore. (Note: Well- actually, in this case, you can. You can still get Gun Kote, but there is a new coating called Cerakote which is what this post will refer to)  Parts and pieces that graced our rides in days past that were noted for some special characteristic, either good or bad, will be featured in this recurring theme from time to time here. I call it "Review Of Parts Past".

In this particular post the theme won't be about a part, but a frame and parts treatment called Gun Kote and a new treatment which s called Cerakote.  
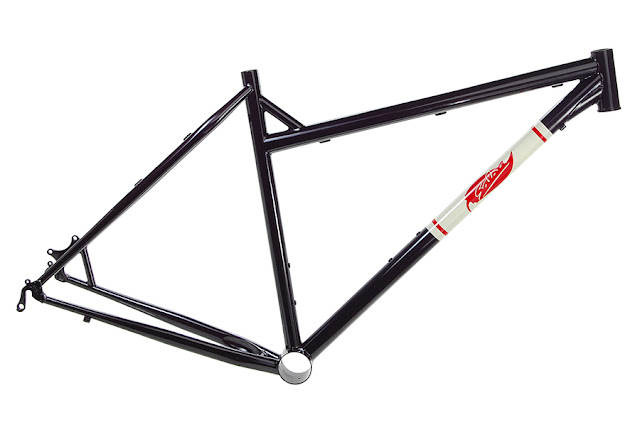
My old 2007 Salsa Cycles El Mariachi in a "Gun Kote" finish. (Image courtesy of Ben's Cycles of Milwaukee.)

There is a bit of a buzz going round these days concerning a new treatment for parts and frames on bicycles called "Cerakote". You may have seen that SILCA is using this on water bottle cages and tools, for instance. But this story in "Bicycle Retailer and Industry News"is what caught my eye. Apparently, there is an effort to diversify uses for Cerakote by the company that provides it to manufacturers. 

After reading about Cerakote, it became quite obvious to me that this was very similar to a surface treatment I had tested back in 2009 on an old Salsa Cycles El Mariachi frame set I once owned. Back in those days the newest 'gun' related treatment was called "Gun Kote".  Now the new kid on the block is "Cerakote". Gun Kote and Cerakote are doing similar jobs with a bit different chemical make-up. That said, I thought a review of it might come in handy for anyone who is seeing Cerakote for the first time. 
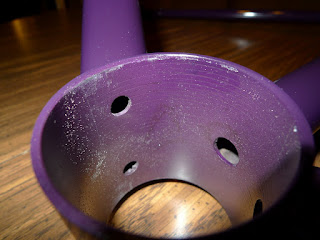
Gun Kote/Cerakote is so thin that you can see the tooling marks in this EBB of my old frame.

These coatings are not paint. They are a coating which have the benefits of being very tough, long-lasting, and they can be applied so thinly that you can actually realize a weight savings over a wet-painted frame or a powder coated frame. These coatings are also fairly impervious to heat, are flexible so they don't chip or crack due to flexing, and they can be had in several colors. 

Downsides are that- currently- Gun Kote is best applied to metal surfaces since it has to be cured at a high temperature which carbon fiber would be ruined by. Cerakote is a little more forgiving, but it still hasn't been widely used on carbon fiber. Although experimentation with a different curing process for carbon is showing a little promise.

So, why isn't Cerakote or Gun Kote on all aluminum, steel, and titanium frames now? That's a great question. I've lived with, and I've seen the long-term results of Gun Kote performance. My old El Mariachi was sold to a local rider, and I've seen it as recently as a couple of years ago in a shop where I used to work, so I've kept up on how this finish holds up after a dozen years of riding.

First of all, the "showroom appeal" of this finish isn't nearly as nice as wet paint or powder coating. Cerakote and Gun Kote looks dull and dead in comparison to the more flashy, sparkly finishes you see on bicycles today. This would line up with what one builder of bikes said in the "BRaIN" article regarding how they liked the matte finishes over the gloss in Cerakote. 

Color choices are also fairly slim in comparison as well, so what you can get is limited. The frame I got was supposedly "Purple" and in intense light, you see that, but I would liken that El Mariachi color to "eggplant" more in normal lighting. It looked like a powder coated finish that had lost its sheen when this Gun Kote was fresh. So, the appeal on new bikes would be far less than with the finishes used typically. And I'm pretty sure you cannot get metallic finishes in Cerakote, further limiting its appeal and this contributes to its 'flat' look.
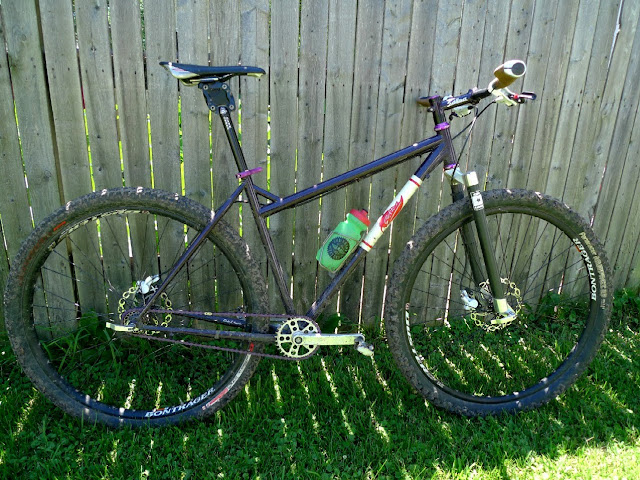
The Gun Kote finished El Mariachi in natural light.

So, let's say you don't mind the muted tones of Cerakote and you are still thinking that this might be a rad finish for your metal framed bike. Well, there are a few concerns to keep in mind. One being that this coating is super-thin, so it can be worn through more easily than a thicker powder coated finish can be. I'd be concerned maybe if I were riding with strapped on bags a lot, for instance.

Also, I wouldn't look at this myself for a gravel bike. The constant biffing of smaller stones and larger rocks would maybe take the Cerakote right off the lower portion of a down tube, the back of a seat tube, and on the chain stays in fairly short order. I had this happen with the Gun Kote-ed El Mariachi. The back of the seat tube on that bike is peppered with tiny pockmarks where sand knocked off the coating and allowed bare steel to show. Now, the frame, being ChroMoly tubed, doesn't rust as badly as you'd expect, and it is hard to notice these imperfections with this "eggplant' color, but on a lighter color it would show up badly. 

As I've said, I've seen this bike off and on since I sold it, and the Gun Kote is a bit duller than when new, which I would completely expect, but since it started off being "not very shiny", it looks pretty dull. Add in the fact that there is no "depth" to the color of this finish, no metallic sparkle, and no sheen, you have to have a certain taste and affection for muted tones to get on with it. Cerakote looks similar in the examples I have seen online. So, the similarities to Gun Kote would make Cerakote appear to be another muted choice in gloss.  Or maybe go with a matte Cerakote finish then.

Conclusions: Cerakote is a pretty cool option for metal, and maybe carbon, but it doesn't hold a candle to wet paint or powder coated finishes when it comes to "eye appeal". Yes- it has attractive physical properties- light weight, resistance to cracking, rust prevention (If it doesn't get rubbed or nicked off)- but the looks are where it is at for many of us. IF you can get by the aesthetics of Cerakote, or if you don't mind a mate finish, then it cold be a great finish for you.

NOTE: See The Standard Disclaimer Page to better understand my relationship and reasons for having been able to use Gun Kote.

Review Of Parts Past: Gun Kote (Cerakote)

 Today we are going to take a look at something you cannot get anymore. (Note: Well- actually, in this case, you can. You can still get Gun Kote, but there is a new coating called Cerakote which is what this post will refer to)  Parts and pieces that graced our rides in days past that were noted for some special characteristic, either good or bad, will be featured in this recurring theme from time to time here. I call it "Review Of Parts Past".

In this particular post the theme won't be about a part, but a frame and parts treatment called Gun Kote and a new treatment which s called Cerakote.  

My old 2007 Salsa Cycles El Mariachi in a "Gun Kote" finish. (Image courtesy of Ben's Cycles of Milwaukee.)

There is a bit of a buzz going round these days concerning a new treatment for parts and frames on bicycles called "Cerakote". You may have seen that SILCA is using this on water bottle cages and tools, for instance. But this story in "Bicycle Retailer and Industry News"is what caught my eye. Apparently, there is an effort to diversify uses for Cerakote by the company that provides it to manufacturers. 

After reading about Cerakote, it became quite obvious to me that this was very similar to a surface treatment I had tested back in 2009 on an old Salsa Cycles El Mariachi frame set I once owned. Back in those days the newest 'gun' related treatment was called "Gun Kote".  Now the new kid on the block is "Cerakote". Gun Kote and Cerakote are doing similar jobs with a bit different chemical make-up. That said, I thought a review of it might come in handy for anyone who is seeing Cerakote for the first time. 

Gun Kote/Cerakote is so thin that you can see the tooling marks in this EBB of my old frame.

These coatings are not paint. They are a coating which have the benefits of being very tough, long-lasting, and they can be applied so thinly that you can actually realize a weight savings over a wet-painted frame or a powder coated frame. These coatings are also fairly impervious to heat, are flexible so they don't chip or crack due to flexing, and they can be had in several colors. 

Downsides are that- currently- Gun Kote is best applied to metal surfaces since it has to be cured at a high temperature which carbon fiber would be ruined by. Cerakote is a little more forgiving, but it still hasn't been widely used on carbon fiber. Although experimentation with a different curing process for carbon is showing a little promise.

So, why isn't Cerakote or Gun Kote on all aluminum, steel, and titanium frames now? That's a great question. I've lived with, and I've seen the long-term results of Gun Kote performance. My old El Mariachi was sold to a local rider, and I've seen it as recently as a couple of years ago in a shop where I used to work, so I've kept up on how this finish holds up after a dozen years of riding.

First of all, the "showroom appeal" of this finish isn't nearly as nice as wet paint or powder coating. Cerakote and Gun Kote looks dull and dead in comparison to the more flashy, sparkly finishes you see on bicycles today. This would line up with what one builder of bikes said in the "BRaIN" article regarding how they liked the matte finishes over the gloss in Cerakote. 

Color choices are also fairly slim in comparison as well, so what you can get is limited. The frame I got was supposedly "Purple" and in intense light, you see that, but I would liken that El Mariachi color to "eggplant" more in normal lighting. It looked like a powder coated finish that had lost its sheen when this Gun Kote was fresh. So, the appeal on new bikes would be far less than with the finishes used typically. And I'm pretty sure you cannot get metallic finishes in Cerakote, further limiting its appeal and this contributes to its 'flat' look.

The Gun Kote finished El Mariachi in natural light.

So, let's say you don't mind the muted tones of Cerakote and you are still thinking that this might be a rad finish for your metal framed bike. Well, there are a few concerns to keep in mind. One being that this coating is super-thin, so it can be worn through more easily than a thicker powder coated finish can be. I'd be concerned maybe if I were riding with strapped on bags a lot, for instance.

Also, I wouldn't look at this myself for a gravel bike. The constant biffing of smaller stones and larger rocks would maybe take the Cerakote right off the lower portion of a down tube, the back of a seat tube, and on the chain stays in fairly short order. I had this happen with the Gun Kote-ed El Mariachi. The back of the seat tube on that bike is peppered with tiny pockmarks where sand knocked off the coating and allowed bare steel to show. Now, the frame, being ChroMoly tubed, doesn't rust as badly as you'd expect, and it is hard to notice these imperfections with this "eggplant' color, but on a lighter color it would show up badly. 

As I've said, I've seen this bike off and on since I sold it, and the Gun Kote is a bit duller than when new, which I would completely expect, but since it started off being "not very shiny", it looks pretty dull. Add in the fact that there is no "depth" to the color of this finish, no metallic sparkle, and no sheen, you have to have a certain taste and affection for muted tones to get on with it. Cerakote looks similar in the examples I have seen online. So, the similarities to Gun Kote would make Cerakote appear to be another muted choice in gloss.  Or maybe go with a matte Cerakote finish then.

Conclusions: Cerakote is a pretty cool option for metal, and maybe carbon, but it doesn't hold a candle to wet paint or powder coated finishes when it comes to "eye appeal". Yes- it has attractive physical properties- light weight, resistance to cracking, rust prevention (If it doesn't get rubbed or nicked off)- but the looks are where it is at for many of us. IF you can get by the aesthetics of Cerakote, or if you don't mind a mate finish, then it cold be a great finish for you.

NOTE: See The Standard Disclaimer Page to better understand my relationship and reasons for having been able to use Gun Kote.

Thursday, September 10, 2020

Review Of Parts Past: WTB SST Saddle

Note: Occasionally I will be struck as to the awesomeness of some part or piece that I use on my bicycles. This was the genesis for the idea of "Review Of Parts Past" where I do a review of a piece or part I use that, perhaps, is no longer in production or that I feel deserves more notice.

WTB SST Saddle: The first time I heard about the SST saddle was late in 1996 when word came out in some MTB magazine that WTB had introduced a new MTB specific saddle that was radically different than the then currently available fare. It was swoopy, curvy, and with that droopy nose, kinda weird looking. I decided to bite on an industry only offer to buy one of the first ones and placed an order over the phone to WTB directly. (Who does THAT anymore?)

Well, my SST came and immediately became my favorite saddle. My first one was a top of the line Titanium railed and leather covered one. Later versions had steel rails, sparkle covers in vinyl, and there were less expensive, Original Equipment versions which weren't really anything like the nicer ones. My suspicions are that the less expensive, OE ones were actually made in a completely different factory. (That's not uncommon, by the way) 

My 1996 vintage SST saddle has resided on several bikes. It spent a long time on my OS Bikes Blackbuck, but recently has found a new lease on life on my Black Mountain Cycles MCD. In a mix-up with a review bike, I ended up with another leather covered SST, only this one has the Kevlar bumpers, and that is now on the Blackbuck. I have a sparkle SST, in gold, which I got from an old friend who sourced it off e-bay. That one was on the Fargo Gen I for ages until I removed it back a few years ago. That sparkle SST was the one I rode 155 miles on in the DK200 in 2015, one of my longest single day rides ever. 

So, there's the history. Saddles are a very personal thing. You may not like the SST, but for me it works really well. However; maybe not quite as you might expect. I like my SST saddles a bit more 'nose-up' than most folks ever would. That is just the way I feel sat the best on them. And, obviously, it agrees with me and still does. Now I've gone off for other saddles since then, thinking I'd found "saddle nirvana", but the SST keeps satisfying my posterior the best. It's the shape, of course, and the leather versions are nicer for sure than the vinyl covered ones are. But none of that matters since they do not make it anymore. 

Interestingly, the SST shape has informed many subsequent WTB saddles. You can still discern the drooped nose idea and "bellied" center section on saddles like the Pure V, the Silverado, and to a very minor degree, the Volt, which has since become WTB's most popular saddle ever. I love the Volt and Silverado, but I really wish WTB would re-introduce a vintage styled SST again. That would be a rad throwback!

Tuesday, July 16, 2019

Review Of Parts Past: Salsa Cycles Shaft Seat Post

Note: Occasionally I will be struck as to the awesomeness of some part or piece that I use on my bicycles. This was the genesis for the idea of "Review Of Parts Past" where I do a review of a piece or part I use that, perhaps, is no longer in production or that I feel deserves more notice. 

Today I am going to feature my all-time favorite seat post, the Salsa Cycles Shaft Seat Post. There are other pretty good seat posts out there, some okay ones, and a whole lot of really frustrating, bad designs.  The Shaft post, which was designed by Ross Shafer, the founder of Salsa Cycles, was mainly sold through the company that bought the Salsa Cycles brand, Quality Bicycle Products. Most of those being sold as stock equipment on Salsa Cycles bikes. Although many were sold as aftermarket purchases. They were available in black anodized and silver anodized aluminum, for the most part, although the predominant color you will see is black. Other than this, the Shaft Post was available in most popular sizes of the 00's, when most of these posts were manufactured. Quality stopped production of the Shaft seat post around 2012, near as I can tell. There may have been store stock on some sizes for a few years afterward.

Salsa replaced the Shaft with their "Guide" post, which was a box stock, typical two bolt design. Nothing to write home about. They did come out with the Regulator Ti Post, which is completely different in design, has a quirky clamp design which isn't quite as nice as the Shaft, and is uber-spendy at $275.00 a pop. (I happen to have a few of those as well)

The Shaft Post wasn't flashy, particularly lightweight, or really all that compliant, but that clamp design! This is a 31.6mm sample.
What makes the Shaft so brilliant isn't what most people think about in regard to a seat post. Most folks want their post to be (1) lightweight and (2) looking good. Some may consider the post compliance in terms of ride feel, but beyond that, who cares, right? Well, yeah.......until you have to remove and replace a saddle. And how about adjustments? Those can be nightmarish with other posts, disregarding saddle mounting altogether.

This is where the design of the Shaft post comes in. It is, by far and away, the single most simple, easy to use seat post clamp design ever. I have worked with a ton of seat posts, and nothing comes close to the ease of saddle mounting and set up that the Shaft Seat Post design has. Nothing.

One, humongous 6 millimeter bolt handles the clamping duties.
The Shaft utilizes a three bolt adjustment design where each bolt does a different job. The first bolt used to mount the saddle is underneath the clamp. It is a 6mm behemoth of a bolt, and by loosening this, you can get the upper part of the clamp to swivel out of the way allowing you to easily place your perch of choice on the lower cradle/clamp part. Tighten this down and, being that it is a 6mm bolt, you can torque it down pretty good. (Recommended 60-70 inch/lbs) That saddle isn't sliding back, or loosening. Ever. That clamp is beefy and works well.

The upper bolt clamps the eccentric, and when loosened, allows adjustment, the bottom one loosens or tightens the axis of the tilt, allowing adjustment when it is loosened.
Saddle angle adjustment is done brilliantly by using a pivot point and a small eccentric controlled by a bolt, and adjusted with a 5mm hex key. When the bolt directly beneath the cradle is loosened, and the 6mm bolt that clamps the eccentric is loosened, you can adjust the tilt angle infinitely within the eccentric's range with a 5mm hex key from the non-driveside. Then when you are finished you tighten both 6mm bolts to a recommended 50-60 inch/lbs.

The tilt adjustment is made by using a 5mm hex key in the according hex pocket in the eccentric.
So, here is why I love this design. First, it should be apparent that you can remove and replace your saddle without disturbing the tilt adjustment, and you can adjust tilt adjustment without the saddle placement being disturbed. Adjustments are "infinitely" made, not pre-determined by a notched cradle, or the like. You can adjust fore and aft adjustment simply by loosening the 6mm clamp bolt under the cradle just enough to allow the saddle to slide in the cradle too. Plus, as I mentioned, saddle removal and replacement is dead simple.

This has made swapping saddles and swapping seatpost/saddle combinations from bike to bike super easy and in a way that is not at all frustrating. Maybe this is not a big deal to many with one or two bicycles, but with as many as I have, it is a boon to me and makes my life far easier.

Okay, the Shaft Seat Post wasn't very sexy looking, and it had setback, which not everyone can handle. It wasn't all that lightweight either, and with all that going on with the clamp, you sometimes will get creaking. A simple cleaning generally quiets these posts down though, so no big deal to me. But yeah..... I get it.

Still, I appreciate the design and I won't be getting rid of any of my Shaft seat posts any time soon. I have several, mostly in the 27.2mm size. It's too bad that they discontinued these, but rumor has it that Mr. Shafer got a penny or two for the design, and QBP wasn't about continuing that arrangement, so the Shaft post was never developed further or produced after 2012 or so. A shame if true. Such a great design there.

Tuesday, February 05, 2019

Review Of Parts Past: WTB Nano 40 Tires

Today we are going to take a look at something you don't see much of anymore. Parts and pieces that graced our rides in days past that were noted for some special characteristic, either good or bad, will be featured in this recurring theme from time to time here. I call it "Review Of Parts Past", but that will get shortened to "ROPP", so there! Today's featured part is the WTB

My old WTB Nano 40 TCS tire
 WTB Nano 40 TCS Tires:

Back in 2014 there wasn't much available for "gravel specific" tires. there was Bruce Gordon's Rock & Road tire and.......the Clement (now Donnelly) MSO was announced, but not quite available yet. (Edit- The MSO was out Spring 2012. The tubeless version was announced, butb not out yet. Thanks to "Dan" a reader who pointed this out.)  It is amazing to me that five short years ago we were looking at less than a handful of "gravel cycling tires", and you know what? I was glad we had any at all.

But it all must have been bubbling up in engineer's minds and marketing rooms behind closed doors at certain cycling companies. If there is one thing I've learned throughout this cycling industry "career" I've had it is that "nothing gets made unless the numbers are there." What that means is that any products you see, typically, are only being made because the projected sales figures seem real enough that manufacturing will get their money back out of making a certain new product and more.

Obviously there are exceptions. The original 1999 Nanoraptor 29"er X 2.1" tire was a HUGE risk. But typically things aren't that murky when a product gets launched. So, I figure that when WTB took the chance on making a gravel tire, they knew a thing or three about what was coming down the pipeline. Anyway........

The tire they introduced, a narrower take on the aforementioned Nanoraptor, was dubbed the Nano 40. It was not tubeless. However; the following year it came out as such and was heralded as the first tubeless gravel specific tire that you could get. I received an advanced set ahead of the "official" release of the tire. In fact, WTB, who had sent over a few sets of the Nano 40 folder as prizing for T.I.v10, doubled down and sent cases of new, unreleased WTB Nano 40 TCS tires as prizing for every finisher of the upcoming T.I.v11. That's another story for another time........

The Nano TCS tires on my old T-6 Standard Rando in '16
The Nano 40 TCS was the tire that made gravel riding a true adventure in that it had dirt prowess as well as a nice roll on harder, smoother surfaces. The tubeless component was really what turned the tire into a pretty decent contender. In its folding bead, tubed version, it wasn't all that impressive. There were better choices out there already. But the Nano 40 TCS holds up over time rather well.

Besides the excellent, well sorted TCS tubeless system, the Nano 40 also benefited from an interlocking center tread block pattern which formed a pseudo-center line which promotes fast roll. This saved the Nano from being perceived as an overly aggressive tread for most gravel roads.

The other thing the Nano has going for it is that it has a voluminous casing without being really wide. Tall-ish and a true 40mm's wide, the Nano gives the rider using it a cushioned, smoother ride over the crushed rock and it still fits most circa 2014 bikes used for gravel. Subsequent tires grew, stretched, or were made wide from the onset so that they were tough to mount into many bikes until recently.

The Nano 40 also seems to wear very well. During the 2016 Guitar Ted Death Ride Invitational, I looked over to see that Scott Sumpter had a set of very worn looking Nano 40's he had put thousands of miles on in two seasons of use. So, they wear well, ride well, and have an excellent tubeless system behind them.

My experiences on the Nano 40 have all been long enough ago now that I felt compelled to revisit the tires. Not that these are not available anymore, but I did set up my original, 2015 set. In fact, you can get a swanky looking skinwall set now days, and I would rather be running that, if only for the good looking part. Otherwise, these tires I have look well enough and the set up just like they used to- easily and hold air just fine. Stay tuned for an update later this Spring about what I think about how the Nano 40 has held up over time.

Wednesday, May 31, 2017

Review Of Parts Past: Ragley Luxy Bar

Today we are going to take a look at something you cannot get anymore. Parts and pieces that graced our rides in days past that were noted for some special characteristic, either good or bad, will be featured in this recurring theme from time to time here. I call it "Review Of Parts Past", but that will get shortened to "ROPP", so there! Today's featured part is the Ragley Luxy Bar.

My 2007 Badger Cycles Drop Bar Custom with a Ragley Luxy Bar
This "ROPP" is all about a drop bar that was in production for maybe less than a year. In fact, the rumor is that only one production run was ever made of this bar. I've written reams about the mysterious Ragley Luxy Bar, but maybe I haven't explained exactly why it is that I, and many others, really like this bar. 

The Luxy Bars as seen on my Gen I Fargo. That is a Bar Yak set up attached to it as well.
 First of all, the Luxy Bar did two things that previously available drop bars for off road did not do: They had swept extensions and really shallow drop. Here in my image to the left you get a feel for how much sweep the extensions have. This puts your hands, forearms, and upper arms in a very natural position that I find extremely comfortable.

Secondly, the extremely shallow drop is unrivaled by any other bar, with the possible exception of the original, (and also unavailable),  Gary Bar. Check out the shallowness of the Luxy's drop in the top image. This was important in that the shallower drop requires a less tall stem on many bikes to make it work. Note also in my image of the Badger that the drops end up just a few inches lower than my saddle. Perfectly where I would have straight bars on any "normal" hard tail. Yet, the drop bar has other positions the traditional mountain bike bar cannot begin to offer a rider. Finally, the extensions and the top/ramps of the bar are parallel to each other and the extensions don't point downward at a weird angle, like Woodchippers extensions do. This makes set up far easier and the extensions stay usable. This is the fatal flaw with Woodchippers and it is why I do not like them at all.

The Luxy Bar did two other things which I haven't found in any other off road drop bar. One was that despite the extreme sweep and the super shallow drop, the brake/shifter controls don't end up in a super odd position which compromises their functionality or comfort. The levers get laid over a tad, for sure, but there are other bars that had far worse positioning for the controls. The aforementioned Gary Bar being one of the worst in that regard.

The width of the Luxy Bar makes for a great drop bar for a single speed.
The other thing which no other off road drop bar does, or any road drop bar, to my knowledge, is the 31.8mm diameter of the entire bar top. The Luxy is a fat bar all the way to the ramps, and when you use the tops for an extended climb, or just for cruising, that 31.8mm diameter feels right in the hand. Plus, it doesn't waste space with a taper that robs you of precious real estate for mounting accessories, should you desire to do that. Honestly, it is such a brilliant idea that I am amazed that more companies don't employ the design.

The Luxy was not perfect, by any stretch. It was only ever offered in one width, to my knowledge, and that extreme sweep was an acquired taste, for sure. However; it did so many things so "right", I cannot imagine any off road bar that comes close to the Luxy's practicality and comfort. The best bar available today, in my opinion, is Salsa Cycles Cowchipper. It has a really good design, but it has more drop and a tapered top from 31.8mm to the traditional 23.8mm for the control clamp size. The sweep is no where near the same either, so for those looking for a great bar to use on a single speed set up, the Cowchipper is a tough sell. However; the Cowchipper's  less extreme sweep is a selling point for many that use geared set ups.

The Luxy Bar is, by a country mile, the most innovative off road drop bar since Charlie Cunningham bent Cinelli bars to his taste for his self-branded aluminum mountain bikes in the early 80's. Nothing ever was made like it before or has been since. Apparently, Chain Reaction Cycles UK, the parent company of Ragley Bikes, holds the original tooling and license for the design hostage to this day. Having new Luxy Bars would be a great thing, but don't hold yer breath. I doubt they will ever be produced again.

But I've been wrong before.


Thursday, May 18, 2017

Review Of Parts Past: Wilderness Trail Bikes Vulpine Tires

Today we are going to take a look at something you cannot get anymore. Parts and pieces that graced our rides in days past that were noted for some special characteristic, either good or bad, will be featured in this recurring theme from time to time here. I call it "Review Of Parts Past", but that will get shortened to "ROPP", so there! Today's featured part is the WTB Vulpine 29"er Tire.  

My Vulpines are still rolling, but are showing their age!
This review is for a tire called the Vulpine. I never knew what that word meant, actually, until just recently. I always figured that it had something to do with a mystical animal, but as it turns out, it has to do with foxes. I don't know, but whomever designed this tire was crazy like a fox. They didn't know it then, but it is a perfect tire for gravel riding on a 29"er or a drop bar bike that can take a 2.1"er, like a Fargo.

I received the set I am still riding on as test tires for Twenty Nine Inches back probably almost ten years ago. I had several tires from WTB to test back then. The Stout, some other all around trail tire I cannot recall the name of, and these XC racing treads. None of the three are still in production, but this tire, The Vulpine, deserves to be.

Oh, I've told WTB. Believe me, they know all about how I feel about this tire. I have said something to them every year for years. But you might wonder, "why", and I am here to tell you! So, let's get into why these tires are so good for gravel riding and why WTB should be making this tire again.

A very "Terrene Elwood" looking affair, but there is more to this tire than meets the eye.
Somehow or another, the designer of the Vulpine, (I assume it was Mark Slate, as he does most of the WTB tires, if not all of them), hit the jackpot for gravel riders when he made up this design. A fast, minimalist tread in the center with graduating outer knobs from shallow to deeper. Ostensibly this was done for straight line speed and cornering grip, but the gravel acts differently than dirt. In gravel, those gradually taller side knobs give the tire a lateral stability in the loose stuff, and help propel you forward in peanut butter mud and loose, sandier gravel. But there is one more, odd, unique characteristic that the Vulpine has which makes it a standout gravel tire.

The casing is kind of flattish in the middle and then falls away sharply where the bigger tread blocks take over. This made the Vulpine corner oddly on dirt, but on gravel, where high lean angles are rare, it does a great job of keeping the fast part of the tread floating up and over the loose stuff and that contact patch is narrower. More like a 40mm tire.

The shallow tread in the middle is just enough for finer, gritty gravel or fine dirt. But it never slows you down. The casing wasn't fantastic, but it was decent enough. The Vulpine damped vibrations in an average way. Nothing spectacular there. The weight was in the ball park, but I don't have a current figure to share on that. One nit- It it was never offered in a tubeless ready version.

The Pofahl has had these tires on it pretty much since day one.

If I Could Change Anything: If the Vulpine were to come back again, I'd obviously want it to be offered in WTB's excellent TCS tubeless ready version with a 120TPI casing in their "TCS Light Casing" technology. Then I would probably tweak those side knobs a bit to optimize them further for gravel. Finally, I'd offer three sizes: 700 X 40, 29" X 2.1", and in WTB's "Road Plus" 650B X 47mm width.

Some might say this tire and the Riddler are almost the same deal, and while that is a fair point, the Vulpine has that unique side treads and the way that the casing is shaped is cool for speedy travel. That may not translate to a 40mm tire though. Too narrow a casing, perhaps.

That's my take on the Vulpine. A great tire for something it was never thought to be designed for in the beginning. I'll have my Vulpines till they are in tatters, which won't be long now! Hopefully I'll find something to work on the Pofahl before long.