 |
| Wolf Tooth head sets are the bomb! |
The Build:
I started building up the pMCD frame Wednesday night but a text message that evening kind of made me put the brakes on the build till Friday. It was okay, since the turn in plans eventually was something that was better than I was going to do in the first place.
When I build a bicycle up from a frame and fork,
the very first order of business is to get the head set in. Now you may want to do it a different way, but to my way of thinking, a frame is a bad unicycle until the fork is on it!
So, I installed the purple
Wolf Tooth head set first and then came the conundrum of where to cut the steer tube. I did not measure the stock steer tube length, but it is
looooong! I decided to go with 11 1/2" length and cut it there, because I didn't want to leave myself short with no option to have a healthy amount of exposed steer tube. However, Mike Varley of
Black Mountain Cycles had designed the frame to have an extended head tube so that steer tube spacer use would be at a minimum. So, with that unknown hanging out there, I measured bikes I already have here and approximated as best I could, with an eye towards leaving too much steer tube rather than cutting it close.
I'm glad that I did, because it came out that I had too much steer tube, but not a ridiculous amount. For the record, I think I cut off about three inches! I know I could go lower, but I'll try riding it with different arrangements of the stem and spacers until I arrive at what I like. Then there will be a final cut and that will be that.
 |
| Wheels Manufacturing angular contact bearing bottom bracket here. Made in the USA! |
After a head set gets installed and a fork is mounted, the next task I go after is to get the bottom bracket in there. You can scooter if you'd like, but a bicycle is pretty worthless without a crank set and pedals.
Mike Varley preps every frame before it leaves his Black Mountain Cycles shop to you, so the threading on the bottom bracket was super smooth and allowed easy installation of my
Wheels Manufacturing angular contact bearing bottom bracket. Then I slotted in my
Shimano CX series 46T/36T crank set for 11spd.
Now normally at this point I'd set up a stem and handle bar, and then work on mounting controls. However; part of the text mentioned above made me decide not to go that way. Instead, I mounted my
Spyre brakes and tested them with the
Irwin Cycling Aon GX 35 carbon wheels I already had waiting on this build. I ended up having to spacer out the rear caliper a bit, but otherwise I had zero issues getting things to line up.
I tried running a few cable housings just to get a feel for how I would route things. The cable routing is really well thought out on this bike. Everything going to the rear of the bike is full run housing. The front brake, obviously being a disc, is as well. Only the front derailleur is a bottom run, exposed cable set up. That may seem weird, but here is why that is actually brilliant. The break in the housing run from the shifter goes to a traditionally mounted road bike style cable stop with a barrel adjuster. This means no oddball in-line cable adjuster is necessary and the front derailleur can be easily adjusted on the fly. Those worried about mud fouling the cable have too much time to think about things. In all my years of riding, that style of cable run has never been the reason my front derailleur did not work. Your mileage may vary......
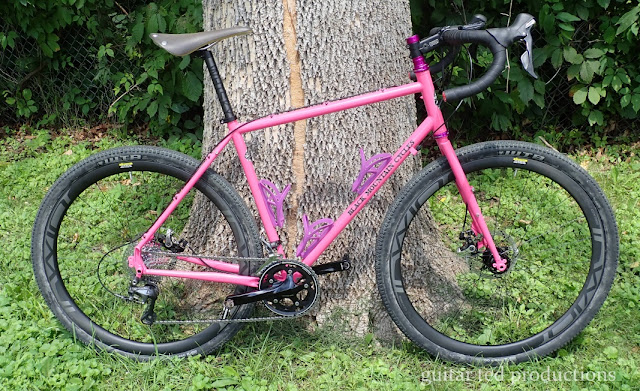 |
| The finished product. (Well......almost finished!) |
Friday I received a set of
Whisky No. 9 Carbon 24F handle bars. In that package was also a
No. 7 Carbon seat post. Friday evening I spent down in the Lab putting it all together. There were some old parts from my Raleigh Tamland Two. The Ultegra levers, front and rear derailleurs, and the aforementioned calipers for the brakes. I got a new SRAM 11-36T 11 speed cassette and I used a Shimano 11 speed chain, the new Ultegra one with the quick link. (Yay!) The stem was my
Redshift Sports ShockStop stem in the 90mm length. The saddle is my
Brooks Cambium from the old T-6 I sold.
Tires are an old set of
WTB Riddler 45mm tires that
barely went on. Those Irwin rims fit tires
tightly! I won't be worrying about throwing off a tire if one goes flat, and burping a tire seems very unlikely. I used an old beat up set of Shimano SPD's and added three purple
Velocity Bottle Traps. I got three pink ones, but the purple looked better to my eyes.
Then it was nearly time to ride after I set up my tires tubeless with "
MG's Special Sauce", (a home brew recipe- you cannot buy it from the bike shop!), and that was successful due to one product. That would be Uncle Dick's Bead Slip. No issues with getting the tires straight and even using Uncle Dick's. Note- I'm not sure where you get this stuff anymore, but if I find out I'll let ya know.
 |
| Whiskey No. 7 Carbon post |
The Whisky components look great on the bike. I like the "ghost" branding and the sheen of the black is cool. The only issue with that post is that it uses a thumb wheel up under the saddle as one of the securing fasteners. It is easier to use than some I've encountered, so at least there wasn't any swearing.
The handle bar is much the same as far as looks. The shape is very similar to a Cowchipper, but
different...... It's hard to describe. The flare is 24° but the reach seems less and the drop seems less. Not by much either. And this bar features flat sections to accommodate cable runs and a little wider 31.8mm center clamp section that makes mounting accessories easier.
The bar was covered in the Marque handle bar tape salvaged from the T-6 when I sold it. Then I capped off the Whiskey Components bar's ends with pink bar end caps. It all is good with the pink frame and helps tie the look together since the parts look more like an ensemble instead of a hodge podge.
 |
| There she be! |
The Ride:
The Black Mountain Cycles rig is fun to ride for sure. Smooth?
Oh yeah! But that may be because of the ShockStop stem and the Whiskey No. 7 post. That post has a sweet ride to it. Plus the Whisky No. 9 24F carbon bar also has a bit of give at the extensions so that when you are in the drops it feels smoother yet. Add in 45mm Riddler tires and it gets smooth fast. But that said, the frame is pretty nice in this regard. While the disc factor caused the fork to be stiffer than my rim brake BMC, it still can be seen working over the rough stuff on gravel. It isn't the "immovable object" that many carbon fiber forks are.
I stuck the bars at a height that was neither the highest I could go, nor the lowest. I'm close, but I'll be swapping around stem spacers till I get it figured out. But otherwise the position I was able to get is spot on. Not too much seat post is extended, and I don't have to get a crazy different length stem. In fact, I may go a touch longer depending upon where I end up at with bar height.
Something struck me as I was riding it. That was that I was feeling similar feelings to something I'd ridden in the past. The steel frame of the MCD felt somehow familiar. Then it hit me. The Vaya! I used to love that bike for its crazy ability to give back what you put into it, eventually. Kind of like winding up a spring and then it recoils. Anyway, the MCD felt like that, like the Vaya used to.
So, is it the
uber-Vaya? Maybe. It just reminds me of that old bike. Only the Black Mountain Cycles bike has more features. More tire clearance, through axles, livelier tubing choices, a better steel fork, and smarter details. So, it is a different beast altogether.
I'll be doing some tweaking in the near future beyond the stem position. I may be switching bar tape, tweaking out the saddle position, and stuff like that. I'll also be doing a switch on the wheels to try 650B X 47mm tires. That said, yes-
I am happy. I like it, and I don't think this one will be going anywhere unless I am riding it in the near future.
Don't ask what it weighs, because I won't tell you. That isn't the point of this bike, but if you have other questions, I'm happy to answer them.


