Showing posts with label generator. Show all posts

Wednesday, September 11, 2019

It's The Light Time For Night Time

I've got the silver version of this light, purchased with my own money, in 2017.
Lights. You're going to be digging yours out soon, if you haven't already, and looking for that dratted USB cord to charge it with. Yep. It's about "Light Time" in these here latitudes.

I was reminded of this the other day when a guy I follow on Instagram was showing his morning group ride and it was dark. "Gosh! Is it already time for lights?", I thought to myself. Yep. It is that time for sure. I got to thinking more about this since then.

So, the first thought I had was, that for a guy like myself, the ultimate set up is definitely what I have on the Ti Muk 2. I cannot imagine a more simple, easy, and less thought intensive way to light the night than with a SON 28 dynamo hub and lighting system. I mean.....I just pedal and the lights work! I don't have to charge them, I don't have to remember to turn them on or to turn them off. I just ride. It cannot possibly be easier than this.

Now, I know that there are downsides. Like, I would have to duplicate the expensive hub into a wheel to be able to switch out to, let's say, a Summer wheel set. That's a big ouch because the SON 28 hub for through axle fat bike set ups is close to five hundred dollars alone. Just the hub! So, I guess I could put up with a measly $200.00 LED, self-contained unit and a separate "blinky" for what? Another $50.00 for something really nice? And that would cover all my bikes? Yeah......that's a good deal.

But I'm tellin' ya. There is no denying "The Power of the Dynamo Hub". Once bitten, you'll find it hard to look at other lighting systems in the same manner. It's just the money, which is a big obstacle, to get over with those. Otherwise, yeah.....I'm completely sold on dynamo lighting now. But until the entire world decides that dynamo hubs are the bomb, (unlikely), and until I come up with a truckload of cash, (also not very likely), to convert my fleet, I'm also going to be running "traditional" LED-type lights for cycling. Oh, and what about a light for the helmet? You aren't going to run that off a dynamo hub......yet. Maybe someday. But for now, you are probably looking at traditional LED lights for the helmet as well.

So, pretty soon I am supposed to be getting in some lights for review that have some crazy features. Every year these self-contained, LED lights are getting less and less expensive and feature more and more things which I did not know I needed.

Stay tuned.......

Thursday, August 22, 2019

Ti Muk 2 Upgrade Path: Part 4

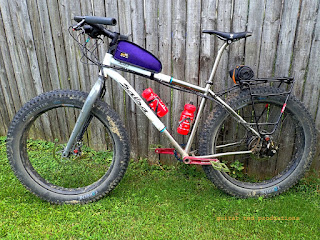
The current look of the Ti Muk 2
In my last update, I mentioned getting the SON "Tail Light For Rack" rear light. Then I was going to install that and hopefully get to cleaning up the wiring situation a bit. Well, last week before Gravel Worlds I got to do all of those things. In this post I am going to detail what I did, how, and why I did these things. There are still many details left to attend to, but this is a rideable, durable, and pretty much worry free set up, in my opinion. With a few minor details tidied up, it should be about bomb proof.

The first thing I did was to remove the old Busch & Muller stay mounted tail light. That light is a good light, but it is just the wrong application for an adventure bike such as the Ti Muk 2. That old tail light may get repurposed, but that is another project for another time.

During the process of dealing with the tail light, I also delved into the rats nest of wadded up wiring which had been zip tied to the front cable housing. The connections were just twisted together and the leads were waaaaay too long! I had enough wiring from the tail light and the head light to wire up two bikes. Of course, I was going to have to shorten all of that. Then I had to sit down and give some serious thoughts to how I wanted to have the new wiring done. There were several points which guided my decision making process. Instead of laboriously going through each one, here is a bullet point list instead. If anyone has questions about these points, feel free to comment or e-mail me.
  • First- The wiring had to be really durable. Able to withstand rain, mud, snow, and rocks. 
  • The wiring had to be clean looking, short as possible, and not interfering with frame bags and pannier mounting. 
  • I did not require any provisions for rack removal or travel which might require boxing up the bike, etc. This isn't going anywhere unless it gets ridden there, transported by my truck, or via a bicycle car rack. This meant I didn't need to consider adding additional connectors to facilitate breaking the bike down. 
  • I wanted to reduce stress on wires wherever possible to prevent internal breakdown of the copper strands, and ultimately, failure due to that. 

That SON light is TINY!
The first thing I did after removing the old wiring was mount up the tail light. I've found that by doing bicycle computer wiring, and full run cable housing, it sometimes is best to wire from the back to the front, instead of the other way around. This ensures you don't cut your wire too short!

With the light secured to the back of the Salsa Alternator Rack, I then had to sit down and figure out not only where I wanted the wire to run, but how I was going to protect it. This area was going to be getting mud baths, snow/slush thrown around in there, and rocks from gravel roads could easily be flying around back here. While the lead provided by SON is about 20 times better than the flimsy plastic covered wires most dynamo systems use, I wasn't convinced it would survive my brand of fat biking. What to do?

After much deliberation and looking through the enormous piles of bicycle detritus I have, I came upon a great solution. I have, for whatever reasons, about three dead Blackburn floor pumps. (Why do we keep this stuff?!) If I could push the wire through an old hose from a floor pump, then mount that to the bike, it would be ultimate protection for the wire, and I could zip tie that hose without stressing the copper strands inside the lead dress. Cool! So, that is what I did with the tail light lead. It fit in with a bit of room to spare, and my new "rubber conduit" now could be routed from back to front. It would not only protect the lead wires from the elements, but from a rubbing frame bag as well.

This was going to work out well. I was excited to get going on this project, so instead of going to bed early, as I should have in preparation for Gravel Worlds on Wednesday evening, I stayed up until almost midnight wiring the bike up!

Wiring under the rack and to the top tube of the Ti Muk 2
I decided I needed to make sure I could use the rack with panniers, and I wanted to clear the rear tire as much as possible, so I chose the routing you can see above here. NOTE: I am planning on modifying a Dave's Mud Shovel rear fender to go in here permanently as another layer of protection to the wiring.

A view of the business end of all this wiring and cable housing. There is still much to do here.
I had to use a second bit of hose from one of the other dead pumps to make the distance from the rear of the rack all the way up to the head tube of the bike. This left me with a good sized chunk of pump hose and got me to thinking, "Why not do this to the front wire lead as well?" So, I undid the wiring for the front light, which was miles too long anyway, and pushed that even more fragile wire lead through the old pump hose, then "Boucher Routed" it along the back of the right fork leg, behind the fork crown, and exited the wires on the left side of the bike. Conveniently, the hole drilled through the fork crown can then be used as a zip tie mount. I use this same routing for rigid fork disc brake hose/cable routes as well.

I used brand new crimp-on spade connectors and shrink tubing on the connections to the lights and for the connection between the fork wire and headlight. There is a nifty little coaxial connector which looks very robust for the hub to fork wiring, which is available from Peter White Cycling, and at some point I may get that. But from stem to stern otherwise, the new wiring scheme should be very robust.

I did make one minor mistake the first time I got everything back together. This had to do with the light itself. Many readers will remember that when I got this bike that the head light was mounted on the outermost bar of the Carbon Jones Loop Bar. This was fine from a lighting standpoint, but it wasn't good from my perspective when it comes to adventure biking, bashing around in the woods, and the like. That thing cantilevered off the bar, as it was, could have been knocked off easily in a tumble. So, my friend Tony suggested I "hang it down" from the bracket in between the outer "loop" of the Jones Bar and the inner part of the bar.

The light is oriented correctly and much less apt to be damaged in a tumble in this placement.
I did this, but when I went out for my test ride last week, I was baffled by how bad the light was shining ahead of me until I realized what it was I had done. By simply "flipping" the mount and hanging it down, I had put the headlight in an upside down orientation. It is designed to be one way, and not upside down! The light was spilling in the completely wrong way, thus my dissatisfaction with how it looked that night.

Now instead of simply pointing the mount down, I re-oriented the light correctly with the bracket pointing forward and down. That made all the difference in the world, and actually gets the beam up and out of the cable housings.

So, everything functions as it should, the wiring is far more robust, stable, and better looking. The SON tail light is bright, even without a reflector, and it can be seen from the side quite well also. When I get that Dave's Mud Shovel fender in there, the plan is to have it extend out enough to protect that tail light from splash and flying debris. That should do it for the rear end. I may also get one of those minimalist "fenders" as a splash guard of sorts for the front wiring as well.

When I have ridden the bike several times and I am satisfied with it all, I will then heat shrink the tubing where I have it over connections and seal off the open ends of the old pump hose/conduit with silicone gasket material or the like. Then I should have the "upgrade path" completed.

Tuesday, August 13, 2019

Ti Muk 2 Upgrade Path: Part 3

Here you can see the Salsa rear rack on the Ti Muk 2
The story on my finishing out the Ti Muk 2 is coming to a conclusion soon. It has been a while since the last update on the progress on this path, so for a refresher, click here.

Basically I was going after three things: New tubeless tires with less rolling resistance than the 45NRTH "beist" combo that I got it with was the first thing. Terrene Cake Eaters solved that problem quite nicely. The next two things were tied together and had to do with the rear tail light of the generator system the bike has.

The bike came with a Busch & Muller Secula stay mounted tail light, and honestly, I think it is a great light, but it comes in a plastic housing. I just find that to be an untenable solution for adventure biking or gravel travel since things can get pretty rough and tumble at times. Plastic housed tail light? Seems like a break waiting to happen. Added to that was the fact that a seat stay mounted light on a fat bike seems like a really bad idea when I think about mud, snow, and other trail debris that gets tossed, churned, and ground up between the rear tire and frame members of a fat bike. (At least that's been how I have observed things going. If you never run your fat bike on anything but groomed trail, please disregard this)

So, it was imperative to me that the seat stay mounted light get replaced and mounted either on the seat post, or..... as it turned out, a rear rack was an option. I decided against the seat post mounting since I may want to use a big seat pack  on this bike, and that wouldn't work well with a light that is "tethered" to a hard wired system. The rack was a better choice, and that also opens up options to use panniers, or a trunk bag/dry bag set up in the future.

So, I needed to get a rack. There were several good choices, but in the end, it was the Alternator Rack which won out. There were a few reasons for this, not least of which was the fact that it was designed for this bike. That it was one of the lighter weight choices didn't hurt matters either. So, I got that in and installed. It's been out of the way and unnoticeable when riding, so no noises, no interfering with off piste ramblings. Bonus- It has dynamo tail light mount holes at the rear. Perfect for many option out there which would work with my SON 28 hub on the Ti Muk 2.

I was shocked at how small this light is. The light shows red at night despite the clear lens.
So, I ended up landing on the SON "Tail Light For Rack" rear light. (NOTE- This also is available as a seat post mounted light) It mounts right to the rear plate on my Alternator Rack, and it is so tiny as to be really out of the way when it comes to the rough and tumble lifestyle I lead with my fat bikes.

The housing is anodized aluminum and despite its tiny size, it has some decent heft. Not that this matters, but my confidence is boosted when something has a solid, in-hand feel as opposed to a thin, plastic shell for a housing. I was pleased to see that it comes with a sturdy looking lead which is much nicer than the two flimsy looking wires the Bush & Muller tail light had. I will route the lead up along with the rear brake line on the frame and tuck the remaining distance along the rack so it will be out of the way and unobtrusive in case I decide to use panniers.

I got extra spade connectors and some shrink tubing along with the tail light, so all I have to do is route the thing carefully, connect the spades to the lead ends and connect it up. Hopefully it all comes together well and I have a functioning light system when I am finished. Once I get everything done I will have a final post on the lighting and tire upgrade which will detail out the performance upgrade each part brings to the Ti Muk 2. Then I'll be ready for some adventuring. (As if I haven't been doing some already, but, ya know........)

Monday, May 20, 2019

A Big, Fat, Titanium Thank You

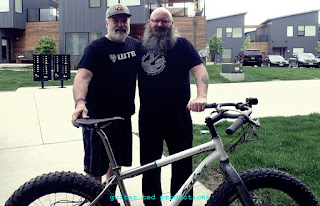
GT (L) and Sam Auen with the Ti Mukluk
Okay..... I'm not sure where to start with this, so I'll just go to the beginning of this story and hopefully it will all make sense. I'm still processing through what happened and I may never fully get my head around this, but here goes......

Several years ago, when I had my original Ti Muk, Ben Witt and I were gabbing about how "the perfect fat bike set up" would be a titanium frame and a Rohloff based drive train. Well, I already had my bike and a Rohloff is, while awesome, very expensive. That didn't stop Ben from trying though. He got a 2015 Titanium Mukluk frame and had built a rear wheel using a Whiskey carbon rim with a then new 170mm rear spaced Rohloff 14 speed internal geared hub. I remember seeing this in his basement when I stayed with him during the 2016 Fargo Reunion Ride.

Okay, fast forwrad a bit to when Sam Auen bought the partial rolling chassis from Ben and obtained another Whiskey carbon rim, (via from myself - long story), and built the bike up into rideable shape. Sam then added the bike to his fleet and did a few rides here and there on it. Then came the time when my good friend Sam realized he needed to "thin the herd". The Ti Muk was on the short list of candidates for him to shed off the fleet to someone who would use it more than he was.

Sam then posted the idea of selling the bike on social media where I jumped in and commented something to the effect that this was the "perfect fat bike set up" and that someone should own this dream bike. My intentions were to help bring some notice to Sam's trying to sell the bike because I wanted to help a friend. Then I forgot about it because it was a temptation I could ill afford anyway, even though I would have purchased it on the spot had I had the money. I figured some other lucky person would get it, and that would be that.

14 internal hub gears of doom.
Then this is where MG got involved. He texted me that very day asking about some things. One of the things mentioned was what I thought about Sam selling that bike. Did I really think that was a "dream build" for a fat bike? I responded to MG that I felt it was "the perfect fat bike set up" for me. That was that. We moved on to other things, and I went about my life, unsuspecting. MG, on the other hand, had a plan.

He contacted a list of people and got them, somehow or another, to contribute to an effort to make the bike mine. Their motivation for doing so was not, and is not, totally understood by me. MG wrote me and explained it this way

" It's funny how your influence stretches much farther than you might think. All of the people who donated have been touched by you and/or your work in one way or another....."

I still find this hard to believe.......

Anyway, it happened. I have the bike and a big list of people I need to thank, so this post is a public thank you to those folks. MG has said that these folks are okay with my publishing their names on the blog, (If you do have issue with that, let me know and I'll strike your name from the list, but I felt you all deserved recognition for this uncommon gesture). So this, in no particular order, are the folks who made it possible for me to get this awesome Ti Mukluk Saturday.

  • Bobby & Crystal Wintle
  • The Gibson family – Christy, Russ and Sofia
  • Joe Billsbach
  • Jason Boucher
  • Bruce Currin
  • Steve Fuller
  • Corey Godfrey
  • Ben Shockey
  • John Wilmeth 
  • Venny Alub
  • Rob Evans
  • Ed and Janelle Gerlach
  • Gary Little
  • Kristi and Tim Mohn
  • Errin Vasquez
  • Walter Zitz
  • Timothy Stephen
  • Todd Masters
  • Jim Phillips
  • Joe Reed
  • Joe Pahr
  • Warren Weibe
  • Ben Welnak
  • Matt Gersib
  • Sam Auen

And here it is. Thanks doesn't say enough, but THANK YOU!
 So, this past weekend my family and I visited my good brother Sam, collected the bike, and brought it home finally. This arrangement by my other good brother, MG is mind blowing. Wow...... Anyway, still wrapping my brain around what happened.

So, I cannot express my feelings. I just don't have the words to show my gratitude here. So, I'll talk about the bike, since it is unusual and I''m sure some of you are curious.

The fork is from an Advocate Watchman fat bike. It was the only 150mm spaced fork Sam could get his hands on at the time he built the bike up. He wanted that spacing for the SON dynamo hub he had someone lace the Whiskey carbon rim to.The handle bar is a Jones Carbon H-Bar with the ESI made Jones grips and the requisite Rohloff shifter. The seat post is another Salsa Regulator, which I love. The saddle is a Salsa branded WTB Silverado, (I think it is a Silverado), and that may go if it is too narrow. (Looks like it) The rims are the aforementioned Whiskey carbon ones in a 70mm width. The tires are the 45NRTH Dunder/Flowbeist models. I'll probably just run those till they are done. Brakes are simple Avid BB-5's with Avid levers.

Can-o-gears
The crank is a Race Face Turbine with a Race Face ring. Obviously, pretty basic outboard drive train stuff because the business end is all inside the 14 speed Rohloff hub.

The Rohloff is the 170mm OD model which came out a few years ago. Basically the internal gear hub is pretty bomb proof. As long as I keep changing the oil when it needs it and keep up on the maintenance of the external cog/chain/chain ring, the drive train shouldn't ever let me down either. That was why I was dreaming one day of owning a Rohloff. That and there are no "dangly bits"to get whacked off during explorations and in nasty conditions. 

I have ridden the bike for a bit. I haven't owned a Rohloff equipped bike before, but I have worked on a lot of internal geared hub bikes and they all have one thing in common- They do not like being shifted under power. Unlike a derailleur drive train, you cannot just shift while mashing the pedals. There is a bit of a special "hiccup" you have to learn to shift a IGH. (Internally Geared Hub) This is especially true with a down shift to get up a hill. I will need a lot of practice before I get this down smoothly with the Rohloff.

I also need to tidy up the wiring on the awesome Busch and Mueller IQ-X lighting system. It works fine, but there is a lot of extra wire and it needs to be routed a bit more permanently. This is also my first dynamo hub experience and so far, I totally see the appeal. I have worked on dynamo hubs before and I have a basic understanding of them, but owning/living with one is going to be a new learning experience.

Basically the entire set up will require some familiarization on my part. Just getting wheels on and off will be a bit more involved than your typical bike due to the complexities with wires, cables, and whatnot. But that said, this bike........wow! Sam insisted several times when I got it from him Saturday that I have "adventures" on it, and get some good use out of it. That is the plan for sure. So stay tuned for a lot of that to happen in the coming weeks and months.

Once again...... Thank You! I am overwhelmed by this act of kindness.

Friday, January 19, 2018

Friday News And Views

Basically new cranks and bottom brackets with their own spindle size.
SRAM Introduces DUB- A New Bottom Bracket & Crank: 

SRAM is introducing a new size spindle and inner diameter bearing system for mountain bikes and fat bikes called "DUB". (Did anyone warn SRAM that is only one letter away from "not very smart"?) Anyway.....

DON"T SAY IT IS A NEW STANDARD! They don't like that, so I won't say it is. ( You can- many are) The big deal here is what SRAM is claiming as a better stiffness, (retains a big spindle at 28.9mm) and better bearing life with the new bearings designed for this system. It fits any current Press Fit or BSA bottom bracket with the correct spindle length for fat or mountain bikes.

I really don't like SRAM's website. It isn't very easy to pull out technical information without digging a few layers into it, which I find frustrating, but that aside, I don't see any issues with this as long as it actually does have better bearing life than BB-30 systems and as long as it really does fit everything out there. (Most crank sets are adaptable to anything out there, by the way.) The DUB system goes across several levels of SRAM componentry on the mtb side so you'll likely see it available on lots of OE bikes in the future. Whether or not road will get this hasn't been revealed, but I cannot see why it would not happen at some point.

SON 12mm through axle dyno hub- Possibility for the new MCD build
Dreaming Of Generators:

A conversation via text messenger and a new series on RidingGravel.com about lights has rekindled my interest in getting a hub dyno. This now would be a dream for the upcoming MCD build from Black Mountain Cycles.  

Both of those things sparked an interest in trying this dyno hub thing out. I'm not 100% sure about it, but having lights always at the ready might just be a reason to do more night time gravel riding in the Summer- a thing I've missed doing. Generally speaking, getting the lights ready, mounted, and whatnot kind of sucks the fun out of spur of the moment thoughts of wandering around in the country at night. The way my life is structured now, moments must be seized or they slip away. I only get chances to do stuff like night gravel rides on a whim most times because I generally have to slip out alone.

But would I do that enough to make a nearly $400.00 hub, (not to mention spokes, rim, nipples, etc) worth it? Hmmm...... Not sure about that. So, this is what I say it is for now- a dream. The icing on the cake, if you will, and certainly an expendable part of the plan for an MCD frame/fork build.

Time To Check This Out:

The other day I had someone ask if I'd ever consider doing the 24hrs of Cumming, (keep the jokes to yerself, people, it is a real town's name in Iowa) and I said probably not because it always falls on my GTDRI date. Well, this year the GTDRI is going to be on July 28th.

Then I found out that the Cumming, Iowa gig is the following weekend which is August 4th. So, then I was texting with my friend, Sam, a fellow Renegade Gent's Race team mate, and he asked if I wanted to tag-team the event with him.

Hmm....... So, I talked it over with Mrs. Guitar Ted and Sam with his lady and it looks like I am in on this. So, yeah...... I said that I wasn't going to do many big competitions this year. The thing is, I am looking at this as just a big mileage day in big hills with maybe some rad gravel night riding thrown in for good measure. Basically, fun. If we do the whole gig and we evenly split the distance/turns/laps, then I figure that I would have to do about a buck-forty and given 24hrs and rests in between, that's doable. Weather can affect that, of course. But we all know that!

Bonus Link: New Riding Gravel Radio Ranch podcast on The State Of Gravel Cycling & More: CLICK HERE

That's it for this week. Have a great weekend!