Showing posts with label tools. Show all posts

Thursday, April 03, 2025

Gauge Time

Noticing a theme to this week's posts?
More air inflation issues here. Specifically having to do with gauges. I already mentioned the Clik Valve gauge I was ordering to measure air pressure for those Clik Valve equipped wheels on the Honeman Flyer. The gauge for the Clik Valves will be here tomorrow, according to the latest shipping update.

I had another gauge issue recently though, and it was a two-stage issue involving my SILCA Pista Plus pump.

I looked down at this pump sevral months ago and noted the lens covering the gauge dial was....gone. No trace of it to be found anywhere. Weird! Maybe I dropped something on the floor which hit the pump first? I had no recollection of this happening, but then again, I may not have noticed where, whatever it was which had been dropped, landed.

Well, I decided to just cover the opening with some clear packing tape until I could be bothered to get around to seeing if I could fix the gauge with a replacement lens or do something better than packing tape. This situation was working well until about a couple of weeks ago when I discovered the gauge just quit working at all. I could see the needle move when I stroked the pump push rod down, but the needle would return to zero on the gauge no matter what. I futzed around with the gauge, taking it off, checking the seal, putting new plumber's tape on the threads, and triple checking the results, but to no avail. I did note that the base of the gauge had been bent, probably as a result of the gauge getting hit months ago.

While I could have delved into things further, I decided to try SILCA and see if they might have a Pista Plus replacement gauge recommendation. Their site does not show a replacement gauge for this model, but it never hurts to ask. At the time, I was preparing to go look for another gauge, assuming SILCA would not have a replacement other than to buy another pump.

To my surprise, I received an answer to my email within a half an hour and the representative indicated this gauge wasn't a typical replacement option, but SILCA would be willing to send one out. I received an invoice which I could use to pay for the gauge, (at a very modest price of $20.00, by the way, plus shipping) and so I went ahead and placed the order.

Now, SILCA did not ask me to report on this, nor do they know I have posted this on my site, but I wanted to point out great customer service where it deserves to be highlighted. No other reason for the story.

Now I'll have two new gauges soon. Yeah.... This was unexpected! Not a planned for pair of purchases, but tools are always good with me, and as a mechanic, I don't mind investing in these as long as they are well-made, durable tools.

Tuesday, February 25, 2025

Two Things

Long before the days of cycling oriented "multi-tools" there were tool rolls, tool pouches, and individual wrenches. An example of this came through,my place of employment, the Cedar Valley Bicycle Collective, recently. 

An individual called about dropping off an old bike and when they came by to donate this bike it turned out to be an old Puegot road bike. It was kitted out with all its original equipment. The "carrot stick" Simplex shifters were still there intact, (IYKYK), and even the funky Simplex front derailleur still worked. It had its original, slightly dried out, Ideal leather saddle, (similar to a Brooks), and the infamous MAFAC Racer brakes.

 It was quite the time piece, as it looked completely unmolested since its sale in, probably the early 1970's, I would guess. Upon closer inspection I saw a black object which looked like a small bag just stuffed in between the saddle's rails and the leather top. I carefully removed it to find that this object was a tool bag. As you may have guessed from the image here. 

It was in remarkable condition and the tools were as well. I'm not sure the combination wrench was an original part of the kit, it looks different and may have been added years ago. However; the four other stamped steel wrenches with the "MAFAC"logo do match the bag with its embossed "MAFAC" logo. Even the hang straps are all intact, which look like easy casualties to wear and time. 

You've got to question the usefulness of stamped steel wrenches. I'm sure they might get you by, and certainly they are light, but obviously they were not precision instruments! I cannot say the combination wrench is a whole lot better, and it is a standard SAE wrench anyway. Not much use on a bicycle. 

It is a cool oddity though, and I will certainly keep it all together as a bit of a conversation starter for the shop and for clinics in the future as a show piece.  

Clik Valve products - Image by A Andonopoulous

Now as I sit and contemplate the soon to be here riding season, I wonder about dedicating a bike to using those TPU tubes to see what I think of this new thing. As I was thinking about what I like about TPU tubes, I was reminded of the number one downfall to these things, in my opinion, and that is the valve stem. 

Those plastic, flexible stems are probably not very sturdy. Although I haven't broken one yet, I know that is a distinct possibility. And furthermore, I do not want to find out. 

There is something I think would help fix this. That would be going to the Clik Valve design. I think it would work in plastic, but even just a steel or brass end, as the TPU tubes have anyway, in the format of a Clik Valve, would be really good. That is because Clik Valve is really easy to engage and disengage. It would likely pose much less of an issue when it comes to the possibility of breaking or damaging a TPU tube. 

Now there is another solution coming out very soon. I'll have more on that in this week's "FN&V", but that solution will be quite pricey. We will see.

Monday, July 03, 2023

Two Things

 Rechargeable Air Compressor Device In For Review:

I mentioned this last week, and well.....here it is. The device that claims to make all your inflation jobs easier. And then some... Oh! I purchased this device with my own money and the company has no idea I am reviewing this item. (I'll have more on why this statement is here later)

Out of the box I have been impressed. This borders on maybe being too much to have for casual rides around town or even longer gravel rides out into the country, but if I were on a tour? Or if I were on a really long ride? Yeah, I could make space for this because it could be a back-up for a device that you'd need an emergency charge for and it has the ability to be a flashlight.  So making repairs in the dark, or setting up camp in the dark, might be an easier task with the light function. Oh, and it also can double as a digital pressure gauge.

The unit and accessories seem well done. I see no reason at all why it wouldn't work well, and the waterproof carrying bag is a nice touch. Stay tuned here and on Riding Gravel for more. 

N.Y. Roll said something about a sub-24 outing. So, I had to get busy.....

 Sub-24 Set Up:

One of my goals for the year was to do a sub-24 camp trip which is going to lead into a special two-day trip I have wanted to do since about this time last year. I hadn't gotten around to setting up the Singular Gryphon Mk3 with the Old Man Mountain Elkhorn Rack I have, but I had meant to get that done and then to start messing with the set up for a sub-24 and eventually this trip. 

N.Y. Roll blurted out something the other day which was quite unexpected, but he wondered if I was up for a sub-24 trip. Now, I don't think he knew what I was thinking about, but it was perfect timing and the kick in the rear I needed to get started.

So, what you see above is basically a "sketch" of a set up. This could all change, and some of it definitely will. But here is what I had in mind so you can understand where I am possibly going here. 

  • Rack: I thought I'd try the Elkhorn up front. I see a lot of bikepackers doing this and it makes sense to a degree.
  • Rear Seat Pack: That's a Topeak unit I have and it has that removable dry sack so the bag stays on the bike. It's big enough to hold my two-man tent, so that's where I stuffed that for now.
  • Topeak also made the extendable water bottle cage which I put underneath and because the front center of the Singular is longer than a gravel bike's, I can stuff a 32oz bottle in there. Perfect! 
  • Water: Speaking of bottles, with the Elkhorn not interfering with the water bottle cages, I can have five bottles, and I could use a Bike Bag Dude Chaff bag for a sixth, if I wanted that, but this amount should do with one chance at a resupply. 
  • Cargo: Okay, here's where I am not 100% yet. I need to rethink my using that old Thermarest pad which is that orangey-brown roll on the rack deck. It still works just fine, but that's as small as I can make it and I really should have it in something. I may just use one of those windshield Sun protectors that some minimalist bikepackers go with. And maybe I don't need to take so much stuff? That's always something I wrestle with, but the Outdoor Research handle bar roll really can handle a lot of my clothing and my sleeping bag, so I'm not sure how much I'll need that rack for in the first place. 

I could buddy-up that Salsa dry bag of the front of the OR handlebar roll, and maybe I don't need the Elkhorn, or....? Still trying to work that all out. But I test rode this set up and it would be okay. So, I am encouraged. I just need to do some decision making on the finer bits and she's ready. 

Stay tuned.....

Wednesday, February 22, 2023

Tool Inspection Time

Don't neglect the inspection of your tools!
 It struck me the other day as I reached for a 4mm hex key that maybe as cyclists there are some of you that don't pay a lot of attention to your tools. This can get you in big trouble down the road, especially if you have been using the same tools for many years. You know, that trusty multi-tool? Maybe it is a set of hex keys you often use at the home shop. Whatever the case may be, tools need looking after, and a well-worn tool, while a beautiful thing, is a time bomb waiting to blow up some project or repair. 

And you all know that never happens at a convenient time! 

So, I thought since I have seen tools wear out and since I have seen what to look for in terms of wear and what that can do if you do not address that, I would drop a few tips in the blog today. This might be handy now as well since "gravel" season - well, really cycling season overall - is about to kick off for the year in the Northern Hemisphere. 

I'll drop hints according to tool type and try to include a few images to help illustrate my points. 

Hex (Allen) Keys: These tools are perhaps the most used of all the tools a cyclist might have besides an air pump. (Note: These tips can mostly be used for the inspection of Torx keys also) The typical high-use keys are the 4mm, 5mm, and 6mm keys with a nod to the bastard child 2.5mm key. (Thanks SRAM!) Hex keys, (also known as Allen wrenches), can become very worn after several years of use. Using a worn hex key is a recipe for a rounded out fastener. You can inspect the ends of your hex keys and maybe see wear in the form of deformation of the hexagonal shape. You may see rounded off corners as well. Anything but sharp, crisp corners should alert you to a potential problem. 

Note the deformation of the 4mm end on the left  here.

Ball end, or Bondhus type hex key ends are even worse for this issue. Pay particular attention to these as they can lose there shape rather easily without your noticing. Tip: NEVER use a ball-end hex key to do any heavy torque work either loosening or tightening. That's not going to go well in the long run. 

Sometimes you can cut off the damaged end and save the tool, but be aware that high-speed cut-off discs or grinders can take the temper out of the metal due to heat and make the tool worse than it was when you started. I recommend a hand-held hack saw if you want to attempt this. Make sure you lightly debur the edges with a file if you should decide to try to extend the life of a hex key. 

A Quick Note On Hack Saws: As long as I'm writing about hack saws- Keep in mind a hack saw only cuts in one direction only (away from you) and that you should always use the entire blade! Most people apply way too much downward pressure (wrong- let the blade do the work), and saw back and forth in the middle of the blade, quickly wearing out that short section of the blade while either end goes unused. As an old jeweler once told me- "You pay for the whole blade. Use all of it then!"

A good chain breaker pin should look like this.
Chain Breaker: These are great tools in the case where you break a chain, but if you have used your chain breaker several times, you may want to look at the pin that pushes out the rivets which hold the side plates together. That pin goes under a lot of stress and pressure with each usage. That can cause the pin to deform, or more likely than that, bend. A bent or deformed pin usually can be replaced, (on good quality tools) so make sure that you replace your chain pin now before you find out that it is bent or mushroomed out when you are trying to use it on some rural road. 

Torque Tools: These handy gizmos are very popular these days for torquing down hex bolts on stem face plates, stem attachments to steer tubes, and other torque sensitive fasteners. However, their bits can also fall prey to the same issues that all hex keys do after a lot of usage. If those bits are replaceable, and they are deformed or very worn, you should replace them. If they are not? New tool time. 

Torque keys can wear out and fall out of spec. Beware!

Also, those torque settings should always be periodically checked against a known, certified torque wrench from time to time. Any torque key that is out of spec should be replaced and not used again. Remember: Tools are not going to last forever! Especially if you use them a lot. Don't want to have to spend the money? Then don't use the tool. But your alternative is what? Seeing a professional mechanic should be the answer there. Let that person foot the bills for tools and the knowledge to use them. But pay that person accordingly with a cheerful heart. 

Otherwise the maintenance and liability for not doing that maintenance is on you. 

Cleaning: This is also the time of the year to inventory and clean up any rucksacks, hydration packs, top tube bags, or any frame bag and see what is in there. It isn't uncommon for riders to find multi-tools, old tubes, food wrappers, or even money that they had forgotten about in the depths of some bag. More importantly, cleaning up the bag and tools that may be in it make life a lot smoother for the upcoming season of riding. Plus, you'll have a handle on what you might need to add or subtract from those bags! 

Those are just a few tips I can think of for the tools you most likely use for your bicycles. Got any other ideas? Let me know. If there are more than a few different suggestions, I'll make a "part 2" for this post.

Tuesday, August 30, 2022

Tire Tools: Odds And Ends

 Last week I wrote a post on tire levers (HERE) and in that post I mentioned I would be back with some ideas for other good tools that you might want to consider for your home shop. I have two things which are related and one sort-of tire lever addition that also does another task you may be needing a good tool to do. 

These tools are a must-have for tubeless tire installation.

"Tire-Jack" Tools - These are a must-have for tight fitting tires like tubeless tires if you are not familiar with tire installation, have delicate or weaker hands, or if you just want to make life easier. These have been a little known secret of shop mechanics until recently when tubeless tires gained popularity and other manufacturers/brands got into the game. 

The one on the left is probably best known as a "Kool Stop Tire Jack", although mine is branded something else. The Kool Stop one is nearly identical to this. The premise is that you have one bead of the tire up and over the rim in the inner rim well. Now you are down to that last 4-5 inches of tire that you need to get set into the rim, but things are getting pretty tight and hard to do at this point. That's when you take this tool and place the non-hinged, straight end against the rim edge on the other side of the tire- where it is seated into the rim already- and the "hook" end, which is hinged, has a lip on the end which you place under the edge (bead) of the tire you are trying to "jack over" the rim edge. 

The operation is intuitive once you get the tool placed correctly. Anyway, this was pretty much the only choice for decades until others like the Challenge tool on the right showed up. That tool is ergonomically better, has a better leverage over the tire, and the "hook" end grabs better without slipping off easily. It is also spring loaded which helps with the operation of the tool in one hand. 

The basic "Kool Stop" version is about 13-14 bucks. The Challenge "Smart Bead" version is about 16 bucks. I highly recommend spending the extra for the Challenge tool, or a similarly designed one.  

The Topeak Power Lever X

The next tool is really a few things in one. It is the Topeak Power Lever X tool. I'm focusing on the tire lever bit here, but this might be a great tool for the touring cyclist, bikepacker, (aren't those the same person?) , and any adventurer. 

This lever set also will install or remove a chain quick-link and it can remove a Presta valve core. The tool comes with a clip to harness the chain and provide some slack to ease the installation of a quick-link and has a storage spot for a spare quick-link. So, it goes beyond just being a cool tire lever set. 

I like the extra length for leverage, the stiff steel core, and the wide, angled bead lip here. Cons are that these are a little heavy, and you still would need a chain tool in certain instances to repair a chain in the field.Of course, if you don't need a lever set with the other functions it is a non-starter for you. But I'd be fine packing this lever set for long gravel rides on a bike with tubeless tires. You know- just in case a tire failed to seal. But then again- how often does that happen to you? Risk versus reward. That answer will be different for everybody. I like the idea because it has other functions than being a tire lever set. In fact, wouldn't this thing make a great mud-scraper tool in wet weather?

The price isn't bad for what this can do at 15 bucks or so. Also, I have reviewed this tool before on Riding Gravel and am doing a more in-depth look at it again there. So, the Standard Disclaimer applies here, and for that Challenge Smart Bead tool as that was provided to me by Challenge Tires.

Thursday, August 25, 2022

Tire Tools: A Lever Round-Up

You need more than just an air source.
 Tires: Nothing gets people talking more about bicycles than perhaps what tires that they think you should run. But tires are pretty useless without specific tools to work on them with. 

In this post I will cover a little spoken about tool that is an imperative for anyone wanting to ride a bicycle. It involves removal and installation of tires. You really, really  need to know how to remove and install a bicycle tire. This skill set is so valuable and important that I cannot believe that what I am going to share today doesn't come up more often than it does. 

What is that? Well, it is the lowly tire lever, that's what. Everyone knows you have to have air in a bicycle tire, so a pump, or some air source, is important. But when it comes to removing a tube, or a tire, you will quickly learn the importance of a good tire lever.

You've probbaly seen these on the counters of bike shops near the money exchanging machines. (I'd say cash register, but hardly anyone under 30 years of age probably uses a buying method that requires one of those anymore.) Anyway, those odd levers in plastic. Generally stacked together in sets of three. Yeah....whatever. A tire lever. psssshaw! They are all the same.....

So wrong.....soooo wrong! 

I've swapped hundreds of tires- maybe thousands- over my career as a bicycle mechanic, so I'm intimately familiar with tire levers, and I can tell you that there certainly are good ones, bad ones, and okay ones. Today I will show you all three types. Now- this is not an unabridged tire lever review. There are a LOT of tire levers out there and I certainly will not have covered all the good ones. But I do know what to look for, and I know what a bad tire lever is. So, let's take a look at what I have to show you today.

Tire levers from my collection, and this is not all of them!
In the image above you see a collection of tire levers and numbers corresponding to each. Below you will get my take on each one of these. 

  1. KOM Tire Levers: These are pretty darn good tire levers and the reasons why are many. They have a nicely shaped, wide hook to pry with. The material used to make them with is stiff and sturdy, so flex- which is bad- does not hinder your levering. They have ribs on their body for really good grip. They have a Presta Valve core remover built in, (good for you tubeless tire users) and the spoke hook is angled well to allow for you to work on another lever when removing a tire. (How you do that is not covered here) When you buy these from KOM you get a nifty aluminum Schrader/Presta core removal tool which nests right in the lever pair which nests into itself rather securely. Nit: The spoke hook bit s finicky. Overall Rating: 9.5 out of 10
  2. Not really a "tire lever", per se', but a nifty tool nonetheless. This is the Quick Stik. It is used to peel off a bead from a rim on stubborn tire/rim combinations. You probably would never want one on the bike, but this is a great tool for the shop and comes in handy if you have a fleet of family bikes to maintain, for instance. Overall Rating: 7 out of 10 because it isn't a tire lever and is sort of specific in use. 
  3. Generic Lever: This is an example of those cheap, add-on sales type levers you may see in a big bowl, or in a box at the front of a store. Usually sold in sets of three nested together. Note the minuscule lip on the bead hook. See how short the lever is compared to others here and how narrow it is. This is a great example of a bad tire lever. Do not buy! Overall rating 2 out of 10. 
  4. Bontrager Tire Lever, circa late 00's/early 2010's. No longer available. This was a pretty decent lever. The pointed lip on the bead hook was pretty useful in certain situations and the lever was stiff. Could have been longer and the tips on these were prone to breaking off. Overall rating: 5 out of 10 for the weak tip and short length. 
  5. Park Tools TL-1 Tire Levers: These levers, since discontinued for the nearly equally as bad TL 1.2, are not good. Weak plastic means that the bead hook lip deforms quickly, the spoke hook deforms, and the levers become nearly useless. The shape and size of the bead hook are not good.   Overall rating: 1 out of 10. 
  6. Pedro's Tire Levers: These levers, and Maxxis tire levers, (not shown) are some of my all-time favorite tools for tires. A wide bead hook lip and sturdy plastic construction give a firm grip and these are a joy to use. They come in pairs, in several fun colors, and are really durable tools which should last most people nearly forever. Overall Rating: 9.5 out of 10 (Same for the mentioned Maxxis levers) Nearly perfect tools. 
  7. Soma Steel Core Tire Levers; These are good. Really good. I just wish that they were a bit wider. Stiff as all-get-out due to their steel core. Heavy due to their steel core. They do not nest together, so its easy to have them get separated and to lose one one or both. Get these if you have really tight fitting tires with tubes. Overall Rating: 8 out of 10. Just misses on a few points for me. 
  8. Old Bontrager/Trek branded levers: Not a great design due to their overly curved shape and plastic that was a bit brittle which led to a lever easily broken. Shown as an example of a goofy shaped lever which isn't necessary. If you see something like this, avoid it. Overall Rating: 5 out of 10.

So, again- there are more levers you can shake a stick at out there, so I get it if you have your favorites not shown here. Honestly, I could live the rest of my days with Maxxis and Pedros levers and never look back, so perhaps this is why I don't show you more than these. Just grab a set of Pedros levers and be happy. But if you have others you like, rock them! 

I'll have a companion post to this covering other tire tools soon.

Thursday, October 28, 2021

Torque Wrench Basics For Home Mechanics

Torque specs and proper application of torque is critical for cyclists.
Today's post is courtesy of G-Ted Productions reader, "Sean", who suggested that a post covering torque wrenches and what I thought of them was probably a good idea. He's right, and so today I am going to cover the basics of torque wrenches. What torque wrenches I like will be detailed. I will also cover reasons why using proper torque on fasteners is important. So off we go now.....

What It Is: Torque is important and you use it everyday. Anytime you screw on or unscrew a lid, cap, or fastener, you are applying torque. When it comes to your bicycle, this ends up being very important  because without torque your bicycle would fall apart, and well.....you wouldn't be pedaling either. "Proper" torque is when you have applied a specified force to a fastener so that it (hopefully) will not break or come undone during use, and so that the parts joined together won't fail because of improper torque. Basically, too tight or too loose is bad. We want to be in that "Goldilocks" area, but how do you know when you have your fastener 'in the zone'? Well, you don't know nuthin' without measuring tools. That's where torque wrenches come in. 

A good torque wrench will give you a measurement that you can check against the specifications for the part you are fastening. For instance, many stem bolts have a 4-5N m. torque specification. Going less than 4N m. is not good and going over 5N m. is not good. The torque wrench will tell tell you when you have that fastener in that 4-5 Newton meter range. (Yes, that is what "N m." stands for) I'm not going to get all into the units of measure for torque here, but the most commonly used units for bicycles are Newton meters, and to a much lesser degree, pound-feet , and inch-pounds. 

An example of beam/deflection torque wrenches
Types Of Torque Wrenches:

There are four types of torque wrenches in use in bicycle shops: Beam/Deflection, Clicker, Digital, and Dial Gauge. Most accept 1/4" or 3/8th" socket tools and some have the hex type bit pockets. 

Beam/Deflection: These are probably less commonplace in bicycle shops these days, but beam/deflection style torque wrenches are simple and low maintenance. They do have a disadvantage though in that it takes a steady, skilled hand to use one properly. It's easy, for instance, to miss your target torque range when getting into higher torque settings since you have to rely on muscle steadiness to get an accurate reading. The plus side is that these types of wrenches, if handled with care, do not go out of spec. This means that when a beam type wrench measures 5 pound-feet of torque today, it will still be 5 pound-feet of torque 20 years from now when it gets used again. (I know because I have two and have had them tested) Beam/Deflection wrenches are usually big and ungainly compared to other options though. 

Dial Type: These are similar to Beam/Deflection wrenches but they use a dial embedded into the wrench to read out torque applied. These wrenches are the ones which were prevalent for many years in auto mechanic shops 30 years ago and more. They will need calibration from time to time to remain accurate. Generally speaking, these are also a bit large and ungainly, and are not generally found in bicycle shops. Besides needing calibration from time to time, dial type torque wrenches need extra special care so as to keep those glass lens covers on the dial gauge intact.

Digital: Now we are getting into wrenches which are typically found in many bicycle shops today and which are made for home mechanic use. I have this Topeak digital wrench which I used in a shop setting for a while until it died. Typical digital wrenches are set up for 1/4" sockets or hex shaped bits. These wrenches work by means of strain gauges, typically.

The digital wrench will typically use a sound when proper torque has been reached, and it will give you a digital read-out as well. Usually these read-outs will stay on screen until you dismiss them. That's handy if you want to stop for any reason and wonder afterward where you were. 

Some do all of the above and 'click' over when the proper torque has been reached. These are nice because you get an audible and tactile alert when the torque specification has been reached. But either way, any of these wrenches will need periodic re-calibration to remain accurate.  

Click Type: These are the other type of torque wrench which you will find often times in a bicycle shop. The Click style wrench will 'click' and the lever arm will 'jump' a tiny bit in the hand when proper torque has been reached. These typically are seen in either 1/4' or 3/8ths" socket tool style and good ones can be just as accurate as a digital wrench. 

Click style wrenches also need to be re-calibrated every so often and, as with all torque wrenches, they need to be handled with extreme care. Many bike tool companies do click style wrenches and support them when it comes to re-calibration. 

Another sub-set of 'click' style torque wrenches exists and these are smaller with sometimes a dedicated bit, or limited bit sizes for the most common fasteners on a bicycle. These are very popular with home mechanics and hobbyist repair people due to their inexpensive cost and smaller, portable size.These types of torque tools typically are not certified for their torque range and cannot be calibrated.
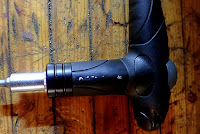
An example of a smaller, 'click' style torque tool.

Which Torque Wrench Is Right For You?

 The proper torque wrench for anyone working on bicycles will be determined by a few factors. First, it must read out in Newton-meters. This is by far the most commonly used measurement for torque on a bicycle. Secondly, you need to know what parts you want to torque and what specification range you will be working in. It does no good, for instance, to have a wrench which measures from 20N m. to 200 N m. if all your fasteners require between 3N m. and 15N m. So, match the range of the tool to your needs. This requires research on your part. But I can tell you that automotive torque wrenches are definite overkill. Unless you already own digital or click style wrenches for automotive, then skip that segment and buy wrenches meant for the bicycle trade. 

The third factor here is to figure out how often you will be disassembling/assembling parts on your bicycle. Is this a wrench for 'just in case', or is this a wrench for your tool kit because you swap out parts monthly? If you don't see yourself messing with parts swapping, a simple "torque key" style tool will get you where you can periodically check things like stem bolt tightness, for instance. Constant parts swapping and tear-down/build-up of bikes will require a more serious tool. 
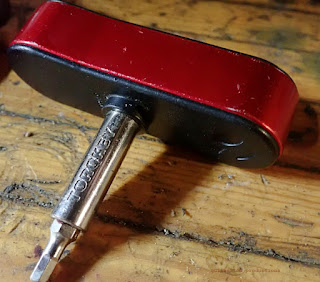
This fixed bit 'torque key' tool might be all you need.
Another determining factor may be that you may feel comfortable changing out stems and seat posts, but anything beyond that goes to the bike mechanic. Then all you might need is a simple digital torque wrench like that Topeak one above. 

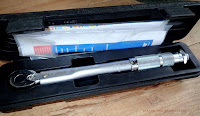
Bigger jobs will require bigger wrenches and more durable wrenches like that silver Unior wrench above. In fact, you may find that- like me- you need several types and styles of torque wrenches to cover any scenario. 

Care And Feeding Of Torque Wrenches:

If you've been reading so far, you've noted that I've brought up that torque wrenches need to be handled with "extreme care". This is no joke. Simply dropping a torque wrench can throw it so far out of spec that it would be dangerous to rely upon it afterward. A digital torque wrench may even be damaged beyond repair if dropped, or if you drop a heavy tool on it in a drawer, for instance. This is why you see many torque wrenches in protective cases. Keep those and ALWAYS store your torque wrench in it. NEVER drop a torque wrench and use it afterward without checking its accuracy. (Typically this means sending it in to be re-calibrated and certified) See the papers which I have in the Unior case in my image above? Those are certification papers on my wrench. Yes- these are precision measuring tools and should be handled with extreme care. No joke. 

Conversely, a torque key style tool should only be used in instances where you are checking torque of an already fastened part. These should never be used in assembly situations. Also, it should be noted that you shall NEVER USE A TORQUE WRENCH TO UNSCREW A FASTENER. Well,unless you don't care about accuracy. This even goes for torque key tools. Just don't do it. That's what regular tools are for. 

Detail shot of my Unior torque wrench.
What's My Favorite?

I bought a torque wrench a few years ago and before I did I determined that this wrench was going to be used on a consistent basis in a shop setting. I needed it to measure Newton meters primarily and within a range of 4N m to 20N m maximum. I did not want a digital wrench after having that Topeak one above which failed on me after about a year of use. (To be fair, the Topeak one is not really a 'daily shop use' type of tool) 

My research led me to Unior, and I've been very happy with this particular one I have. However; I now work at Andy's Bike Shop where he has a similar wrench from PRO, (Shimano's accessory/tool brand) and it also works very well. I would highly recommend either for 'serious' home usage. 

The Topeak wrench could also be a good home mechanic wrench if you are not constantly using it. When mine worked it was great, and I would not hesitate to recommend it for the serious home mechanic. 

Torque key type wrenches are okay for checking tightness of components, but I do not recommend them as 'assembly tools' for any reason. They generally are not calibrated or certified to a high standard, and with today's parts being so sensitive to torque, I would not rely on these tools to be accurate after being used several times for assembling bits. Checking on torque? Yes. Place one gently in your kit to double-check torque before a big ride. But don't buy one of these thinking you can 'get by' and assemble a bicycle safely with any modicum of accuracy. 

Oh, and those beam/deflection wrenches? I have those as back-up in case I have to send in my Unior for any reason. I wouldn't recommend them to most bicycle mechanics, but in a pinch, these are better than not using a torque wrench if used with care.

There is a LOT more to torque wrenches that I am not touching upon here. Things like how to use them and what to do with fasteners and more. Those are things you should research. But I hope that this primer on the subject of the torque wrench itself is useful. 

Thanks to "Sean" for the prompt to write this. Thank you for reading G-Ted Productions.