
 |
| Don't neglect the inspection of your tools! |
And you all know that never happens at a convenient time!
So, I thought since I have seen tools wear out and since I have seen what to look for in terms of wear and what that can do if you do not address that, I would drop a few tips in the blog today. This might be handy now as well since "gravel" season - well, really cycling season overall - is about to kick off for the year in the Northern Hemisphere.
I'll drop hints according to tool type and try to include a few images to help illustrate my points.
Hex (Allen) Keys: These tools are perhaps the most used of all the tools a cyclist might have besides an air pump. (Note: These tips can mostly be used for the inspection of Torx keys also) The typical high-use keys are the 4mm, 5mm, and 6mm keys with a nod to the bastard child 2.5mm key. (Thanks SRAM!) Hex keys, (also known as Allen wrenches), can become very worn after several years of use. Using a worn hex key is a recipe for a rounded out fastener. You can inspect the ends of your hex keys and maybe see wear in the form of deformation of the hexagonal shape. You may see rounded off corners as well. Anything but sharp, crisp corners should alert you to a potential problem.
 |
| Note the deformation of the 4mm end on the left here. |
Ball end, or Bondhus type hex key ends are even worse for this issue. Pay particular attention to these as they can lose there shape rather easily without your noticing. Tip: NEVER use a ball-end hex key to do any heavy torque work either loosening or tightening. That's not going to go well in the long run.
Sometimes you can cut off the damaged end and save the tool, but be aware that high-speed cut-off discs or grinders can take the temper out of the metal due to heat and make the tool worse than it was when you started. I recommend a hand-held hack saw if you want to attempt this. Make sure you lightly debur the edges with a file if you should decide to try to extend the life of a hex key.
A Quick Note On Hack Saws: As long as I'm writing about hack saws- Keep in mind a hack saw only cuts in one direction only (away from you) and that you should always use the entire blade! Most people apply way too much downward pressure (wrong- let the blade do the work), and saw back and forth in the middle of the blade, quickly wearing out that short section of the blade while either end goes unused. As an old jeweler once told me- "You pay for the whole blade. Use all of it then!"
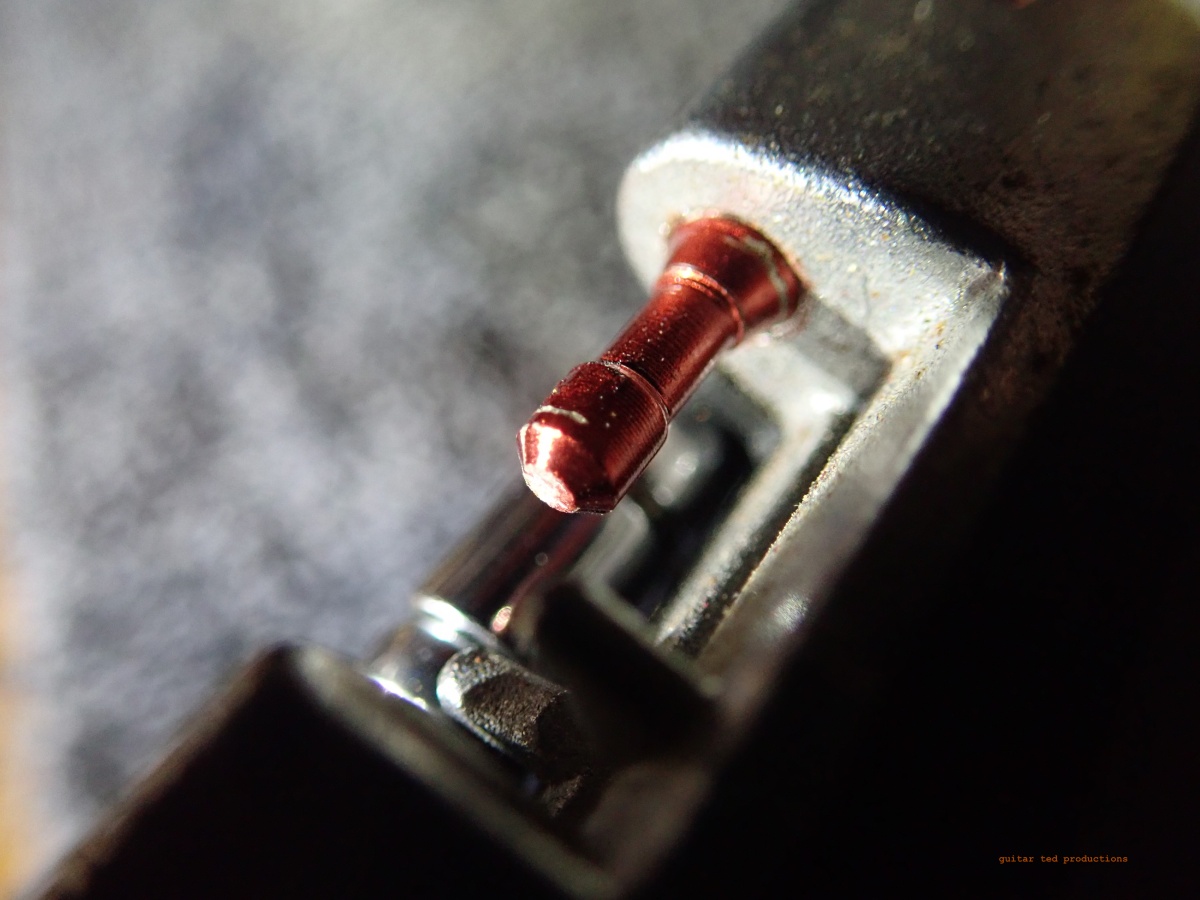 |
| A good chain breaker pin should look like this. |
Torque Tools: These handy gizmos are very popular these days for torquing down hex bolts on stem face plates, stem attachments to steer tubes, and other torque sensitive fasteners. However, their bits can also fall prey to the same issues that all hex keys do after a lot of usage. If those bits are replaceable, and they are deformed or very worn, you should replace them. If they are not? New tool time.
 |
| Torque keys can wear out and fall out of spec. Beware! |
Also, those torque settings should always be periodically checked against a known, certified torque wrench from time to time. Any torque key that is out of spec should be replaced and not used again. Remember: Tools are not going to last forever! Especially if you use them a lot. Don't want to have to spend the money? Then don't use the tool. But your alternative is what? Seeing a professional mechanic should be the answer there. Let that person foot the bills for tools and the knowledge to use them. But pay that person accordingly with a cheerful heart.
Otherwise the maintenance and liability for not doing that maintenance is on you.
Cleaning: This is also the time of the year to inventory and clean up any rucksacks, hydration packs, top tube bags, or any frame bag and see what is in there. It isn't uncommon for riders to find multi-tools, old tubes, food wrappers, or even money that they had forgotten about in the depths of some bag. More importantly, cleaning up the bag and tools that may be in it make life a lot smoother for the upcoming season of riding. Plus, you'll have a handle on what you might need to add or subtract from those bags!
Those are just a few tips I can think of for the tools you most likely use for your bicycles. Got any other ideas? Let me know. If there are more than a few different suggestions, I'll make a "part 2" for this post.
6 comments:
In your experience, when a preset torque goes bad do they tend to provide more torque than desired or less? By that I mean when a 6nm torque key goes bad, does it "click" at 6+ nm or less than 6nm?
@Rydyn9ers - Typically the mechanism becomes weaker with more reps, so you end up with a tool that needs to see more torque to initiate an indication that you are at a given torque spec. that means you've over-torqued the fastener. That's for most "clicker" style tools.
Again, it makes sense to compare your torque keys with a shop-grade, certified torque wrench. Some are pretty far off out of the box, so that's another reason to check these things out.
Thanks for the reminder about the worn hex wrenches. What I found worn as well were the smaller standard and Phillips screwdriver tips used on some derailleur adjustments. Another area where you can maintain or resurrect the tips a bit with a file, but investing in high quality screwdrivers of appropriate sizes really makes a difference if you can afford it.
Also, what are your thoughts on cable cutters? Can they be sharpened or do you replace when the cuts get less clean?
@tntmoriv - Good tip on the screw drivers. I had considered adding that as another tool for the post.
A good idea here would be to buy JIS screw drivers instead of standard Phillips. It makes a big difference.
On cable cutters: I don't bother trying to sharpen those. But I do recommend getting a high-quality pair of cable cutters from Shimnao or Pedros, or even Unior. I'm not a fan of Park, Jagwire, or SRAM's cutters. I've had a pair of Shimano cable cutters last for about 15 years worth of shop usage. So, spending the bucks can make it worth it over the long haul.
I’ll second your vote for genuine Shimano cable cutters… They’re the best. An investment in high quality tools is an investment in the sustainable health of your bikes. It’s as simple as that.
JIS screw drivers were a revelation.
Suggestion: check needle nose and side cutting pliers for wear and even bent jaws.
Taps, dies and other cutting tools wear out and no longer cut to spec.
Post a Comment