Showing posts with label tubeless tires. Show all posts

Tuesday, September 27, 2022

Guitar Ted's How-To: Mounting Tubeless Tires

 I'm going to start sharing some tips from time to time in a series I'll call "Guitar Ted's How-To". This time I am going to share with you how I mount tubeless tires. 

Now, this isn't the only way to do things. It is the way I do things. So, I'm not implicating anyone else's techniques as being "less than good", bad, or great. Nope! This is how I do it. If you can draw anything good from this, then great.

I will say that I've been a bicycle mechanic off and on for the better part of 30 years and a car mechanic for five and a half years. So, in my opinion I will tell you that this way works well. It's not the only way to mount tubeless tires, but I think it is the easiest way. 

Before You Start: I've done hundreds of tubeless tire set-ups over the last 10+ years. I've made a ton of mistakes. So, when I say "do this before you start.", it probably is me telling you, "Hey! I've tried skipping this step. Don't do it!". But - ya know- I can't make you do anything here. Just don't complain to me when things go pear-shaped on you. 

Use a quality sealant and make sure it is fresh.
Use New Tubeless Compatible Components Wherever Possible: Obviously not everyone can use new stuff, but I will tell you NOT to use non-tubeless stuff. We used to have to do this. Now there is no reason at all to use non-tubeless tires, rim strips, sealant, or rims. It's BEST not to re-use valve stems, old tape jobs, old tires, and old sealant. At a minimum, you should use NEW sealant, NEW valves, and re-tape your rims. Not doing that means a BIG chance for a failure resides in your wheel like a ticking time bomb. 

If you try to re-use old stuff, and there is a failure, you can almost bet it is because your tape failed, a stem leaks due to corrosion, or the sealant was too old. Rarely is it anything else. Well......unless you did something wrong or you punctured beyond the sealant's abilities to repair the leak. 

  • Tools & Supplies: With that out of the way, you need to use the following items:
  • Work gloves- preferably those annoying, tight fitting rubber ones. 
  • Safety glasses 
  • Isopropyl Alcohol
  • Rags or Shop Towels
  • Plastic injector tool or a small scoop.
  • Valve Core removal tool
  • A really good floor pump (One of those tubeless compatible ones is even better)
  • Sealant
  • Tires
  • Tubeless Rim Tape (If you haven't done it already. Taping is a separate task from this post, so I won't get into it here. Skip if this is a new wheel with a new tape job..)
  • New valves, or at least new valve cores.

Not necessary, but it would make life easier: A small air compressor, a bicycle repair stand, and a truing stand. 

Procedure: I will assume that you've thoroughly cleaned the rim's inner well and that it is free from dirt, adhesive, old tape, and that you cleaned that inner rim well with isopropyl alcohol. I assume then that you installed a quality tubeless compatible rim tape that is appropriately sized for your rims. I also am assuming you are using new valve stems, or at least good valve stems with NEW CORES. 

Now that is a LOT of assuming, and you know what that makes me then right? Okay, carrying on then....

Make sure that your tires do not have big patches of dried up sealant sticking in one end of the tire, and clean off the bead seat, making sure there is no layer of dried sealant sticking to the bead area at all. The rest of the inner tire carcass? I don't care what you do there, just don't leave anything on the bead area or anything in there that could cause a wheel imbalance at high speeds. Best to use NEW tires, but again- not everyone can afford that.

Tire Orientation: This is EASY to miss and get wrong, so pay attention closely to how your tire is supposed to be mounted.  Most tires are "directional", meaning that they are intended to be rotated in one direction for best results. This will be indicated in tiny, hard to read lettering which is molded into the tire sidewall. Sometimes all you get is an arrow. Sometimes words AND an arrow. Just pay attention to this,or you may be sorry later.

For further instructions, read on and refer to the following images.... 

Here is where you start, and if you do it this way, you should not need to use a tool to mount your tires. Place the new tubeless compatible tire so that your wheel rests inside the casing. It should look like this image to the left all the way around. 

Now you can double check your correct rotating direction. Then align the branding patch, or "hot patch" as I was told to do this many years ago, so that it aligns with your valve stem. Yes.....it is a meaningless "Pro" thing to do, only it isn't meaningless and there is a very practical reason for doing this. I don't have the time to get into all of that here. You can accept that or not, but there is a reason for this to be done.

Okay, now you can start moving one side of the tire up and over the rim and into the rim well. I like to start at the valve stem to make sure the tire sits in between the butt end of valve stem and the inner rim wall. Then, look at that grip I use to the left there. This is THE grip you want to use with BOTH hands. (I had to use one to take the image, so....)

Use your thumbs to push the tire up and over, starting with your hands together at the valve stem and working outwards and downwards to the "six o'clock" position as the wheel sits. Use your grip with your other fingers and your palm as a foundation for your thumbs to work from. 

The tire bead can sit in the inner part of the inner rim well which will make this side of the tire easier to get on the rim. Now you are ready to work on the opposite side.


Using The Grip, shown in the previous step, you can again start at the valve stem, making sure the tire bead is exactly in between the valve stem in there and the rim edge. If the tire bead sits up on the valve stem, or if you get two beads on one side of a valve stem, (don't ask.) you may not notice this and setting up the tire will become impossible. So, pay attention here! 

Work the bead of that tire up and over the rim edge using 'The Grip' . You may actually now want to fold the tire over the rim, (see top image in this section), which will allow you maximum grip on the tire, and maximum leverage over that bead. You still want to use your thumbs to push up and over, but by rotating that tire carcass over the rim, you will gain an advantage. 

The next image shows how I stand and use my leg to brace off of as I use my two hands to push the tire over the rim edge. (Again, only showing one hand here as I had to take the image with the other) Now, it is important to note that I do not mount the entire tire. I leave a little bit out over the rim edge and then I inject sealant. You can go ahead and put the tire all the way on here. Sealant can be introduced through the valve with the core removed, but I've found that method to be less than satisfactory for a few reasons. So, I don't do that. 

I use this cheap but effective injection tool.

The red arrows indicate the space I leave to inject sealant into the tire.

Sealant installed and now I am ready to seat the remaining portion of the tire.

A couple of notes on the images above. First, I have gravitated to these smaller, more nimble, but very effective plastic injectors meant for veterinary usage. They have a nipple perfectly sized to fit into a valve with the core removed, fit inside wheel's space between the hub and rim well at full extension, and have excellent sealing properties as far as the plunger goes. This makes these great at sucking up sealant when I want to recover it from a tire I am removing.

The plastic tub is where I keep recovered sealant. While I recommend that you use new sealant, I switch out at least a couple of pairs of tires every month, sometimes more than that. So, it makes sense for me to keep the "old" sealant and reuse it. You? I'm guessing you don't change tubeless tires very often. 

By the way, I use about 100ml of sealant in a gravel tire. Use whatever sealant you believe in. Most are pretty darn good. I use WTB's stuff nowadays. 

Yes, I used an image twice. Deal with it!

That final bit of tire can now be pushed up and over the rim edge and you'll probably have to fold that tire over hard to get it to go. Your thumbs may hate you, but you will be successful without using a tool, and not using a tool is better because it means that you pretty much cannot damage the rim tape, tire, or rim. 

Now you can air up the tire. You may be really lucky and just be able to use a floor pump. You may need to remove the valve core and use a floor pump.These two scenarios are what I see from my experience 90% of the time now. The other ten percent I need a blast from an air compressor, but that is getting more and more rare now days. 

Once you get ALL the tire bead up and into its position on the rim, you are set to go for a short ride to help seal the tire to the rim. It takes about 15 minutes, and then you are good to go. Clean up the tire and rim with isopropyl alcohol and a rag when you are done.

Final notes: Loud snapping and popping when the tire is being aired up is normal. You may think it is a violent, scary sound, (and it is), but it is okay. This is just the bead of the tire finally snapping up into the shelf on the rim's inner wall where it belongs. You can check for this after you think you are finished by spinning the wheel and watching the line where the tire and rim edge meet. There should be a fine, molded in line on the tire sidewall visible at an equidistant point from the rim edge all the way around on both sides. If the tire is not correctly seated, this will appear - or rather disappear- as the wheel spins, as a low spot in the tire. You just need a bit more air pressure to POP! that out. 

The red arrows point to the "line" I am referring to in the previous paragraph.

Typically I find that tires will sit into place at about 40psi. However; sometimes I have had to go as high as 50+ psi, but those times are getting rarer as tubeless stuff gets more dialed in. Oh, and if you had to remove the valve core, make sure you don't let all the air out. Be like the Dutch boy with his finger in the dike until you get the core snuck back up in there. Snug the core up- don't crank on it. Refill to the desired pressure. Ride.... 

Hmm.... I think that's about it. Got questions? Have ideas for other posts like this? let me know in the comments, please.

Friday, August 13, 2021

Friday News And Views

A bare Zipp 101 XPLR rim: Image courtesy of SRAM
 On Wednesday I gave my rundown of opinions on the new SRAM XPLR group. (Read that here if you missed it) Today I want to comment specifically on the rim design for the XPLR 101 wheel from Zipp.

This struck me as odd, but the design has merits which I understand as valid in gravel design. That said, the results- spec-wise and pricing-wise- are puzzling. Let's take a look...

The design for the rim is, basically, a carbon fat bike rim design shrunk down to fit a gravel bike. It has single wall construction which does a couple of things here that make a bit of sense for a gravel road rider. 

First, that single wall construction, theoretically speaking, should be able to flex a bit more freely in a vertical plane than a box section rim, or a triangulated, shallow section rim. There is a reinforced ridge for the spoke beds, and other than that, one might expect a bit less impact resistance, but here we are speaking of gravel riding- not MTB. So Zipp maybe saw this as a way to introduce some rider comfort.  

The second thing a single wall rim does is that it presents - most likely- the least amount of side drag from cross winds that is possible without doing super-aero stuff with the rim design. But if there are any cross-wind benefits, this is probably secondary to this design. 

A possible third benefit might be light weight, but curiously this complete wheel set weighs in at 1665 grams for the pair. That's kinda heavy, and many aluminum wheel sets weigh similarly, cost less, and have similar comfort claims. Add in the asking price of $1800.00 USD and that value prospect seems to go up in a puff of smoked credit card plastic. 

I like that they dared to go to a 27mm wide inner width here, but I'll have a lot more to say to this feature once I get my Project Wide Gravel Wheels going after Gravel Worlds is over. Stay tuned for that...

Remember this? Well- that didn't work out so well!

Finish Line Introduces FiberLink Sealant:

Back in 2018 I noted on another "FN&V" that Finish Line had introduced a sealant which they said would "..last the usable lifetime of the tire". While I did not say exactly what I thought was going on there in that 2018 post, I had serious misgivings about this new 'wonder sealant', and as it turned out, my instincts about it were largely correct. 

Finish Line sealant quickly became a byword amongst mechanics who tried it out as it became known that by using it the tires would not seal up correctly and it made servicing new tubeless set-ups a total nightmare. Riders found that it sealed punctures poorly as well. So, the sealant was quickly dismissed by the consumer and the industry. It wasn't long before Finish Line started looking into its replacement. By 2019 they were already working on that.

Well, after two years, Finish Line have come out with what they are calling "FiberLink" sealant. As you might suspect, it is now a latex based sealant but it is infused with Kevlar® fibers which, as Finish Line claims, should seal punctures more quickly and with a longer lasting effect. My 'instincts' tell me that -this time- this stuff should work pretty well. 

There is only one real question I have, and that is how well will this work with valve stems, (will it clog them more easily because of the fibers?) and how long will it last before it coagulates and becomes ineffective? Typically, any coagulant enhancing substance in a latex based sealant tends to clog valve stems and/or does not last a long time at all in a tire before it needs to be serviced. If Finish Line dodges those pitfalls with its new FiberLink sealant, then this could be a big deal in sealants. We'll see......

My Adidas!- Got No Stones In 'Em! 

Adidas Shoes just announced a new gravel cycling shoe which is brilliantly named. You won't believe what the name they chose for it is! Check it out:

Introducing, the new "Gravel Cycling Shoe"! 

The name just blows me away it is sooo good! Ahem......right then, so really Adidas? Wow... Okay, let's move on.... 

Yeah, so it is a $170.00 shoe with a 'sock' dealio around the ankle to keep dust and small stones out. Hmm.....okay...I can see that. I mean, I do get stones of the smaller size inside my shoes at times. So, that cuff may not be as goofy as it seems at first glance. However; I would say that as of right now, in this air we have had that is so thick and juicy that you feel like you are being enveloped in a warm blanket, in 90°F weather, that a neoprene cuff is not exactly what I would want sealing off my Earth pads from air flow. 

I could be 100% wrong here though. Maybe there is great air-flow around the feet with these... what is the name again? It's so unique and different that you'd think I'd remember....oh yes! The Gravel Cycling Shoe! Yes! That's it.... 

Anyway, there is supposedly a variant on the black theme with some outlandish, 80's inspired brightness. Now those would get you noticed at the local small village convenience store! Thankfully the basic black is much more fitting in rural conservative America. Hey! I own a pink bicycle, I should know! 

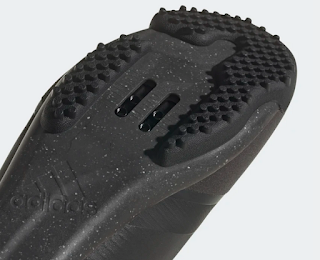
The bottoms look like they took scraps of Schwalbe G-One tires and used them for the walkable soles. I would be slipping like a farm animal on ice if I wore those on a soft or wet Level B Road around here. But for dry gravel travel? That's probably okay. Gotta wonder how long those little nubbins would last though. But you know what? If these made your toes happy, who am I to say? Shoes are highly personal fit items and these look okay to me. Price is fair if they perform and last a decent amount of time.  (All images courtesy of Adidas)

Update: New Riding Gravel radio ranch Podcast Out!

The latest gab-fest between myself and Andy of Andy's Bike shop is live now. Check out the Riding Gravel Radio Ranch here or look for it n your favorite podcast feed. 

We typically get 2-3 episodes out a month and sometimes 4! I'm pretty pumped that this has been a steady flow of content now for about two years straight. You can thank, (or blame- however you feel about this), Andy. He was pretty adamant that we get the ball rolling more often with the podcast and for us to make sure we have a constant flow of content there. 

Andy does provide much of the equipment and the space for recording is his office, so he is a big reason why the streak of content has been fairly steady since early 2020. Thank you Andy for that! Of course, it was a goal of mine, as well, to reinvigorate the podcast and get it coming more consistently as it had kind of petered out there in 2019. Or was that 2018? I can't remember... Time flies! 

There is another podcast in the can which should be published really soon and then we have a special guest coming up which I am excited about. Check out tomorrow's post for more on who that is and why I am stoked. Until then.....
 

That's a wrap for this week! Thank you for reading Guitar Ted Productions!

Thursday, May 14, 2020

Testing For The Single Speed Century: Part 2.1

New tires.
Yesterday I shared with you all about these new Vittoria Terreno XC tires. Well, I got them mounted and test ridden yesterday. Verdict?

These are going to be really good, I think.

There are some attributes which the Schwalbe tires had that I tried at Gravel Worlds last year that these Vittoria tires have. The really fast roll and the suppleness are both there. Equal to the Schwalbe for sure. The Schwalbe was a bigger tire though. 2.4" vs the 2.1" of the Terreno XC. I measured these new tires at 40psi and they came out at 52.2mm. That's not quite 2.1".......yet. The thing about tubeless tires is that they tend to stretch a bit. I'll give these a few days and check again. If they stay the same, I'm really okay with that.

The other thing I've noted is that these exhibit similar traction in corners and climbs that the narrower Terreno Dry 40mm tires have. That's a characteristic that the Schwalbe tires did not have at all, by the way. Another thing which is different- the profile of the Terreno XC. It has a lower "C" shape where the Schwalbe was really rounded in comparison. This makes the Terreno XC a bit more stable in loose, sandier stuff, which I got a taste of on my extensive test ride as well.

The Schwalbe tires were a tic lighter, as I recall, but these are waaaay better tires already, just judging from one ride. And the tubeless set up? Not even close! The Terreno XC tires set up with zero issues. The Schwalbe tires barely went tubeless at all, and after Gravel Worlds they pretty much would not even work tubeless no matter how hard I tried. So, I'm really pleased with these tires and I expect that they will not give me any troubles at all going forward.

Gravel travel is planned soon as a final test for these tires and set up. Stay tuned.....

Wednesday, May 13, 2020

Testing For The Single Speed Century: Part 2

New tires for the effort: Vittoria Terreno XC Race 2.1's.
Last time I was talking about the tires on the Pofahl Signature Custom I am going to use for the Single Speed Century, I mentioned that the ones that are on there now are not tubeless rated and I wanted to ride tubeless tires for this effort.

The reasons why are that- (1) Tubeless tires have lower rolling resistance than tubed tires. This is not at all important to anyone riding short distances or for short time periods. It is important for a multi-hour effort where saving some effort (watts) in lower rolling resistance can make doing something like a century ride on gravel a little less difficult. Also, (2) Tubeless tires self-heal smaller punctures, saving time and effort in repairing flat tires during strenuous efforts.

For me, the first thing is most important. I need every advantage in my corner I can afford to get. Tubeless tires are an easy add for me, so why not? The second point could be a big deal, but getting flat tires where I ride is rare. Not that it couldn't happen, but it is not common at all. (Now watch......I'll flat three times!)

The tires I chose were Vittoria Terreno XC Race tires because I have tried the Terreno Dry tires, which are very similar and they are stellar tires. The Graphene treatment does do something. Vittoria says it can give the tire more grip while retaining lower rolling resistance. This is true to a point with this tread pattern. I've felt that in action. Vittoria also claims this tire resists punctures better due to the Graphene. I cannot personally speak to that. However; if that pans out, all the better. The Terreno XC's also have a 120TPI casing, which also should make the tires more resistant to puncturing, and add some suppleness to the ride.

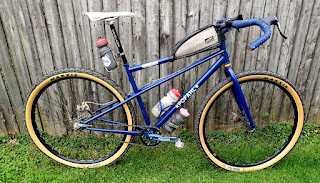
The Pofahl Signature Custom for reference. Tubed Ardents are shown here.
The Terreno XC's also have a tan side wall, which doesn't do a darn thing but look cool. I happen to like the look, so that's a plus for me. Some would say that a tan side wall does give you a more supple casing. Generally speaking? That might be true, but it does not guarantee a smooth ride in every instance.

I'll say this- these don't seem like 2.1" tires to me. Maybe 50 mm? Maybe.... We will see. They weigh in at 612/620 grams, so that's pretty good, I think. They will be big enough and light enough, so I am not fretting about that bit. I don't need them to be huge, really. This bike needs a bigger tire though with those 180mm Race Face cranks.

The rims are Bontrager Duster rims, which by today's standards are gravel rims. Back in the day these were Bontrager's premier trail bike rims. My how times have changed! I'm hoping the Vittoria tubeless beads get along with the old Bontrager plastic rim strips though. If they do, tubeless set up should be a breeze.

I think once this bit is done I'll try a bit longer stem and then if that gets sorted I'll be pretty much ready to roll. Next I will choose a date and then set sail for the hundy. Stay tuned for more on this coming soon.....

Wednesday, April 29, 2020

Tubeless 101: Part 4

Tubeless set ups are not as straightforward as you'd hope.
With this post I am going to end the series on basic bicycle tubeless tire knowledge I use for setting up gravel road tubeless tires/wheels. Some of these tips cross over to mountain bikes and fat bikes, but be aware that things like single wall rims (fat bikes) and "cush core inserts", (mountain bikes) require certain tips and tricks outside of the parameters of my series. For most "basic" needs though, these tips and tricks should suffice. Part One is here, Part Two is here, and Part Three is here. Go back and see these previous posts before asking any questions. Thanks. And......if you haven't already had this drilled into you enough already......

 Tubeless tires are not for everyone, nor do you need tubeless tires in many cases. And also: Tubeless tire set ups are not only more technical and maintenance intensive, but more expensive as well.

Now here's the kicker: Not all tubeless tires fit the rims they are designated to fit, and there is (almost) no way of knowing based upon manufacturers recommendations. 

That's right folks. You may buy a 700c tubeless ready tire, you may have a 700c tubeless ready wheel set, and those tires may not work on those rims. Sound wacky? It totally is, and this has been how things have worked since tubeless tires for bicycles came about. So, how does one navigate the 'wild, wild West' of the tubeless tire/rim world? 

By trial and error- that's how. So, not only does all this tubeless tire stuff cause MORE maintenance, and COST MORE, it may not even work!  Admittedly, this is rarer than it used to be, but it still happens. Reasons are several, but the main ones are:
  • Differences In Wheel Bead Seat Diameter vs Tire Bead Diameter: Tires and rims only have to be off fractional amounts between the two to make things miserable. Stan's rims have their own diameter (slightly larger) and Hutchinson/Vittoria/Mavic/Michelin tires have more UST based diameters (slightly smaller) for tires. Never the twain shall meet. While those are the most glaring offenders, there are others as well. There is almost no information out there at a retail level to protect you from making the mistakes that could cause you a nightmare. 
  • Super-Light Tire Sidewall Construction Leading To Casing Leakage: You may get past the first hurdle only to find that the tires you chose leak sealant through the sidewalls of the casing. This is most notable as a shiny appearance to the tires, and in worst case scenarios, the tire will actually bubble sealant right through the pores of the casing. Sometimes a dosage of more sealant will cure this- but sometimes leaks keep popping up. Beware of tires sporting lightweight claims, XC racing tires for MTB, and certain brands which have histories of doing this. 
  • Tire Tread/Casing Separation: This is a lot less common today than it used to be, but we are still seeing this. Maxxis and Kenda tires have been noted for this in the past. It also will happen more commonly where people use folding bead, non-tubeless tires as tubeless. It usually occurs after you've had the tires a while. The issue is caused by sealant incompatible casing materials which sometimes sneak into a brand's tire casings (or are naturally used in non-tubeless folding bead tires never meant for tubeless set ups) via their factories. If a company changes a factory in the Far East, for whatever reason, this might start happening where it didn't before. Consumers have no way of seeing this coming. 
Use all the resources at your disposal before you jump and buy in.
So, what do you do? Well, as I said, things are not as bad as they were ten years ago, but things are not as straightforward as you'd hope they would be. If you are sitting on the fence yet, here are some recommendations that will help you navigate this minefield more successfully.
  • Use A System: If you have tubeless ready wheels, try to stick with tires from the same manufacturer if they are available. For instance, many bikes come with WTB rims. WTB makes really great tubeless ready tires. Matching the tires to the rims almost always makes for a great tubeless set up. Specialized, Bontrager/Trek, and Giant all have OE spec tubeless ready wheels on many of their bikes and tires to go with them too. 
  • Use Your Local Bike Shop's Knowledge: Got a wrench in your area that knows his stuff and has been around a while? Talk to them and get the knowledge that a guy/gal has that has worked with a lot more tires and wheels than you'll likely ever see in your lifetime. Then, after you gain some hard won knowledge from them, buy something from that shop
  • Research Your Choices: The forums, review sites, and Facebook can be a resource, but extreme caution is advised. Look for trends in commentary, and try to find consistency in comments and advice. Be careful of just wanting your choices to be validated. Cross check with your local bike shop knowledge, and if it is not a systemic approach, double your caution. 
So, let's say you have a tire and the wheels are all prepped properly. Now about mounting those things successfully. You'll know if you are going to have a successful tubeless set up pretty much right away if (a) your tires go on really hard by hand, or (b) if you have to use a tire lever to get that last bit of bead on inside the rim well. Chances are that if this is what you experience, and after you inject some sealant into the tire through the valve stem, that tire will pump up with any old crappy floor pump.

I've used this slightly modded Bontrager Charger pump several times for tubeless set ups.
In fact, I use a Bontrager Charger pump that was headed for the bin after being warranted as my litmus test. If I can pump up a tire tubeless on a rim with that poor old thing, then anyone can do it. I only modded the pump with a Silca pump head, but otherwise it is its bad, broken down self.

If you cannot move quite enough air to create a seal with a floor pump, then a small air compressor will usually do the trick. A short blast of air through a valve with the core removed generally will push the sidewalls out quickly enough to create a seal. I air up the tire- never higher than 40 psi to seat beads - and then slip the core back in, tighten it, then I finish off pumping up the tire.

If either one of those two things does not happen, I am sorry- but this is 2020. If tactics #1 and #2 fail- then that combination is a failure. Flat out. We should not have to bounce, strap, or do any sort of 'trick' outside of the first two things I have described here to get tires to set up anymore. Conversely, if you cannot even get to this point because the tire won't go on? Major Fail. Plain and simple. You need to try a different combination.

By the way, if your tire blows off the rim, that tire is instantaneously no good. Never try that tire tubeless again. It is unsafe. Period.

Now lets say you get that tire set up. You are not done yet. Take the wheel into your hand, lay the wheel/tire down on its side. Now pick up one end about four inches off the ground. Pivot the opposite end up, then drop it. Turn the tire about three degrees, pick up the other end and drop it. Repeat this process for three revolutions of the wheel, then flip the wheel and repeat. Then- if you can- go ride the wheel in a bike for about 15-20 minutes. This should distribute the sealant around the tire's innards enough to seal the casing and the tire should stay sealed now for a reasonable amount of time.

If you see trouble after this, most often it is related to the valve, valve core, or possibly a porous sidewall. Go back and start over.

Did I mention tubeless tires for bikes are more technical, more expensive, and not as easy as tubed systems?

Yeah.