Thursday, April 30, 2020

Seat Post Testing: Final Thoughts And Observations

L-R: The PRO Carbon post, Whiskey Carbon post, Specialized C-GR
Over the past month, month and a half, I have been trading off rides on various vibration absorbing seat posts. I'll admit right up front that this article is all about my subjective opinions and that these observations are not scientifically arrived at. So, boo-hoo if you are looking for numbers and data to crunch here because I'm not going to go into that realm. Not that science is bad, I just cannot afford it. So, you get my considered opinions. If that matters to you, great, if not......well, see ya next time. 

The posts I used included the Specialized C-GR, the Whiskey Parts No. 7 seat post, the PRO Carbon post, the PRO Aluminum post, and the vaunted Redshift Sports ShockStop suspension seat post.

So, let me get the obvious out of the way right up front: Nothing was as comfortable to ride as the Redshift post. Not even close. Secondly- nothing else was nearly as heavy as the Redshift post. To get that level of isolation from vibrations, that comes at a monetary and weight compromise, versus something like the Whiskey No. 7 Carbon Post, which is light and costs under a hundred bucks. But obviously, that Whiskey post, or the others I mentioned, don't have anywhere near that level of smooth.

So, with the Redshift post being the outlier, what post would I go with out of the others? The PRO Carbon post, with the Dyneema fabric, is really light at about 215 grams or so. The C-GR is supposedly pretty cushy too, and that Whiskey post is the least expensive of the lot and has a smooth ride to boot. They are all at about the same level of comfort here, but that said, there are some clear distinctions.

The C-GR is clearly the best feeling post, in terms of what you don't feel. That isn't to say that its claims of 'travel' are there. I didn't feel it being any smoother than the Whiskey post, as an example. However; it does mute a lot of vibrations. In that area, it was the best of the lot of rigid posts. (I classify it as rigid since I don't get any sensation the C-GR actually has any travel) The bad thing? Set back, which the C-GR has a LOT of. If you don't like a lot of set back- don't even look at this post.

The PRO Carbon was probably the next best at vibration absorbing. It supposedly has deflection as well, but the C-GR and this post have similar feeling bump absorbing capabilities. The C-GR just mutes a bit different frequencies, and I thought it edged out the PRO, but barely. Obviously, this post has a reasonable set back, a very usable saddle fore/aft range, and it has the easiest to use clamp of the lot by far.
The PRO Carbon post here.

The Whiskey Post has probably the most deflection here, so if bumps are more of an issue, this post is by far the winner. It does okay in terms of vibration damping, but it doesn't surpass or even attain to the C-GR or the Pro Carbon. It weighs a bit more than the C-GR and is quite a bit heavier than the featherweight PRO Carbon post at 273 grams. As mentioned, this post costs the least amount, by far.

The PRO Aluminum post was the control here, and it does what the majority of good aluminum posts do. By the way, I have three titanium Salsa Cycles Regulator posts as well. That post is the heaviest of the rigid posts here and has about the same deflection as most of these. It is probably the toughest post of all here. So, I'll throw that out as well. (For a bit more detail on the Ti Regulator, here is a post I wrote about it)

All these posts have clear, winning attributes, it just depends on what you expect out of a post. Here is my breakdown;
  • Specialized C-GR: Best at vibration damping. Bad at positioning unless you like set back, expensive.
  • PRO Carbon, Almost as good at vibration damping as the C-GR, reasonable set back, best clamp, lightest, but EXPENSIVE. 
  • Whiskey No. 7: Great bump eater, reasonably light, CHEAP, but a tad heavy. TONS of value for a gravel bike here. 
  • Salsa Cycles Regulator Ti. HEAVY, TOUGH, EXPENSIVE. Probably will not break. Good ride feel. 
Winner for me? Whiskey No. 7. It does all the things reasonably well and doesn't break your wallet into tiny pieces forever. But a 'money-no-object' winner would be the PRO Carbon post for sure. Finally, the Ti Regulator is probably going to outlast me, is cool looking, and rides well enough. If carbon is out of the question, then that would be my choice. I cannot recommend the C-GR to many people. That massive set back is just too extreme.

But oh! That Redshift post is sooooo smoove! Damn the weight. That's my long distance winner everyday.

Wednesday, April 29, 2020

Tubeless 101: Part 4

Tubeless set ups are not as straightforward as you'd hope.
With this post I am going to end the series on basic bicycle tubeless tire knowledge I use for setting up gravel road tubeless tires/wheels. Some of these tips cross over to mountain bikes and fat bikes, but be aware that things like single wall rims (fat bikes) and "cush core inserts", (mountain bikes) require certain tips and tricks outside of the parameters of my series. For most "basic" needs though, these tips and tricks should suffice. Part One is here, Part Two is here, and Part Three is here. Go back and see these previous posts before asking any questions. Thanks. And......if you haven't already had this drilled into you enough already......

 Tubeless tires are not for everyone, nor do you need tubeless tires in many cases. And also: Tubeless tire set ups are not only more technical and maintenance intensive, but more expensive as well.

Now here's the kicker: Not all tubeless tires fit the rims they are designated to fit, and there is (almost) no way of knowing based upon manufacturers recommendations. 

That's right folks. You may buy a 700c tubeless ready tire, you may have a 700c tubeless ready wheel set, and those tires may not work on those rims. Sound wacky? It totally is, and this has been how things have worked since tubeless tires for bicycles came about. So, how does one navigate the 'wild, wild West' of the tubeless tire/rim world? 

By trial and error- that's how. So, not only does all this tubeless tire stuff cause MORE maintenance, and COST MORE, it may not even work!  Admittedly, this is rarer than it used to be, but it still happens. Reasons are several, but the main ones are:
  • Differences In Wheel Bead Seat Diameter vs Tire Bead Diameter: Tires and rims only have to be off fractional amounts between the two to make things miserable. Stan's rims have their own diameter (slightly larger) and Hutchinson/Vittoria/Mavic/Michelin tires have more UST based diameters (slightly smaller) for tires. Never the twain shall meet. While those are the most glaring offenders, there are others as well. There is almost no information out there at a retail level to protect you from making the mistakes that could cause you a nightmare. 
  • Super-Light Tire Sidewall Construction Leading To Casing Leakage: You may get past the first hurdle only to find that the tires you chose leak sealant through the sidewalls of the casing. This is most notable as a shiny appearance to the tires, and in worst case scenarios, the tire will actually bubble sealant right through the pores of the casing. Sometimes a dosage of more sealant will cure this- but sometimes leaks keep popping up. Beware of tires sporting lightweight claims, XC racing tires for MTB, and certain brands which have histories of doing this. 
  • Tire Tread/Casing Separation: This is a lot less common today than it used to be, but we are still seeing this. Maxxis and Kenda tires have been noted for this in the past. It also will happen more commonly where people use folding bead, non-tubeless tires as tubeless. It usually occurs after you've had the tires a while. The issue is caused by sealant incompatible casing materials which sometimes sneak into a brand's tire casings (or are naturally used in non-tubeless folding bead tires never meant for tubeless set ups) via their factories. If a company changes a factory in the Far East, for whatever reason, this might start happening where it didn't before. Consumers have no way of seeing this coming. 
Use all the resources at your disposal before you jump and buy in.
So, what do you do? Well, as I said, things are not as bad as they were ten years ago, but things are not as straightforward as you'd hope they would be. If you are sitting on the fence yet, here are some recommendations that will help you navigate this minefield more successfully.
  • Use A System: If you have tubeless ready wheels, try to stick with tires from the same manufacturer if they are available. For instance, many bikes come with WTB rims. WTB makes really great tubeless ready tires. Matching the tires to the rims almost always makes for a great tubeless set up. Specialized, Bontrager/Trek, and Giant all have OE spec tubeless ready wheels on many of their bikes and tires to go with them too. 
  • Use Your Local Bike Shop's Knowledge: Got a wrench in your area that knows his stuff and has been around a while? Talk to them and get the knowledge that a guy/gal has that has worked with a lot more tires and wheels than you'll likely ever see in your lifetime. Then, after you gain some hard won knowledge from them, buy something from that shop
  • Research Your Choices: The forums, review sites, and Facebook can be a resource, but extreme caution is advised. Look for trends in commentary, and try to find consistency in comments and advice. Be careful of just wanting your choices to be validated. Cross check with your local bike shop knowledge, and if it is not a systemic approach, double your caution. 
So, let's say you have a tire and the wheels are all prepped properly. Now about mounting those things successfully. You'll know if you are going to have a successful tubeless set up pretty much right away if (a) your tires go on really hard by hand, or (b) if you have to use a tire lever to get that last bit of bead on inside the rim well. Chances are that if this is what you experience, and after you inject some sealant into the tire through the valve stem, that tire will pump up with any old crappy floor pump.

I've used this slightly modded Bontrager Charger pump several times for tubeless set ups.
In fact, I use a Bontrager Charger pump that was headed for the bin after being warranted as my litmus test. If I can pump up a tire tubeless on a rim with that poor old thing, then anyone can do it. I only modded the pump with a Silca pump head, but otherwise it is its bad, broken down self.

If you cannot move quite enough air to create a seal with a floor pump, then a small air compressor will usually do the trick. A short blast of air through a valve with the core removed generally will push the sidewalls out quickly enough to create a seal. I air up the tire- never higher than 40 psi to seat beads - and then slip the core back in, tighten it, then I finish off pumping up the tire.

If either one of those two things does not happen, I am sorry- but this is 2020. If tactics #1 and #2 fail- then that combination is a failure. Flat out. We should not have to bounce, strap, or do any sort of 'trick' outside of the first two things I have described here to get tires to set up anymore. Conversely, if you cannot even get to this point because the tire won't go on? Major Fail. Plain and simple. You need to try a different combination.

By the way, if your tire blows off the rim, that tire is instantaneously no good. Never try that tire tubeless again. It is unsafe. Period.

Now lets say you get that tire set up. You are not done yet. Take the wheel into your hand, lay the wheel/tire down on its side. Now pick up one end about four inches off the ground. Pivot the opposite end up, then drop it. Turn the tire about three degrees, pick up the other end and drop it. Repeat this process for three revolutions of the wheel, then flip the wheel and repeat. Then- if you can- go ride the wheel in a bike for about 15-20 minutes. This should distribute the sealant around the tire's innards enough to seal the casing and the tire should stay sealed now for a reasonable amount of time.

If you see trouble after this, most often it is related to the valve, valve core, or possibly a porous sidewall. Go back and start over.

Did I mention tubeless tires for bikes are more technical, more expensive, and not as easy as tubed systems?

Yeah.

Tuesday, April 28, 2020

A Tale Of Two New Frame Sets

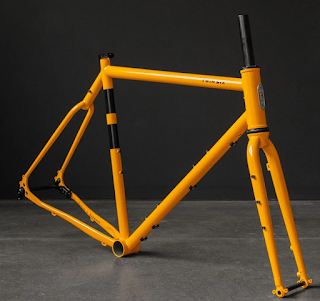
The new Twin Six Standard Rando v2 in Saffron.
This past week a couple new frames were introduced in steel. That's weird and really awesome. I am happy to have this happening in 2020. Carbon and aluminum stuff comes out all the time. Big whoop! But steel stuff isn't as common, (unless your company is run by QBP), and two steel frame intros in the space of one week? That's crazy.

I thought it might be fun to check these two introductions out and cross-compare the two to see which, if any of them, are in the wheelhouse of what I'd call a 'good gravel bike'.

The first frame under the microscope will be the new Ritchey Outback v2. It is redesigned for adventure and features a new Ritchey Adventure fork in carbon with the requisite 'three-pack' bosses made famous by Salsa Cycles. The frame has the integrated cup head set style and a straight steer tube. The fork features an integrated crown race as well. Through axles front and rear, of course, as well as the now standard flat mount disc brake caliper mounting points on the chain stay and fork leg. The frame holds two water bottles in my size within the front triangle. It has rack and fender mounts as well.

The geometry chart tells us that the Outback has a relatively shallow bottom bracket drop in my size at 68mm. The head angle is a nice 71° though, but the chain stays are long at 453mm. Tire clearances are listed as 650B X 2" and 700c X 48mm. That's pretty generous.

Next up we have the Twin Six Standard Rando v2. This is pretty much a tweak on the first Standard Rando with the major differences being a new through axles and flat mount disc brake caliper mounts. The original Standard Rando also had a straight 1 1/8th head tube/fork steer tube arrangement, but the new one has a 44mm head tube which will accept a tapered steer tube. A more traditional pressed cup head set is also retained. While the Standard Rando features a steel fork, a carbon version, painted to match, is available as an upgrade.

The new Ritchey Outback v2 frame set in "Guac y Crema".
Water bottle capacity has been expanded on the T-6 with three bottle mounts on the internal side of the front triangle, and the appearance of the 'three-pack bosses' again on the steel fork. Plus, the T-6 has an under the down tube water bottle boss set as well. (I don't know that the carbon upgrade fork has those triple bosses, by the way.) UPDATE: It appears from a T-6 Instagram post that the carbon fork does indeed have the three-pack bosses.

The geometry of the Standard Rando has not changed since the first one came out. 72° head tube angle, 75mm bottom bracket drop, and 435mm chain stay lengths here. Tire clearance is 700 X 43mm or 650B X 48mm tires here, so not quite as generous as the Ritchey. However; the T-6 can be ordered with painted-to-match fenders. Rack mounts exist, of course. It also can be set up as a single speed with the appropriate bottom bracket.

Comparison: Tom Ritchey has his ideas of 'what works' based upon his riding style and where he rides. It shows in all the bikes with his name on the downtube. Typically his skinnier tire, off-road going bikes feature high bottom brackets, and the Outback follows suit. The bike strikes me as more of a touring bike, but the lighter gauge tubing would reflect a nicer ride quality than a typical touring bike might have. The integrated head set is okay until it isn't. Of course, you are stuck with the included Ritchey headset as well. Not necessarily a bad thing as long as Ritchey keeps making parts. The fork 'matchy-matches' the head set, so again- you are most likely stuck with that choice as well. Hopefully the carbon lay-up for the fork is forgiving. Gotta hand it to the Outback on tire clearances though.

The T-6 has a LOT lower bottom bracket, a touch steeper head angle, and shorter stays at 435mm vs Ritchey's long 453mm ones. Yes- the T-6 limits your 700c tire size to a 43mm, but that should be okay, as long as it plays out to be that for clearances. The original T-6 Standard Rando also claimed that for clearance, but it really was more like a 40mm limit in reality. If the new one has 43mm with a little room to spare? I'm okay with that.

For an adventure bike to limit you to four water bottles is a bit.....weird. Maybe Tom Ritchey doesn't need much water. (NOTE- I have  since found out, via a comment and some more research, that the Outback has a mount under the down tube, although their spec page doesn't list this fact) I don't know, but the T-6 has room, (in my size) for six bottles of water. I'd need all six on a longer ride in Summer. The Outback could be your bike packing rig/touring bike, and the T-6 would be a much more adept light, longer distance gravel sled. Oh yeah....speaking of sleds. That Outback frame and fork probably is lighter than the Twin Six's frame and steel fork. I had an original T-6 SR, and it was definitely NOT light. If the new one is anything like the old one for tubing, well.....you know what to expect there. 

My old Standard Rando from Twin Six.
So, which one does it for me? Which frame set would be the better Iowa gravel traveler? There is no question in my mind. It is the Standard Rando. The Outback is probably the better 'mountain bike' of the two, but I already have a great drop bar mountain bike in the Fargo. And if you want to know, the Gen I Fargo beats the pants off that Outback in my opinion as well.

Anyway... The T-6 Standard Rando has that all important lower bottom bracket which brings a stable feel in loose gravel. A higher bottom bracket, like my Orange Crush #49 has, (which happens to be about exactly what the Outback's is, by the way), is total sketch on loose gravel down hills. That's why I don't go far afield with the BMC anymore. I'll take the new MCD, or another gravel bike with a lower BB first.

Yes....that lower BB gets you in the weeds with 650B wheels and tires. But I'm okay with that for as little as I'd run the smaller wheels. The old T-6 I had rode smoooooth! I would hope that this newer one would too, and with expanded capabilities in water carrying, it fits my way of riding better as well. The Outback curiously does not provide this option. Another interesting bit is that the fit numbers are almost identical for my size between the two contenders with the exception of stack height where the T-6 is slightly higher. A good thing, probably. I don't know though because the new Salsa Stormchaser is literally slammed and I am getting on with that just fine.

Go figure......

So, the search for the Tamland 2 replacement may end up being the new T-6 Standard Rando in the School Bus Yellow scheme. I know, I know...... They call it Saffron Yellow. Tell me that frame doesn't remind you of a school bus. It's totally school bus yellow. The other color is black. Blecch! Not happening here. Give me the "Don't Hit Me Yellow" over black any day.

Seriously though. This frame, at $700.00 is a steal if it is what I think it is. This may end up being the next test sled at the G-Ted Headquarters. Stay tuned.........


Monday, April 27, 2020

Country Views: Chance Meetings

Foulk Road- still in Waterloo here- This field had emergent plantings.
The last weekend in April. Used to be I was too busy to ride bicycles on this weekend, but now I have "time off" so I try to take advantage of my situation these days! Saturday it was supposed to be cloudy, but free of precipitation, so I went out "fore noon" and got onboard the Salsa Cycles Stormchaser single speed.

The plan originally was to go North, as that was where the winds were supposedly going to be blowing from, but when I got out I changed that up as the winds seemed to be more Northeasterly. Makes sense. It is the last weekend in April, after all...... (Past Trans Iowa riders will understand this)

It also seemed to be that the Sun was trying to shine, and that a cloudy day was not going to be happening. It was warmer too, so I rode without a coat for the first time in a long time. Just arm warmers this time, otherwise it was standard dress for Summer. I was a tiny bit chilled later when going into the wind, but otherwise the garb was perfect.

The way I ended up heading out of town was a way that N.Y. Roll seems to prefer when going Southeast of town. I went out on our excellent bike path system to Evansdale, then on to the CVNT, but just a short distance to Foulk Road. I decided to see how far South I could get on that and if I could make it out of the county, I'd loop back toward town on some other roads. I never look at maps much for these rides, by the way. I usually just ride by the seat of my pants for navigation. It's much more fun, and it makes you look at things, think things through, and learn. Unlike following a prompt for someone else's GPS track. Blah! That sounds dreadfully boring to do it that way to me, but to each their own.....

I didn't see any farming actually happening, but signs that it was were everywhere I went.
Foulk Road is pretty much flat for miles South of Waterloo, but eventually it does get hilly. 
The roads were decent going South on Foulk. No fresh gravel here, but the roads weren't devoid of chunk by any stretch of the imagination. Pretty "normal" conditions, actually. The skies were hazy, the light was odd to begin with. Almost dreamy. The wind was a mere breeze, but of course, it was mostly at my backside going South, so take that with a grain of salt!

Foulk Road is pretty flat until you get closer to Benton County. Then the rollers kick in. Nothing unusual here, just typical Iowa countryside. The gear on the Stormchaser wasn't too stiff for me to stay seated and climb everything I ran across here.

Barns For Jason #1
Once I got into a section of Foulk Road I'd never been on, I ran across several 'new-to-me' barns. So, this post will be a bit heavy on the 'Barns For Jason' content!

Another idle planting rig.
Barns For Jason #2
Barns For Jason #3
This section of Foulk Road has a LOT of smaller barns on it. It seemed for a while that I never had my camera put away. It also happened that by this point into the ride that the hills kicked in. So I was juggling speed, braking, a camera in one hand, and taking shots as I rolled by. Sometimes I was shooting completely blind backward over my shoulder. Other than a bit of leveling and cropping afterward, which I usually have to do anyway, they were perfect shots. Crazy!

Barns For Jason #4
Barns For Jason #5
Now, I have to admit that as I was going South I was sure that I was going to roll into Tama County at some point. I forgot that Benton County shares part of Southeastern Black Hawk's border. So, when I saw an offset in the road, I guessed rightly that I was going into another county, I just didn't know it was Benton County until I saw that I was on 11th Street. Tama County uses alphabet letters for their North/South gravel roads. So, here I was, in Benton County. Now to find my way out and loop back to Black Hawk County.

A blind shot I took looking back at Black Hawk County. The border is in the middle of the offset corner there.
Headed West now in Benton County. That's Hickory Hills on the horizon to the left of the gravel.
I found a Westward road after going South a mile into Benton County, but it dumped me out on a county blacktop and I had to go either right or left. I was not sure, so I busted out my iPhone, (I know.......cheating!) , I took a gander, and saw that I was a half a mile from a gravel road that would have been a difficult acquisition in my quest to ride every Black Hawk County gravel road by the end of the year. It is a one mile section of road right on the Southern county line. This is rare in Black Hawk County, as there are only maybe 2 1/4 miles of Southern gravel border roads, and really, that's it for any type of road. Why Black Hawk County has no Southern border roads is a mystery to me, but there aren't many, obviously, and now I had a perfect opportunity to bag about half of what there is. I was going for it!

Barns For Jason #6 - Just off Paydon Road in Tama County.
The road's name is Paydon Road, and it leads up to a "T" intersection at the corner of Hess Road (Black Hawk County) or X Avenue (Tama County). It also leads to what might be the highest point in the county on Hess Road just a little way North of that intersection. I stopped there and took a break, ate some food, and just soaked in the day.

From the highest point on my ride Saturday looking North up Hess Road.
Time to head back toward Waterloo, and into the wind. It wasn't bad, really. At least in the hours just after noon it wasn't. The roads weren't any different, really. Graveled, but not real bad. Climbing the rollers wasn't a big deal.

Barns For Jason #7
Hero gravel on Quarry Road
I was not expecting to have a lot of exciting times after I got back on Quarry Road and much more familiar territory. But as I approached Hammond Avenue, I described what appeared to be a cyclist coming down the hill I was approaching. It turned out to be a local mile-muncher, whose name is Tom and has like three Fargos, and a couple are single speeds. We stopped and chatted for a bit, then parted ways. Not long afterward, I was overtaken by a car. It slowed enough that the passenger was able to say, "Nice day for a ride!" It turned out to be Trans Iowa veteran and volunteer, Mike Johnson. I was flabbergasted!

Huge farm machine. Even huger bins!
So, with that surprise I was smiling ear to ear. I hit the rest of Quarry Westward and ran into some deep, really chunky gravel. It was not bad, but at the end of a ride, not ideal. Then I turned on Aker and wow! Heaven! Super hero gravel, fast, smooth, and fun. Only the last mile of Aker was covered in chunk. But by that point, I didn't care. It was an excellent ride.

I was thinking I'd return on the Sergeant Road bike trail, but it was such a nice day that all the odd cyclists were out and getting around them was a chore, so I peeled off at Martin Road, made my way over to some alleys, and wandered home somehow. Totaled out at about 3.45 hours for the ride. No idea on mileage. Anyway.... Good times. Chance meetings, clear skies, and light winds. I couldn't have asked for a better day out.