Showing posts with label Tangle Bag. Show all posts

Tuesday, July 20, 2021

Water Carriers: Update #4

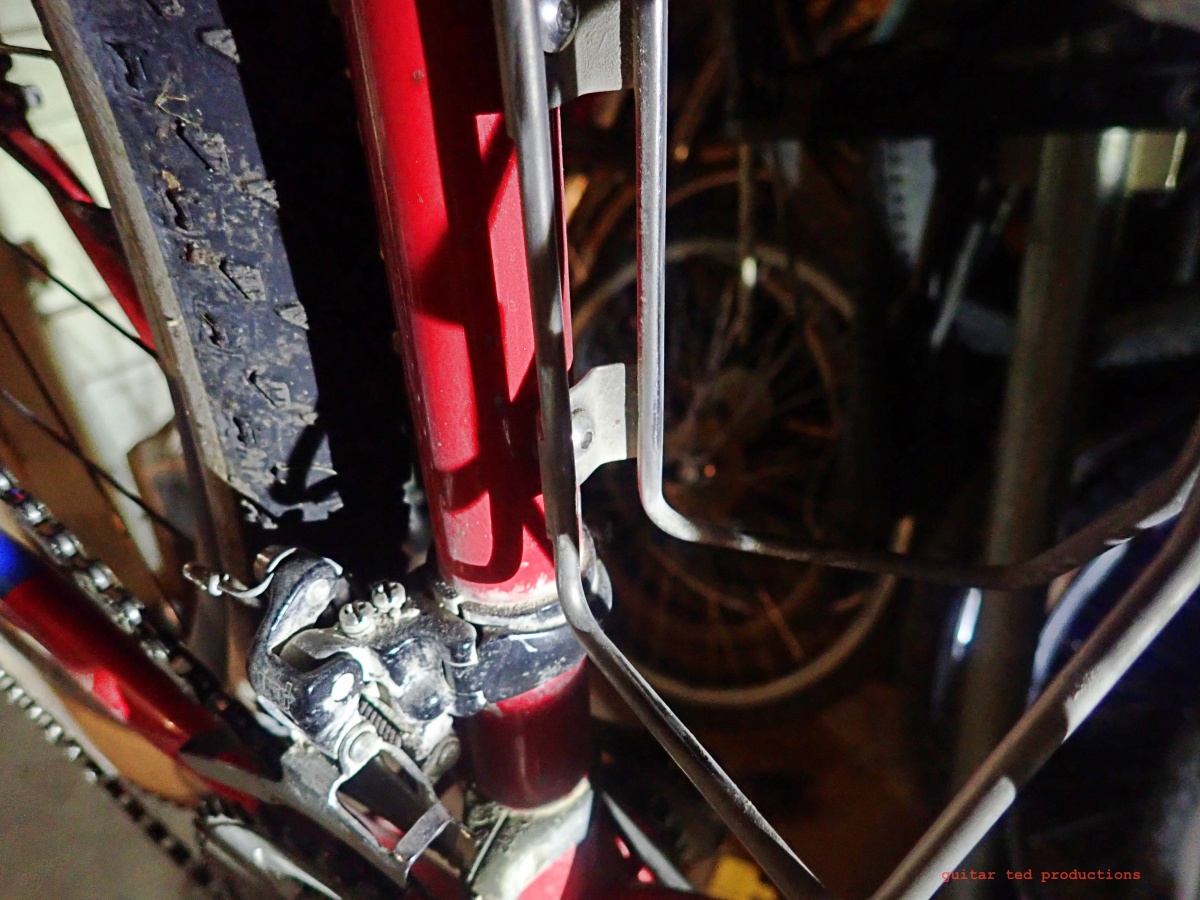
Note the position of this seat tube mounted water bottle cage.
 In my last update (seen here) I mentioned these custom made 'Popsicle Sticks' that DG machined for MJ years ago so MJ could move his water bottle cages in positions that better suited his needs. These are a precursor to the Wolf Tooth B-Rad System rails. I mentioned that I had plans for these machined bits of alloy. 

So, to the left here, you see a grainy image of a seat tube from my Raleigh Tamland Two and the water bottle cage on that tube. Notice how the bottom is higher than the front derailleur clamp? That means that any size bottle I put in that cage interferes with a top tube mounted bag like a Tangle Bag, for instance. 

I wanted to use one of the Popsicle Sticks to move the position of this seat tube mounted cage as low as possible. There are a couple of things to note here. One- I had to allow for clearance of the front derailleur clamp. Two- I had to find shorter water bottle bolts to bolt the cage to the Popsicle Stick at the bottom so the bolt would not interfere with the derailleur clamp. Fortunately, DG machined some spacers and gave them to MJ, who in turn passed them on to me, so that the spacing away of the Popsicle Stick to the seat tube was not an issue. Finding really short water bottle bolts? Could be a problem, that is unless you've been wrenching on bicycles for 20+ years and have been hoarding bits and baubles. 

You can see the special spacers that DG machined to go with the Popsicle Sticks here.
I also had to find longer bolts for the Popsicle Sticks that would find enough purchase after going through the base and spacer. The original bottle boss bolts only stuck out maybe a couple of millimeters after adding spacers. No good for holding a full 24 ounce bottle on rough gravel! So, once again thanks to my hoarding of fasteners, I had no trouble at all finding brand new stainless bolts to mount the Popsicle Stick with. 

Another nice touch here was the counter-sunk pocket DG machined into the stick to allow the mounting bolt's heads to not interfere with the water bottle cage. You can see the bolt heads peeking out in the image above, but I can assure you that they were buried into that aluminum bar once I fastened the stick on the seat tube of my Raleigh.

Here you can see the completed project. Note how the really short lower bottle cage bolt misses the front derailleur clamp.

Fortunately I found a short bolt for the lower mounting hole of the water bottle cage which barely passes through the Popsicle Stick but avoids contact with the front derailleur clamp. Good thing I decided that short bolt was worth hanging on to! 

As you might imagine, that beefy aluminum bar is not flexing at all and the cage, and therefore the water bottle, is secure for any long haul in rougher terrain. Everything clears, and all the bolts are just the right length to do their jobs. I test rode the set up and there are no issues other than that this bottle is a little harder to reach now. Hey! I have long arms! I can stretch yet......

The full view showing that now I have plenty of room for a Tangle Bag, or the equivalent.

So now instead of my cage and bottle sitting above the front derailleur clamp, the cage is lowered so that the bottom of the cage is a good two inches below the top of that clamp. This easily opens up the entire area under the top tube for a 'half-frame' bag, like a Revelate Tangle Bag or customized equivalent. That and a top tube 'tank' bag, like my Bike Bag Dude Garage Bag, and a couple of Chaff Bags and I will be set up for any super-long ride with the Tamland. 

Using one of the Chaff Bags as a water bottle holder, I now can get five bottles onboard the Tamland when originally this bike could only do two bottles. It was an oversight of mine to not advise Raleigh to put on under-the-down-tube water bottle mounts. I also am fortunate that Fyxation made this fork for quick release wheels and added bosses so that I could expand the versatility of this bike even more. In fact, I'm pretty sure that with another B-Rad 4 I could get another water bottle cage up on the down tube above the one already there. Maybe I'll do that as well someday.

So, that leaves one more Popsicle Stick. I have a plan for that one as well which I will show you all soon. Stay tuned for that...... Oh! And by the way, someone asked in the comments about my cue sheet holder and light mount for the pink BMC. I've not forgotten about that. That will get shown soon as well....

Water Carriers: Update #4

Note the position of this seat tube mounted water bottle cage.
 In my last update (seen here) I mentioned these custom made 'Popsicle Sticks' that DG machined for MJ years ago so MJ could move his water bottle cages in positions that better suited his needs. These are a precursor to the Wolf Tooth B-Rad System rails. I mentioned that I had plans for these machined bits of alloy. 

So, to the left here, you see a grainy image of a seat tube from my Raleigh Tamland Two and the water bottle cage on that tube. Notice how the bottom is higher than the front derailleur clamp? That means that any size bottle I put in that cage interferes with a top tube mounted bag like a Tangle Bag, for instance. 

I wanted to use one of the Popsicle Sticks to move the position of this seat tube mounted cage as low as possible. There are a couple of things to note here. One- I had to allow for clearance of the front derailleur clamp. Two- I had to find shorter water bottle bolts to bolt the cage to the Popsicle Stick at the bottom so the bolt would not interfere with the derailleur clamp. Fortunately, DG machined some spacers and gave them to MJ, who in turn passed them on to me, so that the spacing away of the Popsicle Stick to the seat tube was not an issue. Finding really short water bottle bolts? Could be a problem, that is unless you've been wrenching on bicycles for 20+ years and have been hoarding bits and baubles. 

You can see the special spacers that DG machined to go with the Popsicle Sticks here.
I also had to find longer bolts for the Popsicle Sticks that would find enough purchase after going through the base and spacer. The original bottle boss bolts only stuck out maybe a couple of millimeters after adding spacers. No good for holding a full 24 ounce bottle on rough gravel! So, once again thanks to my hoarding of fasteners, I had no trouble at all finding brand new stainless bolts to mount the Popsicle Stick with. 

Another nice touch here was the counter-sunk pocket DG machined into the stick to allow the mounting bolt's heads to not interfere with the water bottle cage. You can see the bolt heads peeking out in the image above, but I can assure you that they were buried into that aluminum bar once I fastened the stick on the seat tube of my Raleigh.

Here you can see the completed project. Note how the really short lower bottle cage bolt misses the front derailleur clamp.

Fortunately I found a short bolt for the lower mounting hole of the water bottle cage which barely passes through the Popsicle Stick but avoids contact with the front derailleur clamp. Good thing I decided that short bolt was worth hanging on to! 

As you might imagine, that beefy aluminum bar is not flexing at all and the cage, and therefore the water bottle, is secure for any long haul in rougher terrain. Everything clears, and all the bolts are just the right length to do their jobs. I test rode the set up and there are no issues other than that this bottle is a little harder to reach now. Hey! I have long arms! I can stretch yet......

The full view showing that now I have plenty of room for a Tangle Bag, or the equivalent.

So now instead of my cage and bottle sitting above the front derailleur clamp, the cage is lowered so that the bottom of the cage is a good two inches below the top of that clamp. This easily opens up the entire area under the top tube for a 'half-frame' bag, like a Revelate Tangle Bag or customized equivalent. That and a top tube 'tank' bag, like my Bike Bag Dude Garage Bag, and a couple of Chaff Bags and I will be set up for any super-long ride with the Tamland. 

Using one of the Chaff Bags as a water bottle holder, I now can get five bottles onboard the Tamland when originally this bike could only do two bottles. It was an oversight of mine to not advise Raleigh to put on under-the-down-tube water bottle mounts. I also am fortunate that Fyxation made this fork for quick release wheels and added bosses so that I could expand the versatility of this bike even more. In fact, I'm pretty sure that with another B-Rad 4 I could get another water bottle cage up on the down tube above the one already there. Maybe I'll do that as well someday.

So, that leaves one more Popsicle Stick. I have a plan for that one as well which I will show you all soon. Stay tuned for that...... Oh! And by the way, someone asked in the comments about my cue sheet holder and light mount for the pink BMC. I've not forgotten about that. That will get shown soon as well....

Thursday, October 15, 2015

Empty Surprise

The harvest continues. Now they are gleaning the corn from the firlds.
I have this new Grava Bikes rig I am testing/reviewing for RidingGravel.com right now. You can check out the intro, if you want to, here. So, anyway, it needs to get ridden, obviously, and yesterday was an opportune time to get some riding in, since I had the day off from work at the shop. I stuck around the house until very late in the morning, or "fore noon", as my older relatives used to say, due to it being quite chilly yet. At least the winds had died down to reasonable levels. The two previous days were ridiculous in that the winds were blowing up to 40mph at times.

I finally clipped in a little before high noon, and set out to do the 3GR route, initially. On the way out, I was feeling okay, but as soon as I hit Moline Road, I felt like I was dragging an anchor. It could have been me. I did eat an early lunch before I left. Typically I fire off better on an empty stomach. So there was that. However; there was also a pretty steady Northwesterly breeze, and it could have something to do with that. Then the bike was alien to me as well. I had to find out "how it liked to dance", so to speak, and I wasn't quite settled in as far as fit goes and as far as the bike's quirks too. Likely it was a bit of all of those things, but I wasn't having the best time out of the gate. A stop to adjust the saddle height made a big difference, and then I was feeling a bit more sprightly. The meal began to digest better, which also helped things along. The bike's quirks? Still not quite there yet. All I'll say now is, "Holy saddle to bar drop, Bat Man!". This is definitely a "racy" set up!

Fall colors are a bit "dusky" this year. Not really popping like in some years. 
 Well, I'll get back to this bike some other day and tell ya'all about that, but for now, I'll just concentrate on the ride story. See, I had it all planned out for the 3GR route. I put on two old Profile plastic bottle cages, and slammed in two big bottles under the medium sized Tangle Bag, which barely fit, and slipped a couple gel packets in there, just in case. I started out with a pair of gloves, but I got too warm and ditched those in the Tangle Bag. This time of year it is hard to judge what you need as the temperatures vary wildly within the span of even an hour in some cases. One minute you are fine with a windbreaker, for instance, then the next it is sweltering. Good thing I attached the Tangle Bag!

The dry wind also reminded me that I had attached the two cages and put two bottles on there. I grabbed one and it felt strangely light. Oh oh! I forgot to fill them! Bah! Oh well......so much for cracking out 40 miles. I wasn't in the mood for cramps and a major bonk. So, I cut the route short and headed for the shed. It was the right decision, as I need to bond with this bike a bit yet. The tires are even something I haven't been on till now- Specialized Trigger Pro tires- and they are a different beast, which I need to dial in with air pressure yet. So, I got in about half of what I was expecting, and then I had a bunch of water!

I topped off, hopped on the Titanium Mukluk, and made the round trip to the shop to grab the day's mail for Trans Iowa. One card! That was a surprise. If I see a trickle till the end of the week next week, it may be that almost everyone that sent a card in will get in. Fine by me. I wasn't expecting to see just one card though. Who knows, that may change in a hurry soon.

Empty Surprise

The harvest continues. Now they are gleaning the corn from the firlds.
I have this new Grava Bikes rig I am testing/reviewing for RidingGravel.com right now. You can check out the intro, if you want to, here. So, anyway, it needs to get ridden, obviously, and yesterday was an opportune time to get some riding in, since I had the day off from work at the shop. I stuck around the house until very late in the morning, or "fore noon", as my older relatives used to say, due to it being quite chilly yet. At least the winds had died down to reasonable levels. The two previous days were ridiculous in that the winds were blowing up to 40mph at times.

I finally clipped in a little before high noon, and set out to do the 3GR route, initially. On the way out, I was feeling okay, but as soon as I hit Moline Road, I felt like I was dragging an anchor. It could have been me. I did eat an early lunch before I left. Typically I fire off better on an empty stomach. So there was that. However; there was also a pretty steady Northwesterly breeze, and it could have something to do with that. Then the bike was alien to me as well. I had to find out "how it liked to dance", so to speak, and I wasn't quite settled in as far as fit goes and as far as the bike's quirks too. Likely it was a bit of all of those things, but I wasn't having the best time out of the gate. A stop to adjust the saddle height made a big difference, and then I was feeling a bit more sprightly. The meal began to digest better, which also helped things along. The bike's quirks? Still not quite there yet. All I'll say now is, "Holy saddle to bar drop, Bat Man!". This is definitely a "racy" set up!

Fall colors are a bit "dusky" this year. Not really popping like in some years. 
 Well, I'll get back to this bike some other day and tell ya'all about that, but for now, I'll just concentrate on the ride story. See, I had it all planned out for the 3GR route. I put on two old Profile plastic bottle cages, and slammed in two big bottles under the medium sized Tangle Bag, which barely fit, and slipped a couple gel packets in there, just in case. I started out with a pair of gloves, but I got too warm and ditched those in the Tangle Bag. This time of year it is hard to judge what you need as the temperatures vary wildly within the span of even an hour in some cases. One minute you are fine with a windbreaker, for instance, then the next it is sweltering. Good thing I attached the Tangle Bag!

The dry wind also reminded me that I had attached the two cages and put two bottles on there. I grabbed one and it felt strangely light. Oh oh! I forgot to fill them! Bah! Oh well......so much for cracking out 40 miles. I wasn't in the mood for cramps and a major bonk. So, I cut the route short and headed for the shed. It was the right decision, as I need to bond with this bike a bit yet. The tires are even something I haven't been on till now- Specialized Trigger Pro tires- and they are a different beast, which I need to dial in with air pressure yet. So, I got in about half of what I was expecting, and then I had a bunch of water!

I topped off, hopped on the Titanium Mukluk, and made the round trip to the shop to grab the day's mail for Trans Iowa. One card! That was a surprise. If I see a trickle till the end of the week next week, it may be that almost everyone that sent a card in will get in. Fine by me. I wasn't expecting to see just one card though. Who knows, that may change in a hurry soon.

Monday, April 14, 2014

Hot & Cold

Wally Kilburg will be doing imagery for T.I.V10 this year
It was a weekend of contrasting weather and activity. Saturday was the big day out taking care of the final cue sheet checking before we go to print. You can read all about that in the previous post to this one.

It was supposed to be warm Saturday, but the 80's? It was ridiculous. The wind was also bad, coming up to full gale by about 1:00pm and not relenting for several hours. Then on the way home that night the most spectacular lightning show I've witnessed in a while happened with strikes going off so often it was as if I was driving with a huge strobe light outside.

Saturday was great though. Without the warmer, drier weather we have had leading up to Saturday, it would have been difficult to drive all the B Maintenance roads that we did. In the end, we drove every single mile of the course but the last three, (since we already know all about that part), and all of it was in primo shape.......on Saturday. Of course, had we tried to do that on Sunday it would have been a complete disaster. So, we had that one thing go our way so far this year coming into this big event. Every time I've been out on the course, it has been like that. Hopefully that trend continues!

Trying out a few things for grins.
Sunday was a complete washout. It was windy, colder, and a lot wetter! It was in the 40's most of the day and the weather pretty much dictated I would stay inside all day like most sane individuals. However; a few Trans Iowa nutcases were out training in that mess. I  did get out on a few, very brief excursions. One of those was to snap off a couple images of the results of my  experimentation with the Tamland.

I first mounted the Bruce Gordon Rock & Road tires to the stock wheels. Plenty of room to spare for clearances with that set up, so I was pleased to find that out. The tan sidewalls definitely give the Raleigh a more retro feel. Then I mounted up an old rack and pannier to check on the fit. It was great. Finally I tried my Revelate Tangle Bag. Everything worked well together and it is nice to know that someone could use bags or frame bags as a way to extend the versatility of this bike. I probably will take the rack and pannier off, but the rest will stay for a bit.

I also have a plan for a light weight wheel option on the Tamland, which I should have almost everything for here already. When I get that sorted I am going to check into a 46T Ultegra 11 chain ring to replace the 52T outer, and I should be good to go on this rig for a long time.

What else does a guy do on a wet, cold, damp Sunday but dink around with bicycle parts!

Hot & Cold

Wally Kilburg will be doing imagery for T.I.V10 this year
It was a weekend of contrasting weather and activity. Saturday was the big day out taking care of the final cue sheet checking before we go to print. You can read all about that in the previous post to this one.

It was supposed to be warm Saturday, but the 80's? It was ridiculous. The wind was also bad, coming up to full gale by about 1:00pm and not relenting for several hours. Then on the way home that night the most spectacular lightning show I've witnessed in a while happened with strikes going off so often it was as if I was driving with a huge strobe light outside.

Saturday was great though. Without the warmer, drier weather we have had leading up to Saturday, it would have been difficult to drive all the B Maintenance roads that we did. In the end, we drove every single mile of the course but the last three, (since we already know all about that part), and all of it was in primo shape.......on Saturday. Of course, had we tried to do that on Sunday it would have been a complete disaster. So, we had that one thing go our way so far this year coming into this big event. Every time I've been out on the course, it has been like that. Hopefully that trend continues!

Trying out a few things for grins.
Sunday was a complete washout. It was windy, colder, and a lot wetter! It was in the 40's most of the day and the weather pretty much dictated I would stay inside all day like most sane individuals. However; a few Trans Iowa nutcases were out training in that mess. I  did get out on a few, very brief excursions. One of those was to snap off a couple images of the results of my  experimentation with the Tamland.

I first mounted the Bruce Gordon Rock & Road tires to the stock wheels. Plenty of room to spare for clearances with that set up, so I was pleased to find that out. The tan sidewalls definitely give the Raleigh a more retro feel. Then I mounted up an old rack and pannier to check on the fit. It was great. Finally I tried my Revelate Tangle Bag. Everything worked well together and it is nice to know that someone could use bags or frame bags as a way to extend the versatility of this bike. I probably will take the rack and pannier off, but the rest will stay for a bit.

I also have a plan for a light weight wheel option on the Tamland, which I should have almost everything for here already. When I get that sorted I am going to check into a 46T Ultegra 11 chain ring to replace the 52T outer, and I should be good to go on this rig for a long time.

What else does a guy do on a wet, cold, damp Sunday but dink around with bicycle parts!

Tuesday, May 24, 2011

Dissecting The Gravel Grinder Set Up

I mentioned last week in this post that I wanted to break down my Black Mountain Cycles "Orange Crush" rig for you all to let you in on the "why" of each choice I made on it. Well, now is as good a time as any.......

First off, this is just my opinion. This works for me and my needs for a lighter, more speed oriented gravel grinding rig. You may or may not agree, and that is fine. I encourage each and everyone of you thinking about a gravel grinder bike to carefully consider for yourself what might work, and then go test it out for yourself. That's what I've done. This works well for me.

Black Mountain Cycles "Monster Cross" frame and Fork:

I won't go into a whole lot of detail on this choice, since I want to do a separate full review on it, but this fit my needs in several ways. It is steel, which as long as I wasn't going to spend the dough for titanium, was my only choice. I just prefer how it rides. The BMC also has cantilever brakes, which I wanted, (reasons for this in the brake section), two water bottle mounts, (Not all cyclo-cross type frames have this), slightly longer chain stays than most CX bikes, single speed capability, and a bit taller head tube than many CX bikes out there. Finally, it has bigger tire clearances, which was key for me.

Ritchey Classic Series Seat Post and Stem: I wanted a silver component group for my gravel grinder. I like the classic look, and it looks better when dusty! The Ritchey Design Classic Series stem and seat post were no-brainers in the category of parts I was looking at. Light, well designed, easy to install, and ultimately invisible when in use.

So far I haven't been disappointed in their performance in use either. The seat post holds its position for the saddle like a vice, but is easily tweaked if needed. The stem holds my bars with a similar vice-like grip, and seems to be plenty stiff torsionally when yanking on the bars in climbs.

Revelate Designs Tangle Bag: My Revelate Designs Tangle Bag is a mainstay of my set up, since it can easily pack my 70 oz. Camelbak reservoir. (Note: Newer Camelbak reservoirs are wider and may not fit in a Tangle bag. Be sure you buy a reservoir that is long and narrow if you plan on stuffing one in a frame bag) Plus, I can get my tubes, tools, and a few other things in there as well. This is huge since it gets everything off my back.

I could even add a seat bag if I needed more storage, but this will do for 90% of the rides I will do with this bike. I also use a Banjo Brothers Top Tube bag. This thing works fantastically well. It is super simple to open, holds what I need it to, (Usually a couple gels, a camera, and a phone or more food), and is stable on the bike. It isn't too wide, so it doesn't graze my legs in out of the saddle climbing either.

Ragley Bikes Luxy Bar: The drop bar choices for rough/off roading have been getting better, and the Luxy by Ragley Bikes was the latest to be offered. I tried them and liked them quite well. Certainly, they are not for everyone, but they seemed to do the trick for me. I especially like the hooks on this bar. The silver color is a bonus as well. (Note: Curiously, Ragley Bikes does not list the Luxy as one of their products on their site. However; Chain Reaction Cycles shows them in stock)

I could use any ol' bar, but I like the Luxy, or a Woodchipper best so far for gravel grinding.

Velocity A-23 Wheel Set: Sure, I could have built my own wheels, but these Velocity A-23's were built by hand in Grand Rapids, Michigan, and they roll on great hubs that should hold up well. My big attraction to these was that the rims are 23mm wide, and therefore provide a better platform for my Bontrager XR-1 tires to work off of. So far, the A-23's have not disappointed, and spin up fast. They have shown me that they have good lateral stiffness, and that's all I need for a gravel grinding set of wheels. These get stopped by some old Shimano cantilevers. I chose cantilevers because they are lighter weight in terms of not only the brakes, but in terms of the hubs as well, since the hubs do not need to be disc compatible. I could get some lighter brakes, and I may do so, but right now the brakes are working very, very well. I would be hard pressed to make this any better, in terms of performance.

Components: Here I just went with Shimano stuff. Ultegra 9sp STI, non-series R600 compact crank set, an Ultegra long cage rear derailleur, and an old STX mtb front that works to shift the compact front gearing. Pedals are Shimano SPD's, and the saddle is a Bontrager Inform RL. The bars are double wrapped Bontrager Gel. I used two Velocity Bottle Traps for water bottle cages. Solid stuff that has worked well so far. I may change the front crank to a more CX like gearing, but so far the 50 X 34 is okay. I mated that with a 11 X 34 rear cassette for ridiculously low gearing. (I figured I'd need it for the Dirty Kanza 200, but....) I may change the cassette to a more reasonable 11 X 28T at some point.

So, that's it. I like everything I picked well enough to ride it just the way it is for a long, long time, but there are always ideas and small tweaks will happen, I am sure. Let me know if you have any questions, I'd be glad to answer them.

Dissecting The Gravel Grinder Set Up

I mentioned last week in this post that I wanted to break down my Black Mountain Cycles "Orange Crush" rig for you all to let you in on the "why" of each choice I made on it. Well, now is as good a time as any.......

First off, this is just my opinion. This works for me and my needs for a lighter, more speed oriented gravel grinding rig. You may or may not agree, and that is fine. I encourage each and everyone of you thinking about a gravel grinder bike to carefully consider for yourself what might work, and then go test it out for yourself. That's what I've done. This works well for me.

Black Mountain Cycles "Monster Cross" frame and Fork:

I won't go into a whole lot of detail on this choice, since I want to do a separate full review on it, but this fit my needs in several ways. It is steel, which as long as I wasn't going to spend the dough for titanium, was my only choice. I just prefer how it rides. The BMC also has cantilever brakes, which I wanted, (reasons for this in the brake section), two water bottle mounts, (Not all cyclo-cross type frames have this), slightly longer chain stays than most CX bikes, single speed capability, and a bit taller head tube than many CX bikes out there. Finally, it has bigger tire clearances, which was key for me.

Ritchey Classic Series Seat Post and Stem: I wanted a silver component group for my gravel grinder. I like the classic look, and it looks better when dusty! The Ritchey Design Classic Series stem and seat post were no-brainers in the category of parts I was looking at. Light, well designed, easy to install, and ultimately invisible when in use.

So far I haven't been disappointed in their performance in use either. The seat post holds its position for the saddle like a vice, but is easily tweaked if needed. The stem holds my bars with a similar vice-like grip, and seems to be plenty stiff torsionally when yanking on the bars in climbs.

Revelate Designs Tangle Bag: My Revelate Designs Tangle Bag is a mainstay of my set up, since it can easily pack my 70 oz. Camelbak reservoir. (Note: Newer Camelbak reservoirs are wider and may not fit in a Tangle bag. Be sure you buy a reservoir that is long and narrow if you plan on stuffing one in a frame bag) Plus, I can get my tubes, tools, and a few other things in there as well. This is huge since it gets everything off my back.

I could even add a seat bag if I needed more storage, but this will do for 90% of the rides I will do with this bike. I also use a Banjo Brothers Top Tube bag. This thing works fantastically well. It is super simple to open, holds what I need it to, (Usually a couple gels, a camera, and a phone or more food), and is stable on the bike. It isn't too wide, so it doesn't graze my legs in out of the saddle climbing either.

Ragley Bikes Luxy Bar: The drop bar choices for rough/off roading have been getting better, and the Luxy by Ragley Bikes was the latest to be offered. I tried them and liked them quite well. Certainly, they are not for everyone, but they seemed to do the trick for me. I especially like the hooks on this bar. The silver color is a bonus as well. (Note: Curiously, Ragley Bikes does not list the Luxy as one of their products on their site. However; Chain Reaction Cycles shows them in stock)

I could use any ol' bar, but I like the Luxy, or a Woodchipper best so far for gravel grinding.

Velocity A-23 Wheel Set: Sure, I could have built my own wheels, but these Velocity A-23's were built by hand in Grand Rapids, Michigan, and they roll on great hubs that should hold up well. My big attraction to these was that the rims are 23mm wide, and therefore provide a better platform for my Bontrager XR-1 tires to work off of. So far, the A-23's have not disappointed, and spin up fast. They have shown me that they have good lateral stiffness, and that's all I need for a gravel grinding set of wheels. These get stopped by some old Shimano cantilevers. I chose cantilevers because they are lighter weight in terms of not only the brakes, but in terms of the hubs as well, since the hubs do not need to be disc compatible. I could get some lighter brakes, and I may do so, but right now the brakes are working very, very well. I would be hard pressed to make this any better, in terms of performance.

Components: Here I just went with Shimano stuff. Ultegra 9sp STI, non-series R600 compact crank set, an Ultegra long cage rear derailleur, and an old STX mtb front that works to shift the compact front gearing. Pedals are Shimano SPD's, and the saddle is a Bontrager Inform RL. The bars are double wrapped Bontrager Gel. I used two Velocity Bottle Traps for water bottle cages. Solid stuff that has worked well so far. I may change the front crank to a more CX like gearing, but so far the 50 X 34 is okay. I mated that with a 11 X 34 rear cassette for ridiculously low gearing. (I figured I'd need it for the Dirty Kanza 200, but....) I may change the cassette to a more reasonable 11 X 28T at some point.

So, that's it. I like everything I picked well enough to ride it just the way it is for a long, long time, but there are always ideas and small tweaks will happen, I am sure. Let me know if you have any questions, I'd be glad to answer them.