Showing posts with label Garage Bag. Show all posts

Tuesday, July 20, 2021

Water Carriers: Update #4

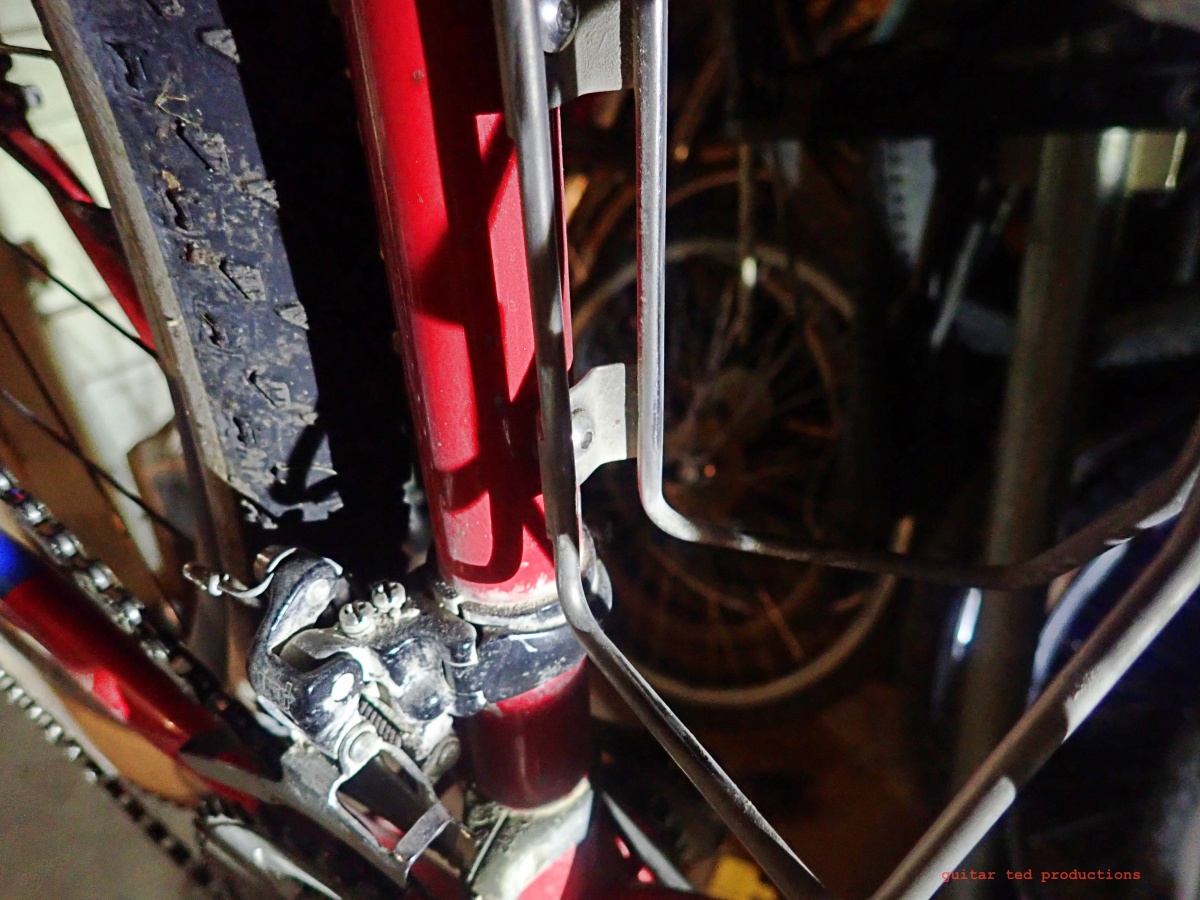
Note the position of this seat tube mounted water bottle cage.
 In my last update (seen here) I mentioned these custom made 'Popsicle Sticks' that DG machined for MJ years ago so MJ could move his water bottle cages in positions that better suited his needs. These are a precursor to the Wolf Tooth B-Rad System rails. I mentioned that I had plans for these machined bits of alloy. 

So, to the left here, you see a grainy image of a seat tube from my Raleigh Tamland Two and the water bottle cage on that tube. Notice how the bottom is higher than the front derailleur clamp? That means that any size bottle I put in that cage interferes with a top tube mounted bag like a Tangle Bag, for instance. 

I wanted to use one of the Popsicle Sticks to move the position of this seat tube mounted cage as low as possible. There are a couple of things to note here. One- I had to allow for clearance of the front derailleur clamp. Two- I had to find shorter water bottle bolts to bolt the cage to the Popsicle Stick at the bottom so the bolt would not interfere with the derailleur clamp. Fortunately, DG machined some spacers and gave them to MJ, who in turn passed them on to me, so that the spacing away of the Popsicle Stick to the seat tube was not an issue. Finding really short water bottle bolts? Could be a problem, that is unless you've been wrenching on bicycles for 20+ years and have been hoarding bits and baubles. 

You can see the special spacers that DG machined to go with the Popsicle Sticks here.
I also had to find longer bolts for the Popsicle Sticks that would find enough purchase after going through the base and spacer. The original bottle boss bolts only stuck out maybe a couple of millimeters after adding spacers. No good for holding a full 24 ounce bottle on rough gravel! So, once again thanks to my hoarding of fasteners, I had no trouble at all finding brand new stainless bolts to mount the Popsicle Stick with. 

Another nice touch here was the counter-sunk pocket DG machined into the stick to allow the mounting bolt's heads to not interfere with the water bottle cage. You can see the bolt heads peeking out in the image above, but I can assure you that they were buried into that aluminum bar once I fastened the stick on the seat tube of my Raleigh.

Here you can see the completed project. Note how the really short lower bottle cage bolt misses the front derailleur clamp.

Fortunately I found a short bolt for the lower mounting hole of the water bottle cage which barely passes through the Popsicle Stick but avoids contact with the front derailleur clamp. Good thing I decided that short bolt was worth hanging on to! 

As you might imagine, that beefy aluminum bar is not flexing at all and the cage, and therefore the water bottle, is secure for any long haul in rougher terrain. Everything clears, and all the bolts are just the right length to do their jobs. I test rode the set up and there are no issues other than that this bottle is a little harder to reach now. Hey! I have long arms! I can stretch yet......

The full view showing that now I have plenty of room for a Tangle Bag, or the equivalent.

So now instead of my cage and bottle sitting above the front derailleur clamp, the cage is lowered so that the bottom of the cage is a good two inches below the top of that clamp. This easily opens up the entire area under the top tube for a 'half-frame' bag, like a Revelate Tangle Bag or customized equivalent. That and a top tube 'tank' bag, like my Bike Bag Dude Garage Bag, and a couple of Chaff Bags and I will be set up for any super-long ride with the Tamland. 

Using one of the Chaff Bags as a water bottle holder, I now can get five bottles onboard the Tamland when originally this bike could only do two bottles. It was an oversight of mine to not advise Raleigh to put on under-the-down-tube water bottle mounts. I also am fortunate that Fyxation made this fork for quick release wheels and added bosses so that I could expand the versatility of this bike even more. In fact, I'm pretty sure that with another B-Rad 4 I could get another water bottle cage up on the down tube above the one already there. Maybe I'll do that as well someday.

So, that leaves one more Popsicle Stick. I have a plan for that one as well which I will show you all soon. Stay tuned for that...... Oh! And by the way, someone asked in the comments about my cue sheet holder and light mount for the pink BMC. I've not forgotten about that. That will get shown soon as well....

Water Carriers: Update #4

Note the position of this seat tube mounted water bottle cage.
 In my last update (seen here) I mentioned these custom made 'Popsicle Sticks' that DG machined for MJ years ago so MJ could move his water bottle cages in positions that better suited his needs. These are a precursor to the Wolf Tooth B-Rad System rails. I mentioned that I had plans for these machined bits of alloy. 

So, to the left here, you see a grainy image of a seat tube from my Raleigh Tamland Two and the water bottle cage on that tube. Notice how the bottom is higher than the front derailleur clamp? That means that any size bottle I put in that cage interferes with a top tube mounted bag like a Tangle Bag, for instance. 

I wanted to use one of the Popsicle Sticks to move the position of this seat tube mounted cage as low as possible. There are a couple of things to note here. One- I had to allow for clearance of the front derailleur clamp. Two- I had to find shorter water bottle bolts to bolt the cage to the Popsicle Stick at the bottom so the bolt would not interfere with the derailleur clamp. Fortunately, DG machined some spacers and gave them to MJ, who in turn passed them on to me, so that the spacing away of the Popsicle Stick to the seat tube was not an issue. Finding really short water bottle bolts? Could be a problem, that is unless you've been wrenching on bicycles for 20+ years and have been hoarding bits and baubles. 

You can see the special spacers that DG machined to go with the Popsicle Sticks here.
I also had to find longer bolts for the Popsicle Sticks that would find enough purchase after going through the base and spacer. The original bottle boss bolts only stuck out maybe a couple of millimeters after adding spacers. No good for holding a full 24 ounce bottle on rough gravel! So, once again thanks to my hoarding of fasteners, I had no trouble at all finding brand new stainless bolts to mount the Popsicle Stick with. 

Another nice touch here was the counter-sunk pocket DG machined into the stick to allow the mounting bolt's heads to not interfere with the water bottle cage. You can see the bolt heads peeking out in the image above, but I can assure you that they were buried into that aluminum bar once I fastened the stick on the seat tube of my Raleigh.

Here you can see the completed project. Note how the really short lower bottle cage bolt misses the front derailleur clamp.

Fortunately I found a short bolt for the lower mounting hole of the water bottle cage which barely passes through the Popsicle Stick but avoids contact with the front derailleur clamp. Good thing I decided that short bolt was worth hanging on to! 

As you might imagine, that beefy aluminum bar is not flexing at all and the cage, and therefore the water bottle, is secure for any long haul in rougher terrain. Everything clears, and all the bolts are just the right length to do their jobs. I test rode the set up and there are no issues other than that this bottle is a little harder to reach now. Hey! I have long arms! I can stretch yet......

The full view showing that now I have plenty of room for a Tangle Bag, or the equivalent.

So now instead of my cage and bottle sitting above the front derailleur clamp, the cage is lowered so that the bottom of the cage is a good two inches below the top of that clamp. This easily opens up the entire area under the top tube for a 'half-frame' bag, like a Revelate Tangle Bag or customized equivalent. That and a top tube 'tank' bag, like my Bike Bag Dude Garage Bag, and a couple of Chaff Bags and I will be set up for any super-long ride with the Tamland. 

Using one of the Chaff Bags as a water bottle holder, I now can get five bottles onboard the Tamland when originally this bike could only do two bottles. It was an oversight of mine to not advise Raleigh to put on under-the-down-tube water bottle mounts. I also am fortunate that Fyxation made this fork for quick release wheels and added bosses so that I could expand the versatility of this bike even more. In fact, I'm pretty sure that with another B-Rad 4 I could get another water bottle cage up on the down tube above the one already there. Maybe I'll do that as well someday.

So, that leaves one more Popsicle Stick. I have a plan for that one as well which I will show you all soon. Stay tuned for that...... Oh! And by the way, someone asked in the comments about my cue sheet holder and light mount for the pink BMC. I've not forgotten about that. That will get shown soon as well....

Wednesday, July 01, 2020

Project Gravel Bus: Update

Parts, parts, and parts.....
Welcome to another boring edition of "Project Gravel Bus"! I hope that you find this nerdy, parts-focused post somewhat enjoyable. Here's the latest stuff I have accumulated for the upcoming build of the Twin Six Standard Rando v2 in "Saffron" (yeah.....right!), or in my world- "Project Gravel Bus".

As with any bike build, you are not really doing anything effective until you get the frame and fork connected with a headset. My choice was to pull this Cane Creek "Forty" headset from the parts bin. By the way, everyone knows that it should be spelled "fourty", not forty. But our language is a jacked-up mish-mash of stolen, borrowed, and made-up marketing hoo-hah mixed in with slang and whatever the "cool kidz" are saying these daze. So......excuse me....back on track now!

Ah......yeah. Next up are brakes because "stopping is a good thing". My choice in stoppers is from TRP and I will be using their Spyre brakes adapted for the flat mount up front matched with a 'real' flat mount brake out back along with their adapter for 140-160mm rotor in the back. Whew! Adapters! Why?! I don't know. Maybe because it's a deal where One Caliper rules them all and the Nine Adapters, sometimes referred to as the "Black Frustrators", run roughshod over our idea of what "Standards" should be. But don't ask me! I'm no "Bike Wizard" with a magic horse.

And shown here also is the mighty bag of doom and destruction from the Bike Bag Dude dubbed the Garage Top Tube Bag. The Bike Bag Dude is a wizard of the night and can conjure up baggage spells to sooth whatever carrying needs ail ya. To battle!

I also have things not shown. Not that I am being secretive, just too lazy to bring them home from the shop, or upstairs from the Lab to photograph. . These include my eccentric bottom bracket insert for PF30 from Wheels Manufacturing. The Surly Single Speed Spacer Kit is there as well. In the Lab lurks a carbon wheel set from Irwin Wheels dubbed the Aon GX-35, and my stem, seat post, saddle, and cables and housing. All very exciting things which I know you all really want to see and read about. I know...... Maybe someday! (<===HA!)

So, as you can see, there is only one major missing component, really, and that is the Twin Six Standard Rando v2 in "School Bus Yellow". (My color naming description) I hear it is coming soon, maybe even tomorrow? We will see. Late June/early July is what I was told, so we are in that window. Once it hits the floor at Andy's Bike Shop the dust will get stirred up, I'll chant a few spells of bike building wizardry, and hopefully all will settle into a beautiful new single speed gravel sled.

Stay tuned......

Project Gravel Bus: Update

Parts, parts, and parts.....
Welcome to another boring edition of "Project Gravel Bus"! I hope that you find this nerdy, parts-focused post somewhat enjoyable. Here's the latest stuff I have accumulated for the upcoming build of the Twin Six Standard Rando v2 in "Saffron" (yeah.....right!), or in my world- "Project Gravel Bus".

As with any bike build, you are not really doing anything effective until you get the frame and fork connected with a headset. My choice was to pull this Cane Creek "Forty" headset from the parts bin. By the way, everyone knows that it should be spelled "fourty", not forty. But our language is a jacked-up mish-mash of stolen, borrowed, and made-up marketing hoo-hah mixed in with slang and whatever the "cool kidz" are saying these daze. So......excuse me....back on track now!

Ah......yeah. Next up are brakes because "stopping is a good thing". My choice in stoppers is from TRP and I will be using their Spyre brakes adapted for the flat mount up front matched with a 'real' flat mount brake out back along with their adapter for 140-160mm rotor in the back. Whew! Adapters! Why?! I don't know. Maybe because it's a deal where One Caliper rules them all and the Nine Adapters, sometimes referred to as the "Black Frustrators", run roughshod over our idea of what "Standards" should be. But don't ask me! I'm no "Bike Wizard" with a magic horse.

And shown here also is the mighty bag of doom and destruction from the Bike Bag Dude dubbed the Garage Top Tube Bag. The Bike Bag Dude is a wizard of the night and can conjure up baggage spells to sooth whatever carrying needs ail ya. To battle!

I also have things not shown. Not that I am being secretive, just too lazy to bring them home from the shop, or upstairs from the Lab to photograph. . These include my eccentric bottom bracket insert for PF30 from Wheels Manufacturing. The Surly Single Speed Spacer Kit is there as well. In the Lab lurks a carbon wheel set from Irwin Wheels dubbed the Aon GX-35, and my stem, seat post, saddle, and cables and housing. All very exciting things which I know you all really want to see and read about. I know...... Maybe someday! (<===HA!)

So, as you can see, there is only one major missing component, really, and that is the Twin Six Standard Rando v2 in "School Bus Yellow". (My color naming description) I hear it is coming soon, maybe even tomorrow? We will see. Late June/early July is what I was told, so we are in that window. Once it hits the floor at Andy's Bike Shop the dust will get stirred up, I'll chant a few spells of bike building wizardry, and hopefully all will settle into a beautiful new single speed gravel sled.

Stay tuned......

Friday, June 19, 2020

Friday News And Views

Bike Bag Dude strikes again! (Note: Debut of new table on G-Ted Productions)
More Top Tube Storage: 

Recently I received a couple more Top Tube Garage Bags from Bike Bag Dude in Australia. These are my third and fourth Top Tube Garage Bags from the BBD, and I have noted that these have seen some slight improvements over the original one I have had here for years.

The inside features a couple of 'side pockets' now which you could use for thin objects like credit cards, money, gels, or small wrenches and the like which would tend to get lost in the swirling mass of 'stuff' you might be putting into one of these. I also noted a nice port for wires to a GPS, battery for a light, or what have you at the lower front of these newer bags. The zipper looks improved and the structure of the bag itself seems improved, although that's hard to say when comparing my original bag, which is years old and abused, to brand new ones.

What hasn't changed is the ginormous size which I happen to love. I have one of the older ones stuffed with a Silca mini-pump, multi-tool, tubeless tire repair kit, a tube, nutrition, and I still have room for my Olympus Tough TG-5 camera. In fact, you can set one of these up with almost everything you'd put in a normal top tube bag and a seat bag, eliminating the seat bag. Cool! Plus, you needn't worry about busting one of these, as they are made tougher than rhino hide and let me tell you- I have tested the seams, zippers, and overall construction severely. There have been times I have thought, "Well, this zipper probably will blow up here.....", only to find it takes a lickin' and keeps on tickin'.

One of these is going on the Gravel Bus, the other will see duty on several other bikes. Stay tuned for another full review of the Top Tube Garage Bag soon.....

Typical fresh gravel in Iowa.
 What Is Gravel? 

As you all know, (unless you're completely disconnected), many cycling companies are falling all over themselves to do something in the 'gravel' category. This has resulted in some.......ah.... weird marketing, shall we say? 

And much of what is produced seems to be 'not-gravel'. Take Cannondale's latest Topstone Carbon and Neo Topstone electrified bikes. The pitch sheet showed folks using them at what looked like a pump track at a mountain bike park.

Or take any number of 'gravel' marketing campaigns where the riders are on dirt roads. Rarely- if ever - do you see actual gravel being used in the promotions of bicycles and gear deemed worth using on 'gravel', whatever that stuff is. Clearly most of these marketing departments don't know what gravel is, or cannot be arsed to find actual gravel roads to use in their marketing. I guess it is boring, or they just think it is MTB on skinnier wheels and tires with drop bars.

Don't like gravel? Fine, call it crushed rock. But if you aren't really going to use real gravel to market for crushed rock/ gravel, don't call it that. Because what I'm seeing isn't gravel at all. Not much of the time it isn't. Take a look at my image here. Now that's gravel. Hey! That gives me an idea!

Come to the Mid-West, you marketing mavens. We've got thousands of miles of this stuff all throughout the mid-sections of the country. It isn't that difficult, and, ya know......you've been flying MTB marketing campaigns to Chile and other such far-flung locations world-wide. Our destination is easy to reach, and cheaper. Tell that to your bean counters when you make your next proposal to market a gravel doohickey or widget. Or........

Quit calling what you do 'gravel'. It isn't gravel, much of the time. And we all know it out here.

Project Gravel Bus; Update- 

Parts acquisition mode enabled: I have been searching for the stuff I think I want to put on the new rig, and brakes were up on the list for consideration. The TRP Spyre mechanical disc brakes are going to be the call here.

Why mechanical disc brakes? 

Answer: Generally speaking, brakes are a lot easier to maintain and take care of if they are mechanical. Hydraulic disc brakes are good, and I have those, of course, but in terms of how this bike is going to get used, I foresee mechanical disc brakes as being the easiest to maintain type for myself. My first go-round with Sprye mechanical disc brakes started in 2014 and I have had a set in consistent usage since then. I have experienced zero issues with that model, and of course, there are no issues in terms of bleeding the system, or having to worry about brake blocks when the wheels are out. Cables are a dime a dozen, and a good housing will bring up the operating performance of Spyre brakes to an acceptable level for gravel travel. Most any hydraulic caliper is about 5 times too powerful for gravel use. Once you can lock up a wheel. any more power than that is wasted. Spyres can lock up wheels on gravel easily.

Secondly, this opens up choices for levers. I happen to like Tektro RL 520 levers quite a bit. I am pretty sure I have a hackneyed set of them somewhere that should do for this build. I just have to find them! Cables and housings are no issue either. So, with that out of the way.......

I have pretty much decided that the Gravel Bus will be a single speed. I have a crank, eccentric bottom bracket, a Surly spacer kit, and cog lined up already. All I need is a brand new chain and I am good to go on the drive train bits. By the way, the drive ring will be a 40T, so I probably am going with a 20T or 22T rear cog depending upon the wheel/tire combo. Really......I should do a 19T cog. You know- the even-odd thing I like. I'll see what I have floating around in my special "Single Speed Drawer" in my tool box.

I'm 90% sure I am swapping over the Redshift ShockStop post and stem to the Gravel Bus, and then all I need are wheels and tires, with a handle bar thrown in for good measure. I have a Ritchey VentureMax bar laying around that would be good. Hmm..... The saddle will be a WTB one already attached to that seat post, by the way. Wheels I have. I will swap around wheels on this bike quite a bit, but I think I will be starting out with 700c wheels and some 40-ish mm tires I have around.

Stay tuned for further updates....

And there will be another "Saturday News And Views" tomorrow. This one will be pretty heavy on the 'views' part! Stay tuned for that. Otherwise, have an awesome weekend. Thanks for reading!

Friday News And Views

Bike Bag Dude strikes again! (Note: Debut of new table on G-Ted Productions)
More Top Tube Storage: 

Recently I received a couple more Top Tube Garage Bags from Bike Bag Dude in Australia. These are my third and fourth Top Tube Garage Bags from the BBD, and I have noted that these have seen some slight improvements over the original one I have had here for years.

The inside features a couple of 'side pockets' now which you could use for thin objects like credit cards, money, gels, or small wrenches and the like which would tend to get lost in the swirling mass of 'stuff' you might be putting into one of these. I also noted a nice port for wires to a GPS, battery for a light, or what have you at the lower front of these newer bags. The zipper looks improved and the structure of the bag itself seems improved, although that's hard to say when comparing my original bag, which is years old and abused, to brand new ones.

What hasn't changed is the ginormous size which I happen to love. I have one of the older ones stuffed with a Silca mini-pump, multi-tool, tubeless tire repair kit, a tube, nutrition, and I still have room for my Olympus Tough TG-5 camera. In fact, you can set one of these up with almost everything you'd put in a normal top tube bag and a seat bag, eliminating the seat bag. Cool! Plus, you needn't worry about busting one of these, as they are made tougher than rhino hide and let me tell you- I have tested the seams, zippers, and overall construction severely. There have been times I have thought, "Well, this zipper probably will blow up here.....", only to find it takes a lickin' and keeps on tickin'.

One of these is going on the Gravel Bus, the other will see duty on several other bikes. Stay tuned for another full review of the Top Tube Garage Bag soon.....

Typical fresh gravel in Iowa.
 What Is Gravel? 

As you all know, (unless you're completely disconnected), many cycling companies are falling all over themselves to do something in the 'gravel' category. This has resulted in some.......ah.... weird marketing, shall we say? 

And much of what is produced seems to be 'not-gravel'. Take Cannondale's latest Topstone Carbon and Neo Topstone electrified bikes. The pitch sheet showed folks using them at what looked like a pump track at a mountain bike park.

Or take any number of 'gravel' marketing campaigns where the riders are on dirt roads. Rarely- if ever - do you see actual gravel being used in the promotions of bicycles and gear deemed worth using on 'gravel', whatever that stuff is. Clearly most of these marketing departments don't know what gravel is, or cannot be arsed to find actual gravel roads to use in their marketing. I guess it is boring, or they just think it is MTB on skinnier wheels and tires with drop bars.

Don't like gravel? Fine, call it crushed rock. But if you aren't really going to use real gravel to market for crushed rock/ gravel, don't call it that. Because what I'm seeing isn't gravel at all. Not much of the time it isn't. Take a look at my image here. Now that's gravel. Hey! That gives me an idea!

Come to the Mid-West, you marketing mavens. We've got thousands of miles of this stuff all throughout the mid-sections of the country. It isn't that difficult, and, ya know......you've been flying MTB marketing campaigns to Chile and other such far-flung locations world-wide. Our destination is easy to reach, and cheaper. Tell that to your bean counters when you make your next proposal to market a gravel doohickey or widget. Or........

Quit calling what you do 'gravel'. It isn't gravel, much of the time. And we all know it out here.

Project Gravel Bus; Update- 

Parts acquisition mode enabled: I have been searching for the stuff I think I want to put on the new rig, and brakes were up on the list for consideration. The TRP Spyre mechanical disc brakes are going to be the call here.

Why mechanical disc brakes? 

Answer: Generally speaking, brakes are a lot easier to maintain and take care of if they are mechanical. Hydraulic disc brakes are good, and I have those, of course, but in terms of how this bike is going to get used, I foresee mechanical disc brakes as being the easiest to maintain type for myself. My first go-round with Sprye mechanical disc brakes started in 2014 and I have had a set in consistent usage since then. I have experienced zero issues with that model, and of course, there are no issues in terms of bleeding the system, or having to worry about brake blocks when the wheels are out. Cables are a dime a dozen, and a good housing will bring up the operating performance of Spyre brakes to an acceptable level for gravel travel. Most any hydraulic caliper is about 5 times too powerful for gravel use. Once you can lock up a wheel. any more power than that is wasted. Spyres can lock up wheels on gravel easily.

Secondly, this opens up choices for levers. I happen to like Tektro RL 520 levers quite a bit. I am pretty sure I have a hackneyed set of them somewhere that should do for this build. I just have to find them! Cables and housings are no issue either. So, with that out of the way.......

I have pretty much decided that the Gravel Bus will be a single speed. I have a crank, eccentric bottom bracket, a Surly spacer kit, and cog lined up already. All I need is a brand new chain and I am good to go on the drive train bits. By the way, the drive ring will be a 40T, so I probably am going with a 20T or 22T rear cog depending upon the wheel/tire combo. Really......I should do a 19T cog. You know- the even-odd thing I like. I'll see what I have floating around in my special "Single Speed Drawer" in my tool box.

I'm 90% sure I am swapping over the Redshift ShockStop post and stem to the Gravel Bus, and then all I need are wheels and tires, with a handle bar thrown in for good measure. I have a Ritchey VentureMax bar laying around that would be good. Hmm..... The saddle will be a WTB one already attached to that seat post, by the way. Wheels I have. I will swap around wheels on this bike quite a bit, but I think I will be starting out with 700c wheels and some 40-ish mm tires I have around.

Stay tuned for further updates....

And there will be another "Saturday News And Views" tomorrow. This one will be pretty heavy on the 'views' part! Stay tuned for that. Otherwise, have an awesome weekend. Thanks for reading!

Monday, August 12, 2019

Dialing In The Set Up - Part 2

The Fargo Gen I set up so far. Nearly there!
Well, the tires came in that I wanted to try and they are now set up on the WTB Frequency Team i23 rims/American Classic hubbed wheels I've had for a long time. I do have some carbon rimmed wheels I could have used, but I didn't because, well......I didn't want to mess with swapping end caps and taking off some tires I would have been putting right back on after Gravel Worlds is over.

Anyway, I chose these tires when I learned that they cam in a 29" X 2.35" width. Why? Here's why.......

The gravel in Nebraska, especially around Lincoln, is sandy. Loose, inconsistent spots of roadway are not uncommon. Skinny tires + heavy guy = pizza cutter. Fatter tires are best from my experiences that I have had down there since 2009. Probably some of the best tires I ever used on Nebraska gravel around the Lincoln area were Bontrager XR-1's. The original ones, which were never tubeless rated. Anyway, finding tires like that since then has been hard to do.

I'd seen G-One tires before, of course, and I have ridden a 35mm version of them, which was not a good experience, so I never really paid much attention to G-One tires after that. However; while at work the other day it came up that these G-One tires came in a 2.35" width, and suddenly I was very interested. (See description of Nebraska gravel above)

Not much for tread there, but a LOT of volume and light weight should make for a great tire for Gravel Worlds.
I got the tires mounted Saturday and it wasn't easy. I probably should have put on fresh tape, but....I'm a bit of a skinflint, and the old tape looked good yet. That said, fresh tape in two layers would have made the setting up of these tires far easier. But since I did not use fresh tape, and the fit on the WTB rims was, well.....on the looser side, it became an issue of perseverance and eventually I won out. I was a bit skeptical about these holding air well because they weigh 553/556 grams and that is really light for 29" X 2.35" tires. Of course, they held air just fine into Sunday. I'll keep a close eye on these and I will be riding the bike as my commuter this week just to get things solidly set up.

Of course, the light weight should be no surprise when you consider that these have basically no tread to speak of. There are those tiny knobs, but whatever. Seriously.......do you think they do anything? I doubt they add anything to traction except that they do boost your psychological mind set into a false belief that these knobs can do something. Basically, these are reverse dimples on a golf ball sort of deal. They probably are more an aero thing than they are traction. These are "textured slicks" in reality.

Not much room left there.
These are the most voluminous tires I have had on the Fargo in many a year. I mentioned that I tried 2.8" 27.5 tires on this bike once, but other than that, I have used mostly 2.0-2.1 tires. These G - Ones seem to be the "real deal", and they measure out at just a shade over 59mm at less than 30psi.

Speaking of psi- I think I'll be able to run something in the 20's, but this week I will be experimenting with dialing that in. I first ran the front and rear, on the initial test ride, at 30psi. That was obviously too harsh. However, I did note straight away that these tires roll like crazy. And, of course, why wouldn't they? They better roll like crazy since they have no tread to slow them down to speak of.

In other news on my set up, I have added my Bar Yak cue sheet holder, my Lezyne GPS computer, and a Topeak saddle bag with two tubes, repair kit, and an extra bottle of sealant. The final bits will be nutrition and stashing that on the bike in my Bike Bag Dude Garage top tube bag. I'll also have a Bike Bag Dude Chaff Bag which I may use for a bottle or I may use it to store food as well. Water will be dealt with by using the six bottle cage mounts on the bike. Re-supply on water is available on route at about ten-ish miles after a 40 mile opening stretch. There is also about a 9 mile stretch to the finish after the last opportunity.

So far, so good.

Dialing In The Set Up - Part 2

The Fargo Gen I set up so far. Nearly there!
Well, the tires came in that I wanted to try and they are now set up on the WTB Frequency Team i23 rims/American Classic hubbed wheels I've had for a long time. I do have some carbon rimmed wheels I could have used, but I didn't because, well......I didn't want to mess with swapping end caps and taking off some tires I would have been putting right back on after Gravel Worlds is over.

Anyway, I chose these tires when I learned that they cam in a 29" X 2.35" width. Why? Here's why.......

The gravel in Nebraska, especially around Lincoln, is sandy. Loose, inconsistent spots of roadway are not uncommon. Skinny tires + heavy guy = pizza cutter. Fatter tires are best from my experiences that I have had down there since 2009. Probably some of the best tires I ever used on Nebraska gravel around the Lincoln area were Bontrager XR-1's. The original ones, which were never tubeless rated. Anyway, finding tires like that since then has been hard to do.

I'd seen G-One tires before, of course, and I have ridden a 35mm version of them, which was not a good experience, so I never really paid much attention to G-One tires after that. However; while at work the other day it came up that these G-One tires came in a 2.35" width, and suddenly I was very interested. (See description of Nebraska gravel above)

Not much for tread there, but a LOT of volume and light weight should make for a great tire for Gravel Worlds.
I got the tires mounted Saturday and it wasn't easy. I probably should have put on fresh tape, but....I'm a bit of a skinflint, and the old tape looked good yet. That said, fresh tape in two layers would have made the setting up of these tires far easier. But since I did not use fresh tape, and the fit on the WTB rims was, well.....on the looser side, it became an issue of perseverance and eventually I won out. I was a bit skeptical about these holding air well because they weigh 553/556 grams and that is really light for 29" X 2.35" tires. Of course, they held air just fine into Sunday. I'll keep a close eye on these and I will be riding the bike as my commuter this week just to get things solidly set up.

Of course, the light weight should be no surprise when you consider that these have basically no tread to speak of. There are those tiny knobs, but whatever. Seriously.......do you think they do anything? I doubt they add anything to traction except that they do boost your psychological mind set into a false belief that these knobs can do something. Basically, these are reverse dimples on a golf ball sort of deal. They probably are more an aero thing than they are traction. These are "textured slicks" in reality.

Not much room left there.
These are the most voluminous tires I have had on the Fargo in many a year. I mentioned that I tried 2.8" 27.5 tires on this bike once, but other than that, I have used mostly 2.0-2.1 tires. These G - Ones seem to be the "real deal", and they measure out at just a shade over 59mm at less than 30psi.

Speaking of psi- I think I'll be able to run something in the 20's, but this week I will be experimenting with dialing that in. I first ran the front and rear, on the initial test ride, at 30psi. That was obviously too harsh. However, I did note straight away that these tires roll like crazy. And, of course, why wouldn't they? They better roll like crazy since they have no tread to slow them down to speak of.

In other news on my set up, I have added my Bar Yak cue sheet holder, my Lezyne GPS computer, and a Topeak saddle bag with two tubes, repair kit, and an extra bottle of sealant. The final bits will be nutrition and stashing that on the bike in my Bike Bag Dude Garage top tube bag. I'll also have a Bike Bag Dude Chaff Bag which I may use for a bottle or I may use it to store food as well. Water will be dealt with by using the six bottle cage mounts on the bike. Re-supply on water is available on route at about ten-ish miles after a 40 mile opening stretch. There is also about a 9 mile stretch to the finish after the last opportunity.

So far, so good.

Sunday, June 11, 2017

DK My Way: Gear And Comments


The Gen I Fargo in Americus
The gear and clothing I used for the century ride in Kansas was spot on, for the most part. I wanted to detail what I used and what was good or not so good here, in case anyone wanted a reference and ideas on what to do for a ride in the Flint Hills.

First of all, it has been my experience down there that water, specifically having enough of it, is a big challenge to riding the Flint Hills. There are some pretty remote places down there with no chances for resupply of water. Added to this is the fact that, generally speaking, the area is windy and somewhat arid. This has the effect of sucking your moisture out of you without you realizing it. Staying hydrated, in my opinion, is mission number one when setting up for a self supported ride in the Flint Hills.

The Gen I Fargo is a bicycle that has a lot of braze ons for water bottle cages. This along with the Wolf Tooth B Rad System afforded me the opportunity to carry six water bottles of water. I could have gone with seven, but the lowest, down tube mounted bottle I reserved for my tool kit. I'll talk about the B Rad System in more detail in a separate review, but (spoiler alert), it works. I was glad I got that before the trip.

The capabilities of the B Rad equipped Gen I Fargo allowed me to get by without a hydration back pack. I carried nothing at all on my back except a few odd things in jersey pockets. This allowed me to not have to suffer the beat down of 3 liters of water on my back over Kansan gravel roads. I had plenty of water, but given the conditions this time, I wasn't really tested in this.

You can see my Bike Bag Dude "Chaff" bag hanging in the front of my bike here.
The Bike Bag Dude's Chaff Bags have been a staple of my set ups over the past 5 years or so now. I would not ever do a long, extended tour or day ride without at least one of these on my bicycle.

This time I used the single Chaff Bag I took for tube and tool storage, along with the convenience of having a quick place to shove used almond butter packets and other trash. I attached this bag to my Bar Yak System.

The Bar Yak System I use is a combination of the load bars, aero carbon bar ends with a titanium cross bar, and the Pergrine Arm Rests. I also attached the Q; Pro cue sheet holder to the load bars. The cue sheet holder is awesome and probably something I should have had a long time ago. The Bar Yak arm rests and aero bar end set up allows me to relieve hand pressure and prevent numbness. Obviously it is more aero as well. The load bars are a great place to strap an under the bar roll or, as in my case, the Chaff Bag. I even mount my light off the Ti cross bar, so there is that bit of versatility to take advantage of here as well.

I did not use a frame bag or traditional "under the top tube" half bag/tank bag/triangle sort of deal this time. First, it really doesn't work to have that and all the water bottles on the bike. Secondly, I was trying to minimize my kit. I did use my Bike Bag Dude Garage top tube "fuel tank style" bag. I also used a just acquired Carousel Designs top tube bag that is most like a "Jerry Can" from Revelate, but kind of different. In the Garage Bag I stowed food, a few small tools, lip balm, and other items I wanted quick access to. In the Carousel Designs bag I stowed my Lezyne mini pump and all my maps I needed.

Luxy Bar, Gevenalle shifters, Bar Yak, Terrene Honali tires, and my Trelock Control Ion light are seen here.
I did not use a saddle/seat tube mounted bag, although I brought one by Banjo Brothers in the event I thought I might need to carry rain gear. The improved forecast ixnayed that choice from the final set up.

I also swapped out my BodyFloat seat post for my Salsa Cycles Ti Regulator post. I did that mostly so I had the option to run a saddle/seat post mounted bag, but in the end I think it worked out well in terms of comfort. It isn't as compliant as the BodyFloat, but it feels better when climbing because it isn't as compliant as the BodyFloat post. I missed the BodyFloat on the copious amounts of washboard road, but other than that, no. The saddle was changed to a WTB Pure, by the way. A Brooks Cambium will get put on at some point.

The Terrene Honali tires were really nice. See my RidingGravel.com review here. 

Clothing was my new RidingGravel.com kit with a Bontrager base layer tank underneath. Thin wool socks, 8"ers, and my Shimano three strap mtb shoes were on my feet. On my head I had a Twin Six cycling hat and my Bontrager helmet. Eyewear was from Oakley.

Nutrition was basically Epic pemmican bars and Justin's Almond Butter packets.I did have some salty chips and the Budweiser. I used Gu energy electrolyte tabs since I forgot my Elete at home. I drank 11 bottles of water throughout the ride.


Comments: Mentally I used a couple "mantras" on this ride. One was "Shift early-shift often." I said this at the beginning of almost every hill. I have a tendency to mash, so I used this little phrase as a way to remind myself to shift and spin. The other was "Enjoy the ride". Sounds simple, but this helped when I found myself suffering, or going too hard. If I was hurting, I tried to focus on things around me that brought me joy or put a smile on my face. If I was going too hard, it was a way that I could limit my output and be more attentive to burning up too many matches.

I also allowed myself to take as many images as I wanted to. This was about enjoyment, not racing. I wanted to take in as much as I could on this ride. That said, when I got back, had showered, and had walked down to the start line, there werestill riders coming in for their DK100 Half Pint finish. So, maybe I should start "racing" the way I rode the DK My Way!


DK My Way: Gear And Comments


The Gen I Fargo in Americus
The gear and clothing I used for the century ride in Kansas was spot on, for the most part. I wanted to detail what I used and what was good or not so good here, in case anyone wanted a reference and ideas on what to do for a ride in the Flint Hills.

First of all, it has been my experience down there that water, specifically having enough of it, is a big challenge to riding the Flint Hills. There are some pretty remote places down there with no chances for resupply of water. Added to this is the fact that, generally speaking, the area is windy and somewhat arid. This has the effect of sucking your moisture out of you without you realizing it. Staying hydrated, in my opinion, is mission number one when setting up for a self supported ride in the Flint Hills.

The Gen I Fargo is a bicycle that has a lot of braze ons for water bottle cages. This along with the Wolf Tooth B Rad System afforded me the opportunity to carry six water bottles of water. I could have gone with seven, but the lowest, down tube mounted bottle I reserved for my tool kit. I'll talk about the B Rad System in more detail in a separate review, but (spoiler alert), it works. I was glad I got that before the trip.

The capabilities of the B Rad equipped Gen I Fargo allowed me to get by without a hydration back pack. I carried nothing at all on my back except a few odd things in jersey pockets. This allowed me to not have to suffer the beat down of 3 liters of water on my back over Kansan gravel roads. I had plenty of water, but given the conditions this time, I wasn't really tested in this.

You can see my Bike Bag Dude "Chaff" bag hanging in the front of my bike here.
The Bike Bag Dude's Chaff Bags have been a staple of my set ups over the past 5 years or so now. I would not ever do a long, extended tour or day ride without at least one of these on my bicycle.

This time I used the single Chaff Bag I took for tube and tool storage, along with the convenience of having a quick place to shove used almond butter packets and other trash. I attached this bag to my Bar Yak System.

The Bar Yak System I use is a combination of the load bars, aero carbon bar ends with a titanium cross bar, and the Pergrine Arm Rests. I also attached the Q; Pro cue sheet holder to the load bars. The cue sheet holder is awesome and probably something I should have had a long time ago. The Bar Yak arm rests and aero bar end set up allows me to relieve hand pressure and prevent numbness. Obviously it is more aero as well. The load bars are a great place to strap an under the bar roll or, as in my case, the Chaff Bag. I even mount my light off the Ti cross bar, so there is that bit of versatility to take advantage of here as well.

I did not use a frame bag or traditional "under the top tube" half bag/tank bag/triangle sort of deal this time. First, it really doesn't work to have that and all the water bottles on the bike. Secondly, I was trying to minimize my kit. I did use my Bike Bag Dude Garage top tube "fuel tank style" bag. I also used a just acquired Carousel Designs top tube bag that is most like a "Jerry Can" from Revelate, but kind of different. In the Garage Bag I stowed food, a few small tools, lip balm, and other items I wanted quick access to. In the Carousel Designs bag I stowed my Lezyne mini pump and all my maps I needed.

Luxy Bar, Gevenalle shifters, Bar Yak, Terrene Honali tires, and my Trelock Control Ion light are seen here.
I did not use a saddle/seat tube mounted bag, although I brought one by Banjo Brothers in the event I thought I might need to carry rain gear. The improved forecast ixnayed that choice from the final set up.

I also swapped out my BodyFloat seat post for my Salsa Cycles Ti Regulator post. I did that mostly so I had the option to run a saddle/seat post mounted bag, but in the end I think it worked out well in terms of comfort. It isn't as compliant as the BodyFloat, but it feels better when climbing because it isn't as compliant as the BodyFloat post. I missed the BodyFloat on the copious amounts of washboard road, but other than that, no. The saddle was changed to a WTB Pure, by the way. A Brooks Cambium will get put on at some point.

The Terrene Honali tires were really nice. See my RidingGravel.com review here. 

Clothing was my new RidingGravel.com kit with a Bontrager base layer tank underneath. Thin wool socks, 8"ers, and my Shimano three strap mtb shoes were on my feet. On my head I had a Twin Six cycling hat and my Bontrager helmet. Eyewear was from Oakley.

Nutrition was basically Epic pemmican bars and Justin's Almond Butter packets.I did have some salty chips and the Budweiser. I used Gu energy electrolyte tabs since I forgot my Elete at home. I drank 11 bottles of water throughout the ride.


Comments: Mentally I used a couple "mantras" on this ride. One was "Shift early-shift often." I said this at the beginning of almost every hill. I have a tendency to mash, so I used this little phrase as a way to remind myself to shift and spin. The other was "Enjoy the ride". Sounds simple, but this helped when I found myself suffering, or going too hard. If I was hurting, I tried to focus on things around me that brought me joy or put a smile on my face. If I was going too hard, it was a way that I could limit my output and be more attentive to burning up too many matches.

I also allowed myself to take as many images as I wanted to. This was about enjoyment, not racing. I wanted to take in as much as I could on this ride. That said, when I got back, had showered, and had walked down to the start line, there werestill riders coming in for their DK100 Half Pint finish. So, maybe I should start "racing" the way I rode the DK My Way!


Thursday, August 20, 2015

Gravel Worlds: Pre-Race Prep

The rig is dialed
Gravel Worlds is this weekend and my final prep has already been taking place. I have been keeping myself in some semblance of physical fitness, and my bike is dialed. As mentioned Monday, the Tamland Two is getting the call with Bruce Gordon Rock & Road tires.

I'm going with a Topeak saddle bag and my Bike Bag Dude "Garage Bag" on the top tube. There will be two Chaff Bags to hold two extra water bottles. I'll utilize jersey pockets for food and the Garage Bag for that as well.

I'm going a hair on the minimalist side here, and that's due to my past experience with the event. I've come within 40-ish miles of finishing it twice, both times on a single speed, so with gears, I feel I will be gaining an advantage. The weather and course generally don't demand that I bring anything other than the basics- tube, pump, multi-tool, and enough water to get by for 40-50 miles at a crack. Food is also replenishable out on course at different spots. Now, I may regret these choices later on, but if I do, it would be because something happened incongruent to my past experiences with Gravel Worlds.

Oh yeah......I found an old Cateye computer in my stash that works. So, I didn't have to buy another. I'll stick a new battery in it, calibrate it, and that will get me by for this event. It will come off immediately afterward! I just don't care for computers on my bicycles. Now all I have to do is pack up my clothes and I'm good to go.

It looks a lot more like mid-September than it does mid-August!
I did go for a couple fat bike rides on Wednesday, just to blow off some steam. The day was cool and wet. Much like a mid-Fall day than a late Summer one. I actually had to wear a rain jacket and it felt okay. Not like wearing a stuffy garbage sack, which is what it should have felt like for a rainy August day. This is surely a preview for Fall weather which is right around the corner.

Speaking of weather- it is the wildcard at any of these events I go to or put on. It looks like we will see a slight return to Summer-like weather for Gravel Worlds with a typical humid, windy forecast, highs in the upper 80's, and possibly a late afternoon thunderstorm out and about to make it all interesting. I'm ready for heat and humidity. It's been that way around here for well over a month and I've done some tough days in some hot conditions. I feel pretty confident I am okay with doing 150 miles of Nebraskan gravel in the upper 80's for temps.

Now a thunderstorm down that way could get real interesting. I'm not going to pack a rain jacket, so if it should decide to pour rain, I'll have to deal with that without the rain gear, which, if it is humid and hot, wouldn't keep me dry anyway. Lightning, on the other hand.....

Well, we won't even think about that right now!

Gravel Worlds: Pre-Race Prep

The rig is dialed
Gravel Worlds is this weekend and my final prep has already been taking place. I have been keeping myself in some semblance of physical fitness, and my bike is dialed. As mentioned Monday, the Tamland Two is getting the call with Bruce Gordon Rock & Road tires.

I'm going with a Topeak saddle bag and my Bike Bag Dude "Garage Bag" on the top tube. There will be two Chaff Bags to hold two extra water bottles. I'll utilize jersey pockets for food and the Garage Bag for that as well.

I'm going a hair on the minimalist side here, and that's due to my past experience with the event. I've come within 40-ish miles of finishing it twice, both times on a single speed, so with gears, I feel I will be gaining an advantage. The weather and course generally don't demand that I bring anything other than the basics- tube, pump, multi-tool, and enough water to get by for 40-50 miles at a crack. Food is also replenishable out on course at different spots. Now, I may regret these choices later on, but if I do, it would be because something happened incongruent to my past experiences with Gravel Worlds.

Oh yeah......I found an old Cateye computer in my stash that works. So, I didn't have to buy another. I'll stick a new battery in it, calibrate it, and that will get me by for this event. It will come off immediately afterward! I just don't care for computers on my bicycles. Now all I have to do is pack up my clothes and I'm good to go.

It looks a lot more like mid-September than it does mid-August!
I did go for a couple fat bike rides on Wednesday, just to blow off some steam. The day was cool and wet. Much like a mid-Fall day than a late Summer one. I actually had to wear a rain jacket and it felt okay. Not like wearing a stuffy garbage sack, which is what it should have felt like for a rainy August day. This is surely a preview for Fall weather which is right around the corner.

Speaking of weather- it is the wildcard at any of these events I go to or put on. It looks like we will see a slight return to Summer-like weather for Gravel Worlds with a typical humid, windy forecast, highs in the upper 80's, and possibly a late afternoon thunderstorm out and about to make it all interesting. I'm ready for heat and humidity. It's been that way around here for well over a month and I've done some tough days in some hot conditions. I feel pretty confident I am okay with doing 150 miles of Nebraskan gravel in the upper 80's for temps.

Now a thunderstorm down that way could get real interesting. I'm not going to pack a rain jacket, so if it should decide to pour rain, I'll have to deal with that without the rain gear, which, if it is humid and hot, wouldn't keep me dry anyway. Lightning, on the other hand.....

Well, we won't even think about that right now!