Showing posts with label Wheelsmith. Show all posts

Tuesday, January 11, 2022

Paul Components WORD Disc Hub Review: Part 1

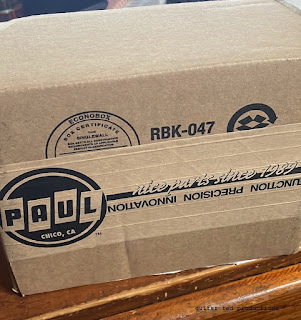
This arrived on Saturday.....
 Since mid-2021 I have been keen on getting the Twin Six Standard Rando v2 on a single speed specific rear wheel set up. That was after I swapped back to a drop bar set up and I realized that this bike makes a great purpose-built single speed. 

But as I have stated in another post, finding a 12mm through axle, single speed only hub is not an easy task. Ten, maybe fifteen years ago, when single speed was in its hey-day due to the popularity of single speed 29"ers, you could find a lot of single speed specific rear hubs. However; those were almost always just quick release, or a combination of that and bolted on options. Neither will work on a through-axle frame like the Standard Rando v2. 

I knew Paul Component Engineering made one, and it was a thread-on free wheel style hub, which actually is what I'd rather have than a truncated cassette style. That is because the thread-on style usually is made in such a way that the resulting wheel build has a zero dish set up. That is "stronger" and "stiffer". Both good things on a high-torque situation as with single speed bikes. Now, Paul Components are not cheap, in terms of dollars, so I was waiting to see if I could somehow score one via the old shop job. Well, that never happened. So, I ponied up my own funds via some income from RidingGravel.com, and I got a hold of that hub this past weekend. 

So, in this post I wanted to document my experience with ordering this hub, because it was pretty good for these times, and also Paul Components does a really great job with the process and experience in general. As most of you probably do these days, I order a lot of stuff online, so when I have a great experience and good service, I will tell you about it, as long as it is bicycle related. I should say that Paul Component Engineering doesn't have any idea at all that I am doing this and that I paid full retail for the hub. Okay, here we go in pictures.....

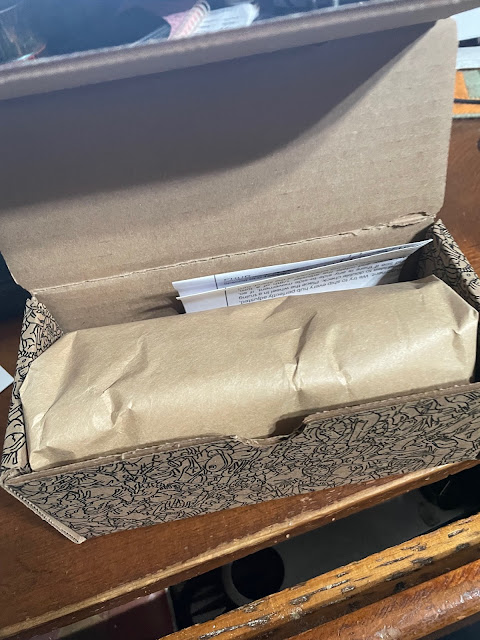
Scared of clowns? Don't look too closely at this box's graphic design! 


No plastic- everything sent to me besides a vinyl sticker was recyclable


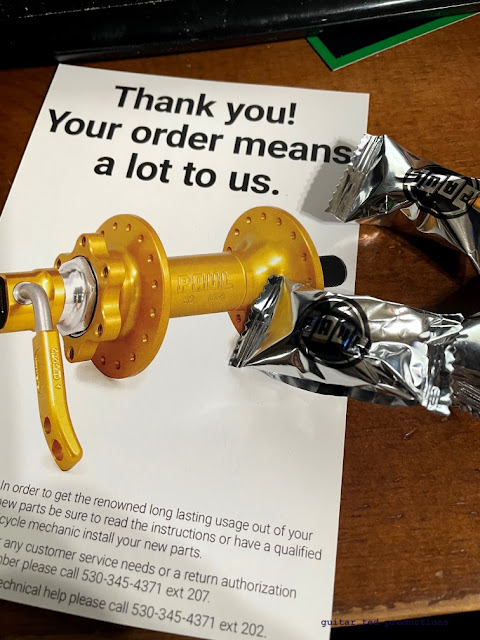
It may seem silly to some of you, but a nice "thank you" and a treat of hard candies goes a long way.

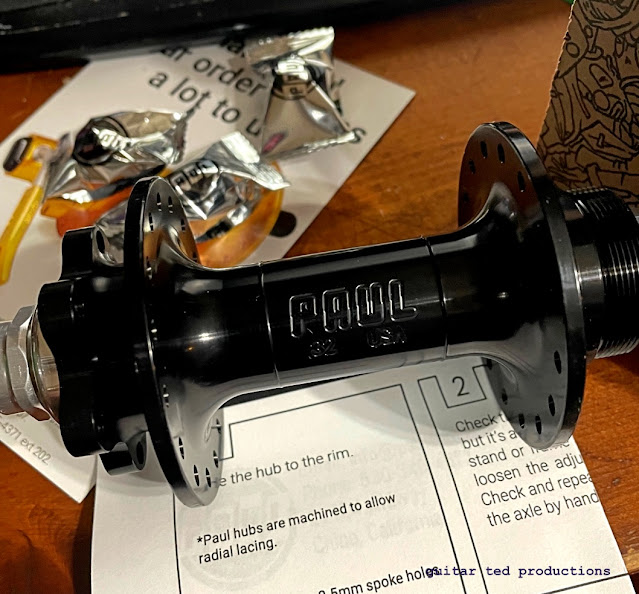
And of course, the WORD Disc Hub itself was in there.

When I ordered this hub I saw warnings and received another when I placed the order that it may take a few weeks - or more- depending upon COVID and whatnot, to get this hub. Of course, I had been on a waiting list for months, since last Summer. (That's why I didn't get the shop discount) So, I was okay with that. But all along afterword Paul Components sent out regular updates to me and thanked me for my patience. That was greatly appreciated and I never felt at any point that my order had been neglected or that I had been forgotten about.

Tracking of the package once it was in the USPS system was flawless. This is generally NOT the case with USPS as I can attest to. I have parts coming for my amplifier repairs (guitar stuff) and that at the same time as the Paul order and USPS tracking is about as good as detecting ghosts in the attic. I'm not sure if Paul Components took cookies down to their local USPS office for the Holidays to 'grease the wheels', but that tracking experience was top notch. 
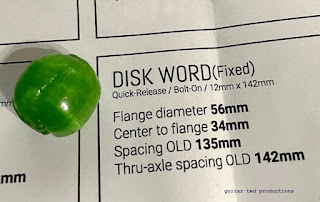
The manual with the hub has all the dimensions you need to build up a wheel

Another nice touch, besides the things shown above, was that the manual which came with the hub had all the hub dimensions necessary for me to calculate spoke lengths. All I required was the ERD measurement for the Velocity Blunt SS rim, which Velocity publishes on their site, and a short innergoogles trip to the United Bicycle Institute's spoke calculator page later and I was set. 

Then I visited my stash of Wheelsmith spokes and nipples and I found that I had all the things I needed to build up this wheel. So, I Spoke Prep'd the Wheelsmith spokes I pulled for this job on Sunday and laced this wheel up. But before I get into all of that....

Disc WORD Hub = 200 grams

Velocity USA Blunt SS 700c rim = 420 grams

Okay, so I decided to go with my "Guitar Ted Productions "Standard Build"" design which is all silver spokes on one side and all black spokes on the other side. This time I used all silver brass (natch) nipples. Being that there was no dish on the build to accommodate for a cassette or for the disc brake, the wheel was simple enough to build up and it looks as though it should tension up very well. 
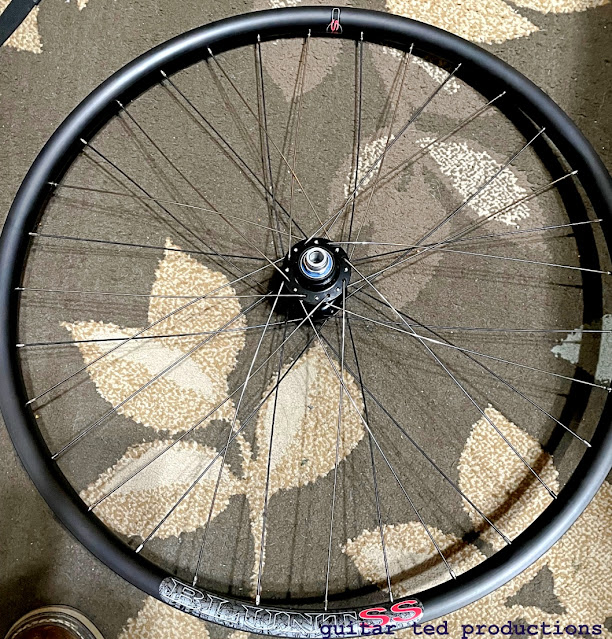
So far- so good.

I'll likely have tensioned this up by the time that you are reading this on the post date. Next after that will be swapping over my White Industries freewheel. Then taping, valve stems, tires, sealant, a rotor, and I'm good to go. That will cover the rear wheel.

Then I'm going to take the Project Wide Gravel Wheels v2 and do a rim swap from the Spank 350's to my set of 28 hole Velocity Blunts. Then I will have a single speed rear which will stay with the Standard Rando, but the front could come off, be paired with the cassette rear, and set up on the BMC or the Noble bike, or whatever may come in the future. That will make the DT Swiss 350 hubs useful also instead of sitting around on rims too wide to use on my gravel bikes. 

Then, in the future, I will probably get some Boost spaced hubs, lace those Spank rims to those, and maybe build up a modern day MTB-ish bike. But we'll see. As for this hub/wheel here I will give a progress report on the final details on the set up. That will be coming soon. Then at some point I'll do a ride report on the hub. So, as for now, I can recommend the Paul Component Engineering ordering experience and the experience of receiving the box and contents was very nice. Stay tuned......

Paul Components WORD Disc Hub Review: Part 1

This arrived on Saturday.....
 Since mid-2021 I have been keen on getting the Twin Six Standard Rando v2 on a single speed specific rear wheel set up. That was after I swapped back to a drop bar set up and I realized that this bike makes a great purpose-built single speed. 

But as I have stated in another post, finding a 12mm through axle, single speed only hub is not an easy task. Ten, maybe fifteen years ago, when single speed was in its hey-day due to the popularity of single speed 29"ers, you could find a lot of single speed specific rear hubs. However; those were almost always just quick release, or a combination of that and bolted on options. Neither will work on a through-axle frame like the Standard Rando v2. 

I knew Paul Component Engineering made one, and it was a thread-on free wheel style hub, which actually is what I'd rather have than a truncated cassette style. That is because the thread-on style usually is made in such a way that the resulting wheel build has a zero dish set up. That is "stronger" and "stiffer". Both good things on a high-torque situation as with single speed bikes. Now, Paul Components are not cheap, in terms of dollars, so I was waiting to see if I could somehow score one via the old shop job. Well, that never happened. So, I ponied up my own funds via some income from RidingGravel.com, and I got a hold of that hub this past weekend. 

So, in this post I wanted to document my experience with ordering this hub, because it was pretty good for these times, and also Paul Components does a really great job with the process and experience in general. As most of you probably do these days, I order a lot of stuff online, so when I have a great experience and good service, I will tell you about it, as long as it is bicycle related. I should say that Paul Component Engineering doesn't have any idea at all that I am doing this and that I paid full retail for the hub. Okay, here we go in pictures.....

Scared of clowns? Don't look too closely at this box's graphic design! 


No plastic- everything sent to me besides a vinyl sticker was recyclable


It may seem silly to some of you, but a nice "thank you" and a treat of hard candies goes a long way.

And of course, the WORD Disc Hub itself was in there.

When I ordered this hub I saw warnings and received another when I placed the order that it may take a few weeks - or more- depending upon COVID and whatnot, to get this hub. Of course, I had been on a waiting list for months, since last Summer. (That's why I didn't get the shop discount) So, I was okay with that. But all along afterword Paul Components sent out regular updates to me and thanked me for my patience. That was greatly appreciated and I never felt at any point that my order had been neglected or that I had been forgotten about.

Tracking of the package once it was in the USPS system was flawless. This is generally NOT the case with USPS as I can attest to. I have parts coming for my amplifier repairs (guitar stuff) and that at the same time as the Paul order and USPS tracking is about as good as detecting ghosts in the attic. I'm not sure if Paul Components took cookies down to their local USPS office for the Holidays to 'grease the wheels', but that tracking experience was top notch. 

The manual with the hub has all the dimensions you need to build up a wheel

Another nice touch, besides the things shown above, was that the manual which came with the hub had all the hub dimensions necessary for me to calculate spoke lengths. All I required was the ERD measurement for the Velocity Blunt SS rim, which Velocity publishes on their site, and a short innergoogles trip to the United Bicycle Institute's spoke calculator page later and I was set. 

Then I visited my stash of Wheelsmith spokes and nipples and I found that I had all the things I needed to build up this wheel. So, I Spoke Prep'd the Wheelsmith spokes I pulled for this job on Sunday and laced this wheel up. But before I get into all of that....

Disc WORD Hub = 200 grams

Velocity USA Blunt SS 700c rim = 420 grams

Okay, so I decided to go with my "Guitar Ted Productions "Standard Build"" design which is all silver spokes on one side and all black spokes on the other side. This time I used all silver brass (natch) nipples. Being that there was no dish on the build to accommodate for a cassette or for the disc brake, the wheel was simple enough to build up and it looks as though it should tension up very well. 

So far- so good.

I'll likely have tensioned this up by the time that you are reading this on the post date. Next after that will be swapping over my White Industries freewheel. Then taping, valve stems, tires, sealant, a rotor, and I'm good to go. That will cover the rear wheel.

Then I'm going to take the Project Wide Gravel Wheels v2 and do a rim swap from the Spank 350's to my set of 28 hole Velocity Blunts. Then I will have a single speed rear which will stay with the Standard Rando, but the front could come off, be paired with the cassette rear, and set up on the BMC or the Noble bike, or whatever may come in the future. That will make the DT Swiss 350 hubs useful also instead of sitting around on rims too wide to use on my gravel bikes. 

Then, in the future, I will probably get some Boost spaced hubs, lace those Spank rims to those, and maybe build up a modern day MTB-ish bike. But we'll see. As for this hub/wheel here I will give a progress report on the final details on the set up. That will be coming soon. Then at some point I'll do a ride report on the hub. So, as for now, I can recommend the Paul Component Engineering ordering experience and the experience of receiving the box and contents was very nice. Stay tuned......

Wednesday, June 23, 2021

Project Wide Gravel Wheels v2: Getting Acquainted With The Machine

Practicing on my own spokes....
 In my effort to get these wheels built I have decided to take all of you readers along for the ride. So, today's post will be about the next step in my Project Wide Gravel Wheels v2. The next step was to get the spokes gathered together. 

I did a bit of a big overview concerning how to arrive at the proper data to get spoke lengths in my last update. So, I will be assuming that you either understand that, or have gotten this far. Now to choose spokes....

I had an excellent question regarding this in the comments section and it will serve to provide a general discussion here of spoke brands, types, and the nipples to go with them. Most people kind of overthink this part, in my opinion. Basically, all the minutiae that some folks sweat over when choosing wheel components is completely forgotten about and not discernible in terms of ride feel after a few weeks of riding. So- why sweat the choices when there are proven winning combinations? My take on component choices follows this philosophy. 

So, I'll list a few 'this-or-that' topics and comment appropriately....

  • Butted/Bladed or Straight Gauge: I don't sweat the weight thing here as the difference in butted versus straight gauge is not all that much. You are much better off being concerned about rim and hub weights as you can realize a lot more gains from those parts than you will from 28-32 spokes. That said.... Use what makes sense for the build. Straight gauge spokes tend to be tougher, they handle more abuse in a better way- so use those in situations where you want that quality. Butted spokes can be more flexible, and they often are the 'strongest' spokes in terms of tensile strength. So, use those where those qualities make more sense. But don't go solely on weight.  
  • Alloy vs Brass Spoke Nipples: You can almost never go wrong using brass nipples. Alloy nipples can be used successfully, and- of course- come in various anodized colors while brass nipples do not. Alloy is lighter, brass is tougher. Brass resists corrosion better than alloy does. Alloy requires that the builder make sure that the spoke lengths are exactly the right length to avoid nipple failures. Brass is more forgiving in that way. Again- use what makes sense for the job. If you go alloy- make sure you, or your wheel builder, knows the correct methods to attain the best outcome. 
  • Brand: Stick with the following- DT Swiss, Sapim, or Wheelsmith. That's my opinion. Anything else is taking a risk, again- my opinion - that is not necessary. Period. 

Okay, one more interesting tidbit- The Spank rims require 'spoke washers', which are what they sound like- Little washers that go under the nipple head and against the inner rim well. These do-dads spread force across a wider area of the rim instead of localizing it at the spoke hole edges. Not all rim manufacturers require these, but some do. (Some builds should have them as well.) Also, Spank strongly recommends using butted spokes to get the best out of their claimed 'vertically compliant rims'. So, I am not going 100% butted, but there will be some butted spokes in this build. Spank also requires the builder use 3 cross pattern in the lacing. That's fine as that is what I would do anyway. So, these wheels will be a bit odd compared to a standard set of wheels. 

I have quite a stash of spokes from the years of wheel building. So, I often go through those to see what I have that I can 'use up' in my next wheel build. They are all Wheelsmith spokes, for the most part, with a few DT Swiss spokes thrown in for good measure. I had to source about half the spokes since I did not have the correct 295mm length. Fortunately we have a Wheel Fanatyk/Wheelsmith/Morizumi spoke cutter at Andy's Bike Shop. Actually, we just got it a couple of months ago. There are 'blank spokes'- spokes which are overly long and not threaded- which can be cut to a precise length and have threads rolled into them by the spoke machine. It is a fun, easy to do process and I cut 28 spokes in minutes for the job before I started work Tuesday. 

The next thing I have to do is to source nipples, and after that- it's wheel building time!

Project Wide Gravel Wheels v2: Getting Acquainted With The Machine

Practicing on my own spokes....
 In my effort to get these wheels built I have decided to take all of you readers along for the ride. So, today's post will be about the next step in my Project Wide Gravel Wheels v2. The next step was to get the spokes gathered together. 

I did a bit of a big overview concerning how to arrive at the proper data to get spoke lengths in my last update. So, I will be assuming that you either understand that, or have gotten this far. Now to choose spokes....

I had an excellent question regarding this in the comments section and it will serve to provide a general discussion here of spoke brands, types, and the nipples to go with them. Most people kind of overthink this part, in my opinion. Basically, all the minutiae that some folks sweat over when choosing wheel components is completely forgotten about and not discernible in terms of ride feel after a few weeks of riding. So- why sweat the choices when there are proven winning combinations? My take on component choices follows this philosophy. 

So, I'll list a few 'this-or-that' topics and comment appropriately....

  • Butted/Bladed or Straight Gauge: I don't sweat the weight thing here as the difference in butted versus straight gauge is not all that much. You are much better off being concerned about rim and hub weights as you can realize a lot more gains from those parts than you will from 28-32 spokes. That said.... Use what makes sense for the build. Straight gauge spokes tend to be tougher, they handle more abuse in a better way- so use those in situations where you want that quality. Butted spokes can be more flexible, and they often are the 'strongest' spokes in terms of tensile strength. So, use those where those qualities make more sense. But don't go solely on weight.  
  • Alloy vs Brass Spoke Nipples: You can almost never go wrong using brass nipples. Alloy nipples can be used successfully, and- of course- come in various anodized colors while brass nipples do not. Alloy is lighter, brass is tougher. Brass resists corrosion better than alloy does. Alloy requires that the builder make sure that the spoke lengths are exactly the right length to avoid nipple failures. Brass is more forgiving in that way. Again- use what makes sense for the job. If you go alloy- make sure you, or your wheel builder, knows the correct methods to attain the best outcome. 
  • Brand: Stick with the following- DT Swiss, Sapim, or Wheelsmith. That's my opinion. Anything else is taking a risk, again- my opinion - that is not necessary. Period. 

Okay, one more interesting tidbit- The Spank rims require 'spoke washers', which are what they sound like- Little washers that go under the nipple head and against the inner rim well. These do-dads spread force across a wider area of the rim instead of localizing it at the spoke hole edges. Not all rim manufacturers require these, but some do. (Some builds should have them as well.) Also, Spank strongly recommends using butted spokes to get the best out of their claimed 'vertically compliant rims'. So, I am not going 100% butted, but there will be some butted spokes in this build. Spank also requires the builder use 3 cross pattern in the lacing. That's fine as that is what I would do anyway. So, these wheels will be a bit odd compared to a standard set of wheels. 

I have quite a stash of spokes from the years of wheel building. So, I often go through those to see what I have that I can 'use up' in my next wheel build. They are all Wheelsmith spokes, for the most part, with a few DT Swiss spokes thrown in for good measure. I had to source about half the spokes since I did not have the correct 295mm length. Fortunately we have a Wheel Fanatyk/Wheelsmith/Morizumi spoke cutter at Andy's Bike Shop. Actually, we just got it a couple of months ago. There are 'blank spokes'- spokes which are overly long and not threaded- which can be cut to a precise length and have threads rolled into them by the spoke machine. It is a fun, easy to do process and I cut 28 spokes in minutes for the job before I started work Tuesday. 

The next thing I have to do is to source nipples, and after that- it's wheel building time!

Saturday, March 05, 2016

Wheels For The Standard Rando

White Industries XMR hubs, Wheelsmith spokes/nipples, and WTB KOM rims.
That took waaaaay too long, but they are finally coming together. What should have been going on in January has finally happened. The parts are paid for and the building of the wheels for the Twin Six Standard Rando is done.

Interestingly enough, I got to do a similar build with slightly different Wheelsmith spokes at work. Same rims and hubs, just all butted spokes instead of what I ended up using. So, I had a bit of practice, which went swimmingly by the way, with these components before I built up my set.

My set uses spokes I had already. After having built up several wheel sets for myself and a few others over the course of a decade, I had quite a few spokes sitting in my spoke drawer in my tool box. I was fortunate enough to be able to use up 64 of them in this build, but the arrangement may be a tiny bit unorthodox. You see, my disc side front and drive side rear spokes are straight gauge black Wheelsmith and the non-driveside rear and driveside front spokes are double butted silver Wheelsmith spokes. All have silver alloy nipples. Weird, I know, but not unheard of.

Straight gauge spokes are considered to be stiffer and stronger, so putting them on the sides that undergo the most stress is often done on wheels. Butted spokes are more flexible and maybe not as strong as straight gauge, but save weight, so using those where I did is something I've seen before. The lengths I needed and color of spoke just worked out the way that it did.

They really don't look as odd as they might seem to by the description. 
I know I could have been rolling on those Stan's wheels a long time ago, and I know these wheels cost a whole heck of a lot more money, but they are what I think are premium hubs and modern, up to the minute rim technology. Plus, these are wider rims internally, and I wanted to experiment with that idea with tires for gravel bikes, which I am reporting on in some future posts for RidingGravel.com.
White Industries designed a super slick end cap to convert these hubs to a 15mm thru axle.

The XMR hubs are super cool in that the front can be easily switched to 15mm through axle simply by pulling the quick release end cap off. Since White Industries designed that end cap to sit flush into the 15mm ID axle, you do not need a separate end cap for 15mm conversion. It is all ready to go once you pop off the quick release cap. Neat! They even put holes into the end cap so you can pluck off the cap with a pick. Super neat! It made converting the set I built up at work a snap. So, now if I ever wanted to switch over to a 15mm through axle fork, I could do so easily. The rear hub is also convertible with swappable end caps, but due to how that overlock dimension (OD) works on the rear, you do need to switch out caps there. (135mmOD vs 142mmOD)

So, now all I have to do is to mount my Avid rotors, SRAM 11 speed cassette, and put the rim strip, valves, and tubeless tires on, and the T-6 Standard Rando should be ready to ride by Monday. I suppose you could say that is "just in time" since the riding season is just cranking up, but that was cutting it close.

I'll have more on the bike, hubs, and how the rims are working out in future posts.

Wheels For The Standard Rando

White Industries XMR hubs, Wheelsmith spokes/nipples, and WTB KOM rims.
That took waaaaay too long, but they are finally coming together. What should have been going on in January has finally happened. The parts are paid for and the building of the wheels for the Twin Six Standard Rando is done.

Interestingly enough, I got to do a similar build with slightly different Wheelsmith spokes at work. Same rims and hubs, just all butted spokes instead of what I ended up using. So, I had a bit of practice, which went swimmingly by the way, with these components before I built up my set.

My set uses spokes I had already. After having built up several wheel sets for myself and a few others over the course of a decade, I had quite a few spokes sitting in my spoke drawer in my tool box. I was fortunate enough to be able to use up 64 of them in this build, but the arrangement may be a tiny bit unorthodox. You see, my disc side front and drive side rear spokes are straight gauge black Wheelsmith and the non-driveside rear and driveside front spokes are double butted silver Wheelsmith spokes. All have silver alloy nipples. Weird, I know, but not unheard of.

Straight gauge spokes are considered to be stiffer and stronger, so putting them on the sides that undergo the most stress is often done on wheels. Butted spokes are more flexible and maybe not as strong as straight gauge, but save weight, so using those where I did is something I've seen before. The lengths I needed and color of spoke just worked out the way that it did.

They really don't look as odd as they might seem to by the description. 
I know I could have been rolling on those Stan's wheels a long time ago, and I know these wheels cost a whole heck of a lot more money, but they are what I think are premium hubs and modern, up to the minute rim technology. Plus, these are wider rims internally, and I wanted to experiment with that idea with tires for gravel bikes, which I am reporting on in some future posts for RidingGravel.com.
White Industries designed a super slick end cap to convert these hubs to a 15mm thru axle.

The XMR hubs are super cool in that the front can be easily switched to 15mm through axle simply by pulling the quick release end cap off. Since White Industries designed that end cap to sit flush into the 15mm ID axle, you do not need a separate end cap for 15mm conversion. It is all ready to go once you pop off the quick release cap. Neat! They even put holes into the end cap so you can pluck off the cap with a pick. Super neat! It made converting the set I built up at work a snap. So, now if I ever wanted to switch over to a 15mm through axle fork, I could do so easily. The rear hub is also convertible with swappable end caps, but due to how that overlock dimension (OD) works on the rear, you do need to switch out caps there. (135mmOD vs 142mmOD)

So, now all I have to do is to mount my Avid rotors, SRAM 11 speed cassette, and put the rim strip, valves, and tubeless tires on, and the T-6 Standard Rando should be ready to ride by Monday. I suppose you could say that is "just in time" since the riding season is just cranking up, but that was cutting it close.

I'll have more on the bike, hubs, and how the rims are working out in future posts.