
 |
| 2020 Cutthroat frame/fork |
Earlier this week Salsa Cycles issued recall notices for certain Cutthroat, Cutthroat frame sets, and after market carbon forks. See the specifics here: https://salsacycles.com/cutthroat-carbon-v2-fork-recall
The statement released by Salsa Cycles reads as follows:
"In some instances, the fork can crack or break which could lead to a crash. Stop riding your bicycle immediately and take it to a Salsa Authorized Retailer for inspection or replacement if necessary."
The models are listed on the site at the link provided above. Be aware that you cannot identify fork batch serial numbers without removing the fork, so an outward inspection is not enough. Please follow recommendations and check out your Cutthroat at a Salsa Cycles dealer if you think it may be affected by this recall.
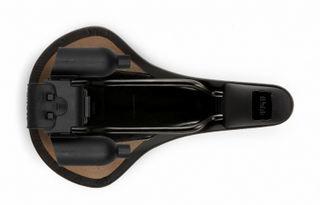 |
| The fizik Alpaca Tool Carrier as mounted to a Terra XC saddle. Image courtesy of fizik. |
Remember in last week's "FN&V" post where I shared with you all about that 'gravel specific Terra saddle from fizik? Well, they just announced a tool storage solution to go along with those saddles also. It is called the Alpaca Tool Carrier.
It is not completely obvious how the Alpaca Tool Carrier integrates with the Terra saddles, but fizik says in its press release that" For a secure, integrated connection, the Tool Carrier easily affixes to your Alpaca saddle with a single screw." At any rate, you get a 12 function multi-tool and a place for two CO2 cartridges. The multi-tool body does double duty as an air inflation head. You also get "removable housing for two C02 cartridges, reusable zip ties and extra space for other small essentials. "
This isn't the first integrated tool carrying solution which works with a cycling saddle. THAT distinction would go to the Brooks B-17, most likely. Those two metal tabs on the back edge of Brooks B-17's are supposed to be mounting points for a leather tool bag, which Brooks also makes, (or did until recently).
The fizik solution may appeal to those who buy into this saddle. It's kind of a neat, streamlined way to do things if you are all about CO2 carts. I know many of you are not really fans for various reasons. I also am not, but many folks dig the idea and this may be something that appeals to your needs.
 |
| Arc8's new 'Eero' model gravel bike. Image courtesy of Arc8 |
You may have noticed the mainstream cycling press sounding off on a new 'gravel' bike from a Swiss company called Arc8. The model the sites were carrying on about is the Eero, which is the first name of a famous rally car driver from the past with a penchant for gravel road performances, apparently.
At any rate, while the marketing claims and hyperbole surrounding this release is somewhat laughable, I wanted to see what, if anything, this bike has that 'gravel' bikes had back in 2014 when the Tamland came around. So with that in mind, let's scrutinize the differences, shall we?
The Eero has what has been termed a 'more racy gravel geometry' which is not all slacked out. Hmm.... Okay, I found that these bikes sport a 71° head angle with a 50mm fork offset. The Tamland sported a 71.5° head angle with the same 50mm offset. The Eero has a 75mm bottom bracket drop with 420mm chain stays and clearances for 'up to a 50mm tire'. The Tamland had a 72.5mm bottom bracket drop with 435mm chain stays and clearances for up to a 50mm tire.
The Eero has a frame which is carbon fiber, with claimed stiffness in the bottom bracket and a stiffer head tube than previous models offered by Arc8. The Tamland had a Reynolds 631 frame and fork with a beautiful 'steel' ride, and not at all like a carbon bike.
The Eero also has the now prized 'clean' look since ALL it's cables are internally routed starting at the stem. The Raleigh had traditional, external routed cables with full run housing for both front and rear brakes. Both bikes have two water bottle bosses inside the front triangle. The Eero also has a 'bento box' mount on the top tube and an additional cage mount underneath the down tube, as did later Tamlands.
Comments: The geometry hasn't changed all that much with the exception of 'road racer' inspired short chain stays, which some say make the bike feel 'snappier'. I don't know about that, but I do know shoving the rear wheel underneath your butt more, (especially on larger sized riders) is a recipe for a bouncier ride off pavement. It also sketches out loose gravel descents. Noted also that the stiffness of the Eero was touted. Again- not exactly what we gravel riding folks are looking to have there.
There are no provisions for bottle mounts on the forks of either this or the Tamland. However; you probably wouldn't want to ride a really stiff bike long enough to drink five water bottles worth of fluids either. Or maybe you would. Good luck with that.
Anyway, this whole 'gravel' thing should really be seen as an 'anti-racing', all-road, adventure, utility bike, better than racing bikes bike. Not a super-stiff race rocket, which is pretty much what the Eero sounds like to me. Maybe I'm all wrong, but if this is what becomes of gravel bikes, well some of it is right on, but rider comfort and control are, once again, being sacrificed. Not to mention ease of maintenance with the stupid internally routed stem cables. Gah! At least the Eero has a threaded bottom bracket.
WTB Announces New Carbon Rims With The CZR:
The WTB CZR rim in 23mm internal width. Image courtesy of WTB.
Thursday WTB released news that they had a new offering for carbon rims dubbed CZR. Coming in two internal width sizes of 23mm and 30mm, WTB is aiming at the gravel and MTB riders here. This rim is lightweight, obviously, but according to WTB's press release, the CZR rims have also been tested and found to be very tough and stiff laterally. Both very desirable traits in a rim for off-pavement usage.
The CZR also features WTB's 4D spoke hole 'geometry', which as a wheel builder myself, having used this feature, I can tell you that it does reduce unwanted tensions on the spoke where it exits the rim. This theoretically leads to a longer spoke life. I built an aluminum rimmed wheel set using WTB's 4D spoke drilling back 8 years ago and those wheels are still going with zero spoke issues. That's one data point, but it also is something to consider.
Now for the bad part: $569.95 for EACH rim. Ouch! But......here's how I would look at this: You build up a set here with a decent hub set, let's say you spend around $600-$700 on that, then spokes, nipples, rim tape, and these rims. For under 2G you'd have a premium set of wheels, hand built, and I would expect them to last years and years. I mean, for gravel road riding? I'd think well over ten years would be nothing. You'd replace hub bearings maybe a time or three, but that's it. So, it would make sense for someone to build up a set IF they were thinking they would be cycling seriously and a lot for many years with a bike style that would fit this wheel's MO.
Now on the MTB side, eh......less of a long term prospect here. Why? Well, wheel standards have changed what? Three times in the last ten years? Changed so much that hubs are completely different lengths and with completely different interfaces. So, given that history, I would be remiss if I didn't think that trend would continue. In my opinion, the gravel bike thing is less likely to change, but even so- one could re-lace these to a new hub set. So, you would have to maybe think along those lines to justify the price.
At any rate, an interesting new carbon rim here and something that can be used to lace up to any high end hub. There is a crash replacement warranty and a limited lifetime warranty on these as well. Check it out at WTB's site.
That's a wrap for this week. Hope you all are getting outside!


