Wednesday, February 22, 2023

Tool Inspection Time

Don't neglect the inspection of your tools!
 It struck me the other day as I reached for a 4mm hex key that maybe as cyclists there are some of you that don't pay a lot of attention to your tools. This can get you in big trouble down the road, especially if you have been using the same tools for many years. You know, that trusty multi-tool? Maybe it is a set of hex keys you often use at the home shop. Whatever the case may be, tools need looking after, and a well-worn tool, while a beautiful thing, is a time bomb waiting to blow up some project or repair. 

And you all know that never happens at a convenient time! 

So, I thought since I have seen tools wear out and since I have seen what to look for in terms of wear and what that can do if you do not address that, I would drop a few tips in the blog today. This might be handy now as well since "gravel" season - well, really cycling season overall - is about to kick off for the year in the Northern Hemisphere. 

I'll drop hints according to tool type and try to include a few images to help illustrate my points. 

Hex (Allen) Keys: These tools are perhaps the most used of all the tools a cyclist might have besides an air pump. (Note: These tips can mostly be used for the inspection of Torx keys also) The typical high-use keys are the 4mm, 5mm, and 6mm keys with a nod to the bastard child 2.5mm key. (Thanks SRAM!) Hex keys, (also known as Allen wrenches), can become very worn after several years of use. Using a worn hex key is a recipe for a rounded out fastener. You can inspect the ends of your hex keys and maybe see wear in the form of deformation of the hexagonal shape. You may see rounded off corners as well. Anything but sharp, crisp corners should alert you to a potential problem. 

Note the deformation of the 4mm end on the left  here.

Ball end, or Bondhus type hex key ends are even worse for this issue. Pay particular attention to these as they can lose there shape rather easily without your noticing. Tip: NEVER use a ball-end hex key to do any heavy torque work either loosening or tightening. That's not going to go well in the long run. 

Sometimes you can cut off the damaged end and save the tool, but be aware that high-speed cut-off discs or grinders can take the temper out of the metal due to heat and make the tool worse than it was when you started. I recommend a hand-held hack saw if you want to attempt this. Make sure you lightly debur the edges with a file if you should decide to try to extend the life of a hex key. 

A Quick Note On Hack Saws: As long as I'm writing about hack saws- Keep in mind a hack saw only cuts in one direction only (away from you) and that you should always use the entire blade! Most people apply way too much downward pressure (wrong- let the blade do the work), and saw back and forth in the middle of the blade, quickly wearing out that short section of the blade while either end goes unused. As an old jeweler once told me- "You pay for the whole blade. Use all of it then!"
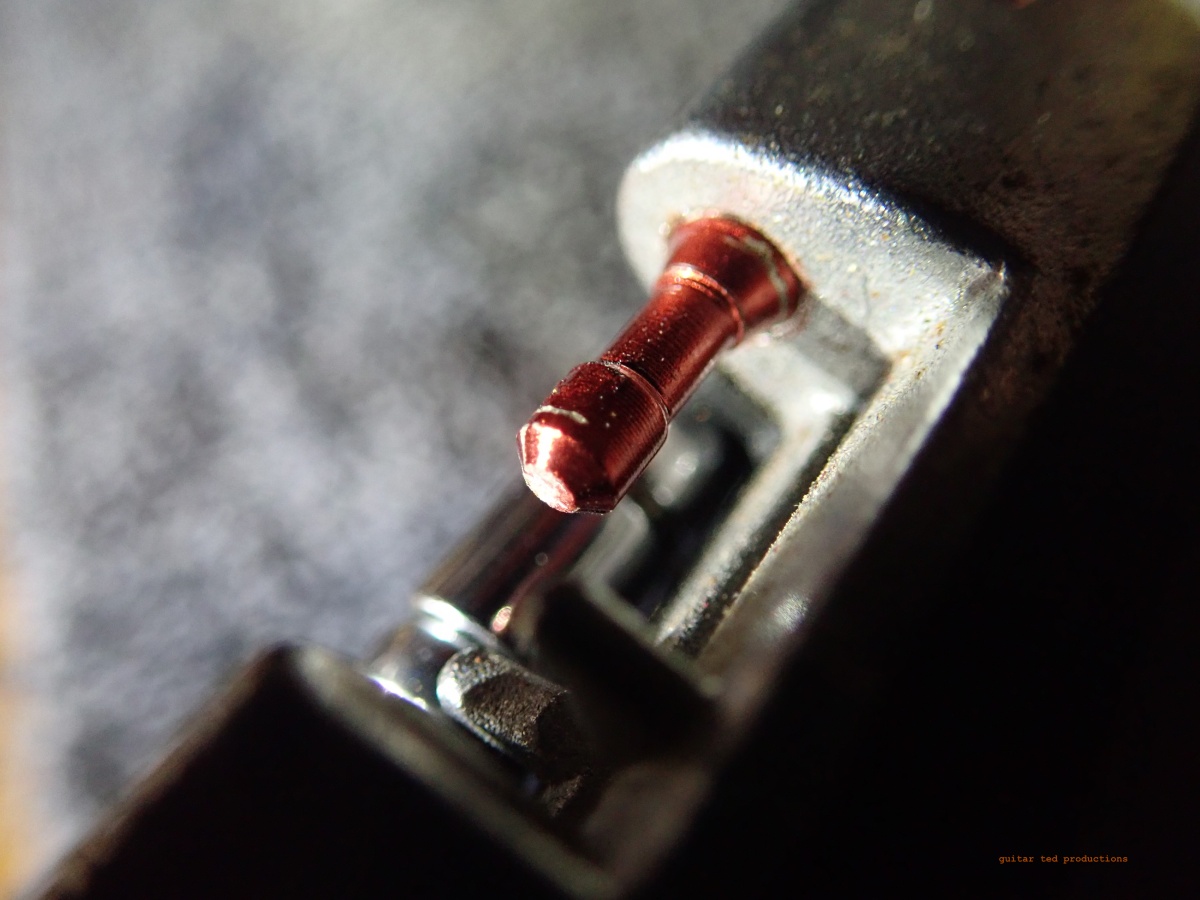
A good chain breaker pin should look like this.
Chain Breaker: These are great tools in the case where you break a chain, but if you have used your chain breaker several times, you may want to look at the pin that pushes out the rivets which hold the side plates together. That pin goes under a lot of stress and pressure with each usage. That can cause the pin to deform, or more likely than that, bend. A bent or deformed pin usually can be replaced, (on good quality tools) so make sure that you replace your chain pin now before you find out that it is bent or mushroomed out when you are trying to use it on some rural road. 

Torque Tools: These handy gizmos are very popular these days for torquing down hex bolts on stem face plates, stem attachments to steer tubes, and other torque sensitive fasteners. However, their bits can also fall prey to the same issues that all hex keys do after a lot of usage. If those bits are replaceable, and they are deformed or very worn, you should replace them. If they are not? New tool time. 

Torque keys can wear out and fall out of spec. Beware!

Also, those torque settings should always be periodically checked against a known, certified torque wrench from time to time. Any torque key that is out of spec should be replaced and not used again. Remember: Tools are not going to last forever! Especially if you use them a lot. Don't want to have to spend the money? Then don't use the tool. But your alternative is what? Seeing a professional mechanic should be the answer there. Let that person foot the bills for tools and the knowledge to use them. But pay that person accordingly with a cheerful heart. 

Otherwise the maintenance and liability for not doing that maintenance is on you. 

Cleaning: This is also the time of the year to inventory and clean up any rucksacks, hydration packs, top tube bags, or any frame bag and see what is in there. It isn't uncommon for riders to find multi-tools, old tubes, food wrappers, or even money that they had forgotten about in the depths of some bag. More importantly, cleaning up the bag and tools that may be in it make life a lot smoother for the upcoming season of riding. Plus, you'll have a handle on what you might need to add or subtract from those bags! 

Those are just a few tips I can think of for the tools you most likely use for your bicycles. Got any other ideas? Let me know. If there are more than a few different suggestions, I'll make a "part 2" for this post.

Tool Inspection Time

Don't neglect the inspection of your tools!
 It struck me the other day as I reached for a 4mm hex key that maybe as cyclists there are some of you that don't pay a lot of attention to your tools. This can get you in big trouble down the road, especially if you have been using the same tools for many years. You know, that trusty multi-tool? Maybe it is a set of hex keys you often use at the home shop. Whatever the case may be, tools need looking after, and a well-worn tool, while a beautiful thing, is a time bomb waiting to blow up some project or repair. 

And you all know that never happens at a convenient time! 

So, I thought since I have seen tools wear out and since I have seen what to look for in terms of wear and what that can do if you do not address that, I would drop a few tips in the blog today. This might be handy now as well since "gravel" season - well, really cycling season overall - is about to kick off for the year in the Northern Hemisphere. 

I'll drop hints according to tool type and try to include a few images to help illustrate my points. 

Hex (Allen) Keys: These tools are perhaps the most used of all the tools a cyclist might have besides an air pump. (Note: These tips can mostly be used for the inspection of Torx keys also) The typical high-use keys are the 4mm, 5mm, and 6mm keys with a nod to the bastard child 2.5mm key. (Thanks SRAM!) Hex keys, (also known as Allen wrenches), can become very worn after several years of use. Using a worn hex key is a recipe for a rounded out fastener. You can inspect the ends of your hex keys and maybe see wear in the form of deformation of the hexagonal shape. You may see rounded off corners as well. Anything but sharp, crisp corners should alert you to a potential problem. 

Note the deformation of the 4mm end on the left  here.

Ball end, or Bondhus type hex key ends are even worse for this issue. Pay particular attention to these as they can lose there shape rather easily without your noticing. Tip: NEVER use a ball-end hex key to do any heavy torque work either loosening or tightening. That's not going to go well in the long run. 

Sometimes you can cut off the damaged end and save the tool, but be aware that high-speed cut-off discs or grinders can take the temper out of the metal due to heat and make the tool worse than it was when you started. I recommend a hand-held hack saw if you want to attempt this. Make sure you lightly debur the edges with a file if you should decide to try to extend the life of a hex key. 

A Quick Note On Hack Saws: As long as I'm writing about hack saws- Keep in mind a hack saw only cuts in one direction only (away from you) and that you should always use the entire blade! Most people apply way too much downward pressure (wrong- let the blade do the work), and saw back and forth in the middle of the blade, quickly wearing out that short section of the blade while either end goes unused. As an old jeweler once told me- "You pay for the whole blade. Use all of it then!"

A good chain breaker pin should look like this.
Chain Breaker: These are great tools in the case where you break a chain, but if you have used your chain breaker several times, you may want to look at the pin that pushes out the rivets which hold the side plates together. That pin goes under a lot of stress and pressure with each usage. That can cause the pin to deform, or more likely than that, bend. A bent or deformed pin usually can be replaced, (on good quality tools) so make sure that you replace your chain pin now before you find out that it is bent or mushroomed out when you are trying to use it on some rural road. 

Torque Tools: These handy gizmos are very popular these days for torquing down hex bolts on stem face plates, stem attachments to steer tubes, and other torque sensitive fasteners. However, their bits can also fall prey to the same issues that all hex keys do after a lot of usage. If those bits are replaceable, and they are deformed or very worn, you should replace them. If they are not? New tool time. 

Torque keys can wear out and fall out of spec. Beware!

Also, those torque settings should always be periodically checked against a known, certified torque wrench from time to time. Any torque key that is out of spec should be replaced and not used again. Remember: Tools are not going to last forever! Especially if you use them a lot. Don't want to have to spend the money? Then don't use the tool. But your alternative is what? Seeing a professional mechanic should be the answer there. Let that person foot the bills for tools and the knowledge to use them. But pay that person accordingly with a cheerful heart. 

Otherwise the maintenance and liability for not doing that maintenance is on you. 

Cleaning: This is also the time of the year to inventory and clean up any rucksacks, hydration packs, top tube bags, or any frame bag and see what is in there. It isn't uncommon for riders to find multi-tools, old tubes, food wrappers, or even money that they had forgotten about in the depths of some bag. More importantly, cleaning up the bag and tools that may be in it make life a lot smoother for the upcoming season of riding. Plus, you'll have a handle on what you might need to add or subtract from those bags! 

Those are just a few tips I can think of for the tools you most likely use for your bicycles. Got any other ideas? Let me know. If there are more than a few different suggestions, I'll make a "part 2" for this post.

Tuesday, February 21, 2023

Brown Season: Urban Ramble

Spring is on the doorstep.
 Monday was the last "good" day of the week in terms of weather. So, I decided to head out for a ride. I had intended to ride the Twin Six Standard Rando v2 to test out those new Easton drop bars. However; a stem change caused an issue, (I'll post about all that later at some point), so I ditched that idea and went in on the Noble GX5 instead. 

It was Sunny but cold when I started out. It was below freezing, which turned out to be to my advantage. The wind was out from the Southwest, but since I stayed within the confines of the city, I was out of most of that wind's powers. 

The one thing that turned out to be a bit unfortunate but no big deal, was that I forgot my "stinger" rear fender. Actually, it is an SKS clip-on rear deflector. I like it a lot too. Well, as it turned out, I wasn't in danger of getting gooped after all, but things could have gone sideways in a hurry had a few things been slightly different. 

The Level B nature of my unpaved adventure was fortunately still frozen- but juuust barely!

So, my route was along some of my old Andy's Bike Shop commute and the aim was to get to old Shirey Way where there is that bit of dirt road I like to hit when I cannot get out into the country. I'll tell ya one thing- The only constant is change. My OG commute to Andy's? No longer possible. There is a new development going in where there used to be a big grassy field I crossed. 

Once I dropped into the back end of Hartman Reserve, I had to slow down a bit here and there to negotiate some snowy and icy places on the old road. But eventually I reached Shirey Way and found it to be passable only because it was still ever so slightly frozen. 

Bits of ice flowing down steam on the Cedar River

I went halfway in and decided to turn back around because with the increase in temperatures, you could literally see the ground softening by the minute. It would not be long before what I was riding on would be a quagmire and impassable with the bike I was on.

At the point where I turned around I dismounted to take an image and I noted some clumps of mud on the Noble Bikes top tube. "Hmm....", I wondered, "How'd that get there? I didn't see anything coming off my front wheel." I was assuming I had taken the SKS clip-on fender, but then I noticed that I had not. Whoops! Another good reason for getting out of there, and quickly!

Back at home and none the worse for wear.

Fortunately the way that Shirey Road had already been rutted and post-holed up by walkers and riders made it so that I had to take matters slowly and deliberately to avoid going off the bike. That kept the speeds down and that kept me cleaner and the bike actually came out of it okay as well.

Anyway, it was a nice foundational ride to base more on. I hope that these building blocks carry me onward and upward to bigger and better things on into 2023.

Brown Season: Urban Ramble

Spring is on the doorstep.
 Monday was the last "good" day of the week in terms of weather. So, I decided to head out for a ride. I had intended to ride the Twin Six Standard Rando v2 to test out those new Easton drop bars. However; a stem change caused an issue, (I'll post about all that later at some point), so I ditched that idea and went in on the Noble GX5 instead. 

It was Sunny but cold when I started out. It was below freezing, which turned out to be to my advantage. The wind was out from the Southwest, but since I stayed within the confines of the city, I was out of most of that wind's powers. 

The one thing that turned out to be a bit unfortunate but no big deal, was that I forgot my "stinger" rear fender. Actually, it is an SKS clip-on rear deflector. I like it a lot too. Well, as it turned out, I wasn't in danger of getting gooped after all, but things could have gone sideways in a hurry had a few things been slightly different. 

The Level B nature of my unpaved adventure was fortunately still frozen- but juuust barely!

So, my route was along some of my old Andy's Bike Shop commute and the aim was to get to old Shirey Way where there is that bit of dirt road I like to hit when I cannot get out into the country. I'll tell ya one thing- The only constant is change. My OG commute to Andy's? No longer possible. There is a new development going in where there used to be a big grassy field I crossed. 

Once I dropped into the back end of Hartman Reserve, I had to slow down a bit here and there to negotiate some snowy and icy places on the old road. But eventually I reached Shirey Way and found it to be passable only because it was still ever so slightly frozen. 

Bits of ice flowing down steam on the Cedar River

I went halfway in and decided to turn back around because with the increase in temperatures, you could literally see the ground softening by the minute. It would not be long before what I was riding on would be a quagmire and impassable with the bike I was on.

At the point where I turned around I dismounted to take an image and I noted some clumps of mud on the Noble Bikes top tube. "Hmm....", I wondered, "How'd that get there? I didn't see anything coming off my front wheel." I was assuming I had taken the SKS clip-on fender, but then I noticed that I had not. Whoops! Another good reason for getting out of there, and quickly!

Back at home and none the worse for wear.

Fortunately the way that Shirey Road had already been rutted and post-holed up by walkers and riders made it so that I had to take matters slowly and deliberately to avoid going off the bike. That kept the speeds down and that kept me cleaner and the bike actually came out of it okay as well.

Anyway, it was a nice foundational ride to base more on. I hope that these building blocks carry me onward and upward to bigger and better things on into 2023.

Monday, February 20, 2023

Review: Bookman Lights

The Bookman Curve model.
 I mentioned that I had received a set of Bookman lights to review recently  and so here is my thoughts on these new-to-me lights. Keep in mind the Standard Disclaimer applies here. 

Up front, when I heard about these lights, I wasn't all that interested. In fact, I ignored the first request I received on these because these were lights for "urban areas" and I try to stay in my lane, so to speak. But the offer was made again, and in an almost insistent way, so I acquiesced to the request to have me review these lights. 

Of course, just getting the Monocle in was worth the trouble as it is such a useful light for anyone that commutes, of course, or is a runner, or even for bikepacking, setting up camp, or reading cues at night while riding. And I already gave a pretty detailed look at that light. So, what about the other two?

The "Curve" model is available as a front or rear light with four modes for the front light, three for the rear light. The lights have a cam lock/rubber strap attachment system which will work with most handlebar sizes. The clasp doubles as a switch activation to toggle you through the modes and turn the light on or off with a long press. 

Both lights charge via an included USB cable.

The unique shape of the 220 Lumen (on highest setting) Curve allows for the light to be seen better from more angles. The light housing is all plastic, but it seems well built and I could not see any ill-fitting parts or misalignment issues in either example of the Curve light I had. 

Charging duties are accomplished via the ubiquitous USB cable method and charging time from dead flat to full charge is a claimed two hours. Run time on high for the front light is one hour, or it can go to 70 hours in flashing mode. The rear light is rated at 37 Lumen and on steady lasts for two and a half hours or up to 32 hours in flashing mode. 

The lights both were easy to attach to my handle bar and seat post. It seems a bit unfortunate that the front light can only be attached in a vertical orientation, since a side spill of light would seem to be advantageous for commuting. In the vertical position, you are losing a lot of that light as it is aimed up into the air. Fortunately, it seems to "throw" the light frontwards, for the most part, but not being able to orient the light horizontally seems like a miss to me. 

The rear light attachment also does not account for seat post angling which points the rear light slightly downward. However; this may or may not be an issue depending upon the bike used. Another nit I had was that clasping the cam lock over can easily turn the light on, which resulted in one occurrence of myself receiving the full 220 lumen blast to the face. Random? Not really, I had the light come on in both rear and front applications while attaching them several times. 

The Bookman Curve on the front to the Left of my Schmidt Edulux II light.

The Curve on steady at 220 Lumen is bright enough to see by all by itself, but it could not compete with my Schmidt Edulux II with its wider, longer throw of light. Would the Curve get you by in a pinch as a light for maybe an hour? Let's say that your main light runs out just short of your destination, or before Sunrise. I'd say that this would be an okay "bail-out" light, and it would pack small and it is lightweight. 

But in my estimation, where this light really works best is in its flashing mode which I would run alongside a steady torch at night. That flashing light doesn't seem to compete with my main light, and it isn't distracting to ride with it. 

The Curve on the seat post here. The Schmidt tail light is on the rack.

Out on the back end, I felt that the Curve light worked really well. In one of the flashing modes, it almost reminds me of a police/emergency vehicle flashing light. The rear Curve throws light well, has side visibility due to its shape, and despite it being tucked under my Topeak rear seat bag, it shined forth with more authority than the rack mounted Schmidt light. 

Conclusions: I've already spoken to the Monocle, it's a winner in case you didn't check the link, and I won't go back over that one. How about the Curve lights? They retail at $45.00 a piece and come in several colors for the cases. Fashionable. I suppose that is somewhat important. The overall design is pretty clever and has that certain "European" feel and look to it. On these merits the Bookman lights are very much winners.

But in terms of how they work? I like them, but that clasp/power switch combination is somewhat annoying and I wish I could orient the front light horizontally. The rear light would be better if there were an accommodation for seat post angle, and try attaching this light to anything with a light-loop. Like on my Topeak bag, for instance, this light won't work. 

The lights by themselves are great for their intended purposes. I have no beef at all and I especially really like the rear light. The front would be my "bail-out" for long night rides and will be my flasher for commutes. So, in terms of the lights themselves, they are great, it's just the lack of attention to attachment scenarios that brings this light back to being "just okay". 

Get these if you swoon at the sight of them because the design just gets you. Otherwise there are a lot of very good, very well priced alternatives that have a bit better attention to details than the Bookman lights do.

NOTE: As A reminder: Standard Disclaimer

Review: Bookman Lights

The Bookman Curve model.
 I mentioned that I had received a set of Bookman lights to review recently  and so here is my thoughts on these new-to-me lights. Keep in mind the Standard Disclaimer applies here. 

Up front, when I heard about these lights, I wasn't all that interested. In fact, I ignored the first request I received on these because these were lights for "urban areas" and I try to stay in my lane, so to speak. But the offer was made again, and in an almost insistent way, so I acquiesced to the request to have me review these lights. 

Of course, just getting the Monocle in was worth the trouble as it is such a useful light for anyone that commutes, of course, or is a runner, or even for bikepacking, setting up camp, or reading cues at night while riding. And I already gave a pretty detailed look at that light. So, what about the other two?

The "Curve" model is available as a front or rear light with four modes for the front light, three for the rear light. The lights have a cam lock/rubber strap attachment system which will work with most handlebar sizes. The clasp doubles as a switch activation to toggle you through the modes and turn the light on or off with a long press. 

Both lights charge via an included USB cable.

The unique shape of the 220 Lumen (on highest setting) Curve allows for the light to be seen better from more angles. The light housing is all plastic, but it seems well built and I could not see any ill-fitting parts or misalignment issues in either example of the Curve light I had. 

Charging duties are accomplished via the ubiquitous USB cable method and charging time from dead flat to full charge is a claimed two hours. Run time on high for the front light is one hour, or it can go to 70 hours in flashing mode. The rear light is rated at 37 Lumen and on steady lasts for two and a half hours or up to 32 hours in flashing mode. 

The lights both were easy to attach to my handle bar and seat post. It seems a bit unfortunate that the front light can only be attached in a vertical orientation, since a side spill of light would seem to be advantageous for commuting. In the vertical position, you are losing a lot of that light as it is aimed up into the air. Fortunately, it seems to "throw" the light frontwards, for the most part, but not being able to orient the light horizontally seems like a miss to me. 

The rear light attachment also does not account for seat post angling which points the rear light slightly downward. However; this may or may not be an issue depending upon the bike used. Another nit I had was that clasping the cam lock over can easily turn the light on, which resulted in one occurrence of myself receiving the full 220 lumen blast to the face. Random? Not really, I had the light come on in both rear and front applications while attaching them several times. 

The Bookman Curve on the front to the Left of my Schmidt Edulux II light.

The Curve on steady at 220 Lumen is bright enough to see by all by itself, but it could not compete with my Schmidt Edulux II with its wider, longer throw of light. Would the Curve get you by in a pinch as a light for maybe an hour? Let's say that your main light runs out just short of your destination, or before Sunrise. I'd say that this would be an okay "bail-out" light, and it would pack small and it is lightweight. 

But in my estimation, where this light really works best is in its flashing mode which I would run alongside a steady torch at night. That flashing light doesn't seem to compete with my main light, and it isn't distracting to ride with it. 

The Curve on the seat post here. The Schmidt tail light is on the rack.

Out on the back end, I felt that the Curve light worked really well. In one of the flashing modes, it almost reminds me of a police/emergency vehicle flashing light. The rear Curve throws light well, has side visibility due to its shape, and despite it being tucked under my Topeak rear seat bag, it shined forth with more authority than the rack mounted Schmidt light. 

Conclusions: I've already spoken to the Monocle, it's a winner in case you didn't check the link, and I won't go back over that one. How about the Curve lights? They retail at $45.00 a piece and come in several colors for the cases. Fashionable. I suppose that is somewhat important. The overall design is pretty clever and has that certain "European" feel and look to it. On these merits the Bookman lights are very much winners.

But in terms of how they work? I like them, but that clasp/power switch combination is somewhat annoying and I wish I could orient the front light horizontally. The rear light would be better if there were an accommodation for seat post angle, and try attaching this light to anything with a light-loop. Like on my Topeak bag, for instance, this light won't work. 

The lights by themselves are great for their intended purposes. I have no beef at all and I especially really like the rear light. The front would be my "bail-out" for long night rides and will be my flasher for commutes. So, in terms of the lights themselves, they are great, it's just the lack of attention to attachment scenarios that brings this light back to being "just okay". 

Get these if you swoon at the sight of them because the design just gets you. Otherwise there are a lot of very good, very well priced alternatives that have a bit better attention to details than the Bookman lights do.

NOTE: As A reminder: Standard Disclaimer

Sunday, February 19, 2023

The GTDRI Stories: Big Changes Affect The Plans

I think this header got used for five yeas. So get used to seeing it!
 "The GTDRI Stories" is a series telling the history, untold tales, and showing the sights from the run of Guitar Ted Death Ride Invitationals. This series will run on Sundays. Thanks for reading!

The 2011 GTDRI was a big success and a huge turnaround in terms of participation which made me very happy. I was astounded that riders would drive many hours to come spend a day on a bicycle with me and whomever else might show up. Keep in mind, I never publicized a roster or let anyone know who might show up, generally. So, it was as much a surprise for those who came as it was for myself.

Now let me set the stage for the upcoming seventh running of this event. Things were changing all around me and I think in terms of the gravel side of my cycling life, this is when the tide turned from a focus on MTB to more gravelly things. 

The big mess that happened internally with "Twentynine Inches", the 29"er site I had been involved with since 2006, was finally being settled out. I had taken full ownership of the site but the site was in a shambles in terms of advertising, the inner workings, and in terms of presentation. Fortunately for me I had a friend in SoCal that helped me muddle through all of that and by the time 2011 concluded we had made a new site which we had 100% control of. Up to that time we were living on a site which the old owner had set up and still had "the keys" to, so the advertising was not 100% coming my way. This consumed my time to a degree that not many know about.

Interbike 2011: The MTB side of my life started to fade about this time.

But that wasn't the only thing draining my energy at this point in my life. I had a major change involving Trans Iowa. I was essentially on my own with it and the story has been shared elsewhere. The main point for the GTDRI was that Trans Iowa was my main focus. Everything else was pretty much secondary to that event. 

That meant that if I had time for another GTDRI, it might happen. But I was completely, 100% prepared not to do the ride if Trans Iowa or the website needed my attention more. Of course, if you know anything about the series of rides, you already know that it continued on. But many of you do not know how close it came to a point where I stopped with the GTDRI. 

Fortunately, my Trans Iowa plans fell into place really well and the website work was pretty much settled before the conclusion of 2011. This allowed space for the GTDRI, but 2011 was also really full of other things going on. Essentially, I was not going to have the time to go recon a course. This meant that either I was going to recycle a course or...... I could use the GTDRI for recon. Recon for future Trans Iowas. Maybe..... 

The recon and prep went well for T.I.v8, which was a good thing for the GTDRI!

I had a big family trip to El Paso, Texas to go on. I also had to recon the Trans Iowa v8 course before the event in late April. On top of all of that I started a weekly gravel group ride. I was still doing MTB reviews and working at the bike shop as a mechanic. My schedule was stuffed and wandering around to do recon of a fully new course for the GTDRI seemed of least import to me. 

But in the end, it all came together as I used several bits from the Trans Iowa v6 and v7 courses in a sort of amalgamation with a bit of extra roads I hadn't been on thrown in for good measure. The course I came up with was an odd one since it was essentially two loops. One more or less east and south of Grinnell and the other more West and North. I came up with this and used the loop back in Grinnell as a way for some to get in a shorter, less than death, Death Ride. I had received some criticism about my lack of an easier option, and this was done to appease those who were clamoring for me to offer such an option. 

Interestingly there was no recon done for the ride since most of the roads were from past Trans Iowa events in and around Grinnell. the parts that were new I wanted to keep as a surprise for myself, and ostensibly as recon for possible inclusion in a future Trans Iowa. So, what did I do instead?

Next: Training? Yes, Training!

The GTDRI Stories: Big Changes Affect The Plans

I think this header got used for five yeas. So get used to seeing it!
 "The GTDRI Stories" is a series telling the history, untold tales, and showing the sights from the run of Guitar Ted Death Ride Invitationals. This series will run on Sundays. Thanks for reading!

The 2011 GTDRI was a big success and a huge turnaround in terms of participation which made me very happy. I was astounded that riders would drive many hours to come spend a day on a bicycle with me and whomever else might show up. Keep in mind, I never publicized a roster or let anyone know who might show up, generally. So, it was as much a surprise for those who came as it was for myself.

Now let me set the stage for the upcoming seventh running of this event. Things were changing all around me and I think in terms of the gravel side of my cycling life, this is when the tide turned from a focus on MTB to more gravelly things. 

The big mess that happened internally with "Twentynine Inches", the 29"er site I had been involved with since 2006, was finally being settled out. I had taken full ownership of the site but the site was in a shambles in terms of advertising, the inner workings, and in terms of presentation. Fortunately for me I had a friend in SoCal that helped me muddle through all of that and by the time 2011 concluded we had made a new site which we had 100% control of. Up to that time we were living on a site which the old owner had set up and still had "the keys" to, so the advertising was not 100% coming my way. This consumed my time to a degree that not many know about.

Interbike 2011: The MTB side of my life started to fade about this time.

But that wasn't the only thing draining my energy at this point in my life. I had a major change involving Trans Iowa. I was essentially on my own with it and the story has been shared elsewhere. The main point for the GTDRI was that Trans Iowa was my main focus. Everything else was pretty much secondary to that event. 

That meant that if I had time for another GTDRI, it might happen. But I was completely, 100% prepared not to do the ride if Trans Iowa or the website needed my attention more. Of course, if you know anything about the series of rides, you already know that it continued on. But many of you do not know how close it came to a point where I stopped with the GTDRI. 

Fortunately, my Trans Iowa plans fell into place really well and the website work was pretty much settled before the conclusion of 2011. This allowed space for the GTDRI, but 2011 was also really full of other things going on. Essentially, I was not going to have the time to go recon a course. This meant that either I was going to recycle a course or...... I could use the GTDRI for recon. Recon for future Trans Iowas. Maybe..... 

The recon and prep went well for T.I.v8, which was a good thing for the GTDRI!

I had a big family trip to El Paso, Texas to go on. I also had to recon the Trans Iowa v8 course before the event in late April. On top of all of that I started a weekly gravel group ride. I was still doing MTB reviews and working at the bike shop as a mechanic. My schedule was stuffed and wandering around to do recon of a fully new course for the GTDRI seemed of least import to me. 

But in the end, it all came together as I used several bits from the Trans Iowa v6 and v7 courses in a sort of amalgamation with a bit of extra roads I hadn't been on thrown in for good measure. The course I came up with was an odd one since it was essentially two loops. One more or less east and south of Grinnell and the other more West and North. I came up with this and used the loop back in Grinnell as a way for some to get in a shorter, less than death, Death Ride. I had received some criticism about my lack of an easier option, and this was done to appease those who were clamoring for me to offer such an option. 

Interestingly there was no recon done for the ride since most of the roads were from past Trans Iowa events in and around Grinnell. the parts that were new I wanted to keep as a surprise for myself, and ostensibly as recon for possible inclusion in a future Trans Iowa. So, what did I do instead?

Next: Training? Yes, Training!

Saturday, February 18, 2023

Mending Fences

A challenging day for the family started with this.
Well.....that wasn't what I expected to do on a Friday afternoon!

It all started with a Winter storm that arrived on Thursday here. We were told for a day or two ahead of Thursday that we would get a lot of snow, but by 11:00am on Thursday nothing had fallen from the sky. Now here was my dilemma. 

My son uses the "Truck With No Name" these days as his way to get back and forth to community college classes. He's a new driver, with barely any experience, and he's maybe driven on freshly fallen snow once, maybe twice so far this Winter. Compound that with the truck, which if you know a two wheel drive truck at all, is a handful on slick surfaces. Well, then it could be understandable that a driver with a developing sense of throttle control and senses for what the wheels are doing might be at a disadvantage.  

And I thought we'd escape with a dusting,as the weather forecast was saying the snow would end soon after he left. But it didn't. It got worse and we ended up with a couple of inches, maybe more, of slick snow. Maybe I should have driven him to school.....

But maybe he needed a lesson. Well.....he got one! And he cleared out 16 feet of a woman's fencing made out of solid lumber. He knocked the bumper hard enough to loosen it up, (haven't fully diagnosed that, but it is derivable), so he didn't mess the truck up badly. But he did cause a significant amount of property damage. We had to call a tow truck to pull the vehicle off the fence and out of the ditch. Two wheel drive with no positraction, ya know? 

The end of a hard day.

The landowner was distraught as they have a dog that they like to let loose in the fenced in area, which now was not so fenced in, and they wanted a solution now. So...

Mrs. Guitar Ted, my son, and I had to buy some snow fencing, some wire, zip ties, and a wire cutter and attempt to patch the opening in 25-30mph gusting winds. This all with sub-zero wind chill. 

Now, I'm not complaining, my son had caused this property owner undue concerns and damages, so I was fine with helping out. It was just not what I had expected to have to do on a Thursday afternoon. And let's face it- I am a bicycle mechanic, not so much a fence mender! 

I'm not sure we made any difference in the situation with the fence in the moment, but we did begin to mend another fence. That being the one between two parties that maybe saw each other as adversaries in the beginning. Afterward? I cannot speak to what the landowner was feeling, but we came home and had a good discussion about how to deal with a situation like this, and to have compassion on a stranger. We learned that owning up to your responsibilities is the right thing to do, and that sometimes that can lead to better outcomes. (For one thing, the police did not issue a ticket to my son.) 

There will be consequences to come that must be dealt with. Insurance, fixing the bumper on the truck, and maybe some unforeseen issues. But I am happy and grateful it wasn't worse, and in the end, if there were lessons learned and (hopefully) remembered by my son? 

It was all worth it then.

Mending Fences

A challenging day for the family started with this.
Well.....that wasn't what I expected to do on a Friday afternoon!

It all started with a Winter storm that arrived on Thursday here. We were told for a day or two ahead of Thursday that we would get a lot of snow, but by 11:00am on Thursday nothing had fallen from the sky. Now here was my dilemma. 

My son uses the "Truck With No Name" these days as his way to get back and forth to community college classes. He's a new driver, with barely any experience, and he's maybe driven on freshly fallen snow once, maybe twice so far this Winter. Compound that with the truck, which if you know a two wheel drive truck at all, is a handful on slick surfaces. Well, then it could be understandable that a driver with a developing sense of throttle control and senses for what the wheels are doing might be at a disadvantage.  

And I thought we'd escape with a dusting,as the weather forecast was saying the snow would end soon after he left. But it didn't. It got worse and we ended up with a couple of inches, maybe more, of slick snow. Maybe I should have driven him to school.....

But maybe he needed a lesson. Well.....he got one! And he cleared out 16 feet of a woman's fencing made out of solid lumber. He knocked the bumper hard enough to loosen it up, (haven't fully diagnosed that, but it is derivable), so he didn't mess the truck up badly. But he did cause a significant amount of property damage. We had to call a tow truck to pull the vehicle off the fence and out of the ditch. Two wheel drive with no positraction, ya know? 

The end of a hard day.

The landowner was distraught as they have a dog that they like to let loose in the fenced in area, which now was not so fenced in, and they wanted a solution now. So...

Mrs. Guitar Ted, my son, and I had to buy some snow fencing, some wire, zip ties, and a wire cutter and attempt to patch the opening in 25-30mph gusting winds. This all with sub-zero wind chill. 

Now, I'm not complaining, my son had caused this property owner undue concerns and damages, so I was fine with helping out. It was just not what I had expected to have to do on a Thursday afternoon. And let's face it- I am a bicycle mechanic, not so much a fence mender! 

I'm not sure we made any difference in the situation with the fence in the moment, but we did begin to mend another fence. That being the one between two parties that maybe saw each other as adversaries in the beginning. Afterward? I cannot speak to what the landowner was feeling, but we came home and had a good discussion about how to deal with a situation like this, and to have compassion on a stranger. We learned that owning up to your responsibilities is the right thing to do, and that sometimes that can lead to better outcomes. (For one thing, the police did not issue a ticket to my son.) 

There will be consequences to come that must be dealt with. Insurance, fixing the bumper on the truck, and maybe some unforeseen issues. But I am happy and grateful it wasn't worse, and in the end, if there were lessons learned and (hopefully) remembered by my son? 

It was all worth it then.

Friday, February 17, 2023

Friday News And Views

The Ritchey 50th Anniversary Outback (Image courtesy of Ritchey)
Ritchey Continues To Celebrate Its 50th With Special Outback: 

Ritchey Design has been releasing special paint schemes of its bicycles over the course of Ritchey's 50th anniversary. This time they are featuring a special Outback frame and fork.

Ritchey says in its press release:  "Possibly Ritchey's best selling model, the Outback is a dedicated off road machine designed to feel at home on long dirt passes. " This frame and fork can utilize 650B X 2.0" tires and wheels or 700c X 44mm wheels and tires. Frame, fork, through-axles, and a head set come in at a reasonable $1699.00 for the special "Half Moon Bay Blue" paint scheme. 

Comments: This was a frame and fork I was seriously considering getting at one point. Turns out that a lot of you readers had some passionate thoughts on this one as well, judging from the comments left on my post about this and the Twin Six Standard Rando v2. As you all know, I ended up with the Twin Six.

But the Outback is still a cool design and might make someone a fine bicycle. It just has a couple of quirks that, for myself, take it out of contention for a bike I'd want to have around here. I think in many ways, the Outback, especially with 27.5" tires and wheels (650B), is the modern-day equivalent to the early 90's MTB with drop bars. It truly represents what MTB was at one time: An adventurous way to disconnect from the day-to-day grind and just have some fun. All without setting pressures, clicking rebound dampers, locking out, dropping down, or checking power meters and electronic shifter battery levels. 

It's good to see bicycles like this still being made in 2023.  

Two SILCA Impero Ultimate II frame pumps (Image courtesy of SILCA)
Inflation Option:

One of the most feared and ride-ruining things that can happen to a cyclist is experiencing a flat tire. Of course, tubeless tires and sealant have reduced this occurrence, or perhaps has eliminated it to a high degree for many riders. But you still should have a way to inflate a tire/tube anyway. You know....just in case. Any good gravel cyclist should be self-sufficient in that manner, at any rate. 

You can always go the mini-pump route, and several are good, but for my money, a frame pump is even better. Less strokes to fill up, and all with less effort. Plus, in a pinch, a frame pump can be used to ward off a dog attack. 

I know that mini-pumps often cost less, but most of them are - sorry to say - garbage. There are exceptions, but a well-made frame pump is like having a great floor pump on your bike versus using a mini pump. I mean, given the choice, which would you rather use? Additionally, frame pumps can last a lifetime, and the SILCA example here is built to last. 

Not every bicycle can fit a frame pump, I get that, and there is no argument that CO2 carts are faster/easier, but which choice is more environmentally friendly? Unless you are racing, well, do you actually need a CO2 cart? I know many of you will dig you feet in and staunchly defend your CO2 thingies, but there is no denying that a frame pump, built to last a lifetime, is a more Earth-friendly way to go. 

My ancient 1990's era Blackburn frame pumps are getting a bit long in the tooth. (Note- those weren't made anywhere near as well as this SILCA option and they still lasted 30+ years.) I may have to pop for one of these.

Chris King GRD 23 gravel wheels.
So, Did You Hear That Chris King Is Making Wheels Now?

I guess this came out in early December last year, but if it did, it slipped under my radar. Chris King is making its own wheels with USA made carbon fiber rims now. No - It is not Enve. And yes - They are very expensive. (Now listing at $2915,00 for the set)

So, with that out of the way, what's the deal here? Apparently, Chris King is using a newer carbon fiber manufacturing process called FusionFiber™. It is a new process for bonding carbon layers using nylon instead of epoxy. It's a product of the Utah based company, CSS Composites

It's a thermoplastic carbon fiber which means that it can be molded with less labor intensive methods and, supposedly, is recyclable since theoretically it can be re-melted and molded again. 

It also lays claim to being tougher than typical carbon wheel sets and allows for a bit better ride feel. You can read this CyclingTips review for more of how these wheels perform.  

Comments: The cycling world is awash in carbon wheel sets. The choices are dizzying. It is especially hard to choose the Chris King wheels here when you know that wheels are out there that weigh less, are cheaper, and probably ride pretty similarly. But, (in case you did not read that linked review), these are a more responsibly sourced choice with a lifetime warranty. So, I think some people will be attracted to that. That and the Chris King hubs, which are pretty stellar in their own right. 

But in the end, paying about a thousand dollar+ premium over similar wheels in this class is a very hard sell. Maybe this is a harbinger of things to come in terms of carbon fiber production. Thermoplastic carbon made more responsibly with the promise of ease of recycling would be cool. Maybe that's what this wheel represents.  

Diagram showing how a Lalbikes' Supre Drive derailleur works.
Derailleur Dangle No More!

Derailleur drive trains are very efficient and hard to beat in that way. However, those "dangly bits" can get wiped away by trail debris or rocks easily leaving you and your bike stranded.

Lal Bikes has developed a drive train which helps to eliminate this issue for the more extreme MTB type bikes. It's called Supre Drive, and it separates the two functions of a derailleur to achieve its out-of-the-way placement, on proprietary frames, of course. 

The diagram I chose to post here, (courtesy of Lal Bikes), shows the pathway of the chain in the highest gear (red line) and lowest gear (blue line). The actual chain shifting bit remains out back, albeit morre "in front of" the cassette. The tensioning part of a derailleur now has a satellite jockey wheel which traces the outer edge of the chain wheel. (shown by the black arrows).Check out the link for a deeper dive.

 Comments: I like the direction here for a mountain bike, or say even a fat bike that gets into a lot of underbrush/rocky areas. The proprietary frame bit is going to probably keep this as a niche choice, but you never know. It'll only take one company to buy in and this could take off. Or.....Shimano or SRAM could buy the company out, salt away the patents, and you'll never see this again. 

I just thought it was interesting since it is truly a different take on a derailleur drive train for a specific purpose.  

Yes - It's Another New Podcast!

Just in case you missed it, we posted another new podcast this week. We actually got a Featured Sponsor again, which is The Spinistry, a group out of Texas that puts on some cool events in Texas and Colorado. 

I first ran across The Spinistry back in late 2009 when they announced The Red River Riot gravel race in North Texas. They have expanded their offerings ever since and have several varied types of events and challenges which you could take part in. 

The podcast is another fly-over view of what types of things should be "on the radar" for anyone considering a ride on gravel. Give it a listen if you have some time, leave some feedback, and a review if you don't mind. Thanks!


That's a wrap for this week folks! have a great weekend and get in a ride if you can. Spring will be here soon! Thanks for reading Guitar Ted Productions!

Friday News And Views

The Ritchey 50th Anniversary Outback (Image courtesy of Ritchey)
Ritchey Continues To Celebrate Its 50th With Special Outback: 

Ritchey Design has been releasing special paint schemes of its bicycles over the course of Ritchey's 50th anniversary. This time they are featuring a special Outback frame and fork.

Ritchey says in its press release:  "Possibly Ritchey's best selling model, the Outback is a dedicated off road machine designed to feel at home on long dirt passes. " This frame and fork can utilize 650B X 2.0" tires and wheels or 700c X 44mm wheels and tires. Frame, fork, through-axles, and a head set come in at a reasonable $1699.00 for the special "Half Moon Bay Blue" paint scheme. 

Comments: This was a frame and fork I was seriously considering getting at one point. Turns out that a lot of you readers had some passionate thoughts on this one as well, judging from the comments left on my post about this and the Twin Six Standard Rando v2. As you all know, I ended up with the Twin Six.

But the Outback is still a cool design and might make someone a fine bicycle. It just has a couple of quirks that, for myself, take it out of contention for a bike I'd want to have around here. I think in many ways, the Outback, especially with 27.5" tires and wheels (650B), is the modern-day equivalent to the early 90's MTB with drop bars. It truly represents what MTB was at one time: An adventurous way to disconnect from the day-to-day grind and just have some fun. All without setting pressures, clicking rebound dampers, locking out, dropping down, or checking power meters and electronic shifter battery levels. 

It's good to see bicycles like this still being made in 2023.  

Two SILCA Impero Ultimate II frame pumps (Image courtesy of SILCA)
Inflation Option:

One of the most feared and ride-ruining things that can happen to a cyclist is experiencing a flat tire. Of course, tubeless tires and sealant have reduced this occurrence, or perhaps has eliminated it to a high degree for many riders. But you still should have a way to inflate a tire/tube anyway. You know....just in case. Any good gravel cyclist should be self-sufficient in that manner, at any rate. 

You can always go the mini-pump route, and several are good, but for my money, a frame pump is even better. Less strokes to fill up, and all with less effort. Plus, in a pinch, a frame pump can be used to ward off a dog attack. 

I know that mini-pumps often cost less, but most of them are - sorry to say - garbage. There are exceptions, but a well-made frame pump is like having a great floor pump on your bike versus using a mini pump. I mean, given the choice, which would you rather use? Additionally, frame pumps can last a lifetime, and the SILCA example here is built to last. 

Not every bicycle can fit a frame pump, I get that, and there is no argument that CO2 carts are faster/easier, but which choice is more environmentally friendly? Unless you are racing, well, do you actually need a CO2 cart? I know many of you will dig you feet in and staunchly defend your CO2 thingies, but there is no denying that a frame pump, built to last a lifetime, is a more Earth-friendly way to go. 

My ancient 1990's era Blackburn frame pumps are getting a bit long in the tooth. (Note- those weren't made anywhere near as well as this SILCA option and they still lasted 30+ years.) I may have to pop for one of these.

Chris King GRD 23 gravel wheels.
So, Did You Hear That Chris King Is Making Wheels Now?

I guess this came out in early December last year, but if it did, it slipped under my radar. Chris King is making its own wheels with USA made carbon fiber rims now. No - It is not Enve. And yes - They are very expensive. (Now listing at $2915,00 for the set)

So, with that out of the way, what's the deal here? Apparently, Chris King is using a newer carbon fiber manufacturing process called FusionFiber™. It is a new process for bonding carbon layers using nylon instead of epoxy. It's a product of the Utah based company, CSS Composites

It's a thermoplastic carbon fiber which means that it can be molded with less labor intensive methods and, supposedly, is recyclable since theoretically it can be re-melted and molded again. 

It also lays claim to being tougher than typical carbon wheel sets and allows for a bit better ride feel. You can read this CyclingTips review for more of how these wheels perform.  

Comments: The cycling world is awash in carbon wheel sets. The choices are dizzying. It is especially hard to choose the Chris King wheels here when you know that wheels are out there that weigh less, are cheaper, and probably ride pretty similarly. But, (in case you did not read that linked review), these are a more responsibly sourced choice with a lifetime warranty. So, I think some people will be attracted to that. That and the Chris King hubs, which are pretty stellar in their own right. 

But in the end, paying about a thousand dollar+ premium over similar wheels in this class is a very hard sell. Maybe this is a harbinger of things to come in terms of carbon fiber production. Thermoplastic carbon made more responsibly with the promise of ease of recycling would be cool. Maybe that's what this wheel represents.  

Diagram showing how a Lalbikes' Supre Drive derailleur works.
Derailleur Dangle No More!

Derailleur drive trains are very efficient and hard to beat in that way. However, those "dangly bits" can get wiped away by trail debris or rocks easily leaving you and your bike stranded.

Lal Bikes has developed a drive train which helps to eliminate this issue for the more extreme MTB type bikes. It's called Supre Drive, and it separates the two functions of a derailleur to achieve its out-of-the-way placement, on proprietary frames, of course. 

The diagram I chose to post here, (courtesy of Lal Bikes), shows the pathway of the chain in the highest gear (red line) and lowest gear (blue line). The actual chain shifting bit remains out back, albeit morre "in front of" the cassette. The tensioning part of a derailleur now has a satellite jockey wheel which traces the outer edge of the chain wheel. (shown by the black arrows).Check out the link for a deeper dive.

 Comments: I like the direction here for a mountain bike, or say even a fat bike that gets into a lot of underbrush/rocky areas. The proprietary frame bit is going to probably keep this as a niche choice, but you never know. It'll only take one company to buy in and this could take off. Or.....Shimano or SRAM could buy the company out, salt away the patents, and you'll never see this again. 

I just thought it was interesting since it is truly a different take on a derailleur drive train for a specific purpose.  

Yes - It's Another New Podcast!

Just in case you missed it, we posted another new podcast this week. We actually got a Featured Sponsor again, which is The Spinistry, a group out of Texas that puts on some cool events in Texas and Colorado. 

I first ran across The Spinistry back in late 2009 when they announced The Red River Riot gravel race in North Texas. They have expanded their offerings ever since and have several varied types of events and challenges which you could take part in. 

The podcast is another fly-over view of what types of things should be "on the radar" for anyone considering a ride on gravel. Give it a listen if you have some time, leave some feedback, and a review if you don't mind. Thanks!


That's a wrap for this week folks! have a great weekend and get in a ride if you can. Spring will be here soon! Thanks for reading Guitar Ted Productions!