Showing posts with label B.O.G. Series Basics Of Gravel Series. Show all posts

Sunday, May 17, 2026

BRAN Gravel: Bike Choice

In the run-up to the 44th BRAN ride, and specifically for the gravel route, I am writing up my suggestions and personal choices for bicycles and gear. I hope this will be enlightening and helpful to anyone deciding on gear for this ride or any gravel ride. 

The Bike Choice:

A "gravel bike"? What is that? You may find yourself asking those questions concerning gravel cycling. There is no definitive answer as gravel cycling varies from place to place greatly. Essentially, one could just say "A gravel bike is whatever bicycle you feel comfortable riding on gravel." It could be a mountain bike, a hybrid bike, or even a recumbent. 

Now, with this in mind, I will say there are "better tools for the job" and how one chooses, when there is a possibility for choices, can still vary greatly. Sandy, loose back roads? Maybe you have a lot more pavement than gravel? Or you ride a fair amount of single track connecting dirt roads. All these can change what "tool works best" for the job. But again, you can do a lot with several kinds of bicycles and still "grind the gravel" with anyone. 

In this article I am going to assume the reader has either knowledge of Nebraska gravel types or has listened to the podcasts about "Bran Gravel" (Here and Here

Black Mountain Cycles MCD

As I listened to the folks we interviewed who have either done BRAN on the gravel, or know about Nebraska gravel, it became apparent to me that there were going to be various types of surfaces to deal with. Pavement is an obvious one. However; there were sandy surfaces mentioned out in the (of all places) The Sand Hill Region of Nebraska. One person we interviewed mentioned "MMR" (dirt) roads. Then there will be a transition to "white rock" gravel, or in other words, the crushed rock you may think of when "gravel" is mentioned. 

Salsa Cycles Fargo
So, it might be a good idea to have something for a bicycle with wider tires than not, but not huge. One of the interviewed folks mentions this in the first podcast episode linked above. The trend in gravel bicycles of late is for wider tires, so if you have a late model gravel bike, you probably can fit tires with a width of 45mm or so easily. This was a recommendation on the podcast and one I would agree with. 

What would be "too skinny"? I'd say anything under 40mm, but it isn't that one could not do the ride on, say, 38mm tires. It might just be a little harder and not as much fun is all. Ratchet up the "Not Fun" and "Harder" categories as you get narrower than this with tires. 

What would be too wide/big? Well, as one person on the podcast said, a "fat bike" (any bike with 3.5" tires or wider) might be overkill. Again, you could use a fat bike, it just might not be the "best tool", that's all. 

"What are you gonna do, Guitar Ted?"

Well, I have many years of experience on different types of gravel and my choices are narrowed down to the two bicycles you see above. The Fargo has 2.25" MTB cross country racing tires on it and the pink Black Mountain Cycles MCD has 50mm wide Schwalbe gravel tires on it. Here's the difference, as I see it.....

The Fargo is a nod to comfort and a better handling bike in sketchy terrain. You might think about the sandy gravel and dirt roads that BRAN gravel may have on the course this year. The negatives would be that this bike, essentially a drop bar mountain bike, is heavier. The wheels and tires weigh more. So, this may factor into why you might not want to choose thusly.

The MCD has lighter wheels, but skinnier tires. 50mm is a LOT of rubber though, honestly, and this wide a tire should be more than enough while giving a nod to paved riding and a bit of grace in climbing. Negatives could be a less comfortable ride and not as much confidence in any sketchy, loose sections.

Sure, I have less wide tires, lighter wheels, and maybe I could go that route, but comfort over seven days of gravel kind of beats having a lightweight wheel set, in my opinion. My final choice? Well, I'm leaning toward the pink BMC now


 You might note I have spent a lot of time on tires and wheels because this makes the most difference in the way a bike handles and feels than anything else. The other consideration is comfort, and tires do a lot here as well. Air pressures chosen will determine a lot in this regard. I would wager most people think they need higher pressure in their tires than they actually do need. One way to find out is to use a tire pressure calculator online. 

There are two I will recommend here. The first one is from a company called SILCA. You can check theirs out HERE. The other is from another company called Wolf Tooth.  Their calculator can be seen HERE. Want one more choice? Component maker SRAM also has an online air pressure calculator HERE

Optimizing air pressure will help you go faster. longer, and with less fatigue while retaining a balance of good rolling resistance versus comfort and handling traits. 

As far as the rest of what makes your bicycle go, I would recommend a tubeless set up due to the reported goat heads and other pointy objects out in Western Nebraska. (Obviously, you could run tubes, but then risk the punctures.) Your bicycle should be in tip-top condition, shifting well, and braking well. Stopping is good! Besides this, overall you should choose a bicycle you are confident on and most importantly for a week long ride, comfortable on. There is nothing worse than a bicycle that hurts to sit on after a few days!

Need more beginner gravel tips? Read my series on Beginners On Gravel HERE.  

More information on the BRAN ride HERE.  Register for BRAN HERE.

Wednesday, January 31, 2024

The Cleaning, Lubricating Post

If you recall earlier this year I made the call that i needed to be doing more referencing to past posts from the nearly 20 years of backlog here. Otherwise I get to thinking I should write about a topic and then I find out later that I had already done a series or several posts on that subject years ago. 

This time I am going to point you back through the fog of time to posts I have written on cleaning your bicycles and lubricating the chain a well. 

The first post I will reference here is the one I posted in 2019 about how I go about cleaning my own bikes. It was.....controversial. As one commenter stated, "... I think only old bike mechanics (who know how not to create more work for themselves) understand your bike cleaning practices."

Maybe so. But if you want the best results with the least amount of collateral damage, this is the way you should go about cleaning your bicycles. It works well for me and has for many years. Another primer for easy home cleaning of bicycles can be found HERE that I wrote as part of my Beginners On Gravel series.

Secondly, that post raised some questions which I answered in a separate post. This time it was how I clean up a drive train while it is all still on the bike. Chain lube practices are also covered here. back then I was a strong DuMonde Tech lubricant advocate, (still am), but these days I've been using a lot of Silca's Super Secret Lube. You can check that post out HERE

Questions? Suggestions? Hit me up in the comments. If I get feedback I'll do a follow-up post.

Friday, May 21, 2021

Friday News And Views

 Beginners On Gravel Series Page:

This past Wednesday I completed the B.O.G. Series of posts which had started out in late February and ran every Wednesday after until this week when it ended. As promised, I posted all the articles on their own page. You can always access the link under the header of the blog where all my page links are located. In fact, if you have not checked out those pages, please do. 

I was taking a bit of a risk with publishing such a series on a blog visited by plenty of seasoned cyclists, experienced in all manner of situations, and who hold varying opinions on 'what is the right way to do that'. Because the B.O.G. was aimed at novice cyclists and at those with little experience at riding rural roads I felt that I may get a little push-back on how I was handling certain topics. That expectation was met, by the way, but overall, I feel that the series was well accepted. 

I have heard a bit of feedback on the series and what I have heard is encouraging. If it truly helps out a cyclist, breaks down a barrier for someone, and seems to enhance a cyclist's experience, then I have done my job. 

MRP introduces the gravel/bikepacking oriented Baxter Fork.

MRP Debuts Another "Gravel Suspension Fork":

This past week saw the introduction of another gravel suspension fork, the MRP Baxter, which I alluded to earlier this week in my "We've Been Here Before" post about such devices. 

Again we have 40mm of travel, like the Fox AX, but the Baxter does have a unique feature in that there are built in mounts for fork mounted water bottle cages. 12mm or 15mm through axles are offered and the fork comes in black or white, when it hits availability, that is, and that is said to be later in the Summer. 

One report I saw also mentioned that a Baxter with longer travel and a Boost front spaced option was also going to be coming soon, but as that fork will have a long axle to crown measurement, it will be unsuitable for almost every gravel bike out there currently. The gravel version of the Baxter is already sitting at 424 mm, which is almost an inch longer than most forks on gravel bikes currently. About 3/4's of an inch to an inch doesn't sound like much, but that is HUGE in terms of how a bike handles. (And yes- I've tested different length forks on one bike before) 

The Baxter goes for about $800.00, so it also is not cheap by any means. Again, I don't see the point in putting sub-standard suspension travel with its extra weight, complexity, initial cost, long-term maintenance cost, and inevitable short shelf life on a gravel bike. But maybe I am an old, hackneyed Luddite and I should not be listened to. You make the call. 

In the meantime, this sort of product does not make a lot of sense to my mind. I would opt for an 80mm-100mm suspension fork on a hardtail style MTB with my preferred drive train any day over what I would  term as a 'band-aid suspension fork for a bike that wasn't designed for that'. Unless, you know, gravel bikes effectively become drop bar MTB's and start looking like, you know, a Fargo?

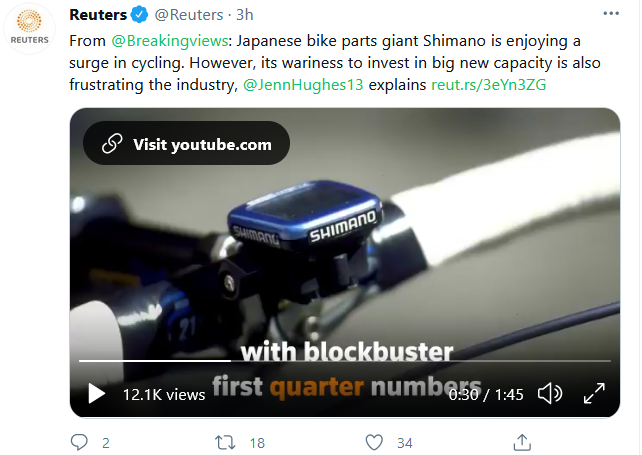
A screen shot from Reuters News' story on Shimano.

Parts Shortages Make "The News":

It isn't often that mainstream news outlets like Reuters makes mention of the cycling industry, but that happened on Wednesday on Reuters' social media feed.

It isn't news that part of the bottleneck in getting new bicycles and repair parts is that Shimano is not ramping up to build more manufacturing capacity to meet the spike in demand caused during the pandemic. Shimano, who have cleared more capital in the last 12 months than they did over the last ten years combined, (according to the Reuters report), feels that making investments into new factories, or expanding current factories to allow for greater production may not be a wise move. According to the report, Shimano stated that any new expansion in manufacturing capacity would take at least two years to realize, and by that time the 'boom' may have busted. 

So, if the report is to be believed, your wait for parts may be quite a long one. What is more, we're hearing in the industry channels that 'lead times'- the time it takes from when an order is placed to its fulfillment- is now extending into 2023 in some cases. Keeping in mind that we are nearing 2022 at a rapid pace, that sounds more and more credible as we slip into Summer. 

I suspect that we will see a mixed bag of availability, varying parts quality on bikes, varying levels of fit and finish, and more common complaints on bicycles in 2022 and 2023 until all this water gets under the bridge. I also suspect that whatever gains were made by cycling companies in 2020 and 2021 will get tempered by not-so-great sales in '22 and '23 as consumers get frustrated and find other things to do. Finally, any economic upheavals in the next three years will also have a detrimental effect upon cycling as a whole. I gotta say- I side with Shimano on their thoughts on the future, but ironically, their reluctance and inability to keep pace with demand currently is probably a big reason why things will not continue 'booming'. That's what happens when you control an estimated 2/3rds of the business in components for cycling.

That's a wrap on this week. Have a great weekend!

Friday News And Views

 Beginners On Gravel Series Page:

This past Wednesday I completed the B.O.G. Series of posts which had started out in late February and ran every Wednesday after until this week when it ended. As promised, I posted all the articles on their own page. You can always access the link under the header of the blog where all my page links are located. In fact, if you have not checked out those pages, please do. 

I was taking a bit of a risk with publishing such a series on a blog visited by plenty of seasoned cyclists, experienced in all manner of situations, and who hold varying opinions on 'what is the right way to do that'. Because the B.O.G. was aimed at novice cyclists and at those with little experience at riding rural roads I felt that I may get a little push-back on how I was handling certain topics. That expectation was met, by the way, but overall, I feel that the series was well accepted. 

I have heard a bit of feedback on the series and what I have heard is encouraging. If it truly helps out a cyclist, breaks down a barrier for someone, and seems to enhance a cyclist's experience, then I have done my job. 

MRP introduces the gravel/bikepacking oriented Baxter Fork.

MRP Debuts Another "Gravel Suspension Fork":

This past week saw the introduction of another gravel suspension fork, the MRP Baxter, which I alluded to earlier this week in my "We've Been Here Before" post about such devices. 

Again we have 40mm of travel, like the Fox AX, but the Baxter does have a unique feature in that there are built in mounts for fork mounted water bottle cages. 12mm or 15mm through axles are offered and the fork comes in black or white, when it hits availability, that is, and that is said to be later in the Summer. 

One report I saw also mentioned that a Baxter with longer travel and a Boost front spaced option was also going to be coming soon, but as that fork will have a long axle to crown measurement, it will be unsuitable for almost every gravel bike out there currently. The gravel version of the Baxter is already sitting at 424 mm, which is almost an inch longer than most forks on gravel bikes currently. About 3/4's of an inch to an inch doesn't sound like much, but that is HUGE in terms of how a bike handles. (And yes- I've tested different length forks on one bike before) 

The Baxter goes for about $800.00, so it also is not cheap by any means. Again, I don't see the point in putting sub-standard suspension travel with its extra weight, complexity, initial cost, long-term maintenance cost, and inevitable short shelf life on a gravel bike. But maybe I am an old, hackneyed Luddite and I should not be listened to. You make the call. 

In the meantime, this sort of product does not make a lot of sense to my mind. I would opt for an 80mm-100mm suspension fork on a hardtail style MTB with my preferred drive train any day over what I would  term as a 'band-aid suspension fork for a bike that wasn't designed for that'. Unless, you know, gravel bikes effectively become drop bar MTB's and start looking like, you know, a Fargo?

A screen shot from Reuters News' story on Shimano.

Parts Shortages Make "The News":

It isn't often that mainstream news outlets like Reuters makes mention of the cycling industry, but that happened on Wednesday on Reuters' social media feed.

It isn't news that part of the bottleneck in getting new bicycles and repair parts is that Shimano is not ramping up to build more manufacturing capacity to meet the spike in demand caused during the pandemic. Shimano, who have cleared more capital in the last 12 months than they did over the last ten years combined, (according to the Reuters report), feels that making investments into new factories, or expanding current factories to allow for greater production may not be a wise move. According to the report, Shimano stated that any new expansion in manufacturing capacity would take at least two years to realize, and by that time the 'boom' may have busted. 

So, if the report is to be believed, your wait for parts may be quite a long one. What is more, we're hearing in the industry channels that 'lead times'- the time it takes from when an order is placed to its fulfillment- is now extending into 2023 in some cases. Keeping in mind that we are nearing 2022 at a rapid pace, that sounds more and more credible as we slip into Summer. 

I suspect that we will see a mixed bag of availability, varying parts quality on bikes, varying levels of fit and finish, and more common complaints on bicycles in 2022 and 2023 until all this water gets under the bridge. I also suspect that whatever gains were made by cycling companies in 2020 and 2021 will get tempered by not-so-great sales in '22 and '23 as consumers get frustrated and find other things to do. Finally, any economic upheavals in the next three years will also have a detrimental effect upon cycling as a whole. I gotta say- I side with Shimano on their thoughts on the future, but ironically, their reluctance and inability to keep pace with demand currently is probably a big reason why things will not continue 'booming'. That's what happens when you control an estimated 2/3rds of the business in components for cycling.

That's a wrap on this week. Have a great weekend!

Wednesday, May 19, 2021

B.O.G. Series: Sending You Off!

Are you ready for adventure? Yes....yes you are!
 Welcome to the FINAL entry for the Basics of Gravel Series (B.O.G.)! In this series I attempted to bring a very foundational knowledge of gravel and back road riding to anyone reading that may be curious or a beginner in riding off-pavement, but not wanting to be mountain biking. There was a new entry every Wednesday until now that the series is complete.  The old entries will be populated to a page which will be linked under the header soon. Thanks! 

First of all, Thank you for reading! This series- hopefully- has brought new knowledge and understanding for the beginners and 'new-to-gravel' folks that were reading along, and hopefully will be a resource for the future. It was my sincere hope that this was, and will continue to be, a help to my fellow cyclists. 

Secondly, this was by no means all you can know or hope to gain from riding rural byways and paths. Even I would never say I have it all figured out! There will always be more to learn, understand, and see out there, and I think this is what keeps riding gravel and dirt a fresh thing for myself. Hopefully it will be similar for you. Never stop learning! Always keep an open mind. 

But now it is time for you to take the dive. Leap off the comfortable and the known for uncharted territory (for you) and see what adventures await you. With that willingness to explore, experience new things, and not be afraid of getting a little lost or coming up against a new challenge, you will have a ton of fun and grow as a person as a result. 

Not to mention all the other side benefits of cycling, which are well documented. That said, I find that rural cycling has a unique way of rearranging your perspective. It can be a revelation in terms of mental health. It can even touch your soul if you let it. (I strongly suggest that you let it do just that!)

Young or old- Rural cycling can open up a whole new vista in your cycling experience.

So, take your chance while you have the opportunity and get out there. Things may not go perfectly at first, and that's okay. It's all part of the experience. Don't beat yourself up over mistakes or if you feel that you are not 'good enough'. Just turn your back on those thoughts and go for it. 

One thing I've been extremely encouraged by over the past 16 years of spending time riding gravel roads, and hanging out with others that do likewise, is that the community of folks that participate in this form of cycling tend to be very accepting and accommodating. Helpful? Totally. Non-judgemental? For the most part, that's been my experience, and listen- I am no great cyclist by any metric that the normal cycling/racing community would measure by. So, I think I can speak from a place that many of you may find yourselves in now, just getting into this rural/gravel cycling thing. Don't be afraid of being put down, left behind, or what have you. 

And for you folks that may be reading this that are seasoned gravel cycling folks- YOU HAVE A RESPONSIBILITY. We need you to be good ambassadors. What does that mean? 

Just be a good human being and be kind to other human beings, no matter what. 

Simple. 

Now get off this device and go ride already! 

B.O.G. Series: Sending You Off!

Are you ready for adventure? Yes....yes you are!
 Welcome to the FINAL entry for the Basics of Gravel Series (B.O.G.)! In this series I attempted to bring a very foundational knowledge of gravel and back road riding to anyone reading that may be curious or a beginner in riding off-pavement, but not wanting to be mountain biking. There was a new entry every Wednesday until now that the series is complete.  The old entries will be populated to a page which will be linked under the header soon. Thanks! 

First of all, Thank you for reading! This series- hopefully- has brought new knowledge and understanding for the beginners and 'new-to-gravel' folks that were reading along, and hopefully will be a resource for the future. It was my sincere hope that this was, and will continue to be, a help to my fellow cyclists. 

Secondly, this was by no means all you can know or hope to gain from riding rural byways and paths. Even I would never say I have it all figured out! There will always be more to learn, understand, and see out there, and I think this is what keeps riding gravel and dirt a fresh thing for myself. Hopefully it will be similar for you. Never stop learning! Always keep an open mind. 

But now it is time for you to take the dive. Leap off the comfortable and the known for uncharted territory (for you) and see what adventures await you. With that willingness to explore, experience new things, and not be afraid of getting a little lost or coming up against a new challenge, you will have a ton of fun and grow as a person as a result. 

Not to mention all the other side benefits of cycling, which are well documented. That said, I find that rural cycling has a unique way of rearranging your perspective. It can be a revelation in terms of mental health. It can even touch your soul if you let it. (I strongly suggest that you let it do just that!)

Young or old- Rural cycling can open up a whole new vista in your cycling experience.

So, take your chance while you have the opportunity and get out there. Things may not go perfectly at first, and that's okay. It's all part of the experience. Don't beat yourself up over mistakes or if you feel that you are not 'good enough'. Just turn your back on those thoughts and go for it. 

One thing I've been extremely encouraged by over the past 16 years of spending time riding gravel roads, and hanging out with others that do likewise, is that the community of folks that participate in this form of cycling tend to be very accepting and accommodating. Helpful? Totally. Non-judgemental? For the most part, that's been my experience, and listen- I am no great cyclist by any metric that the normal cycling/racing community would measure by. So, I think I can speak from a place that many of you may find yourselves in now, just getting into this rural/gravel cycling thing. Don't be afraid of being put down, left behind, or what have you. 

And for you folks that may be reading this that are seasoned gravel cycling folks- YOU HAVE A RESPONSIBILITY. We need you to be good ambassadors. What does that mean? 

Just be a good human being and be kind to other human beings, no matter what. 

Simple. 

Now get off this device and go ride already! 

Wednesday, May 12, 2021

B.O.G. Series: Riding "Right" (Basic Gravel Road Riding Rules)

Evidence of traffic: Dust trails can aid you in being traffic aware.
 Welcome to the Basics of Gravel Series (B.O.G.)! In this series I will attempt to bring a very foundational knowledge of gravel and back road riding to anyone reading that may be curious or a beginner in riding off-pavement, but not wanting to be mountain biking. There will be a new entry every Wednesday until the series is complete. To see the schedule, click this LINK. Thanks! 

As we get toward the final post of the series it is time now to run through some basic gravel road riding tips concerning your safety. This can be summed up in the saying, "Ride Right". 

It's pretty basic really. When climbing any hill steep enough that you cannot see the road on the other side, you should bear to the right side as you approach the crest of the hill. This is basic, unwritten form for any driver raised in rural areas where roads do not have a marked centerline. Traffic- be that automobile, truck, farm implement, or horse and buggy all know this tenet of rural road travel. So remember: Always Crest Hills On The Right Side! 

I've seen this Rule of the Road save lives. It was during a ride I was in charge of for beginners where we had some pretty steep rollers. I made sure to strictly inform all the riders that day that cresting hills on the right side was expected. Good thing I did! There were about ten of us and just as we were about to crest a hill a big Dodge Ram truck came over the top going at a very high rate of speed. It was scary as it was, but had we had riders on the left side of the road they would have gotten blasted and would probably have died and certainly would have been severely injured. 

Along with this rule I would also caution riders to not get lulled to sleep, in a manner of speaking, and let your guard down so much due to there being so little traffic, that you don't pay attention to your surroundings. You still need to be aware and keep checking for movements. It could be the tell-tale roost of dust heading your way. It could even be an animal coming out of a ditch or wooded area. (I'll speak to dogs at the end here, by the way) Just don't think that because the roads are seemingly empty that traffic won't happen.

It's best to give farm equipment a very wide berth.
Next, it can be tough at times to hear traffic coming from behind in windy situations. Sounds can be pushed by the wind, and rushing wind by the ears can create enough 'white noise' that you almost become deaf to anything else around you. As an example, I couldn't hear a semi tractor-trailer rig coming up from behind me due to the fact that I was riding into a pretty stiff headwind the other day. Only a short blast from the driver's air horn alerted me to his presence so I could move aside to allow him to pass me. My bad! I should have been more aware. 

In groups of riders use general group ride etiquette mixed with the "Ride Right" idea and the tips outlined here. While it is fun and enjoyable to ride two and even three abreast, be very careful and watch out for traffic,because it will happen. Also, drafting can be a handful on gravel and only the most experienced cyclists should even attempt this. I would dissuade the practice myself outside of racing, because gravel surfaces can be very unpredictable. It just is not worth the increased risk to rider safety. Especially for beginners. 

Descending can be dangerous and my advice is to space yourself out, if in a group setting, and allow other riders lots of space. Things can happen pretty fast at 30mph or more, so it is best to not ride closely to other riders, if at all possible. Sudden changes in another rider's line would put you into a bind if you are too close to them. This is because making sudden reductions in your speed, or your direction of travel, in order to avoid another rider, will likely result in your losing control and crashing. This is because gravel is unforgiving and has little traction for sudden braking and maneuvering for riders trying to take avoidance measures. You just have little chance of pulling off such a move on gravel, so don't put yourself into a situation where you might get taken out. 

Likewise, if you are descending hold your line if at all possible so you do not put another rider at risk of having to try to avoid you if you were to suddenly change your line. As outlined in an earlier post in this series, it is okay to drag and feather your brakes, reduce speed, look ahead down the hill where you want to go, and be cautious. While it is fun to "grip it and rip it" at times, you should not put yourself or other riders at an unnecessary risk of crashing. 

What do you do when a dog gives chase?
A Word Or Two About Dogs: If you ride a bicycle long enough, at some point you will come across a dog or two, (or more!) that wants to bark, chase, hunt, or try to bite you. Be prepared! My best advice in the shortest form I can make this in would be to do the following. If a dog chases you out on the road:

  • Assess the situation quickly. Can you outrun this dog, (most times if it is a medium sized dog or larger, the answer is no) If you cannot, prepare to stop. Yes- Stop. 
  • Put your bike between you and the dog. 
  • Next, there are two schools of thought here- Tell the dog(s) "GO HOME!!" in a commanding voice, or talk to the dog until it calms down. 
  • If the owner comes out let them call the dog(s) off because at that point whatever you say to the dog will be a moot point- The dog will try to protect its owner unless it is called off. 
  • If you are bitten, or harassed by an out-of-control dog, REPORT THE INCIDENT TO THE AUTHORITIES. Dog owners are responsible for the control of their dogs if you are on public property (the roadway)
  • BE AWARE THAT IF YOU GO ONTO A PROPERTY YOU ARE RESPONSIBLE FOR YOUR ACTIONS IF YOU GET BIT.  Be very careful if you need to ask for help while out for a ride and you decide to approach a residence in a rural area. I know of a few incidents where riders have been attacked and bitten by dogs when doing this. When getting attacked and/or bitten happens, and you are on another's property, the owner may not be responsible for your injuries. 

This could be a huge article, but these very basic points should be remembered and practiced for your encounter with a rural dog. (If you've never had a dog chase you while you are riding, just hold on, it will happen someday)

Okay folks! That's a brief review of the basic riding rules and some things to think about concerning dogs. By no means is this an exhaustive list or a comprehensive article on the subjects, but in order to keep it brief and easy, this is what I have for you. 

Next week I conclude the series with a Final Send-Off!

B.O.G. Series: Riding "Right" (Basic Gravel Road Riding Rules)

Evidence of traffic: Dust trails can aid you in being traffic aware.
 Welcome to the Basics of Gravel Series (B.O.G.)! In this series I will attempt to bring a very foundational knowledge of gravel and back road riding to anyone reading that may be curious or a beginner in riding off-pavement, but not wanting to be mountain biking. There will be a new entry every Wednesday until the series is complete. To see the schedule, click this LINK. Thanks! 

As we get toward the final post of the series it is time now to run through some basic gravel road riding tips concerning your safety. This can be summed up in the saying, "Ride Right". 

It's pretty basic really. When climbing any hill steep enough that you cannot see the road on the other side, you should bear to the right side as you approach the crest of the hill. This is basic, unwritten form for any driver raised in rural areas where roads do not have a marked centerline. Traffic- be that automobile, truck, farm implement, or horse and buggy all know this tenet of rural road travel. So remember: Always Crest Hills On The Right Side! 

I've seen this Rule of the Road save lives. It was during a ride I was in charge of for beginners where we had some pretty steep rollers. I made sure to strictly inform all the riders that day that cresting hills on the right side was expected. Good thing I did! There were about ten of us and just as we were about to crest a hill a big Dodge Ram truck came over the top going at a very high rate of speed. It was scary as it was, but had we had riders on the left side of the road they would have gotten blasted and would probably have died and certainly would have been severely injured. 

Along with this rule I would also caution riders to not get lulled to sleep, in a manner of speaking, and let your guard down so much due to there being so little traffic, that you don't pay attention to your surroundings. You still need to be aware and keep checking for movements. It could be the tell-tale roost of dust heading your way. It could even be an animal coming out of a ditch or wooded area. (I'll speak to dogs at the end here, by the way) Just don't think that because the roads are seemingly empty that traffic won't happen.

It's best to give farm equipment a very wide berth.
Next, it can be tough at times to hear traffic coming from behind in windy situations. Sounds can be pushed by the wind, and rushing wind by the ears can create enough 'white noise' that you almost become deaf to anything else around you. As an example, I couldn't hear a semi tractor-trailer rig coming up from behind me due to the fact that I was riding into a pretty stiff headwind the other day. Only a short blast from the driver's air horn alerted me to his presence so I could move aside to allow him to pass me. My bad! I should have been more aware. 

In groups of riders use general group ride etiquette mixed with the "Ride Right" idea and the tips outlined here. While it is fun and enjoyable to ride two and even three abreast, be very careful and watch out for traffic,because it will happen. Also, drafting can be a handful on gravel and only the most experienced cyclists should even attempt this. I would dissuade the practice myself outside of racing, because gravel surfaces can be very unpredictable. It just is not worth the increased risk to rider safety. Especially for beginners. 

Descending can be dangerous and my advice is to space yourself out, if in a group setting, and allow other riders lots of space. Things can happen pretty fast at 30mph or more, so it is best to not ride closely to other riders, if at all possible. Sudden changes in another rider's line would put you into a bind if you are too close to them. This is because making sudden reductions in your speed, or your direction of travel, in order to avoid another rider, will likely result in your losing control and crashing. This is because gravel is unforgiving and has little traction for sudden braking and maneuvering for riders trying to take avoidance measures. You just have little chance of pulling off such a move on gravel, so don't put yourself into a situation where you might get taken out. 

Likewise, if you are descending hold your line if at all possible so you do not put another rider at risk of having to try to avoid you if you were to suddenly change your line. As outlined in an earlier post in this series, it is okay to drag and feather your brakes, reduce speed, look ahead down the hill where you want to go, and be cautious. While it is fun to "grip it and rip it" at times, you should not put yourself or other riders at an unnecessary risk of crashing. 

What do you do when a dog gives chase?
A Word Or Two About Dogs: If you ride a bicycle long enough, at some point you will come across a dog or two, (or more!) that wants to bark, chase, hunt, or try to bite you. Be prepared! My best advice in the shortest form I can make this in would be to do the following. If a dog chases you out on the road:

  • Assess the situation quickly. Can you outrun this dog, (most times if it is a medium sized dog or larger, the answer is no) If you cannot, prepare to stop. Yes- Stop. 
  • Put your bike between you and the dog. 
  • Next, there are two schools of thought here- Tell the dog(s) "GO HOME!!" in a commanding voice, or talk to the dog until it calms down. 
  • If the owner comes out let them call the dog(s) off because at that point whatever you say to the dog will be a moot point- The dog will try to protect its owner unless it is called off. 
  • If you are bitten, or harassed by an out-of-control dog, REPORT THE INCIDENT TO THE AUTHORITIES. Dog owners are responsible for the control of their dogs if you are on public property (the roadway)
  • BE AWARE THAT IF YOU GO ONTO A PROPERTY YOU ARE RESPONSIBLE FOR YOUR ACTIONS IF YOU GET BIT.  Be very careful if you need to ask for help while out for a ride and you decide to approach a residence in a rural area. I know of a few incidents where riders have been attacked and bitten by dogs when doing this. When getting attacked and/or bitten happens, and you are on another's property, the owner may not be responsible for your injuries. 

This could be a huge article, but these very basic points should be remembered and practiced for your encounter with a rural dog. (If you've never had a dog chase you while you are riding, just hold on, it will happen someday)

Okay folks! That's a brief review of the basic riding rules and some things to think about concerning dogs. By no means is this an exhaustive list or a comprehensive article on the subjects, but in order to keep it brief and easy, this is what I have for you. 

Next week I conclude the series with a Final Send-Off!

Wednesday, May 05, 2021

B.O.G. Series: Routes and Navigation Basics

  Welcome to the Basics of Gravel Series (B.O.G.)! In this series I will attempt to bring a very foundational knowledge of gravel and back road riding to anyone reading that may be curious or a beginner in riding off-pavement, but not wanting to be mountain biking. There will be a new entry every Wednesday until the series is complete. To see the schedule, click this LINK. Thanks! 

Now that we've covered the bikes, the gear, and some self-sufficiency basics, it is time to talk about the riding. Where do you get routes and how do you navigate out there? These questions can be addressed with technology, but many times the devices (Garmins, Wahoo, etc) are very expensive for beginners and knowing the nuances of route finding is a somewhat clouded pursuit for many. 

So, let's take a look at routes first.

Snip from Google.
Sources for routes can be found all over now days. Just check out Google Earth to start out with. Pick an area you want to explore and search it. You'll see all the roads, but don't take it all as gospel. This is just researching now. You are just getting ideas here. 

So, what do you look for? Okay, anytime you see a lot of curvy roads, rivers, creeks, and areas marked as preserves or forests, etc, you can pretty much bet on facing some challenging terrain. Now while that may sound disappointing, usually the best stuff to experience is in these sorts of areas. Well....not best, but 'most spectacular? Probably. If you are looking for pictures for your Instagram, then you are on the right track. 

But I might suggest a different approach. If you are a beginner, not used to rural riding, and maybe are not quite feeling confident in your self-support skill sets, then keep things closer to home. Actually, I've found some real gems to see which are very near to my hometown. I bet most people could say the same if they researched routes and took the time to look. 

But Google will help you sort out a possible route. Next up, I would look to your government sources. Many states maintain a Department of Transportation web presence which may have a wealth of road information for you to verify that your route you found on Google Earth is not a State highway or some blacktop road now. Iowans can see stuff like this here. Clicking on a color PDF for any county will pull up maps that have color coded roads, (hint: You want the green and red roads in Iowa!), and you can print those out and either use them as is, or input the route on a mapping program, if you want. 

Many states have this sort of information. Out West, your best bet is the BLM, or the Bureau of Land Management which has information on cycling besides maps for their jurisdictions. But government sources are great for detailed information which will help you decide where you might be interested in going. 

Next stop- Local Knowledge. Fortunately gravel cycling isn't anything new, at least that's a plus for you beginners. Because of this, there are already thousands upon thousands of miles of loops, point-to-point, and local routes which have been searched out and have been proven to be great routes. You can generally find these sorts of things out from local bike shops, local bicycle clubs, or even promoters of events in your area. It is highly likely that the promoters of gravel events have ridden or driven thousands of miles of rural roads searching for good routes, so don't forget to check in with anyone who may be connected to the promotion of a local-to-you gravel ride or race. 

If you haven't already found a great route, you can try making your own using some of the above mentioned resources, and if you do, I have one critical bit of advice for you: Drive the route first to verify it actually exists. Too many times I've run into bad information from all sorts of sources, even from the latest governmental agencies and from Google or any online atlas or paper atlas. There just is not as much of an emphasis on accuracy for roads seldom traveled or used for touring. So, don't get caught at a dead end on your bike! Drive that route and see if it works first! Besides, you'll maybe see if it actually will work out how you think. Or you may see a more tantalizing alternative. 

Many rural intersections are marked with 'street signs' like this one at a "T" intersection.
Navigation: So, are you challenged when it comes to finding your way? Well, get used to navigating via a paper map by using one to route yourself through an unfamiliar urban area, or draw up your own cue cards and see if you can follow them on an urban adventure. Practice makes perfect, and once you understand maps and how to follow them, you are on your way. 

Many times roads in rural areas have corner signs, almost like street signs, which will help you to orient yourself or to help you verify your directions. If you are fortunate enough to own a GPS device with a route prompt feature, you can use those signs to help make sure you are lining up with your downloaded route. Out West you may have sign posts with numbered forest roads or trail numbers. Just make sure you are acquainted with how things are marked in the area you are hoping to travel through before you get there. Again, government sources are key here.   

And the old compass is a great tool for righting a disoriented mind. Don't discount having one in your bag for a ride, especially if the route is a turning and twisting one which can make finding directions a bit more challenging at times. Finally- ride with seasoned riders a few times. Often you can learn a lot by doing and asking questions of those more experienced riders, if that is at all possible. Local gravel group rides are another thing to look for here to get your feet wet in following routes and learning about where to ride.

To close, I'll just reiterate that if you are a beginner, don't try to bite off more than you can chew the first few times. Maybe stick closer to town, or an area you are familiar with. Maybe hook up with a gravel group ride, or hang with the folks that already ride gravel on social media who can suggest routes or take you out to ride something. There are a bunch of ways to do this, and finding the way that suits you best shouldn't be too difficult these days.

Next: Riding "Right" (Basic Gravel Road Riding Rules and a word or two about dogs)

B.O.G. Series: Routes and Navigation Basics

  Welcome to the Basics of Gravel Series (B.O.G.)! In this series I will attempt to bring a very foundational knowledge of gravel and back road riding to anyone reading that may be curious or a beginner in riding off-pavement, but not wanting to be mountain biking. There will be a new entry every Wednesday until the series is complete. To see the schedule, click this LINK. Thanks! 

Now that we've covered the bikes, the gear, and some self-sufficiency basics, it is time to talk about the riding. Where do you get routes and how do you navigate out there? These questions can be addressed with technology, but many times the devices (Garmins, Wahoo, etc) are very expensive for beginners and knowing the nuances of route finding is a somewhat clouded pursuit for many. 

So, let's take a look at routes first.

Snip from Google.
Sources for routes can be found all over now days. Just check out Google Earth to start out with. Pick an area you want to explore and search it. You'll see all the roads, but don't take it all as gospel. This is just researching now. You are just getting ideas here. 

So, what do you look for? Okay, anytime you see a lot of curvy roads, rivers, creeks, and areas marked as preserves or forests, etc, you can pretty much bet on facing some challenging terrain. Now while that may sound disappointing, usually the best stuff to experience is in these sorts of areas. Well....not best, but 'most spectacular? Probably. If you are looking for pictures for your Instagram, then you are on the right track. 

But I might suggest a different approach. If you are a beginner, not used to rural riding, and maybe are not quite feeling confident in your self-support skill sets, then keep things closer to home. Actually, I've found some real gems to see which are very near to my hometown. I bet most people could say the same if they researched routes and took the time to look. 

But Google will help you sort out a possible route. Next up, I would look to your government sources. Many states maintain a Department of Transportation web presence which may have a wealth of road information for you to verify that your route you found on Google Earth is not a State highway or some blacktop road now. Iowans can see stuff like this here. Clicking on a color PDF for any county will pull up maps that have color coded roads, (hint: You want the green and red roads in Iowa!), and you can print those out and either use them as is, or input the route on a mapping program, if you want. 

Many states have this sort of information. Out West, your best bet is the BLM, or the Bureau of Land Management which has information on cycling besides maps for their jurisdictions. But government sources are great for detailed information which will help you decide where you might be interested in going. 

Next stop- Local Knowledge. Fortunately gravel cycling isn't anything new, at least that's a plus for you beginners. Because of this, there are already thousands upon thousands of miles of loops, point-to-point, and local routes which have been searched out and have been proven to be great routes. You can generally find these sorts of things out from local bike shops, local bicycle clubs, or even promoters of events in your area. It is highly likely that the promoters of gravel events have ridden or driven thousands of miles of rural roads searching for good routes, so don't forget to check in with anyone who may be connected to the promotion of a local-to-you gravel ride or race. 

If you haven't already found a great route, you can try making your own using some of the above mentioned resources, and if you do, I have one critical bit of advice for you: Drive the route first to verify it actually exists. Too many times I've run into bad information from all sorts of sources, even from the latest governmental agencies and from Google or any online atlas or paper atlas. There just is not as much of an emphasis on accuracy for roads seldom traveled or used for touring. So, don't get caught at a dead end on your bike! Drive that route and see if it works first! Besides, you'll maybe see if it actually will work out how you think. Or you may see a more tantalizing alternative. 

Many rural intersections are marked with 'street signs' like this one at a "T" intersection.
Navigation: So, are you challenged when it comes to finding your way? Well, get used to navigating via a paper map by using one to route yourself through an unfamiliar urban area, or draw up your own cue cards and see if you can follow them on an urban adventure. Practice makes perfect, and once you understand maps and how to follow them, you are on your way. 

Many times roads in rural areas have corner signs, almost like street signs, which will help you to orient yourself or to help you verify your directions. If you are fortunate enough to own a GPS device with a route prompt feature, you can use those signs to help make sure you are lining up with your downloaded route. Out West you may have sign posts with numbered forest roads or trail numbers. Just make sure you are acquainted with how things are marked in the area you are hoping to travel through before you get there. Again, government sources are key here.   

And the old compass is a great tool for righting a disoriented mind. Don't discount having one in your bag for a ride, especially if the route is a turning and twisting one which can make finding directions a bit more challenging at times. Finally- ride with seasoned riders a few times. Often you can learn a lot by doing and asking questions of those more experienced riders, if that is at all possible. Local gravel group rides are another thing to look for here to get your feet wet in following routes and learning about where to ride.

To close, I'll just reiterate that if you are a beginner, don't try to bite off more than you can chew the first few times. Maybe stick closer to town, or an area you are familiar with. Maybe hook up with a gravel group ride, or hang with the folks that already ride gravel on social media who can suggest routes or take you out to ride something. There are a bunch of ways to do this, and finding the way that suits you best shouldn't be too difficult these days.

Next: Riding "Right" (Basic Gravel Road Riding Rules and a word or two about dogs)

Wednesday, April 28, 2021

B.O.G. Series: How To Clean Your Bike

 Welcome to the Basics of Gravel Series (B.O.G.)! In this series I will attempt to bring a very foundational knowledge of gravel and back road riding to anyone reading that may be curious or a beginner in riding off-pavement, but not wanting to be mountain biking. There will be a new entry every Wednesday until the series is complete. To see the schedule, click this LINK. Thanks!

 Usually in this series I have had to write, from scratch, a way for beginners and 'new-to-gravel' folks to learn the ins and outs of riding out in rural areas. But this time will be an exception. That is because I already wrote a post in January of 2019 that is perfect for this series. 

In THIS POST (click the link to read it) I uncover the simplest way to clean a bike and tell you what NOT to do and what to use on your bicycle. Now, it may be a rather revolutionary take on cleaning, which you may not believe works. That's okay- I understand- but if you want to re-invent the wheel and find out the hard way what NOT to do, then I cannot stop you. 

Okay, with that said I will add that there were a few things I inferred when I wrote that post. I will break those out here now for you. Here is a list of stuff I would have on hand to use:

  • Rags: Preferably terry cloth, thinner rags, or old t-shirts torn up into strips. Old used up bath towels are awesome for this.
  • Soft bristle brushes used for washing other things, but don't get anything huge. The smaller and easier to fit into tight spaces the better. 
  • A bucket to keep rags, brushes, and your cleaner in.
  • I recommend Pedro's Bike Lust, but there are other bike wash/cleaners and of course, household cleaners, which will do okay. Don't use anything you wouldn't use on your appliances. furniture, etc. Stay away from caustic cleaners and aggressive formulas. They may hurt your skin, paint on the bike, or attack aluminum finishes. 
  • As always, use rubber gloves and safety glasses. 
  • Pick a spot to clean where you can easily sweep up the remains of dust, dirt, and mud clods that you knock off your bicycle. In other words, not in the living area! 

 You will find that behind the fork up by the frame, down by the junction of the frame tubes where your crank is, and the crank itself are usually the dirtiest parts of the bike after a gravel ride. (Study my image above of my Nobel Bikes gravel rig here and see for yourself)  Think you are done cleaning? Flip your bicycle over and look again. You might be surprised how much more cleaning you can do! \

One more benefit of a thorough cleaning of your bike from time to time is that you end up giving your bike a great visual inspection. You'll pick up on things a lot quicker later on, and you will learn how your bicycle is put together. This will lead to a better understanding when someone starts telling you about parts and whatnot and you will be able to better connect the dots and begin to understand what is being spoken of. 

Patience is key when cleaning. I can clean up a bike pretty fast these days- after doing it for years, I should be fast, right? But I recall that when I started out, this could take hours to do. Now- it all depends upon how picky you are, but my best advice is that don't shoot for 'perfectly clean', because riding always trumps that! However; if you have the time, go for it!

For extra credit you can take a deeper dive into cleaning by reading my follow-up post to that original one that I linked to by Clicking HERE.  

Next Week: We get into How and Where to ride with "Routes and Navigation Basics".

B.O.G. Series: How To Clean Your Bike

 Welcome to the Basics of Gravel Series (B.O.G.)! In this series I will attempt to bring a very foundational knowledge of gravel and back road riding to anyone reading that may be curious or a beginner in riding off-pavement, but not wanting to be mountain biking. There will be a new entry every Wednesday until the series is complete. To see the schedule, click this LINK. Thanks!

 Usually in this series I have had to write, from scratch, a way for beginners and 'new-to-gravel' folks to learn the ins and outs of riding out in rural areas. But this time will be an exception. That is because I already wrote a post in January of 2019 that is perfect for this series. 

In THIS POST (click the link to read it) I uncover the simplest way to clean a bike and tell you what NOT to do and what to use on your bicycle. Now, it may be a rather revolutionary take on cleaning, which you may not believe works. That's okay- I understand- but if you want to re-invent the wheel and find out the hard way what NOT to do, then I cannot stop you. 

Okay, with that said I will add that there were a few things I inferred when I wrote that post. I will break those out here now for you. Here is a list of stuff I would have on hand to use:

  • Rags: Preferably terry cloth, thinner rags, or old t-shirts torn up into strips. Old used up bath towels are awesome for this.
  • Soft bristle brushes used for washing other things, but don't get anything huge. The smaller and easier to fit into tight spaces the better. 
  • A bucket to keep rags, brushes, and your cleaner in.
  • I recommend Pedro's Bike Lust, but there are other bike wash/cleaners and of course, household cleaners, which will do okay. Don't use anything you wouldn't use on your appliances. furniture, etc. Stay away from caustic cleaners and aggressive formulas. They may hurt your skin, paint on the bike, or attack aluminum finishes. 
  • As always, use rubber gloves and safety glasses. 
  • Pick a spot to clean where you can easily sweep up the remains of dust, dirt, and mud clods that you knock off your bicycle. In other words, not in the living area! 

 You will find that behind the fork up by the frame, down by the junction of the frame tubes where your crank is, and the crank itself are usually the dirtiest parts of the bike after a gravel ride. (Study my image above of my Nobel Bikes gravel rig here and see for yourself)  Think you are done cleaning? Flip your bicycle over and look again. You might be surprised how much more cleaning you can do! \

One more benefit of a thorough cleaning of your bike from time to time is that you end up giving your bike a great visual inspection. You'll pick up on things a lot quicker later on, and you will learn how your bicycle is put together. This will lead to a better understanding when someone starts telling you about parts and whatnot and you will be able to better connect the dots and begin to understand what is being spoken of. 

Patience is key when cleaning. I can clean up a bike pretty fast these days- after doing it for years, I should be fast, right? But I recall that when I started out, this could take hours to do. Now- it all depends upon how picky you are, but my best advice is that don't shoot for 'perfectly clean', because riding always trumps that! However; if you have the time, go for it!

For extra credit you can take a deeper dive into cleaning by reading my follow-up post to that original one that I linked to by Clicking HERE.  

Next Week: We get into How and Where to ride with "Routes and Navigation Basics".

Wednesday, April 21, 2021

B.O.G. Series: How To Lubricate Your Chain

  Welcome to the Basics of Gravel Series (B.O.G.)! In this series I will attempt to bring a very foundational knowledge of gravel and back road riding to anyone reading that may be curious or a beginner in riding off-pavement, but not wanting to be mountain biking. There will be a new entry every Wednesday until the series is complete. To see the schedule, click this LINK. Thanks! 

In this installment of the B.O.G. Series I am going to show an effective and easy way to lubricate your chain. But first- Chain lubrication can be a religion for many "serious cyclists" and please note- This is for beginners! So if you feel the urge to tell the world about how you do things or about how 'such-and-such' chain lube is best, please don't fill the comments with it. I will warn y'all right now, I'm not going to publish those comments. Helpful hints? That's welcomed as long as you understand, this is for beginners. You'll note the statement in bold which will appear throughout this article. This will serve as a reminder.

One of my favorite chain lubes, and some tomatoes!

As I say, chain lubes are a religion for many, and we are not going there. So, what do you do in this bewildering jungle of products and opinions? Easy.....don't sweat the overwhelming amount of advice and products. We're going to keep this super-simple. 

First, gravel and dirt roads are dusty/dirty. 'Captain Obvious' there, but that guides us in lubrication choice. There are basically two types of bicycle chain lube- "Wet" and "Dry" types. We're going the "Dry" route here because wetter lubes tend to grab more dust/dirt and we are trying to avoid that. 

Secondly- Don't lubricate a dirty chain. What's the point? You aren't going to penetrate the goo already there, and you are just making things worse if the chain is dirty. So, we'll be looking at a super-simple, fairly effective way to get most of the dirt/grunge off

Thirdly- Don't lubricate immediately before a ride. The chain motion while riding will just sling off most of what you just put on, making a mess and making your efforts ineffective. Always do this the night before a ride, or after you are done riding, so the lubrication has a chance to soak in, the carrier of the lubricant has a chance to off-gas, and the lubricant can bond with the metal of the chain. 

Okay, with that all out of the way, here are the items you will need for this operation. 

  • Dry chain lube (Pick yer poison here, most are good. I like Muc-Off C3 Ceramic lube or DuMonde Tech)
  • A couple rags
  • Nitrile gloves or equivalent
  • Safety glasses
  • WD-40 (NOT a lube! You'll see in a minute....)
  • A Flat blade screw driver
  • A room to do 'dirty work' (ie: NOT your significant other's kitchen, bedroom, etc)
  • A place to lean your bike or in a perfect world, a bike stand.

Okay, after you've assembled your stuff here, get to the place you are going to do the deed. Lean your bike, drive side toward you, by placing one side of the handlebar and the rear tire against the wall in such a way that you can back pedal the bike freely. (Or put it in a bike stand, if you have one)

____________________________________

 NOTE: This process will get the majority of the dirt, gunk, and old lube off your chain, but not all of it. It's okay, because we're more concerned about making this process less about technicalities and having to buy and know how to use tools and more about quick, easy ways to help you get the most out of your bike.  

____________________________________

Holding a rag wrapped around the chain like this is one of the main techniques to learn here.
 

Next- With your gloves on and safety glasses on, grab a rag (I like a terry cloth rag, like an old bath towel)  and place it underneath the chain in such a way that the rag will catch any gunk and lube that happens to come off the chain and derailleur. Secondly, grab the flat bladed screw driver, and back pedal the bike with one hand slowly. Then holding the flat bladed screw driver in such a way that the blade scrapes the sides of the lower jockey wheel, you should be able to get any build up of gunk to scrape off that jockey wheel. Kind of like a lathe, if you know about that. You may have to apply a small mount of pressure here, but not much. Do the same with the upper jockey wheel, being careful not to jamb the wheel while you pedal backward. It can be tricky at first, but you should be able to manage it, and once you get the hang of this, it goes faster. 

NOTE: You can spend the time to do this with your front chain rings and cassette, but I find rear derailleur jockey wheels get far more stuff stuck on them than do the chain rings and cassette. 

The back pedaling of the drive train and a screw driver held like this will peel off gunk from jockey wheels.

 Next- Grab the WD-40, make sure that little red tube is in the spray nozzle to make sure that you can direct the spray where you want it, grab the other rag, and cup that rag under the lower run of the chain. Now spray the lower run of the chain with the WD-40. Follow the spray with your rag in the other hand to prevent your wheel and the rest of your bike from getting WD-40 on it. This helps to loosen grime and dirt from the chain. Back pedal to a new section of chain, repeat the process, and continue until you've gone all the way round the chain. (About 4 sections on most bikes, maybe a bit extra.) 

Next- Use that rag you have and clamp down on the chain in the middle of the lower run, being careful to avoid the crank set and jockey wheels. Back pedal the drive train. You'll note a black streak on the rag. Move to a cleaner section of the rag and repeat as necessary. 

Your rag will get pretty grimy. Repeat the process until you are satisfied, but remember, you won't get ALL the dirt out this way.  It's okay!

 _________________________________________

NOTE: This process will get the majority of the dirt, gunk, and old lube off your chain, but not all of it. It's okay, because we're more concerned about making this process less about technicalities and having to buy and know how to use tools and more about quick, easy ways to help you get the most out of your bike.  

___________________________________________

Next: It's time to lubricate. Grab the lube you have, (I like drip bottles of lube versus spray. Less waste and less chances to foul wheels, braking, and paint jobs) Start at a quick link on a chain for reference, or if you don't happen to have a quick link on your chain, mark a link with permanent black marker for a reference point. Then apply one drop of lube on each roller on each link. Work your way around the chain until you come back to your reference point by back pedaling the drive train so that you are always applying lube to the lower part of the chain run. This is important because when you lubricate this way, gravity pulls the lube down into the inner workings of the chain, and as you back pedal to a new section, the chain ring teeth help push this lube into the chain as well. 

One drop on each roller is enough lube. This is the lower run of the chain, and I am applying the lube from above, letting gravity pull the lube into the chain links.

Once you've made it all the way around, you are done with the lubrication. Now grab the rag, using a clean portion, and hold it around the chain, as you did when cleaning the chain, and back pedal the chain through the stationary rag position to wipe off any excess lube. Then that's it! 

Let the bike sit for several hours, preferably overnight, for best results. Then ride. 

 Now- when do you do this again? I check my chain by rubbing my finger across a few links, if I do not get any wet residue on my finger tip, it is time to re-lubricate. Also, if you happen to ride in some wet weather, through snow, streams, puddles, mud, or the like, you will likely need to re-lubricate right away. 

Tip: If you have that WD-40 handy, spray it on a chain right after a wet ride. The "WD" in the name means "Water Displacement", so this product drives water out of your chain and helps prevent rust. I also like it for its grime-dissolving properties. Thus my suggestion for it as a cleaner for beginners. Besides, many people have this already, so it could be one less thing to buy. 

I geek out on lube often here on the blog (Example here) but for the B.O.G. Series, my intentions are to 'make things as easy as possible- not perfect!'. In the case of bicycle skills and maintenance, the minutiae often espoused by the bike geeks is a huge turn-off to those not so personally invested in whatever nuances are being discussed. So, as far as lubricating chains, is there a 'better way'? Sure there is! But 'Perfect is The Enemy of the Good' in this case where I am aiming to get beginners out and doing things instead of becoming overwhelmed by the 'ya gotta do it THIS way, with THIS lube!' mentality. And even this tutorial may be too much! 

So, keep that in mind. 

Next Week: An effective way to clean your bike without using water.