
 |
| Mess of old sealant to get off. How do you do it? |
This is the first in what should have been a long time running series here, but, ya know, sometimes I'm thick-headed when it comes to thinking about features for this blog. Anyway... Here is today's question from reader "S.C." (Note- The question was lightly edited for clarity)
"I use Orange Seal for my tubeless bikes and spend a lot of time getting the old sealant off the bead of the tire. What do you use? I have used alcohol, Scotch Brite and rubbing my fingers back and forth, which works pretty good, but makes my fingers raw after a while. I have now 3 bikes with tubeless and I start to cringe when I think of replacing the sealant and cleaning the tires."
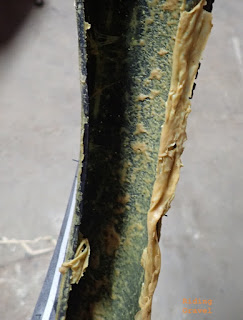
Cleaning up a tubeless tire after it has been used a while is smart maintenance. First of all, if you just keep jamming sealant into a tire when your sealant dries out, your tire is going to end up looking kind of like this one here to the left. That is not a good look! Plus it makes your set up heavier and less capable of sealing a puncture.
So, the best call is to look at your tubeless tires at least once every six to twelve months by at least pulling a bead and cleaning things up- if necessary. Not every sealant dries up similar to another. For instance, Stan's often dries up into these clumps a lot of people refer to as "Stanimals". They are wet, slimy, and often a wet, slimy residue is left inside a Stan's sealed set up. In that case, a good cleaning with a rag and isopropyl alcohol is all you'll need to do there. Oh....and discard the Stanimal!
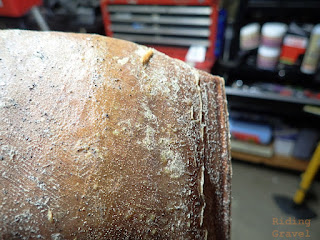 |
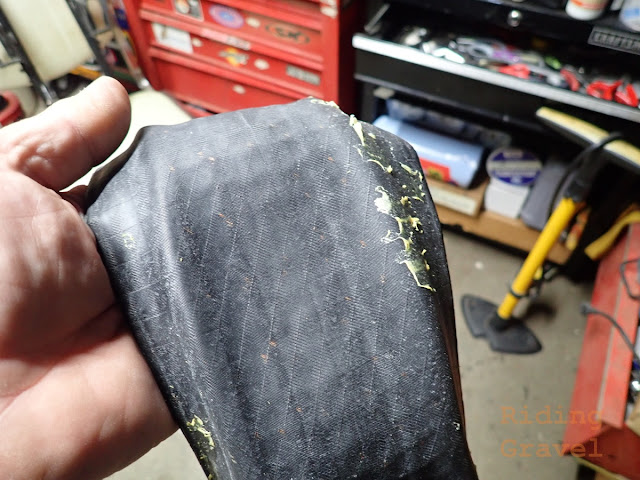
| An example where I probably wouldn't worry about cleaning off the old sealant. |
Then there are the sealants where you get a 'skin'. Kind of like peeling off a stretchy sticker, or a Sunburned patch of skin. I usually just do the peeling thing. It can be soooo satisfying! I don't know why that is. Anyway.... The bead area can be the hardest part of cleaning off a sealant like that, and our Reader Mail question today refers to just such a sealant.
Orange Seal, when it dries out, does leave a 'skin' and you can peel it off. But as our question today reveals, getting this off from the bead to leave a clean area to seal against your rim is hard. This is important to achieve though, because leaving old sealant on a bead area invites a place for sealant to leak, or make your set up more difficult than it needs to be. A thin layer of dried sealant on the casing is really no big deal. I wouldn't even worry about that. But the bead area is a critical area to clean. So, just how do I get a bead area cleaned up?
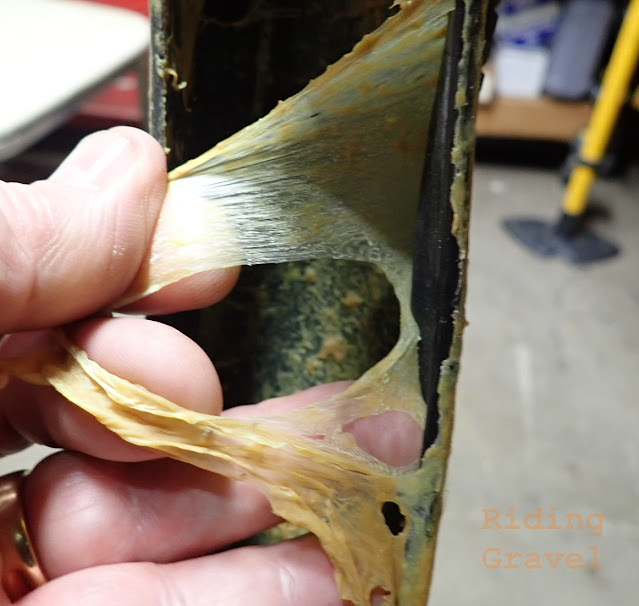 |
| I decided to use this gross old sealant clogged tire as an example for today's post. |
For my example today I used an old Terrene Honali tire I tested for RidingGravel.com a few years back. (Standard Disclaimer) This tire was run with my 'home made sealant' which dries up a lot like Orange Seal does. I used a ton of sealant in this tire over a fairly long period of time without cleaning it up. You can see the disgusting results! My task to answer today's question was to see how long it would take to clean up this tire to a state where I would feel comfortable using it on a new tubeless set up again.
The main bit I had peeled out in five to ten minutes. The beads took a little longer, but I found a tool which sped up the process, and I think this will be something a lot of you can do at home which will help you get a tire cleaned up in a jiffy.
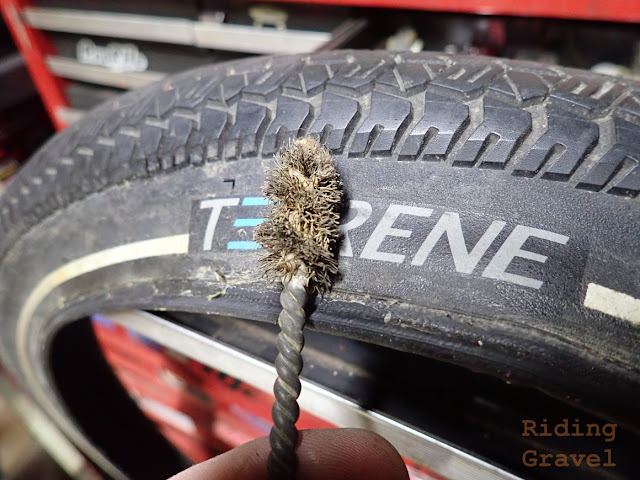 |
| This plumber's wire brush soldering tool worked a trick. |
I had a wire brush which plumbers use for soldering, but you probably could use any wire bush made with finer gauge wire. Gently, and I mean gently, scrub the beads of the tire where sealant has built up until it balls up or an edge peels back. Then grab that and peel away as much as you can. Repeat as necessary. It is very important that you don't scrub so hard you cut into the rubber! You won't need to use much pressure as the wire will pull up the sealant easily.
 |
| You don't need to have it 100% clean. This is good to go on to another rim now. |
I wouldn't use a motorized drill type set up either. Just go by hand and be gentle! My results were very satisfactory and the entire tire took about 15 minutes from start to finish to clean up to a point that I felt comfortable with remounting it. And you can see how mucked up it was to start out with! That went 360°, by the way. It wasn't just on one side of the tire.
Obviously the best practice is to not let sealant dry out 100% and then it cleans up initially with a rag, then some soapy water, and a follow up with a dry rag. But sometimes you don't catch it that way and it ends up all dried up. Then you can use these tips to get that tire ready for remounting and a new dose of sealant. And by the way, while you are in there, replace your tape, valve core, or the entire valve. It isn't worth trying to reuse these things if they look even the tiniest bit 'iffy'. I replace tape before remounting any tires and I replace valve cores every six months religiously. Cheap insurance!
I hope this helps! If you have further tips, leave them in the comments. Also, I take questions for future Reader mail posts at g.ted.productions@gmail.com.
Thanks!
5 comments:
Ted,
Thank you for the information. I came across this product by 3M 4- 1/2" abrasive bristle disc used in automotive repair. Do you think this would be too harsh on the bead? They come in three different grits, here are the part numbers out of the Class C Solutions Catalog they are part of MSC Industrial Supply.
#120-24241 green 50 grit
120-24242 Yellow 80 grit
120-24243 White 120 grit
Here is the link to the catalog https://classccatalogs.mscdirect.com/ and it's on page H 66. I will email you pictures, I could get them to paste on here.
Sean
@Unknown, (Sean) - Thanks for the response.
I have seen discs like those, but as I posted in today’s article, I would really shy away from using power tools.
The reason is that it becomes far too easy to burn through the rubber coating on the aramid bead and once you’ve done that the tire is ruined.
Working with hand tools pretty much reduces the risk of that to zero.
But if you feel confident that you can do that, I would not stop you. That said, I would also never advise that anyone try using that disc in a power tool for this purpose.
Ted,
You have a good point and tires are not cheap like they were in the 70's. LOL
I love your content and your willingness the share.
Happy Trails!
Does the type of tubeless tape matter with the different solutions available these days?
@teamdarb - As long as you use tape meant for tubeless tire set ups- no. It doesn't matter. Of course, you need to make sure your tape matches up with the various inner rim widths. There are about three to four widths (or perhaps more) of tape available nowadays for anything from a narrow road rim to wide fat bike tires.
Stan's tape is good, lots of great reviews on Whisky tape, and Muc-Off tape works pretty well. I have used Velocity "Blue" tape with some success as well. I'm sure there are a few others also.
While it may seem okay and cheaper to use "Gorilla Tape" or a similar threaded/vinyl 'duct type' tape, I would really advise against doing that. The adhesive is wicked sticky with those tapes and it makes clean up when you have to change tape- and you will have to change it eventually - a nightmare.
Post a Comment